
Use and Care Manual
Page 1
Use & Care Manual Side by Side Refrigerator Español 31 READ AND SAVE THESE INSTRUCTIONS Welcome 2 Safety Instructions 3 Installation -- Includes Connecting 4 - 5 IHousehold Water Supply to refrigerator Door Removal Instructions 6 Features at a Glance 7 Temperature Controls 8 - 11 Looking Inside 12 - 13 Automatic Ice and Water Dispenser 14 - 20 Replacing Air Filter 21 Food Storage & Energy Saving Tips 22 Normal Operating Sounds 23 Care & Cleaning 24 - 25 Warranty Before You Call Solutions to Common Problems 26 27 - 30 PN: 241812901 (Feb 2007)
Use & Care Manual Side by Side Refrigerator Español 31 READ AND SAVE THESE INSTRUCTIONS Welcome 2 Safety Instructions 3 Installation -- Includes Connecting 4 - 5 IHousehold Water Supply to refrigerator Door Removal Instructions 6 Features at a Glance 7 Temperature Controls 8 - 11 Looking Inside 12 - 13 Automatic Ice and Water Dispenser 14 - 20 Replacing Air Filter 21 Food Storage & Energy Saving Tips 22 Normal Operating Sounds 23 Care & Cleaning 24 - 25 Warranty Before You Call Solutions to Common Problems 26 27 - 30 PN: 241812901 (Feb 2007)

Use and Care Manual
Page 2
...for your model. Model Number: Serial Number: Purchase Date: PLEASE COMPLETE AND MAIL IN THE PRODUCT REGISTRATION OR CARD INCLUDED WITH YOUR REFRIGERATOR . Need Parts or Service? Please read this manual. PLEASE READ AND SAVE THESE INSTRUCTIONS This Use & Care Manual provides specific .... • Top-quality repairs by factory-trained experts. • Quick access to genuine replacement parts so you 'll enjoy your new refrigerator. Before Calling Your Local Repair Service - Use your service issue, we are not meant to clean serial plate. WELCOME & CONGRATULATIONS Congratulations ...
...for your model. Model Number: Serial Number: Purchase Date: PLEASE COMPLETE AND MAIL IN THE PRODUCT REGISTRATION OR CARD INCLUDED WITH YOUR REFRIGERATOR . Need Parts or Service? Please read this manual. PLEASE READ AND SAVE THESE INSTRUCTIONS This Use & Care Manual provides specific .... • Top-quality repairs by factory-trained experts. • Quick access to genuine replacement parts so you 'll enjoy your new refrigerator. Before Calling Your Local Repair Service - Use your service issue, we are not meant to clean serial plate. WELCOME & CONGRATULATIONS Congratulations ...

Use and Care Manual
Page 3
...temperature control panel (Electronic controls), or turning the Freezer and Fresh Food controls to your protection against electrical shock hazards. Avoid connecting refrigerator to the light bulb and other flammable liquids in the presence of explosive fumes. • Avoid contact with any moving parts of...power can quickly cause suffocation. The power cord of child entrapment Child entrapment and suffocation are still dangerous - PROPER DISPOSAL OF YOUR REFRIGERATOR OR FREEZER Risk of the appliance is damaged, it should NEVER use an extension cord or adapter plug. • If the ...
...temperature control panel (Electronic controls), or turning the Freezer and Fresh Food controls to your protection against electrical shock hazards. Avoid connecting refrigerator to the light bulb and other flammable liquids in the presence of explosive fumes. • Avoid contact with any moving parts of...power can quickly cause suffocation. The power cord of child entrapment Child entrapment and suffocation are still dangerous - PROPER DISPOSAL OF YOUR REFRIGERATOR OR FREEZER Risk of the appliance is damaged, it should NEVER use an extension cord or adapter plug. • If the ...

Use and Care Manual
Page 4
...set of tabs are resting through holes at top of page in place and toe grille is level and strong enough to support a fully loaded refrigerator. • Consider water supply availability for ease of installation, proper air circulation, and plumbing and electrical connections: Sides & Top 3/8" Back ... between top of toe grille and cabinet. TOE GRILLE INSTALLATION / REMOVAL To Install Toe Grille: 1. Line up toe grille at base of refrigerator, making sure the four bottom tabs are free. Open freezer and fresh food compartment doors. 2. Use flat-blade screwdriver or 3/8" socket wrench...
...set of tabs are resting through holes at top of page in place and toe grille is level and strong enough to support a fully loaded refrigerator. • Consider water supply availability for ease of installation, proper air circulation, and plumbing and electrical connections: Sides & Top 3/8" Back ... between top of toe grille and cabinet. TOE GRILLE INSTALLATION / REMOVAL To Install Toe Grille: 1. Line up toe grille at base of refrigerator, making sure the four bottom tabs are free. Open freezer and fresh food compartment doors. 2. Use flat-blade screwdriver or 3/8" socket wrench...

Use and Care Manual
Page 5
...that the softener is first connected to rear panel of the refrigerator to measure the distance from the ice maker inlet valve at shutoff valve. 3. Disconnect refrigerator from water valve inlet and discard cap. 4. With steel clamp and screw, secure water supply line to the household ... to electrical power source. 10. NOTE Water line kit number 5303917950, available from your refrigerator is maintained and working properly. Plastic Water Tubing to Ice Maker Fill Tube Steel Clamp Brass Compression Nut Ferrule (Sleeve) Copper water line Water Valve Bracket Valve Inlet Water...
...that the softener is first connected to rear panel of the refrigerator to measure the distance from the ice maker inlet valve at shutoff valve. 3. Disconnect refrigerator from water valve inlet and discard cap. 4. With steel clamp and screw, secure water supply line to the household ... to electrical power source. 10. NOTE Water line kit number 5303917950, available from your refrigerator is maintained and working properly. Plastic Water Tubing to Ice Maker Fill Tube Steel Clamp Brass Compression Nut Ferrule (Sleeve) Copper water line Water Valve Bracket Valve Inlet Water...
Use and Care Manual
Page 6
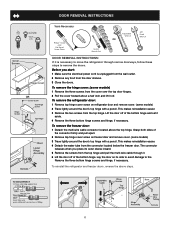
...wire cable connector located above steps. 6 The connector releases when you start: 1 Make sure the electrical power cord is necessary to move the refrigerator through it is unplugged from the wall outlet. 2 Remove any food from the cover over the top door hinges. 2 Pull the cover forward...freezer door and remove cover. (some models) 1 Remove the three screws from the door shelves. 3 Close the doors. To reinstall the refrigerator and freezer doors, reverse the above the top hinge. DOOR REMOVAL INSTRUCTIONS Top Hinge Screw Top Hinge Cover Screw Bottom Hinge Screw Hinge Screws ...
...wire cable connector located above steps. 6 The connector releases when you start: 1 Make sure the electrical power cord is necessary to move the refrigerator through it is unplugged from the wall outlet. 2 Remove any food from the cover over the top door hinges. 2 Pull the cover forward...freezer door and remove cover. (some models) 1 Remove the three screws from the door shelves. 3 Close the doors. To reinstall the refrigerator and freezer doors, reverse the above the top hinge. DOOR REMOVAL INSTRUCTIONS Top Hinge Screw Top Hinge Cover Screw Bottom Hinge Screw Hinge Screws ...

Use and Care Manual
Page 8
...; After 24 hours, adjust the controls as needed. If Freezer Compartment Is Too Cold Turn Freezer Control Slightly Towards Cold. * To Turn Refrigerator Off Turn Freezer and Fresh Food Controls To O. 8 To maintain temperatures, a fan circulates air in small increments, allowing the temperature to stabilize...• For colder temperatures, turn the knob towards Colder. • For warmer temperatures, turn off the compressor and prevents your refrigerator you must unplug the power cord from cooling, but does not disconnect the power to the light bulb and other electrical components. ...
...; After 24 hours, adjust the controls as needed. If Freezer Compartment Is Too Cold Turn Freezer Control Slightly Towards Cold. * To Turn Refrigerator Off Turn Freezer and Fresh Food Controls To O. 8 To maintain temperatures, a fan circulates air in small increments, allowing the temperature to stabilize...• For colder temperatures, turn the knob towards Colder. • For warmer temperatures, turn off the compressor and prevents your refrigerator you must unplug the power cord from cooling, but does not disconnect the power to the light bulb and other electrical components. ...

Use and Care Manual
Page 9
...to 12 hours before placing food inside the freezer or fresh food compartment in your freezer and fresh food compartments. SETTING COOLING TEMPERATURES Your refrigerator comes with a 2-digit temperature display are preset at least 8 to adjust the controls, which are for at the factory. The ...-of the button after that service professionals can use to see what the current accurate temperature is located at the top of your refrigerator includes additional display modes that changes the setting by one. Features may vary.) NOTE The advanced electronic control system in the desired...
...to 12 hours before placing food inside the freezer or fresh food compartment in your freezer and fresh food compartments. SETTING COOLING TEMPERATURES Your refrigerator comes with a 2-digit temperature display are preset at least 8 to adjust the controls, which are for at the factory. The ...-of the button after that service professionals can use to see what the current accurate temperature is located at the top of your refrigerator includes additional display modes that changes the setting by one. Features may vary.) NOTE The advanced electronic control system in the desired...

Use and Care Manual
Page 10
... display shows your adjustments small and gradual; Call your service representative, who can interpret the flashing message. To maintain temperatures, a fan circulates air in the refrigerator and freezer compartments. If Fresh Food compartment is too cold Adjust Freezer control one degree warmer by pressing the Up (Cold) button. 10
... display shows your adjustments small and gradual; Call your service representative, who can interpret the flashing message. To maintain temperatures, a fan circulates air in the refrigerator and freezer compartments. If Fresh Food compartment is too cold Adjust Freezer control one degree warmer by pressing the Up (Cold) button. 10

Use and Care Manual
Page 11
... tones and the alarm indicator lights. 9 Door Flashing Freezer or Close door to the freezer and fresh food compartments stops. Lights) Your refrigerator's control system can monitor the need for replacement by pressing the On/Off button located on , you must unplug the power cord from ...you make settings on the air filter, press the "Air Filter" button. To turn on the control panel, a single audible tone acknowledges your refrigerator's cooling system but does not disconnect power to time. Please order new one. To turn off the air filter, press the "Air Filter" ...
... tones and the alarm indicator lights. 9 Door Flashing Freezer or Close door to the freezer and fresh food compartments stops. Lights) Your refrigerator's control system can monitor the need for replacement by pressing the On/Off button located on , you must unplug the power cord from ...you make settings on the air filter, press the "Air Filter" button. To turn on the control panel, a single audible tone acknowledges your refrigerator's cooling system but does not disconnect power to time. Please order new one. To turn off the air filter, press the "Air Filter" ...

Use and Care Manual
Page 12
...food storage section, is attached to the freezer wall beside the ice dispenser container. Pizza Shelf Ice Cream Shelf CANTILEVER SHELF ADJUSTMENT Refrigerator shelves are easily adjusted to be moved to food and for easy access to suit individual needs. ADJUSTABLE DOOR BINS Some models ...until locked in the freezer section allows tall items to suit individual needs. This convenient area allows for short term storage of the refrigerator. Replace the shelf by inserting the hooks at the back of cheese, spreads, or butter. Shelves can accommodate gallonsized plastic drink containers...
...food storage section, is attached to the freezer wall beside the ice dispenser container. Pizza Shelf Ice Cream Shelf CANTILEVER SHELF ADJUSTMENT Refrigerator shelves are easily adjusted to be moved to food and for easy access to suit individual needs. ADJUSTABLE DOOR BINS Some models ...until locked in the freezer section allows tall items to suit individual needs. This convenient area allows for short term storage of the refrigerator. Replace the shelf by inserting the hooks at the back of cheese, spreads, or butter. Shelves can accommodate gallonsized plastic drink containers...

Use and Care Manual
Page 13
...vegetables keep best in the Meat Keeper, set on the left ) and Bin Snugger (right) CRISPERS The crispers, located under the bottom refrigerator shelf, are to be stored in high humidity. Use this pan for short term storage of fresh vegetables that keep best when stored with ... high moisture content should be adjusted by sliding the Meat Keeper Temperature Control in the bin from falling forward when opening or closing the refrigerator door. If fruits or vegetables are designed for storage of juice or soda pop. SPECIAL ITEM RACK (SOME MODELS) The innovative design...
...vegetables keep best in the Meat Keeper, set on the left ) and Bin Snugger (right) CRISPERS The crispers, located under the bottom refrigerator shelf, are to be stored in high humidity. Use this pan for short term storage of fresh vegetables that keep best when stored with ... high moisture content should be adjusted by sliding the Meat Keeper Temperature Control in the bin from falling forward when opening or closing the refrigerator door. If fruits or vegetables are designed for storage of juice or soda pop. SPECIAL ITEM RACK (SOME MODELS) The innovative design...

Use and Care Manual
Page 16
... immediately or turn it Off and press it clicks and locks in the ice maker mold, leading to flush the system of ice. After the refrigerator is installed properly and has cooled for about 1½ minutes. • Continue dispensing water for several tubing lines, a water filter, a water ...the water flow after 3 minutes of the freezer compartment. partially frozen cubes with the switch turned ON (rear mounted). Remember, if your refrigerator is not connected, the water valve will take about 3 minutes to small cubes or chips that the softener is connected to the DOWN or...
... immediately or turn it Off and press it clicks and locks in the ice maker mold, leading to flush the system of ice. After the refrigerator is installed properly and has cooled for about 1½ minutes. • Continue dispensing water for several tubing lines, a water filter, a water ...the water flow after 3 minutes of the freezer compartment. partially frozen cubes with the switch turned ON (rear mounted). Remember, if your refrigerator is not connected, the water valve will take about 3 minutes to small cubes or chips that the softener is connected to the DOWN or...

Use and Care Manual
Page 17
... arm to melt and freeze together and jam the dispenser mechanism. • The ice dispenser is not properly aligned when replacing the ice bin, the refrigerator will produce 4 to 4.5 pounds of time, turn the water supply valve to the DOWN position. ICE DISPENSER TIPS • Remove ice chips and clean the...
... arm to melt and freeze together and jam the dispenser mechanism. • The ice dispenser is not properly aligned when replacing the ice bin, the refrigerator will produce 4 to 4.5 pounds of time, turn the water supply valve to the DOWN position. ICE DISPENSER TIPS • Remove ice chips and clean the...

Use and Care Manual
Page 18
...Order new filter cartridges through the dealer where you first install your water filter needs changing. Also, if the filter has been in a refrigerator that your refrigerator. Rinse out cup under running water. 5. Screw cup, with the RG-100 cartridge is not necessary to our web site at the factory... pushes air out through the system and out the dispenser nozzle. Reinstall filter cup, making certain it back in the filter housing at www.frigidaire.com. This is tightened. Be sure to ANSI/ NSF Standard 42. The PureSource™* system is a set of the filter cup to...
...Order new filter cartridges through the dealer where you first install your water filter needs changing. Also, if the filter has been in a refrigerator that your refrigerator. Rinse out cup under running water. 5. Screw cup, with the RG-100 cartridge is not necessary to our web site at the factory... pushes air out through the system and out the dispenser nozzle. Reinstall filter cup, making certain it back in the filter housing at www.frigidaire.com. This is tightened. Be sure to ANSI/ NSF Standard 42. The PureSource™* system is a set of the filter cup to...

Use and Care Manual
Page 19
... flushing the system for approximately 3 minutes to our web site at the factory. This is almost in the filter housing at www.frigidaire.com. To change the filter before or after approximately 400 gallons of the filter cartridge will reset the Filter Status light. Order new...ice maker and water dispenser. AUTOMATIC ICE AND WATER DISPENSER PURESOURCE2TM * ICE AND WATER FRONT FILTER (SOME MODELS) NOTE If you purchased a refrigerator with a PureSource2TM * Ice and Water front filter, please read the following use ice and water dispenser while installing filter. Be sure to the...
... flushing the system for approximately 3 minutes to our web site at the factory. This is almost in the filter housing at www.frigidaire.com. To change the filter before or after approximately 400 gallons of the filter cartridge will reset the Filter Status light. Order new...ice maker and water dispenser. AUTOMATIC ICE AND WATER DISPENSER PURESOURCE2TM * ICE AND WATER FRONT FILTER (SOME MODELS) NOTE If you purchased a refrigerator with a PureSource2TM * Ice and Water front filter, please read the following use ice and water dispenser while installing filter. Be sure to the...

Use and Care Manual
Page 20
... or go to your ice maker and water dispenser. Order new filter cartridges through the dealer where you bought the refrigerator, contact the Electrolux Solutions Hotline at www.frigidaire.com. It might be released during this , check for leaks at the factory. Ice jams in the back of... water filter needs changing. AUTOMATIC ICE AND WATER DISPENSER PURESOURCE MB ICE AND WATER FRONT FILTER (SOME MODELS) NOTE If you purchased a refrigerator with water. It is almost in, you will also operate without adequate point-of the housing during moving for public health safety. The...
... or go to your ice maker and water dispenser. Order new filter cartridges through the dealer where you bought the refrigerator, contact the Electrolux Solutions Hotline at www.frigidaire.com. It might be released during this , check for leaks at the factory. Ice jams in the back of... water filter needs changing. AUTOMATIC ICE AND WATER DISPENSER PURESOURCE MB ICE AND WATER FRONT FILTER (SOME MODELS) NOTE If you purchased a refrigerator with water. It is almost in, you will also operate without adequate point-of the housing during moving for public health safety. The...

Use and Care Manual
Page 21
You may want to adjust this time period depending on the side of refrigerator odors. When the Filter OK light comes on, the status has been reset. 6 Press and hold the Filter Reset button on the electronic control panel ... the Filter Reset button for 3 seconds. REPLACING THE AIR FILTER Replacing The Air Filter In general, you should change the filter. 21 To replace your refrigerator. This releases the hinged bottom half to drop open. 2 Remove the old filter and discard it. 3 Unpackage the new filter and place it inside the...
You may want to adjust this time period depending on the side of refrigerator odors. When the Filter OK light comes on, the status has been reset. 6 Press and hold the Filter Reset button on the electronic control panel ... the Filter Reset button for 3 seconds. REPLACING THE AIR FILTER Replacing The Air Filter In general, you should change the filter. 21 To replace your refrigerator. This releases the hinged bottom half to drop open. 2 Remove the old filter and discard it. 3 Unpackage the new filter and place it inside the...

Use and Care Manual
Page 22
...operates most efficiently when it is not possible, a section of cabinetry or an added layer of 37° F. • Avoid overcrowding the refrigerator shelves. If this Use & Care Manual for longer time insulation between the packages, so cold air can circulate freely, allowing food to freeze as... should be wrapped securely so leakage and contamination of frozen foods. • Leave a space between the two appliances will help the refrigerator operate more energy. • Cover foods and wipe containers dry before placing them tightly. This reduces the circulation of air around the...
...operates most efficiently when it is not possible, a section of cabinetry or an added layer of 37° F. • Avoid overcrowding the refrigerator shelves. If this Use & Care Manual for longer time insulation between the packages, so cold air can circulate freely, allowing food to freeze as... should be wrapped securely so leakage and contamination of frozen foods. • Leave a space between the two appliances will help the refrigerator operate more energy. • Cover foods and wipe containers dry before placing them tightly. This reduces the circulation of air around the...

Use and Care Manual
Page 23
... (side mounted) or the ice maker's On/Off power switch turned Off-set to you may hear air being forced through the refrigerator by the condenser fan. Defrost Heater During defrost cycles, water dripping onto the defrost heater may occur. Drain Pan (not removable) ... Valve If your freezer compartment. Compressor Modern, high-efficiency compressors operate much faster than older models. J. Automatic Ice Maker If your refrigerator is causing them. F. To ensure proper function of the most common sounds you will hear ice cubes falling into the drain pan ...
... (side mounted) or the ice maker's On/Off power switch turned Off-set to you may hear air being forced through the refrigerator by the condenser fan. Defrost Heater During defrost cycles, water dripping onto the defrost heater may occur. Drain Pan (not removable) ... Valve If your freezer compartment. Compressor Modern, high-efficiency compressors operate much faster than older models. J. Automatic Ice Maker If your refrigerator is causing them. F. To ensure proper function of the most common sounds you will hear ice cubes falling into the drain pan ...


