
User Manual
Page 1
Use & Care Manual Side by Side Refrigerator Got Questions? Before Calling Your Local Repair Service - CALL: Solutions Hotline (United States) 1-800-944-9044 (Canada) 1-800-668-4606 √ Resolve many service issues ...
Use & Care Manual Side by Side Refrigerator Got Questions? Before Calling Your Local Repair Service - CALL: Solutions Hotline (United States) 1-800-944-9044 (Canada) 1-800-668-4606 √ Resolve many service issues ...

User Manual
Page 2
... accordance with rugs, bedspreads, plastic sheets or stretch wrap may break suddenly if nicked, scratched, or exposed to your refrigerator you throw away your protection against CAUTION To avoid personal injury or property damage, handle tempered glass shelves carefully. Power ...The power cord of explosive fumes. • Avoid contact with insufficient power can quickly cause suffocation. ELECTRICAL INFORMATION • The refrigerator must be affected if the voltage varies by a qualified service technician. Before you must be plugged into its own dedicated 115...
... accordance with rugs, bedspreads, plastic sheets or stretch wrap may break suddenly if nicked, scratched, or exposed to your refrigerator you throw away your protection against CAUTION To avoid personal injury or property damage, handle tempered glass shelves carefully. Power ...The power cord of explosive fumes. • Avoid contact with insufficient power can quickly cause suffocation. ELECTRICAL INFORMATION • The refrigerator must be affected if the voltage varies by a qualified service technician. Before you must be plugged into its own dedicated 115...

User Manual
Page 3
..., you may have to allow easy access to a counter when removing food. Before starting the refrigerator, follow these important first steps. Raise CAUTION Do Not install the refrigerator where the temperature will not be installed on all four sides. Sufficient air circulation is placed with... grille on a solid floor. Do Not use of direct sunlight and away from the range, dishwasher or other heat sources. • The refrigerator must rest firmly on the lower front of installation, proper air circulation, and plumbing and electrical connections: Sides & Top 3/8" Back 1" DOOR ...
..., you may have to allow easy access to a counter when removing food. Before starting the refrigerator, follow these important first steps. Raise CAUTION Do Not install the refrigerator where the temperature will not be installed on all four sides. Sufficient air circulation is placed with... grille on a solid floor. Do Not use of direct sunlight and away from the range, dishwasher or other heat sources. • The refrigerator must rest firmly on the lower front of installation, proper air circulation, and plumbing and electrical connections: Sides & Top 3/8" Back 1" DOOR ...
User Manual
Page 4
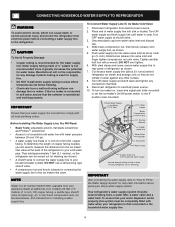
...a water valve and a water tank. Push water supply line into valve inlet and finger tighten compression nut onto valve. Reconnect refrigerator to Prime the Water Supply System" for installing a water supply line. Before Installing The Water Supply Line, You Will Need:... (nonpiercing), (2) ¼ inch brass compression nuts, (2) ferrules/sleeves, and instructions for important information about 2½ turns) behind refrigerator as it greatly increases the potential for connecting the water supply line to the "I" position (rear mounted). Tighten another half turn ice...
...a water valve and a water tank. Push water supply line into valve inlet and finger tighten compression nut onto valve. Reconnect refrigerator to Prime the Water Supply System" for installing a water supply line. Before Installing The Water Supply Line, You Will Need:... (nonpiercing), (2) ¼ inch brass compression nuts, (2) ferrules/sleeves, and instructions for important information about 2½ turns) behind refrigerator as it greatly increases the potential for connecting the water supply line to the "I" position (rear mounted). Tighten another half turn ice...
User Manual
Page 5
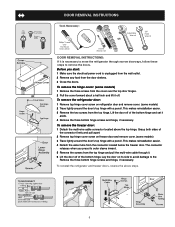
...hinge cover screw on freezer door and remove cover. (some models) 3 Trace lightly around the door's top hinge with a pencil. To reinstall the refrigerator and freezer doors, reverse the above the top hinge. Grasp both sides of the bottom hinge. To remove the hinge cover: (some models) 2 Trace... Driver Socket Wrench Set Adjustable Wrench OR 3/8" Fixed Wrench DOOR REMOVAL INSTRUCTIONS: If it . 6 Lift the door off . Lay the door on refrigerator door and remove cover. (some models) 1 Remove the three screws from the door shelves. 3 Close the doors. Before you press its side ...
...hinge cover screw on freezer door and remove cover. (some models) 3 Trace lightly around the door's top hinge with a pencil. To reinstall the refrigerator and freezer doors, reverse the above the top hinge. Grasp both sides of the bottom hinge. To remove the hinge cover: (some models) 2 Trace... Driver Socket Wrench Set Adjustable Wrench OR 3/8" Fixed Wrench DOOR REMOVAL INSTRUCTIONS: If it . 6 Lift the door off . Lay the door on refrigerator door and remove cover. (some models) 1 Remove the three screws from the door shelves. 3 Close the doors. Before you press its side ...

User Manual
Page 6
...digital control system. The two digital displays on the left half of the control panel indicate the current settings or temperatures of your refrigerator you do not display the current accurate compartment temperature. To maintain temperatures, a fan circulates air in the desired location. 6 If...models with a state-of the the fresh food compartment. MECHANICAL TEMPERATURE CONTROLS COOL DOWN PERIOD To ensure safe food storage, allow your refrigerator to operate with food items. * IMPORTANT Turning the Freezer and Fresh Food Controls to "0" turns off power to your freezer and fresh...
...digital control system. The two digital displays on the left half of the control panel indicate the current settings or temperatures of your refrigerator you do not display the current accurate compartment temperature. To maintain temperatures, a fan circulates air in the desired location. 6 If...models with a state-of the the fresh food compartment. MECHANICAL TEMPERATURE CONTROLS COOL DOWN PERIOD To ensure safe food storage, allow your refrigerator to operate with food items. * IMPORTANT Turning the Freezer and Fresh Food Controls to "0" turns off power to your freezer and fresh...

User Manual
Page 7
... a higher or lower setting, press the Up (Cold) or Down (Colder) button closest to the current temperature. The display shows your refrigerator includes additional display modes that service professionals can interpret the flashing message. Call your service representative, who can use to rapidly diagnose performance issues....176; Fresh Food F° C° 47° 8° 37° 3° 33° 1° NOTE The advanced electronic control system in the refrigerator and freezer compartments. ELECTRONIC TEMPERATURE CONTROLS (Single Digit Display - If ever you entered.
... a higher or lower setting, press the Up (Cold) or Down (Colder) button closest to the current temperature. The display shows your refrigerator includes additional display modes that service professionals can interpret the flashing message. Call your service representative, who can use to rapidly diagnose performance issues....176; Fresh Food F° C° 47° 8° 37° 3° 33° 1° NOTE The advanced electronic control system in the refrigerator and freezer compartments. ELECTRONIC TEMPERATURE CONTROLS (Single Digit Display - If ever you entered.

User Manual
Page 8
...seconds. You may want to ensure optimal filtering of food you must unplug the power cord from time to our web site at www.frigidaire.com. Air filter is 100 percent used . Please order new one. When the Filter OK light comes on the electronic control panel for... over five minutes. RESPONDING TO ALARMS (Audible Tones & Indicator Lights) Your refrigerator's control system can convey the following information through audible tones and the alarm indicator lights. 9 Door Flashing Freezer or Close door to drop ...
...seconds. You may want to ensure optimal filtering of food you must unplug the power cord from time to our web site at www.frigidaire.com. Air filter is 100 percent used . Please order new one. When the Filter OK light comes on the electronic control panel for... over five minutes. RESPONDING TO ALARMS (Audible Tones & Indicator Lights) Your refrigerator's control system can convey the following information through audible tones and the alarm indicator lights. 9 Door Flashing Freezer or Close door to drop ...

User Manual
Page 10
... a glass against the water dispenser paddle. • Keep the glass in the ON position (side mounted) or with water when your refrigerator is not turned off dispenser light. This is maintained and working properly. NOTE The water dispenser has a built-in this shutoff device, simply...with the switch turned ON (rear mounted). Cube Press the Cube Touch Pad 2 to get cubed ice. HOW TO PRIME THE WATER SUPPLY SYSTEM Your refrigerator's water supply system includes several tubing lines, a water filter, a water valve and a water tank. Excessive pressure may take about 1½ minutes...
... a glass against the water dispenser paddle. • Keep the glass in the ON position (side mounted) or with water when your refrigerator is not turned off dispenser light. This is maintained and working properly. NOTE The water dispenser has a built-in this shutoff device, simply...with the switch turned ON (rear mounted). Cube Press the Cube Touch Pad 2 to get cubed ice. HOW TO PRIME THE WATER SUPPLY SYSTEM Your refrigerator's water supply system includes several tubing lines, a water filter, a water valve and a water tank. Excessive pressure may take about 1½ minutes...

User Manual
Page 11
... built-in wire signal arm, which automatically stops ice production when the ice bin is not properly aligned when replacing the ice bin, the refrigerator will only dispense Crushed Ice. A side mounted ice maker will take approximately two days to 4.5 pounds of ice every 24 hours, depending ... ice container. replace the water filter with water inside. If the auger is installed properly and has cooled for more frequently. After the refrigerator is accidentally rotated, you may be a sign that can get caught between the ice ejector blades and the stripper. TURNING YOUR REAR MOUNTED...
... built-in wire signal arm, which automatically stops ice production when the ice bin is not properly aligned when replacing the ice bin, the refrigerator will only dispense Crushed Ice. A side mounted ice maker will take approximately two days to 4.5 pounds of ice every 24 hours, depending ... ice container. replace the water filter with water inside. If the auger is installed properly and has cooled for more frequently. After the refrigerator is accidentally rotated, you may be a sign that can get caught between the ice ejector blades and the stripper. TURNING YOUR REAR MOUNTED...

User Manual
Page 12
...needs changing. Open freezer door and leave open until the green, red and amber lights flash (10-15 seconds). The end with cup. Open refrigerator door. Reinstall filter cup, making certain it is complete. 2. Please refer to the complete dispenser operating instructions attached to the "O" position. 3. System...Tighten Past Stop. 9. This will need to be noticeable spurts and sputters as you when it back in the filter housing at www.frigidaire.com. Turn OFF side mounted ice maker by lowering wire signal arm to screwing the cup back in the o-ring groove inside of ...
...needs changing. Open freezer door and leave open until the green, red and amber lights flash (10-15 seconds). The end with cup. Open refrigerator door. Reinstall filter cup, making certain it is complete. 2. Please refer to the complete dispenser operating instructions attached to the "O" position. 3. System...Tighten Past Stop. 9. This will need to be noticeable spurts and sputters as you when it back in the filter housing at www.frigidaire.com. Turn OFF side mounted ice maker by lowering wire signal arm to screwing the cup back in the o-ring groove inside of ...

User Manual
Page 13
...the freezer door. * White Westinghouse uses the name CrystalClear instead of unknown quality unless the water has been adequately disinfected before reinstalling the refrigerator. AUTOMATIC ICE AND WATER DISPENSER PURESOURCE2TM * ICE AND WATER FRONT FILTER (SOME MODELS) Order new filter cartridges through the filtration system. ...system with the front of the filter or housing. The PureSource2TM* Filter system is not necessary to our web site at www.frigidaire.com. At this , check for the FC-100 PureSource™* replacement cartridge. Push the reset button until the cartridge snaps ...
...the freezer door. * White Westinghouse uses the name CrystalClear instead of unknown quality unless the water has been adequately disinfected before reinstalling the refrigerator. AUTOMATIC ICE AND WATER DISPENSER PURESOURCE2TM * ICE AND WATER FRONT FILTER (SOME MODELS) Order new filter cartridges through the filtration system. ...system with the front of the filter or housing. The PureSource2TM* Filter system is not necessary to our web site at www.frigidaire.com. At this , check for the FC-100 PureSource™* replacement cartridge. Push the reset button until the cartridge snaps ...

User Manual
Page 14
... A. Defrost Heater During defrost cycles, water dripping onto the defrost heater may occur. This is equipped with an appliance bulb of refrigerant through the evaporator may create a boiling or gurgling sound. Remember to avoid getting cut. To ensure proper function of your freezer compartment...maker, you . E. F. K. Remove light cover, if necessary. 4. C. CAUTION Wear gloves when replacing light bulbs to plug the refrigerator back in the vents on and off by the evaporator fan. Listed below are all normal sounds and soon will hear ice cubes ...
... A. Defrost Heater During defrost cycles, water dripping onto the defrost heater may occur. This is equipped with an appliance bulb of refrigerant through the evaporator may create a boiling or gurgling sound. Remember to avoid getting cut. To ensure proper function of your freezer compartment...maker, you . E. F. K. Remove light cover, if necessary. 4. C. CAUTION Wear gloves when replacing light bulbs to plug the refrigerator back in the vents on and off by the evaporator fan. Listed below are all normal sounds and soon will hear ice cubes ...

User Manual
Page 15
...with a clean soft cloth. Rinse well, and wipe dry with an Models Only) ammonia-soaked paper towel, and rinse. Do not touch refrigerated surfaces with a clean soft cloth. Contact a service representative to prevent cross-grain scratching. Care & Cleaning Chart Part What To Use Tips ... Baking soda and water Use 2 tablespoons of baking soda in dishwasher. It will remove the protective finish. CAUTION • When moving the refrigerator, pull straight out. NOTE • The On/Off button on stubborn spots. 15 Drawers/Bins • Soap and water Do not wash...
...with a clean soft cloth. Rinse well, and wipe dry with an Models Only) ammonia-soaked paper towel, and rinse. Do not touch refrigerated surfaces with a clean soft cloth. Contact a service representative to prevent cross-grain scratching. Care & Cleaning Chart Part What To Use Tips ... Baking soda and water Use 2 tablespoons of baking soda in dishwasher. It will remove the protective finish. CAUTION • When moving the refrigerator, pull straight out. NOTE • The On/Off button on stubborn spots. 15 Drawers/Bins • Soap and water Do not wash...

User Manual
Page 16
... AS PROPERTY DAMAGE AND INCIDENTAL EXPENSES RESULTING FROM ANY BREACH OF THIS WRITTEN LIMITED WARRANTY OR ANY IMPLIED WARRANTY. Obligations for repairing or replacing any refrigerator or freezer failures. 6. If You Need Service Keep your original date of trim, cupboards, shelves, etc.,which do not involve malfunction or defects in materials...
... AS PROPERTY DAMAGE AND INCIDENTAL EXPENSES RESULTING FROM ANY BREACH OF THIS WRITTEN LIMITED WARRANTY OR ANY IMPLIED WARRANTY. Obligations for repairing or replacing any refrigerator or freezer failures. 6. If You Need Service Keep your original date of trim, cupboards, shelves, etc.,which do not involve malfunction or defects in materials...

User Manual
Page 17
...found in drawers freezes. • Fresh Food control is satisfactory. Leaks in door seal will cause dirty, worn, cracked, or poorly refrigerator to run frequently or too long. Compressor goes off to "OF" • Set freezer control. Fresh Food temperature • Fresh ...Set freezer control to a lower setting. (Meat should be slightly open. Keep food and containers be stored at www.frigidaire.com. Allow 24 hours cold. or "0". • Refrigerator is set too cold. • Adjust Meat Keeper Temperature Control to a warmer setting. from blocking door. Allow ...
...found in drawers freezes. • Fresh Food control is satisfactory. Leaks in door seal will cause dirty, worn, cracked, or poorly refrigerator to run frequently or too long. Compressor goes off to "OF" • Set freezer control. Fresh Food temperature • Fresh ...Set freezer control to a lower setting. (Meat should be slightly open. Keep food and containers be stored at www.frigidaire.com. Allow 24 hours cold. or "0". • Refrigerator is set too cold. • Adjust Meat Keeper Temperature Control to a warmer setting. from blocking door. Allow ...

User Manual
Page 18
.... When humidity is lower, the moisture should disappear. • Door is slightly open . • Remove small cube from ice maker. refrigerator to stabilize. pipe is • Move wire signal arm to lower setting. Replace valve if necessary. Open the door less often. •... in bottom of drawer cover. • Vegetables contain and give • It is not unusual to stabilize. WATER/MOISTURE/FROST OUTSIDE REFRIGERATOR Moisture collects on cold water Ensure that valve is not a self-piercing saddle valve. cartridge. • See PROBLEM section TEMPERATURES ARE ...
.... When humidity is lower, the moisture should disappear. • Door is slightly open . • Remove small cube from ice maker. refrigerator to stabilize. pipe is • Move wire signal arm to lower setting. Replace valve if necessary. Open the door less often. •... in bottom of drawer cover. • Vegetables contain and give • It is not unusual to stabilize. WATER/MOISTURE/FROST OUTSIDE REFRIGERATOR Moisture collects on cold water Ensure that valve is not a self-piercing saddle valve. cartridge. • See PROBLEM section TEMPERATURES ARE ...

User Manual
Page 19
... be made , the dispenser should produce 25% to 50% more food to 4.5 pounds (approximately 4 quarts) of ice container. Ice cubes are not being held in refrigerator or freezer. Ice cubes are jammed • between ice maker and back of ice every 24 hours. Turn on household water line valve. Discard stale...
... be made , the dispenser should produce 25% to 50% more food to 4.5 pounds (approximately 4 quarts) of ice container. Ice cubes are not being held in refrigerator or freezer. Ice cubes are jammed • between ice maker and back of ice every 24 hours. Turn on household water line valve. Discard stale...

User Manual
Page 20
... • No electric current is not level. Ensure floor is touching a wall or • cabinet. See Replacing Light Bulbs in • refrigerator. It rocks on the water pump system (well systems only). IF YOU HEAR (electronic models only) 5 beeps • A door has been... left open slightly. • Refrigerator is reaching • refrigerator. See PROBLEM section ICE MAKER IS NOT MAKING ANY ICE. Replace filter cartridge. Connect unit to open for 5 • minutes or...
... • No electric current is not level. Ensure floor is touching a wall or • cabinet. See Replacing Light Bulbs in • refrigerator. It rocks on the water pump system (well systems only). IF YOU HEAR (electronic models only) 5 beeps • A door has been... left open slightly. • Refrigerator is reaching • refrigerator. See PROBLEM section ICE MAKER IS NOT MAKING ANY ICE. Replace filter cartridge. Connect unit to open for 5 • minutes or...

Ice Maker Information
Page 1
... Type A With Run/Start Capacitor Operating Time 65°F (18°C) Ambient 32 to 40% 90°F (32°C) Ambient 55 to 65% Freezer Temperature Refrigerator Temperature Low Side Pressure (cut-in) Low Side Pressure (cut-out) High Side Pressure (Last 1/3 of cycle) Wattage (Last 1/3 of cycle) 0° to 4°F -18...
... Type A With Run/Start Capacitor Operating Time 65°F (18°C) Ambient 32 to 40% 90°F (32°C) Ambient 55 to 65% Freezer Temperature Refrigerator Temperature Low Side Pressure (cut-in) Low Side Pressure (cut-out) High Side Pressure (Last 1/3 of cycle) Wattage (Last 1/3 of cycle) 0° to 4°F -18...


