Complete Owner's Guide (English)
Page 4
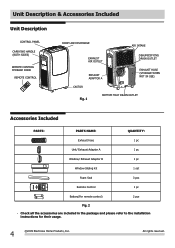
... (BOTH SIDES) REMOTE CONTROL STORAGE DOOR REMOTE CONTROL ROOM AIR DISCHARGE AIR INTAKE EXHAUST AIR OUTLET DEHUMIDIFYING DRAIN OUTLET EXHAUST ADAPTOR A EXHAUST HOSE (STORAGE WHEN NOT IN USE) CASTOR Fig. 1 BOTTOM TRAY DRAIN OUTLET Accessories Included PARTS: PARTS NAME: QUANTITY: Exhaust... hose 1 pc Unit/ Exhaust Adaptor A 1 pc Window/ Exhaust Adaptor B 1 pc Window Sliding Kit 1 set Foam Seal 3 pcs Remote Control 1 pc Battery(For remote control) 2 pcs...
... (BOTH SIDES) REMOTE CONTROL STORAGE DOOR REMOTE CONTROL ROOM AIR DISCHARGE AIR INTAKE EXHAUST AIR OUTLET DEHUMIDIFYING DRAIN OUTLET EXHAUST ADAPTOR A EXHAUST HOSE (STORAGE WHEN NOT IN USE) CASTOR Fig. 1 BOTTOM TRAY DRAIN OUTLET Accessories Included PARTS: PARTS NAME: QUANTITY: Exhaust... hose 1 pc Unit/ Exhaust Adaptor A 1 pc Window/ Exhaust Adaptor B 1 pc Window Sliding Kit 1 set Foam Seal 3 pcs Remote Control 1 pc Battery(For remote control) 2 pcs...
Complete Owner's Guide (English)
Page 5
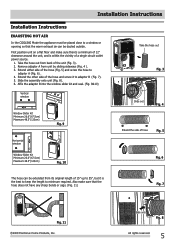
... unit (Fig. 3). 2. Slide the assembly onto unit (Fig. 8). 6. Remove adaptor A from back of the hose (Fig. 5) and screw the hose to adaptor B (Fig. 7). 5. Extend the other side of the hose and screw it is within the vicinity of 12" clearance around the unit, and is the best to keep... the window slider kit and seal. (Fig. 9&10) Vertical window Window Slider Kit Minimum:26.6"(67.5cm) Maxmum:48.5"(123cm) Fig. 9 Horizontal window Take the hose out Fig. 3 Slide out Fig. 4 Extend the side of 15" up to 55", but it to adaptor A (Fig. 6) . 4. Installation Instructions Installation ...
... unit (Fig. 3). 2. Slide the assembly onto unit (Fig. 8). 6. Remove adaptor A from back of the hose (Fig. 5) and screw the hose to adaptor B (Fig. 7). 5. Extend the other side of the hose and screw it is within the vicinity of 12" clearance around the unit, and is the best to keep... the window slider kit and seal. (Fig. 9&10) Vertical window Window Slider Kit Minimum:26.6"(67.5cm) Maxmum:48.5"(123cm) Fig. 9 Horizontal window Take the hose out Fig. 3 Slide out Fig. 4 Extend the side of 15" up to 55", but it to adaptor A (Fig. 6) . 4. Installation Instructions Installation ...
Complete Owner's Guide (English)
Page 8
...mode there is in the "EXHAUSTING HOT AIR" section. 1. See Drainage Section. 1. Under AUTO mode, you want to use the exhaust adaptor hose, BUT the water collected must be discharged. Press the FAN button to previous temperature display. If you can not select the fan speed. The ...;windows closed for the desired heat setting. This ends the "Sleep" mode and the unit will automatically change the timing to use the exhaust hose or drainage hose. Note: This feature is selected. To cancel the timer setting, simply tap ( ) or ( ) button to change the display back to...
...mode there is in the "EXHAUSTING HOT AIR" section. 1. See Drainage Section. 1. Under AUTO mode, you want to use the exhaust adaptor hose, BUT the water collected must be discharged. Press the FAN button to previous temperature display. If you can not select the fan speed. The ...;windows closed for the desired heat setting. This ends the "Sleep" mode and the unit will automatically change the timing to use the exhaust hose or drainage hose. Note: This feature is selected. To cancel the timer setting, simply tap ( ) or ( ) button to change the display back to...
Complete Owner's Guide (English)
Page 9
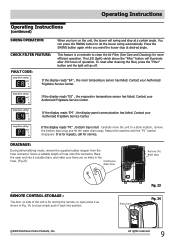
... All rights reserved. 9 Contact your Authorized Frigidaire Service Center. If error repeats, call for storing the remote, to close simply push it back into a suitable drain, and make sure there are no kinks in the hose. (Fig.23) Continuous drain hose Remove the drain plug REMOTE CONTROL STORAGE :... The door on the unit, the louver will go off. DRAINAGE: During dehumidifying mode, remove the supplied rubber stopper from the hose connector. Press the SWING button again while you turn on side of operation. The LED (light) which above the "Filter" button will ...
... All rights reserved. 9 Contact your Authorized Frigidaire Service Center. If error repeats, call for storing the remote, to close simply push it back into a suitable drain, and make sure there are no kinks in the hose. (Fig.23) Continuous drain hose Remove the drain plug REMOTE CONTROL STORAGE :... The door on the unit, the louver will go off. DRAINAGE: During dehumidifying mode, remove the supplied rubber stopper from the hose connector. Press the SWING button again while you turn on side of operation. The LED (light) which above the "Filter" button will ...


