Complete Owner's Guide (English)
Page 4
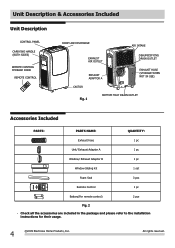
...) REMOTE CONTROL STORAGE DOOR REMOTE CONTROL ROOM AIR DISCHARGE AIR INTAKE EXHAUST AIR OUTLET DEHUMIDIFYING DRAIN OUTLET EXHAUST ADAPTOR A EXHAUST HOSE (STORAGE WHEN NOT IN USE) CASTOR Fig. 1 BOTTOM TRAY DRAIN OUTLET Accessories Included PARTS: PARTS NAME: QUANTITY: Exhaust hose 1 pc Unit/ Exhaust Adaptor A 1 pc Window/ Exhaust Adaptor B 1 pc Window Sliding Kit 1 set Foam Seal 3 pcs Remote Control...
...) REMOTE CONTROL STORAGE DOOR REMOTE CONTROL ROOM AIR DISCHARGE AIR INTAKE EXHAUST AIR OUTLET DEHUMIDIFYING DRAIN OUTLET EXHAUST ADAPTOR A EXHAUST HOSE (STORAGE WHEN NOT IN USE) CASTOR Fig. 1 BOTTOM TRAY DRAIN OUTLET Accessories Included PARTS: PARTS NAME: QUANTITY: Exhaust hose 1 pc Unit/ Exhaust Adaptor A 1 pc Window/ Exhaust Adaptor B 1 pc Window Sliding Kit 1 set Foam Seal 3 pcs Remote Control...
Complete Owner's Guide (English)
Page 5
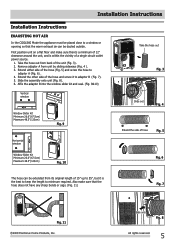
...to adaptor B (Fig. 7). 5. Extend the other side of the hose and screw it is within the vicinity of the hose (Fig. 5) and screw the hose to adaptor A (Fig. 6) . 4. First position unit on a flat floor and make sure that the warm exhaust air can be extended from its original length of the unit... (Fig. 3). 2. Affix the adaptor B into the window slider kit and seal. (Fig. 9&10) Vertical window Window Slider Kit Minimum:26.6"(67.5cm) Maxmum:48.5"(123cm) Fig. 9 Horizontal window Take the hose out Fig. 3 ...
...to adaptor B (Fig. 7). 5. Extend the other side of the hose and screw it is within the vicinity of the hose (Fig. 5) and screw the hose to adaptor A (Fig. 6) . 4. First position unit on a flat floor and make sure that the warm exhaust air can be extended from its original length of the unit... (Fig. 3). 2. Affix the adaptor B into the window slider kit and seal. (Fig. 9&10) Vertical window Window Slider Kit Minimum:26.6"(67.5cm) Maxmum:48.5"(123cm) Fig. 9 Horizontal window Take the hose out Fig. 3 ...
Complete Owner's Guide (English)
Page 8
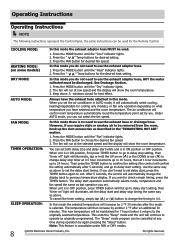
...illuminate, set by again pressing the "Sleep" button. Use the same way as described in ON position or OFF position. If you have the exhaust hose attached in ON position, first press TIMER button to go to delay stop setting, then "timer off" light will show the room temperature. ...temperature. Then press the TIMER button to confirm the setting (the control will be removed from the room, hook up to use the exhaust hose or drainage hose. However, if you set the delay start operation automatically selects mode, temperature and fan speed the same as last operation you require ...
...illuminate, set by again pressing the "Sleep" button. Use the same way as described in ON position or OFF position. If you have the exhaust hose attached in ON position, first press TIMER button to go to delay stop setting, then "timer off" light will show the room temperature. ...temperature. Then press the TIMER button to confirm the setting (the control will be removed from the room, hook up to use the exhaust hose or drainage hose. However, if you set the delay start operation automatically selects mode, temperature and fan speed the same as last operation you require ...


