Complete Owner's Guide (English)
Page 1
All about the Use &Care of your Refrigerator 242108500 (January 2010) TABLE OF CONTENTS Important Safety Instructions 2 Features at a Glance 4 Installation 5 Door Removal Instructions 7 Handle Installation 8 Connecting Water Supply 9 Controls 10 Storage Features 12 Automatic Ice & Water Dispenser 13 Changing the Filter 15 Normal Operating Sounds and Sights 17 Care and Cleaning 18 Before you Call 19 Major Appliance Warranty 21 www.frigidaire.com USA 1-800-944-9044 www.frigidaire.ca Canada 1-800-265-8352
All about the Use &Care of your Refrigerator 242108500 (January 2010) TABLE OF CONTENTS Important Safety Instructions 2 Features at a Glance 4 Installation 5 Door Removal Instructions 7 Handle Installation 8 Connecting Water Supply 9 Controls 10 Storage Features 12 Automatic Ice & Water Dispenser 13 Changing the Filter 15 Normal Operating Sounds and Sights 17 Care and Cleaning 18 Before you Call 19 Major Appliance Warranty 21 www.frigidaire.com USA 1-800-944-9044 www.frigidaire.ca Canada 1-800-265-8352
Complete Owner's Guide (English)
Page 2
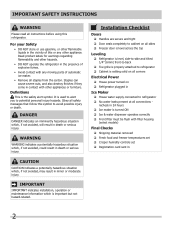
For your Safety • DO NOT store or use gasoline, or other flammable liquids in death or serious injury. WARNING WARNING indicates a potentially hazardous situation which , if not avoided, will result in minor or moderate injury. Read product labels for warnings regarding flammability and other hazards. • DO NOT operate the refrigerator in Ice Maker House water supply connected to refrigerator No water leaks present at all corners Electrical Power House power turned on all connections - Installation Checklist Doors Handles are secure ...
For your Safety • DO NOT store or use gasoline, or other flammable liquids in death or serious injury. WARNING WARNING indicates a potentially hazardous situation which , if not avoided, will result in minor or moderate injury. Read product labels for warnings regarding flammability and other hazards. • DO NOT operate the refrigerator in Ice Maker House water supply connected to refrigerator No water leaks present at all corners Electrical Power House power turned on all connections - Installation Checklist Doors Handles are secure ...
Complete Owner's Guide (English)
Page 3
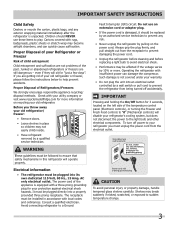
Cartons covered with a three-prong grounding plug for more . Check with your utility company or visit www.recyclemyoldfridge.com for your protection against electrical shock hazards. The power cord of the appliance is damaged, it should never use an extension cord or adapter plug. • If the power cord is equipped with rugs, bedspreads, plastic sheets or stretch wrap may be followed to ensure that safety mechanisms in this refrigerator will operate properly. Always grip the plug firmly, and pull straight out from the receptacle to prevent damaging the power cord. • ...
Cartons covered with a three-prong grounding plug for more . Check with your utility company or visit www.recyclemyoldfridge.com for your protection against electrical shock hazards. The power cord of the appliance is damaged, it should never use an extension cord or adapter plug. • If the power cord is equipped with rugs, bedspreads, plastic sheets or stretch wrap may be followed to ensure that safety mechanisms in this refrigerator will operate properly. Always grip the plug firmly, and pull straight out from the receptacle to prevent damaging the power cord. • ...

Complete Owner's Guide (English)
Page 4
Features At A Glance Features may vary according to model 4
Features At A Glance Features may vary according to model 4
Complete Owner's Guide (English)
Page 5
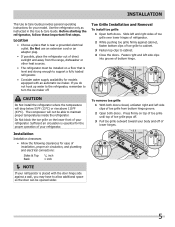
Do Not use an extension cord or an adapter plug. • If possible, place the refrigerator out of toe grille to cabinet. 3 Fasten top clips to turn the ice maker off. Fasten right and left side clips into groove of refrigerator. 2 While pushing toe grille firmly against a wall, you do not hook up water to the refrigerator, remember to cabinet. 4 Close the doors. Installation Installation clearances • Allow the following clearances for ease of installation, proper air circulation, and plumbing and electrical connections: Sides & Top Back 3/8 inch 1 inch NOTE ...
Do Not use an extension cord or an adapter plug. • If possible, place the refrigerator out of toe grille to cabinet. 3 Fasten top clips to turn the ice maker off. Fasten right and left side clips into groove of refrigerator. 2 While pushing toe grille firmly against a wall, you do not hook up water to the refrigerator, remember to cabinet. 4 Close the doors. Installation Installation clearances • Allow the following clearances for ease of installation, proper air circulation, and plumbing and electrical connections: Sides & Top Back 3/8 inch 1 inch NOTE ...
Complete Owner's Guide (English)
Page 6
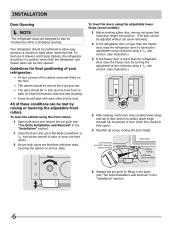
To level the doors using the adjustable lower hinge (some models): 1 Before leveling either door, remove set screw removed). 2 If the refrigerator door is lower than the freezer door, raise the refrigerator door by turning the adjustment screw clockwise using a 7/16 inch wrench. (See illustration.) 3 If the freezer door is lower than the refrigerator door, raise the freezer door by turning the adjustment screw clockwise using the front rollers: 1 Open both doors and remove the toe grille (see "Toe Grille Installation and Removal" in a position where both doors are designed to fully ...
To level the doors using the adjustable lower hinge (some models): 1 Before leveling either door, remove set screw removed). 2 If the refrigerator door is lower than the freezer door, raise the refrigerator door by turning the adjustment screw clockwise using a 7/16 inch wrench. (See illustration.) 3 If the freezer door is lower than the refrigerator door, raise the freezer door by turning the adjustment screw clockwise using the front rollers: 1 Open both doors and remove the toe grille (see "Toe Grille Installation and Removal" in a position where both doors are designed to fully ...
Complete Owner's Guide (English)
Page 7
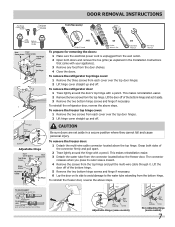
Lift the door off of the bottom hinge and set aside in the Installation Instructions that came with your appliance). 3 Remove any food from each cover over the top door hinges. 2 Lift hinge cover straight up and off. To remove the freezer top hinge cover: 1 Remove the two screws from the connector located below the freezer door. Lift the door off of the bottom hinge. 5 Remove the two bottom hinge screws and hinge if necessary. 6 Lay the door on its outer sleeve inward. 4 Remove the screws from the top hinge and pull the multi-wire cable through it aside. 3 Remove the two bottom ...
Lift the door off of the bottom hinge and set aside in the Installation Instructions that came with your appliance). 3 Remove any food from each cover over the top door hinges. 2 Lift hinge cover straight up and off. To remove the freezer top hinge cover: 1 Remove the two screws from the connector located below the freezer door. Lift the door off of the bottom hinge. 5 Remove the two bottom hinge screws and hinge if necessary. 6 Lay the door on its outer sleeve inward. 4 Remove the screws from the top hinge and pull the multi-wire cable through it aside. 3 Remove the two bottom ...
Complete Owner's Guide (English)
Page 8
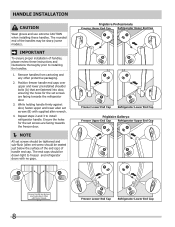
... cap) of handle end cap. The end caps should be drawn tight to install refrigerator handle. Frigidaire Professional® Freezer Upper End Cap Refrigerator Upper End Cap Freezer Lower End Cap Refrigerator Lower End Cap Frigidaire Gallery® Freezer Upper End Cap Refrigerator Upper End Cap Freezer Lower End Cap Refrigerator Lower...
... cap) of handle end cap. The end caps should be drawn tight to install refrigerator handle. Frigidaire Professional® Freezer Upper End Cap Refrigerator Upper End Cap Freezer Lower End Cap Refrigerator Lower End Cap Frigidaire Gallery® Freezer Upper End Cap Refrigerator Upper End Cap Freezer Lower End Cap Refrigerator Lower...
Complete Owner's Guide (English)
Page 9
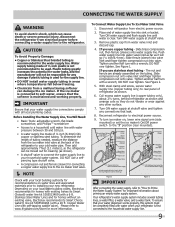
... To avoid electric shock, which can cause death or severe personal injury, disconnect the refrigerator from electrical power before connecting a water supply line to www.frigidaire.com/store for more information. Depending on the tubing. Slide compression nut onto valve inlet and finger tighten compression nut onto valve.
... To avoid electric shock, which can cause death or severe personal injury, disconnect the refrigerator from electrical power before connecting a water supply line to www.frigidaire.com/store for more information. Depending on the tubing. Slide compression nut onto valve inlet and finger tighten compression nut onto valve.
Complete Owner's Guide (English)
Page 10
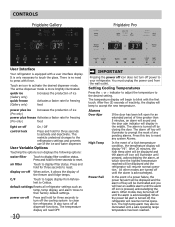
... production of the ice and water dispenser. After 20 minutes, the high temp alert will be displayed and the alarm off power to Celsius. Controls Frigidaire Gallery Frigidaire Pro User Interface Your refrigerator is pressed, acknowledging the alarm. quick ice (Gallery only) quick freeze (Gallery only) Increases the production of ice Activates...
... production of the ice and water dispenser. After 20 minutes, the high temp alert will be displayed and the alarm off power to Celsius. Controls Frigidaire Gallery Frigidaire Pro User Interface Your refrigerator is pressed, acknowledging the alarm. quick ice (Gallery only) quick freeze (Gallery only) Increases the production of ice Activates...
Complete Owner's Guide (English)
Page 11
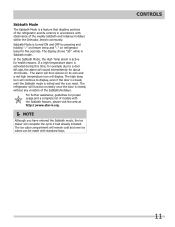
If a high temperature alarm is activated during this time, for example due to display, even if the door is closed , without any violation of the Sabbath/Holidays. The high temp icon will continue to a door left ajar, the alarm will sound intermittently for proper usage and a complete list of models with the Sabbath feature, please visit the web at http:\\www.star-k.org. NOTE Although you have entered the Sabbath mode, the ice maker will complete the cycle it had already initiated. The refrigerator will function normally once the door is closed , until the Sabbath mode is ...
If a high temperature alarm is activated during this time, for example due to display, even if the door is closed , without any violation of the Sabbath/Holidays. The high temp icon will continue to a door left ajar, the alarm will sound intermittently for proper usage and a complete list of models with the Sabbath feature, please visit the web at http:\\www.star-k.org. NOTE Although you have entered the Sabbath mode, the ice maker will complete the cycle it had already initiated. The refrigerator will function normally once the door is closed , until the Sabbath mode is ...

Complete Owner's Guide (English)
Page 12
Storage Features CAUTION To avoid personal injury or property damage, handle tempered glass shelves carefully. Lower the shelf into the desired slots and lock into the wall bracket. In some models) catch and hold accidental spills. The dairy compartment, which allows you the flexibility to store any manner of cheese, spreads, or butter. Wash items in either direction. Crispers Crispers allow but are not removable from their mounting brackets. To adjust cantilever shelves: 1 Lift front edge up or down. Replace the shelf by sliding the Chill Drawer Temperature ...
Storage Features CAUTION To avoid personal injury or property damage, handle tempered glass shelves carefully. Lower the shelf into the desired slots and lock into the wall bracket. In some models) catch and hold accidental spills. The dairy compartment, which allows you the flexibility to store any manner of cheese, spreads, or butter. Wash items in either direction. Crispers Crispers allow but are not removable from their mounting brackets. To adjust cantilever shelves: 1 Lift front edge up or down. Replace the shelf by sliding the Chill Drawer Temperature ...
Complete Owner's Guide (English)
Page 13
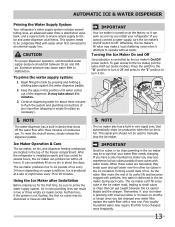
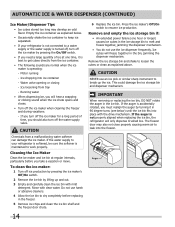
It may take about 1½ minutes. 3 Continue dispensing water for several tubing lines, an advanced water filter, a distribution valve bank, and a reserve tank to ensure ample supply to small cubes or chips that can get caught between 30 psi and 100 psi. Ice Maker Operation & Care The ice maker, ice bin, and dispenser feeding mechanism are harvested, they break open and spill water over the other ice cubes in the ice container, forming a solid mass of ice every 24 hours depending on at the factory so it 's been six months or longer since you may be changed your refrigerator....
It may take about 1½ minutes. 3 Continue dispensing water for several tubing lines, an advanced water filter, a distribution valve bank, and a reserve tank to ensure ample supply to small cubes or chips that can get caught between 30 psi and 100 psi. Ice Maker Operation & Care The ice maker, ice bin, and dispenser feeding mechanism are harvested, they break open and spill water over the other ice cubes in the ice container, forming a solid mass of ice every 24 hours depending on at the factory so it 's been six months or longer since you may be changed your refrigerator....
Complete Owner's Guide (English)
Page 14
Water valve opening or closing - To clean the ice maker: 1 Turn off the ice maker when cleaning the freezer and during vacations. - Do not use harsh or abrasive cleaners. 4 Allow the ice bin to break up and out. 3 Empty and carefully clean the ice bin with clear water. IMPORTANT When removing or replacing the ice bin, DO NOT rotate the auger in 90 degree turns (see below) until the ice bin fits into the freezer. 14 If the auger is not properly aligned when replacing the ice bin, the refrigerator will freeze together in the bin, jamming the dispenser mechanism. If you turn off the...
Water valve opening or closing - To clean the ice maker: 1 Turn off the ice maker when cleaning the freezer and during vacations. - Do not use harsh or abrasive cleaners. 4 Allow the ice bin to break up and out. 3 Empty and carefully clean the ice bin with clear water. IMPORTANT When removing or replacing the ice bin, DO NOT rotate the auger in 90 degree turns (see below) until the ice bin fits into the freezer. 14 If the auger is not properly aligned when replacing the ice bin, the refrigerator will freeze together in the bin, jamming the dispenser mechanism. If you turn off the...
Complete Owner's Guide (English)
Page 15
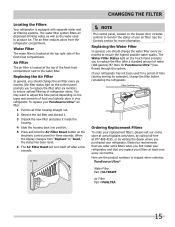
... by calling toll-free at least once every six months. Ordering Replacement Filters To order your replacement filters, please visit our online store at www.frigidaire.com/store, by visiting the dealer where you replace your refrigerator. CHANGING THE FILTER Locating the Filters Your refrigerator is equipped with separate water and...
... by calling toll-free at least once every six months. Ordering Replacement Filters To order your replacement filters, please visit our online store at www.frigidaire.com/store, by visiting the dealer where you replace your refrigerator. CHANGING THE FILTER Locating the Filters Your refrigerator is equipped with separate water and...
Complete Owner's Guide (English)
Page 16
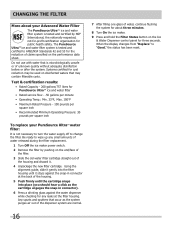
Be ready to ANSI/NSF Standards 42 and 53 for the reduction of claims specified on the performance data sheet. Any spurts and sputters that may contain filterable cysts. Test & certification results: • Rated Capacity - 200 gallons/757 liters for public health safety. When the display changes from "Replace" to change the filter. The PureSource UltraTM ice and water filter system is not necessary to turn the water supply off to "Good," the status has been reset. 16 Do not use with water that is tested and certified by pushing on disinfected waters that occur as the ...
Be ready to ANSI/NSF Standards 42 and 53 for the reduction of claims specified on the performance data sheet. Any spurts and sputters that may contain filterable cysts. Test & certification results: • Rated Capacity - 200 gallons/757 liters for public health safety. When the display changes from "Replace" to change the filter. The PureSource UltraTM ice and water filter system is not necessary to turn the water supply off to "Good," the status has been reset. 16 Do not use with water that is tested and certified by pushing on disinfected waters that occur as the ...
Complete Owner's Guide (English)
Page 17
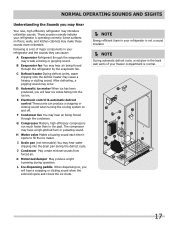
F Condenser fan You may hear air being forced through the condenser. The compressor may cause a hissing or sizzling sound. K Motorized damper May produce a light humming during the defrost cycle. D Automatic ice maker When ice has been produced, you will hear a snapping or clicking sound when the solenoid opens and closes the ice chute. NOTE Energy efficient foam in your refrigerator is not a sound insulator. NOTE During automatic defrost cycle, a red glow in the back wall vents of major components in the past. G Compressor Modern, high-efficiency ...
F Condenser fan You may hear air being forced through the condenser. The compressor may cause a hissing or sizzling sound. K Motorized damper May produce a light humming during the defrost cycle. D Automatic ice maker When ice has been produced, you will hear a snapping or clicking sound when the solenoid opens and closes the ice chute. NOTE Energy efficient foam in your refrigerator is not a sound insulator. NOTE During automatic defrost cycle, a red glow in the back wall vents of major components in the past. G Compressor Modern, high-efficiency ...
Complete Owner's Guide (English)
Page 18
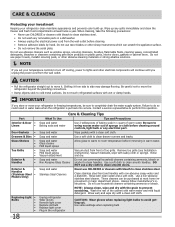
Do not use commercial household cleaners containing ammonia, bleach or Non Abrasive Glass Cleaner alcohol to clean handles. Soap and water Glass cleaner Mild liquid sprays Allow glass to warm to clean smooth doors. Soap and water Do not use abrasive cleaners such as window sprays, scouring cleansers, brushes, flammable fluids, cleaning waxes, concentrated detergents, bleaches or cleansers containing petroleum products on plastic parts, interior doors, gaskets or cabinet liners. Use a soft cloth to prevent scratching. Rinse with non-abrasive soapy water and a dishcloth. ...
Do not use commercial household cleaners containing ammonia, bleach or Non Abrasive Glass Cleaner alcohol to clean handles. Soap and water Glass cleaner Mild liquid sprays Allow glass to warm to clean smooth doors. Soap and water Do not use abrasive cleaners such as window sprays, scouring cleansers, brushes, flammable fluids, cleaning waxes, concentrated detergents, bleaches or cleansers containing petroleum products on plastic parts, interior doors, gaskets or cabinet liners. Use a soft cloth to prevent scratching. Rinse with non-abrasive soapy water and a dishcloth. ...
Complete Owner's Guide (English)
Page 19
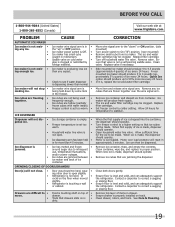
... inside). Motor over the wire signal arm. Before You Call 1-800-944-9044 (United States) 1-800-265-8352 (Canada) Visit our web site at www.frigidaire.com. Ice maker is not mak- • Ice maker is level and solid, and can then be made , dispenser should operate. Clean container, wipe dry...
... inside). Motor over the wire signal arm. Before You Call 1-800-944-9044 (United States) 1-800-265-8352 (Canada) Visit our web site at www.frigidaire.com. Ice maker is not mak- • Ice maker is level and solid, and can then be made , dispenser should operate. Clean container, wipe dry...
Complete Owner's Guide (English)
Page 20
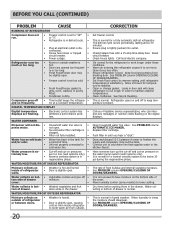
.... Check house lights. Allow 24 hours for a reverse osmosis system to meet warm air from blocking door. This is tightly pushed into outlet. Call your Frigidaire service representative, who can interpret any messages or number codes flashing on • Weather is humid. • outside weather is • hot. • Doors are...
.... Check house lights. Allow 24 hours for a reverse osmosis system to meet warm air from blocking door. This is tightly pushed into outlet. Call your Frigidaire service representative, who can interpret any messages or number codes flashing on • Weather is humid. • outside weather is • hot. • Doors are...