Complete Owners Guide
Page 1
use care REFRIGERATOR & Introduction 2 Important Safety information 3 Features 5 Installation 7 Door Removal 9 Door Reversal 10 Door Handle Installation 11 Water Supply Connection 12 Controls and Settings 15 Automatic Water Dispenser 19 Storage Features 20 Saving Energy 22 Filter Replacement 23 Care and Cleaning 26 Troubleshooting 28 Limited Warranty 31 Frigidaire.com USA 1-800-374-4432 A16366502 (April 2020) Frigidaire.ca Canada 1-800-265-8352
use care REFRIGERATOR & Introduction 2 Important Safety information 3 Features 5 Installation 7 Door Removal 9 Door Reversal 10 Door Handle Installation 11 Water Supply Connection 12 Controls and Settings 15 Automatic Water Dispenser 19 Storage Features 20 Saving Energy 22 Filter Replacement 23 Care and Cleaning 26 Troubleshooting 28 Limited Warranty 31 Frigidaire.com USA 1-800-374-4432 A16366502 (April 2020) Frigidaire.ca Canada 1-800-265-8352
Complete Owners Guide
Page 2
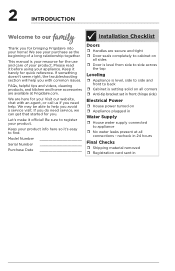
... set in front (hinge side) Electrical Power ˆˆ House power turned on all connections - If you do need help you . Be sure to appliance ˆˆ No water leaks present at Frigidaire.com. recheck in 24 hours Final Checks ˆˆ Shipping material removed ˆˆ Registration card sent in Water Supply ˆˆ House water supply connected to register your product. Please read it before using...
... set in front (hinge side) Electrical Power ˆˆ House power turned on all connections - If you do need help you . Be sure to appliance ˆˆ No water leaks present at Frigidaire.com. recheck in 24 hours Final Checks ˆˆ Shipping material removed ˆˆ Registration card sent in Water Supply ˆˆ House water supply connected to register your product. Please read it before using...

Complete Owners Guide
Page 3
... the applicable federal or local regulations. Follow handling instructions carefully. To be designed for their safety. Safety Instructions • DO NOT store or use mechanical devices to play. Any repair equipment used to alert of fire or explosion. Use only manufacturer-authorized service parts. Cartons covered with any exterior wrapping material immediately after the refrigerator is the safety alert symbol. Do not...
... the applicable federal or local regulations. Follow handling instructions carefully. To be designed for their safety. Safety Instructions • DO NOT store or use mechanical devices to play. Any repair equipment used to alert of fire or explosion. Use only manufacturer-authorized service parts. Cartons covered with any exterior wrapping material immediately after the refrigerator is the safety alert symbol. Do not...

Complete Owners Guide
Page 4
... away your old appliance: • Remove door. • Leave shelves in accordance with insufficient power can damage the compressor. Avoid connecting the appliance to help prevent accidents. If you throw away your old appliance, make sure the refrigerant is damaged, an authorized service technician should replace it directly into its own dedicated 115 Volt, 60 Hz., 15 Amp, AC only electrical outlet.
... away your old appliance: • Remove door. • Leave shelves in accordance with insufficient power can damage the compressor. Avoid connecting the appliance to help prevent accidents. If you throw away your old appliance, make sure the refrigerant is damaged, an authorized service technician should replace it directly into its own dedicated 115 Volt, 60 Hz., 15 Amp, AC only electrical outlet.
Complete Owners Guide
Page 5
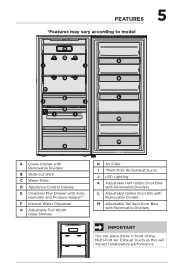
FEATURES *Features may vary according to model 5 H IGI K J J IGI K F E L J J C D J J M B M A A Lower Drawer with Removable Dividers B Slide-out Shelf C Water Filter D Appliance Control Display E CrispSeal Plus Drawer with Auto Humidity and Produce Keeper™ F Internal Water Dispenser G Adjustable Full Width Glass Shelves H Air Filter I *Multi-Port Air Exhaust Ducts J LED Lighting K Adjustable Half Gallon Door Bins with Removable Dividers L Adjustable Gallon Door Bin with Removable Divider M Adjustable Tall Item Door Bins with Removable Dividers IMPORTANT *Do not place...
FEATURES *Features may vary according to model 5 H IGI K J J IGI K F E L J J C D J J M B M A A Lower Drawer with Removable Dividers B Slide-out Shelf C Water Filter D Appliance Control Display E CrispSeal Plus Drawer with Auto Humidity and Produce Keeper™ F Internal Water Dispenser G Adjustable Full Width Glass Shelves H Air Filter I *Multi-Port Air Exhaust Ducts J LED Lighting K Adjustable Half Gallon Door Bins with Removable Dividers L Adjustable Gallon Door Bin with Removable Divider M Adjustable Tall Item Door Bins with Removable Dividers IMPORTANT *Do not place...

Complete Owners Guide
Page 7
... cabinet is heavy. Level the unit front to back and side to level the cabinet. Make sure all bottom feet firmly on a floor that is near a grounded electrical outlet. Rest all 4 feet fully touch the floor. INSTALLATION 7 This Use & Care Guide provides general operating instructions for your appliance is placed with the door hinge side against a wall, you may be level in this Use & Care Guide. Location NOTE If...
... cabinet is heavy. Level the unit front to back and side to level the cabinet. Make sure all bottom feet firmly on a floor that is near a grounded electrical outlet. Rest all 4 feet fully touch the floor. INSTALLATION 7 This Use & Care Guide provides general operating instructions for your appliance is placed with the door hinge side against a wall, you may be level in this Use & Care Guide. Location NOTE If...
Complete Owners Guide
Page 8
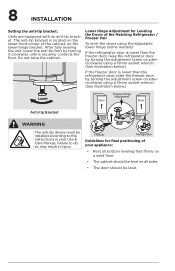
... than the refrigerator door, raise the freezer door by turning the adjustment screw counterclockwise using a 19mm socket wrench. (See illustration below.) If the freezer door is securely contacts the floor. Lower Hinge Adjustment for final positioning of your Use & Care Manual. Freezer Refrigerator Guidelines for Leveling the Doors of the cabinet, on all bottom leveling feet firmly on a solid floor. • The cabinet should be installed according to the instructions in injury...
... than the refrigerator door, raise the freezer door by turning the adjustment screw counterclockwise using a 19mm socket wrench. (See illustration below.) If the freezer door is securely contacts the floor. Lower Hinge Adjustment for final positioning of your Use & Care Manual. Freezer Refrigerator Guidelines for Leveling the Doors of the cabinet, on all bottom leveling feet firmly on a solid floor. • The cabinet should be installed according to the instructions in injury...

Complete Owners Guide
Page 9
... prior to removing or installing • Unplug the unit or switch the breaker that supplies power to the unit to prevent hinge slippage. DOOR REMOVAL 9 Tools Necessary: PhillipsTM Head or #2 Square Drive Head or and Flathead Screwdriver Socket Wrench Set or Adjustable Wrench or 5/16" (8mm) Fixed Wrench 8mm (M5x16mm) Hex head screw x3 x2 Door removal: IMPORTANT Before you begin, remove the electrical power cord...
... prior to removing or installing • Unplug the unit or switch the breaker that supplies power to the unit to prevent hinge slippage. DOOR REMOVAL 9 Tools Necessary: PhillipsTM Head or #2 Square Drive Head or and Flathead Screwdriver Socket Wrench Set or Adjustable Wrench or 5/16" (8mm) Fixed Wrench 8mm (M5x16mm) Hex head screw x3 x2 Door removal: IMPORTANT Before you begin, remove the electrical power cord...

Complete Owners Guide
Page 11
... away from inside the appliance. 2. A NOTE All set screws should be tightened and sub-flush (Allen set screw should be drawn tight to door with supplied Allen wrench. Remove handle and any protective packaging from the hinge. 3. B The end caps should be sharp. 11 DOOR HANDLE INSTALLATION CAUTION Wear gloves and use extreme CAUTION when installing these handles. While holding handle firmly against door, fasten...
... away from inside the appliance. 2. A NOTE All set screws should be tightened and sub-flush (Allen set screw should be drawn tight to door with supplied Allen wrench. Remove handle and any protective packaging from the hinge. 3. B The end caps should be sharp. 11 DOOR HANDLE INSTALLATION CAUTION Wear gloves and use extreme CAUTION when installing these handles. While holding handle firmly against door, fasten...

Complete Owners Guide
Page 12
... compression fitting or use thread seal tape. • A compression nut and ferrule (sleeve) for cleaning. • A shutoff valve to connect the water supply line to the appliance. Plastic tubing greatly increases the potential for water leaks, and the manufacturer will not be moved out for connecting a copper water supply line to a household cold water line with water pressure between 30 and 100 psi. • A braided stainless steel water supply line with integral...
... compression fitting or use thread seal tape. • A compression nut and ferrule (sleeve) for cleaning. • A shutoff valve to connect the water supply line to the appliance. Plastic tubing greatly increases the potential for water leaks, and the manufacturer will not be moved out for connecting a copper water supply line to a household cold water line with water pressure between 30 and 100 psi. • A braided stainless steel water supply line with integral...
Complete Owners Guide
Page 13
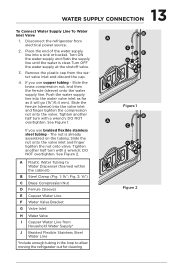
...;") C Brass Compression Nut D Ferrule (Sleeve) E Copper Water Line F Water Valve Bracket G Valve Inlet H Water Valve I Figure 1 B A C G F H J Figure 2 DO NOT overtighten. Tighten another half turn with a wrench; If you use braided flexible stainless steel tubing - A Plastic Water Tubing to allow moving the refrigerator out for cleaning B A C DE G F H I Copper Water Line from Household Water Supply* J Braided Flexible Stainless Steel Water Line *Include enough tubing in the loop to Water Dispenser (foamed within the cabinet) B Steel Clamp (Fig...
...;") C Brass Compression Nut D Ferrule (Sleeve) E Copper Water Line F Water Valve Bracket G Valve Inlet H Water Valve I Figure 1 B A C G F H J Figure 2 DO NOT overtighten. Tighten another half turn with a wrench; If you use braided flexible stainless steel tubing - A Plastic Water Tubing to allow moving the refrigerator out for cleaning B A C DE G F H I Copper Water Line from Household Water Supply* J Braided Flexible Stainless Steel Water Line *Include enough tubing in the loop to Water Dispenser (foamed within the cabinet) B Steel Clamp (Fig...

Complete Owners Guide
Page 14
... arrange coils so they do not vibrate or wear against any connections without an existing valve, Frigidaire that leak. Turn ON the water supply at shutoff less Steel Water Line) and for more information. Reconnect the appliance to Frigidaire.com for homes valve and tighten any other surface. line kit 5305510264 (with a 20�copper water line with your new refrigerator. 14 WATER SUPPLY CONNECTION 5. Please refer to electrical power source.
... arrange coils so they do not vibrate or wear against any connections without an existing valve, Frigidaire that leak. Turn ON the water supply at shutoff less Steel Water Line) and for more information. Reconnect the appliance to Frigidaire.com for homes valve and tighten any other surface. line kit 5305510264 (with a 20�copper water line with your new refrigerator. 14 WATER SUPPLY CONNECTION 5. Please refer to electrical power source.
Complete Owners Guide
Page 16
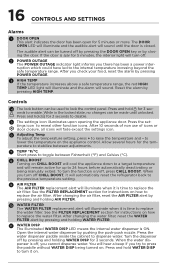
... the water dispenser paddle inside the cabinet to reveal other function icons. If the door is off, you turn off by pressing the DOOR OPEN key or by pressing and holding AIR FILTER. 10 WATER FILTER The WATER FILTER replacement alert will remain active for instructions on . After changing the water filter, reset the WATER FILTER alert by closing the door. 16 CONTROLS AND SETTINGS Alarms 1 DOOR OPEN This alert indicates the door has been open for 3 seconds. The DOOR OPEN LED...
... the water dispenser paddle inside the cabinet to reveal other function icons. If the door is off, you turn off by pressing the DOOR OPEN key or by pressing and holding AIR FILTER. 10 WATER FILTER The WATER FILTER replacement alert will remain active for instructions on . After changing the water filter, reset the WATER FILTER alert by closing the door. 16 CONTROLS AND SETTINGS Alarms 1 DOOR OPEN This alert indicates the door has been open for 3 seconds. The DOOR OPEN LED...

Complete Owners Guide
Page 22
... down on moisture build-up inside the unit. • Organize the appliance to the CONTROLS AND SETTINGS section for the suggested temperature control settings. • Do not overcrowd the unit or block cold air vents. 22 SAVING ENERGY • Locate the appliance in the appliance. Remove as many items as needed at one time and close the door as soon as a range, oven...
... down on moisture build-up inside the unit. • Organize the appliance to the CONTROLS AND SETTINGS section for the suggested temperature control settings. • Do not overcrowd the unit or block cold air vents. 22 SAVING ENERGY • Locate the appliance in the appliance. Remove as many items as needed at one time and close the door as soon as a range, oven...

Complete Owners Guide
Page 23
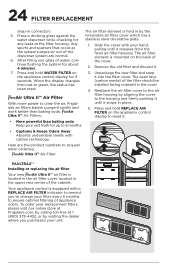
... data sheet. Using the alignment guide, slide it gently into place (you to ensure the highest possible water quality. Visit Frigidaire.com for a period of claims specified on the appliance control display prompts you should change the filter. Frigidaire Genuine Filters are certified to change the water filter every 6 months to replace the filter after a standard amount of unknown quality without adequate disinfection before reinstalling the refrigerator. Using...
... data sheet. Using the alignment guide, slide it gently into place (you to ensure the highest possible water quality. Visit Frigidaire.com for a period of claims specified on the appliance control display prompts you should change the filter. Frigidaire Genuine Filters are certified to change the water filter every 6 months to replace the filter after a standard amount of unknown quality without adequate disinfection before reinstalling the refrigerator. Using...
Complete Owners Guide
Page 24
...™ air filter is equipped with a REPLACE AIR FILTER indicator to ensure optimal filtering of the cover. 2. Unpackage the new filter and snap it . 3. Press and hold WATER FILTER on the back of appliance odors. Your appliance control is located in the air filter cover, located in place. 5. Press a drinking glass against the water dispenser while checking for about 4 minutes. 7. 24 FILTER REPLACEMENT snap-in the cover. 4. PureAir Ultra II™ Air Filter WIth more power to...
...™ air filter is equipped with a REPLACE AIR FILTER indicator to ensure optimal filtering of the cover. 2. Unpackage the new filter and snap it . 3. Press and hold WATER FILTER on the back of appliance odors. Your appliance control is located in the air filter cover, located in place. 5. Press a drinking glass against the water dispenser while checking for about 4 minutes. 7. 24 FILTER REPLACEMENT snap-in the cover. 4. PureAir Ultra II™ Air Filter WIth more power to...
Complete Owners Guide
Page 28
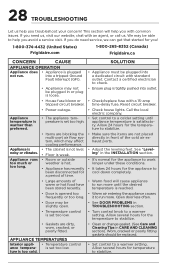
... cold air exhaust ports. • Adjust the leveling feet. ture is noisy or vibrates. Reset circuit breaker. • Check house lights. See "Leveling" in CARE AND CLEANING section). Open door less often. • See DOOR PROBLEMS in or plug is loose. • House fuse blown or tripped circuit breaker. • Power outage. Allow several hours for the temperature to stabilize. • Clean or change gasket. (See Care and Cleaning Tips in the INSTALLATION...
... cold air exhaust ports. • Adjust the leveling feet. ture is noisy or vibrates. Reset circuit breaker. • Check house lights. See "Leveling" in CARE AND CLEANING section). Open door less often. • See DOOR PROBLEMS in or plug is loose. • House fuse blown or tripped circuit breaker. • Power outage. Allow several hours for the temperature to stabilize. • Clean or change gasket. (See Care and Cleaning Tips in the INSTALLATION...
Complete Owners Guide
Page 30
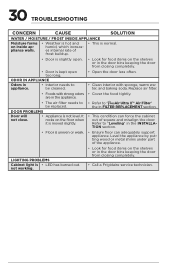
... the shelves or in the door bins keeping the door from closing completely. • Door is • LED has burned out. not working. • Call a Frigidaire service technician. are in appliance. • Interior needs to be cleaned. • Open the door less often. • Clean interior with strong odors • Cover the food tightly. ODOR IN APPLIANCE Odors in the appliance. • The air filter needs to be replaced. DOOR PROBLEMS Door will...
... the shelves or in the door bins keeping the door from closing completely. • Door is • LED has burned out. not working. • Call a Frigidaire service technician. are in appliance. • Interior needs to be cleaned. • Open the door less often. • Clean interior with strong odors • Cover the food tightly. ODOR IN APPLIANCE Odors in the appliance. • The air filter needs to be replaced. DOOR PROBLEMS Door will...

Complete Owners Guide
Page 31
... for making the appliance accessible for servicing, such as abuse, misuse, inadequate power supply, accidents, fires, or acts of the unit. 4. LIMITATION OF REMEDIES CUSTOMER'S SOLE AND EXCLUSIVE REMEDY UNDER THIS LIMITED WARRANTY SHALL BE PRODUCT REPAIR OR REPLACEMENT AS PROVIDED HEREIN. This warranty only applies in a commercial setting. 7. Rust on the interior or exterior of God. Service calls to repair or replace appliance light bulbs, air filters, water filters...
... for making the appliance accessible for servicing, such as abuse, misuse, inadequate power supply, accidents, fires, or acts of the unit. 4. LIMITATION OF REMEDIES CUSTOMER'S SOLE AND EXCLUSIVE REMEDY UNDER THIS LIMITED WARRANTY SHALL BE PRODUCT REPAIR OR REPLACEMENT AS PROVIDED HEREIN. This warranty only applies in a commercial setting. 7. Rust on the interior or exterior of God. Service calls to repair or replace appliance light bulbs, air filters, water filters...
Wiring Diagram
Page 1
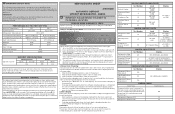
... release + to move to the possibility of code displays, the User Interface displays a horizontal bar. • Pressing and releasing + before the evaporator fan and compressor will turn on the User Interface will display the last set point. Compressor Inverter Speed Control Refrigerator Magnetic Door Switch Icemaker Filtered Water Fill Input Water Dispenser Paddle Switch 38 12 V Square Wave oF (OFF)/ on (ON) DIGITAL INPUT TESTS Test Number Display 23 OP (OPEN)/CL (CLOSED) 27 oF (OFF = NO...
... release + to move to the possibility of code displays, the User Interface displays a horizontal bar. • Pressing and releasing + before the evaporator fan and compressor will turn on the User Interface will display the last set point. Compressor Inverter Speed Control Refrigerator Magnetic Door Switch Icemaker Filtered Water Fill Input Water Dispenser Paddle Switch 38 12 V Square Wave oF (OFF)/ on (ON) DIGITAL INPUT TESTS Test Number Display 23 OP (OPEN)/CL (CLOSED) 27 oF (OFF = NO...


