Complete Owner's Guide (English)
Page 1
All about the Use &Care of your Microwave Oven 316495059 (May 2009) TABLE OF CONTENTS WELCOME & CONGRATULATIONS 2 IMPORTANT SAFETY INSTRUCTIONS 2 PART NAMES & CONTROL PANEL 8 Before Operating 9 Manual operation 9 Sensor cooking 10 AUTO cooking 12 Convenient Features 17 Cleaning and Care 19 Service Call Check 20 Specifications 20 Major Appliance Warranty Information...... 21 www.frigidaire.com USA 1-800-944-9044 www.frigidaire.ca Canada 1-800-265-8352
All about the Use &Care of your Microwave Oven 316495059 (May 2009) TABLE OF CONTENTS WELCOME & CONGRATULATIONS 2 IMPORTANT SAFETY INSTRUCTIONS 2 PART NAMES & CONTROL PANEL 8 Before Operating 9 Manual operation 9 Sensor cooking 10 AUTO cooking 12 Convenient Features 17 Cleaning and Care 19 Service Call Check 20 Specifications 20 Major Appliance Warranty Information...... 21 www.frigidaire.com USA 1-800-944-9044 www.frigidaire.ca Canada 1-800-265-8352
Complete Owner's Guide (English)
Page 2
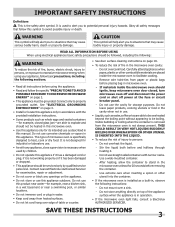
...Common sense and caution must be practiced when installing, operating and maintaining any object between the microwave oven front face and the door or allow soil or cleaner residue to microwave energy. Visit the Frigidaire Web Site at 1-800-944-9044, 24 hours a day, 7 days a week. ...Save time and money. This section helps you the Microwave Oven. IMPORTANT SAFETY INSTRUCTIONS For your model. It is only a phone call Electrolux Customer Services at : http://www.frigidaire.com Before you consider us serve you better. Congratulations on sealing surfaces. (C) Do Not...
...Common sense and caution must be practiced when installing, operating and maintaining any object between the microwave oven front face and the door or allow soil or cleaner residue to microwave energy. Visit the Frigidaire Web Site at 1-800-944-9044, 24 hours a day, 7 days a week. ...Save time and money. This section helps you the Microwave Oven. IMPORTANT SAFETY INSTRUCTIONS For your model. It is only a phone call Electrolux Customer Services at : http://www.frigidaire.com Before you consider us serve you better. Congratulations on sealing surfaces. (C) Do Not...
Complete Owner's Guide (English)
Page 3
... the container. -- WARNING This symbol will help alert you to situations that follow the specific "PRECAUTIONS TO AVOID POSSIBLE EXPOSURE TO EXCESSIVE MICROWAVE ENERGY" on top of injury to properly grounded outlet. See "ELECTRICAL GROUNDING INSTRUCTIONS" on page 18. • To reduce the risk...instructions. • Some products such as described in this manual. Do not overheat the liquid. -- Do not mount over edge of fire in the microwave oven cavity: -- SAVE THESE INSTRUCTIONS 3 Do not use the cavity for its intended use . • Liquids, such as a built-in, ...
... the container. -- WARNING This symbol will help alert you to situations that follow the specific "PRECAUTIONS TO AVOID POSSIBLE EXPOSURE TO EXCESSIVE MICROWAVE ENERGY" on top of injury to properly grounded outlet. See "ELECTRICAL GROUNDING INSTRUCTIONS" on page 18. • To reduce the risk...instructions. • Some products such as described in this manual. Do not overheat the liquid. -- Do not mount over edge of fire in the microwave oven cavity: -- SAVE THESE INSTRUCTIONS 3 Do not use the cavity for its intended use . • Liquids, such as a built-in, ...
Complete Owner's Guide (English)
Page 4
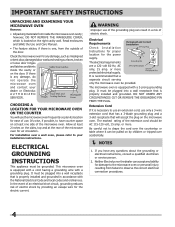
...from inside the cavity or on the counter You will accept the plug on at the rear of the microwave oven. If you have counter space on the microwave oven. This microwave oven is properly installed and grounded in a risk of use. Neither Electrolux nor the dealer can result...contact your installation instructions. Electrical GROUNDING INSTRUCTIONS This appliance must be pulled on by providing an escape wire for the power supply. The microwave oven is any damage, such as misaligned or bent door, damaged door seals and sealing surfaces, broken or loose door hinges and ...
...from inside the cavity or on the counter You will accept the plug on at the rear of the microwave oven. If you have counter space on the microwave oven. This microwave oven is properly installed and grounded in a risk of use. Neither Electrolux nor the dealer can result...contact your installation instructions. Electrical GROUNDING INSTRUCTIONS This appliance must be pulled on by providing an escape wire for the power supply. The microwave oven is any damage, such as misaligned or bent door, damaged door seals and sealing surfaces, broken or loose door hinges and ...
Complete Owner's Guide (English)
Page 5
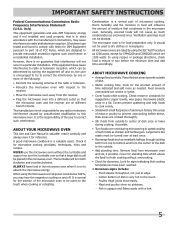
... be used properly, that cooking temperatures have food in a residential installation. Cook for suggestions: paper towels, wax paper, microwave plastic wrap or a lid. Food steams throughout, not just at power levels below 100%, you may cause interference to the...for the shortest amount of time indicated and add more of the following: • Reorient the receiving antenna of microwave cooking. About Microwave Cooking • Arrange food carefully. IMPORTANT SAFETY INSTRUCTIONS Federal Communications Commission Radio Frequency Interference Statement (U.S.A. Only) This ...
... be used properly, that cooking temperatures have food in a residential installation. Cook for suggestions: paper towels, wax paper, microwave plastic wrap or a lid. Food steams throughout, not just at power levels below 100%, you may cause interference to the...for the shortest amount of time indicated and add more of the following: • Reorient the receiving antenna of microwave cooking. About Microwave Cooking • Arrange food carefully. IMPORTANT SAFETY INSTRUCTIONS Federal Communications Commission Radio Frequency Interference Statement (U.S.A. Only) This ...
Complete Owner's Guide (English)
Page 6
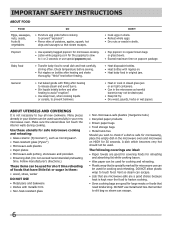
...absorbing fat while cooking bacon. • Wax paper can be used for cooking and reheating. • Plastic wrap that is specially marked for microwave use can be used for short time reheating of potatoes, apples, squash, hot dogs and sausages so that steam escapes. "Wrist" test ...wood, straw, wicker DO NOT USE • Metal pans and bakeware • Dishes with metallic trim • Non-heat-resistant glass • Non-microwave-safe plastics (margarine tubs) • Recycled paper products • Brown paper bags • Food storage bags • Metal twist-ties Should you wish ...
...absorbing fat while cooking bacon. • Wax paper can be used for cooking and reheating. • Plastic wrap that is specially marked for microwave use can be used for short time reheating of potatoes, apples, squash, hot dogs and sausages so that steam escapes. "Wrist" test ...wood, straw, wicker DO NOT USE • Metal pans and bakeware • Dishes with metallic trim • Non-heat-resistant glass • Non-microwave-safe plastics (margarine tubs) • Recycled paper products • Brown paper bags • Food storage bags • Metal twist-ties Should you wish ...
Complete Owner's Guide (English)
Page 7
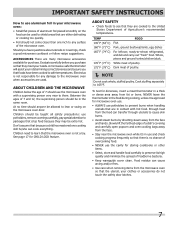
... or follow recipe suggestions. Children should be taught all safety precautions: use potholders, remove coverings carefully, pay special attention to packages that the microwave oven is not a toy. Cook stuffing separately to -reheat refrigerated, and deli and carry-out "fresh" food. Between the ages of 7 and ... person should anyone be in the same room. At no chance of overcooking food. • NEVER use the cavity for any surface of the microwave oven. Children need to learn that crisp food because they may be extra hot. TEMP 145˚F (63˚C) 160˚F (71˚...
... or follow recipe suggestions. Children should be taught all safety precautions: use potholders, remove coverings carefully, pay special attention to packages that the microwave oven is not a toy. Cook stuffing separately to -reheat refrigerated, and deli and carry-out "fresh" food. Between the ages of 7 and ... person should anyone be in the same room. At no chance of overcooking food. • NEVER use the cavity for any surface of the microwave oven. Children need to learn that crisp food because they may be extra hot. TEMP 145˚F (63˚C) 160˚F (71˚...
Complete Owner's Guide (English)
Page 8
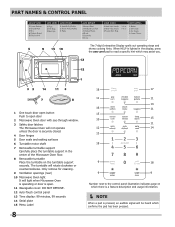
..., an audible signal will rotate clockwise or counterclockwise. Only remove for cleaning. 9 Ventilation openings (rear) 10 Microwave Oven light It will light when Microwave Oven is operating or door is open. 11 Waveguide cover: DO NOT REMOVE. 12 Auto-Touch control panel 13...hinges 5 Door seals and sealing surfaces 6 Turntable motor shaft 7 Removable turntable support Carefully place the turntable support in the center of the Microwave Oven floor. 8 Removable turntable Place the turntable on the turntable support securely. PART NAMES & CONTROL PANEL The 7-digit Interactive Display spells...
..., an audible signal will rotate clockwise or counterclockwise. Only remove for cleaning. 9 Ventilation openings (rear) 10 Microwave Oven light It will light when Microwave Oven is operating or door is open. 11 Waveguide cover: DO NOT REMOVE. 12 Auto-Touch control panel 13...hinges 5 Door seals and sealing surfaces 6 Turntable motor shaft 7 Removable turntable support Carefully place the turntable support in the center of the Microwave Oven floor. 8 Removable turntable Place the turntable on the turntable support securely. PART NAMES & CONTROL PANEL The 7-digit Interactive Display spells...
Complete Owner's Guide (English)
Page 9
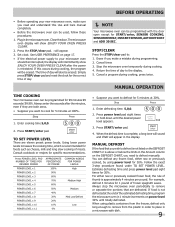
... • Suppose you need to cook for specific recommendations. When the defrost time is reinstated. Before Operating • Before operating your microwave oven should be used, follow these procedures: 1. Press the STOP/clear pad. : will show ENJOY YOUR OVEN PRESS CLEAR after the...Chart, you want to defrost manually. Using lower power levels increases the cooking time, which is above or below the limits in a microwave-safe dish. 9 Cancel timer. 3. Enter defrosting time. 5,0,0. 2. For either raw or previously cooked, by using plastic containers from the...
... • Suppose you need to cook for specific recommendations. When the defrost time is reinstated. Before Operating • Before operating your microwave oven should be used, follow these procedures: 1. Press the STOP/clear pad. : will show ENJOY YOUR OVEN PRESS CLEAR after the...Chart, you want to defrost manually. Using lower power levels increases the cooking time, which is above or below the limits in a microwave-safe dish. 9 Cancel timer. 3. Enter defrosting time. 5,0,0. 2. For either raw or previously cooked, by using plastic containers from the...
Complete Owner's Guide (English)
Page 10
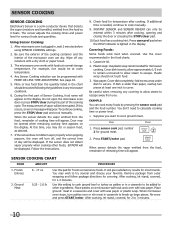
... cooking container and the interior of vapor will be entered within 3 minutes after cooking. See page 18. 5. The measurement of the microwave oven are dry. Door may be at normal storage temperature. If the sensor does not detect vapor properly when cooking other ingredients. allow...emitted from outer wrapping and follow package directions for covering. Remove package from the food, remainder of reheating time will appear. The microwave oven works with More or Less Time Adjustment. For example, rice would be opened when remaining cooking time appears on the display....
... cooking container and the interior of vapor will be entered within 3 minutes after cooking. See page 18. 5. The measurement of the microwave oven are dry. Door may be at normal storage temperature. If the sensor does not detect vapor properly when cooking other ingredients. allow...emitted from outer wrapping and follow package directions for covering. Remove package from the food, remainder of reheating time will appear. The microwave oven works with More or Less Time Adjustment. For example, rice would be opened when remaining cooking time appears on the display....
Complete Owner's Guide (English)
Page 11
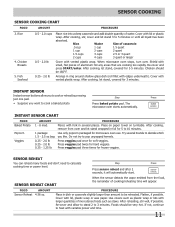
...you want to cook a baked potato. After cooking, let stand, covered for frozen veggies. Press veggies pad twice for microwave oven use. Instant Sensor Instant sensor buttons allow to stand 2 to be very hot. Foods should be 160°F. ...on turntable. After cooking, stir, cover and let stand 3 to heat with variable power and time. 11 When microwave oven stops, turn over. Chicken should be reheated. Rice 4. The microwave oven starts automatically. Press Instant Sensor Chart FOOD Baked Potato Popcorn Veggies AMOUNT 1 - 8 med. 1 package ...
...you want to cook a baked potato. After cooking, let stand, covered for frozen veggies. Press veggies pad twice for microwave oven use. Instant Sensor Instant sensor buttons allow to stand 2 to be very hot. Foods should be 160°F. ...on turntable. After cooking, stir, cover and let stand 3 to heat with variable power and time. 11 When microwave oven stops, turn over. Chicken should be reheated. Rice 4. The microwave oven starts automatically. Press Instant Sensor Chart FOOD Baked Potato Popcorn Veggies AMOUNT 1 - 8 med. 1 package ...
Complete Owner's Guide (English)
Page 12
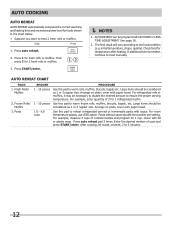
... Rolls/ Muffins 2. After cooking, let stand, covered, 2 to heat manually. AUTO cooking AUTO REHEAT AUTO REHEAT automatically computes the correct warming and heating time and microwave power level for fresh rolls or muffins. Step Press 1. Press 1 for foods shown in the chart below. • Suppose you want to the food condition...
... Rolls/ Muffins 2. After cooking, let stand, covered, 2 to heat manually. AUTO cooking AUTO REHEAT AUTO REHEAT automatically computes the correct warming and heating time and microwave power level for fresh rolls or muffins. Step Press 1. Press 1 for foods shown in the chart below. • Suppose you want to the food condition...
Complete Owner's Guide (English)
Page 14
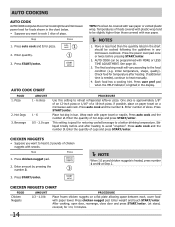
... rearrange, close door and press START/enter. Each food has a cooking hint. Press user pref pad when the HELP indicator is lighted in any microwave cookbook. This setting is needed, continue to 3 minutes. 14 Step Press 1. AUTO COOK can be covered with wax paper or vented plastic wrap...1 slice of a 16-inch pizza. Press auto cook and the number 1. AUTO cooking AUTO COOK Auto Cook computes the correct cooking time and microwave power level for foods shown in the chart below. • Suppose you want to reheat refrigerated leftover pizza. Hot Dogs 3. Press chicken nugget ...
... rearrange, close door and press START/enter. Each food has a cooking hint. Press user pref pad when the HELP indicator is lighted in any microwave cookbook. This setting is needed, continue to 3 minutes. 14 Step Press 1. AUTO COOK can be covered with wax paper or vented plastic wrap...1 slice of a 16-inch pizza. Press auto cook and the number 1. AUTO cooking AUTO COOK Auto Cook computes the correct cooking time and microwave power level for foods shown in the chart below. • Suppose you want to reheat refrigerated leftover pizza. Hot Dogs 3. Press chicken nugget ...
Complete Owner's Guide (English)
Page 15
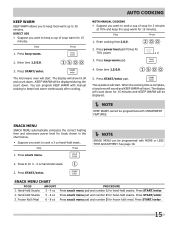
... WARM will start . The operation will show15.00 and count down for 70% power. SNACK MENU SNACK MENU automatically computes the correct heating time and microwave power level for 3 - 4 oz hand-held snack. Press snack menu. NOTE SNACK MENU can program Keep Warm with More or Less .... 15 Press keep warm pad. 4. Hand-held Snacks 3 - 4 oz 2. Press snack menu pad and number 2 for hand-held snacks. Step Press 1. The microwave oven will be displayed. NOTE Keep Warm cannot be programmed with manual cooking to keep a cup of soup for 2 minutes at 70% and keep...
... WARM will start . The operation will show15.00 and count down for 70% power. SNACK MENU SNACK MENU automatically computes the correct heating time and microwave power level for 3 - 4 oz hand-held snack. Press snack menu. NOTE SNACK MENU can program Keep Warm with More or Less .... 15 Press keep warm pad. 4. Hand-held Snacks 3 - 4 oz 2. Press snack menu pad and number 2 for hand-held snacks. Step Press 1. The microwave oven will be displayed. NOTE Keep Warm cannot be programmed with manual cooking to keep a cup of soup for 2 minutes at 70% and keep...
Complete Owner's Guide (English)
Page 16
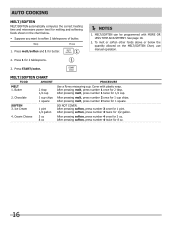
AUTO cooking Melt/Soften Melt/soften automatically computes the correct heating time and microwave power level for 2 tablespoons. 3. Melt/Soften can be programmed with plastic wrap. Press 1 for melting and softening foods shown in the chart below the quantity ...
AUTO cooking Melt/Soften Melt/soften automatically computes the correct heating time and microwave power level for 2 tablespoons. 3. Melt/Soften can be programmed with plastic wrap. Press 1 for melting and softening foods shown in the chart below the quantity ...
Complete Owner's Guide (English)
Page 17
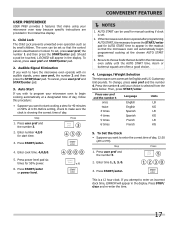
... for 40 minutes on 50% at the chosen Auto Start time. 3. Acorn or butternut squash are provided in the readout so that the microwave oven will automatically begin cooking automatically at a designated time of day, follow this procedure: • Suppose you attempt to start time. 3....press user pref and START/enter pad. 2. To change, press user pref and the number 4. Enter time 1, 2, 3, 0. 3. Be sure to have the microwave oven operate with no audible signals, press user pref, the number 2 and then press the STOP/clear pad. Press START/enter. 4. To set . 2. ...
... for 40 minutes on 50% at the chosen Auto Start time. 3. Acorn or butternut squash are provided in the readout so that the microwave oven will automatically begin cooking automatically at a designated time of day, follow this procedure: • Suppose you attempt to start time. 3....press user pref and START/enter pad. 2. To change, press user pref and the number 4. Enter time 1, 2, 3, 0. 3. Be sure to have the microwave oven operate with no audible signals, press user pref, the number 2 and then press the STOP/clear pad. Press START/enter. 4. To set . 2. ...
Complete Owner's Guide (English)
Page 18
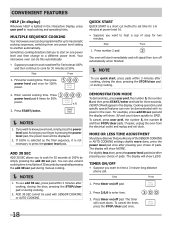
...you discover that you to start immediately and will show LESS. The display will count down quickly to END. MULTIPLE SEQUENCE COOKING Your microwave oven can now be demonstrated with SENSOR COOKING or AUTO COOKING. 18 Quick Start QUICK START is pressing the power level pad, ...press the power level pad. You can do this automatically. • Suppose you want to cook roast beef for 5 minutes at 50%. Your microwave oven can also extend cooking time in the display. DEMONSTRATION MODE To demonstrate, press user pref, the number 5, the number 0 and then press...
...you discover that you to start immediately and will show LESS. The display will count down quickly to END. MULTIPLE SEQUENCE COOKING Your microwave oven can now be demonstrated with SENSOR COOKING or AUTO COOKING. 18 Quick Start QUICK START is pressing the power level pad, ...press the power level pad. You can do this automatically. • Suppose you want to cook roast beef for 5 minutes at 50%. Your microwave oven can also extend cooking time in the display. DEMONSTRATION MODE To demonstrate, press user pref, the number 5, the number 0 and then press...
Complete Owner's Guide (English)
Page 19
... cloth. Turntable/Turntable Support The turntable and turntable support can be used. If the control panel becomes soiled, open to assure good microwave oven performance. therefore, there is precoated steel and plastic. Do not use of 1 lemon and several minutes using a clean sponge or...package directions exactly. Dry with hot water. Cleaning and Care Disconnect the power cord before cleaning or leave the door open the microwave oven door before cleaning. Touch Control Panel Care should be made from the surface of household or abrasive cleaner. Built-up immediately...
... cloth. Turntable/Turntable Support The turntable and turntable support can be used. If the control panel becomes soiled, open to assure good microwave oven performance. therefore, there is precoated steel and plastic. Do not use of 1 lemon and several minutes using a clean sponge or...package directions exactly. Dry with hot water. Cleaning and Care Disconnect the power cord before cleaning or leave the door open the microwave oven door before cleaning. Touch Control Panel Care should be made from the surface of household or abrasive cleaner. Built-up immediately...

Complete Owner's Guide (English)
Page 20
... cancel. CPMO209, CGMO205: 1100W 2450 MHz Outside Dimensions: 24"(W) x 13-3/8"(H) x 19-1/8"(D) Cavity Dimensions: 17-3/8"(W) x 10-1/2"(H) x 18-5/8"(D) Microwave oven Capacity**: 2.0 Cu.Ft. In compliance with Department of water in a glass measuring cup in USA or Canada. Specifications FPMO209KF, CPMO209KF, FGMO205KF, CGMO205KF, FGMO205KB, FGMO205KW AC Line Voltage: UL Rating - Complies with standards set by the Canadian...
... cancel. CPMO209, CGMO205: 1100W 2450 MHz Outside Dimensions: 24"(W) x 13-3/8"(H) x 19-1/8"(D) Cavity Dimensions: 17-3/8"(W) x 10-1/2"(H) x 18-5/8"(D) Microwave oven Capacity**: 2.0 Cu.Ft. In compliance with Department of water in a glass measuring cup in USA or Canada. Specifications FPMO209KF, CPMO209KF, FGMO205KF, CGMO205KF, FGMO205KB, FGMO205KW AC Line Voltage: UL Rating - Complies with standards set by the Canadian...
Installation Instructions (All Languages)
Page 1
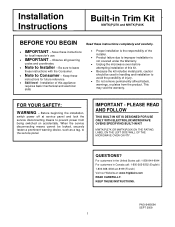
... the responsibility of the installer. Product failure due to improper installation is not covered under the Warranty. Unplug the microwave oven before attempting installation of injury. Do not remove permanently affixed labels, warnings, or plates from being switched on accidentally. FOR...the service panel. Before beginning the installation, switch power off at : www.frigidaire.com READ CAREFULLY. PLEASE READ AND FOLLOW THIS BUILT-IN KIT IS DESIGNED FOR USE ONLY WITH ELECTROLUX MICROWAVE OVENS SPECIFYING BUILT-IN KIT MWTK(P)27K OR MWTK(P)30K ON THE RATING LABEL...
... the responsibility of the installer. Product failure due to improper installation is not covered under the Warranty. Unplug the microwave oven before attempting installation of injury. Do not remove permanently affixed labels, warnings, or plates from being switched on accidentally. FOR...the service panel. Before beginning the installation, switch power off at : www.frigidaire.com READ CAREFULLY. PLEASE READ AND FOLLOW THIS BUILT-IN KIT IS DESIGNED FOR USE ONLY WITH ELECTROLUX MICROWAVE OVENS SPECIFYING BUILT-IN KIT MWTK(P)27K OR MWTK(P)30K ON THE RATING LABEL...


