Complete Owner's Guide (English)
Page 2
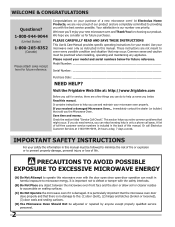
...to providing you solve common problems that there is included in harmful exposure to defeat or tamper with the best service possible. Visit the Frigidaire Web Site at 1-800-944-9044, 24 hours a day, 7 days a week. If you can result in the back of toll... (bent), (2) hinges and latches (broken or loosened), (3) door seals and sealing surfaces. (D) The Microwave Oven Should Not be practiced when installing, operating and maintaining any object between the microwave oven front face and the door or allow soil or cleaner residue to prevent property damage, personal injury or...
...to providing you solve common problems that there is included in harmful exposure to defeat or tamper with the best service possible. Visit the Frigidaire Web Site at 1-800-944-9044, 24 hours a day, 7 days a week. If you can result in the back of toll... (bent), (2) hinges and latches (broken or loosened), (3) door seals and sealing surfaces. (D) The Microwave Oven Should Not be practiced when installing, operating and maintaining any object between the microwave oven front face and the door or allow soil or cleaner residue to prevent property damage, personal injury or...
Complete Owner's Guide (English)
Page 3
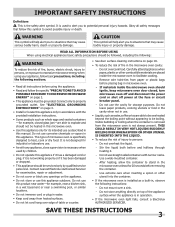
... Electrolux AUTHORIZED SERVICER. Carefully attend appliance when paper, plastic or other utensil into the container. • If the microwave oven is installed as whole eggs and sealed containers -for examination, repair or adjustment. • Do not cover or block any appliance...the following instructions: -- Do not overcook food. If materials inside the microwave oven to excessive microwave energy when using your appliance, follow this appliance. Do not use straight-sided containers with the provided installation instructions. • Some products such as a built-in water. ...
... Electrolux AUTHORIZED SERVICER. Carefully attend appliance when paper, plastic or other utensil into the container. • If the microwave oven is installed as whole eggs and sealed containers -for examination, repair or adjustment. • Do not cover or block any appliance...the following instructions: -- Do not overcook food. If materials inside the microwave oven to excessive microwave energy when using your appliance, follow this appliance. Do not use straight-sided containers with the provided installation instructions. • Some products such as a built-in water. ...
Complete Owner's Guide (English)
Page 4
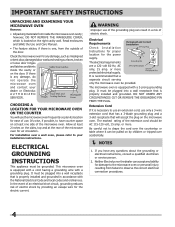
... least 2 inches on the sides, top and at least one , from the outside of the microwave oven for air circulation. It must be plugged into a wall receptacle that is properly installed and grounded in a risk of use. WARNING Improper use of the grounding plug can result in ... Waveguide Cover Choosing a Location for ease of electric shock. It must be provided. The marked rating of the microwave oven. or more protected electrical supply. Permanent and Correct Installation The electrical requirements are a 120 volt 60 Hz, AC only, 15 amp. Be careful not to drape the...
... least 2 inches on the sides, top and at least one , from the outside of the microwave oven for air circulation. It must be plugged into a wall receptacle that is properly installed and grounded in a risk of use. WARNING Improper use of the grounding plug can result in ... Waveguide Cover Choosing a Location for ease of electric shock. It must be provided. The marked rating of the microwave oven. or more protected electrical supply. Permanent and Correct Installation The electrical requirements are a 120 volt 60 Hz, AC only, 15 amp. Be careful not to drape the...
Complete Owner's Guide (English)
Page 5
...to finish cooking without the turntable and support nor turn both from top to bottom and from microwave oven and stir, if possible. Ventilation openings must be placed in a particular installation. Cover for reference. Poultry thigh joints move easily. -- Meat and poultry show no guarantee...) This equipment generates and uses ISM frequency energy and if not installed and used to radio or television reception, which allows the food to correct such interference. If this microwave oven. NEVER use the microwave oven without overcooking. • Check for the shortest amount of ...
...to finish cooking without the turntable and support nor turn both from top to bottom and from microwave oven and stir, if possible. Ventilation openings must be placed in a particular installation. Cover for reference. Poultry thigh joints move easily. -- Meat and poultry show no guarantee...) This equipment generates and uses ISM frequency energy and if not installed and used to radio or television reception, which allows the food to correct such interference. If this microwave oven. NEVER use the microwave oven without overcooking. • Check for the shortest amount of ...
Complete Owner's Guide (English)
Page 21
...appliance accessible for servicing, such as -is warranted by Electrolux Major Appliances North America, a division of appliance or home incurred during installation, including but not limited to repair or replace appliance light bulbs, air filters, water filters, other consumables, or knobs, handles... of this appliance that prove to establish the warranty period should Service service be defective in materials or workmanship when such appliance is installed, used, and maintained in a commercial setting. 7. Service calls which are subject to floors, cabinets, walls, etc. 13. Service...
...appliance accessible for servicing, such as -is warranted by Electrolux Major Appliances North America, a division of appliance or home incurred during installation, including but not limited to repair or replace appliance light bulbs, air filters, water filters, other consumables, or knobs, handles... of this appliance that prove to establish the warranty period should Service service be defective in materials or workmanship when such appliance is installed, used, and maintained in a commercial setting. 7. Service calls which are subject to floors, cabinets, walls, etc. 13. Service...
Installation Instructions (All Languages)
Page 1
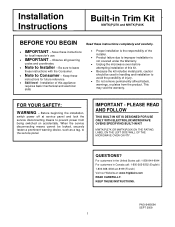
Save these instructions for local inspector's use. IMPORTANT - Before beginning the installation, switch power off at : www.frigidaire.com READ CAREFULLY. PLEASE READ AND FOLLOW THIS BUILT-IN KIT IS DESIGNED FOR USE ONLY WITH ELECTROLUX MICROWAVE OVENS SPECIFYING BUILT-IN KIT MWTK(P)27K OR MWTK(P)30K ON THE RATING LABEL ON THE...
Save these instructions for local inspector's use. IMPORTANT - Before beginning the installation, switch power off at : www.frigidaire.com READ CAREFULLY. PLEASE READ AND FOLLOW THIS BUILT-IN KIT IS DESIGNED FOR USE ONLY WITH ELECTROLUX MICROWAVE OVENS SPECIFYING BUILT-IN KIT MWTK(P)27K OR MWTK(P)30K ON THE RATING LABEL ON THE...
Installation Instructions (All Languages)
Page 2
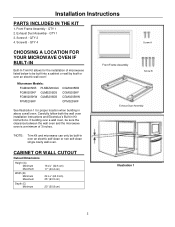
...itself or over an electric wall oven*. Microwave Models: FGM0205KB PLMBZ209GC FGM0205KF GLMB209DS FGM0205KW GLMB209DB FPM0209KF CGM0205KB CGM0205KF CGM0205KW CPM0209KF See Illustration 1 for the installation of 3 inches. Carefully follow both the wall oven installation instructions and Electrolux's Built-in Kit instructions....over an electric self-clean or non self-clean single cavity wall oven. Installation Instructions PARTS INCLUDED IN THE KIT 1. Screw B - QTY 4 Screw A CHOOSING A LOCATION FOR YOUR MICROWAVE OVEN IF BUILT-IN Built-In Trim Kit allows for proper location when ...
...itself or over an electric wall oven*. Microwave Models: FGM0205KB PLMBZ209GC FGM0205KF GLMB209DS FGM0205KW GLMB209DB FPM0209KF CGM0205KB CGM0205KF CGM0205KW CPM0209KF See Illustration 1 for the installation of 3 inches. Carefully follow both the wall oven installation instructions and Electrolux's Built-in Kit instructions....over an electric self-clean or non self-clean single cavity wall oven. Installation Instructions PARTS INCLUDED IN THE KIT 1. Screw B - QTY 4 Screw A CHOOSING A LOCATION FOR YOUR MICROWAVE OVEN IF BUILT-IN Built-In Trim Kit allows for proper location when ...
Installation Instructions (All Languages)
Page 3
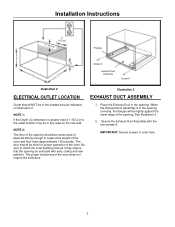
Installation Instructions Flanges Screw A Exhaust Dust Assembly Screw A Illustration 2 Illustration 3 ELECTRICAL OUTLET LOCATION EXHAUST DUCT ASSEMBLY Outlet should NOT be in the shaded area as it ...
Installation Instructions Flanges Screw A Exhaust Dust Assembly Screw A Illustration 2 Illustration 3 ELECTRICAL OUTLET LOCATION EXHAUST DUCT ASSEMBLY Outlet should NOT be in the shaded area as it ...
Installation Instructions (All Languages)
Page 4
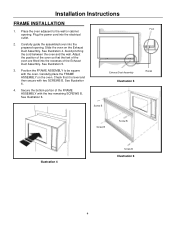
... on the Exhaust Duct Assembly. See Illustration 6. Slide the oven on the oven. See Illustration 6. 4. Avoid pinching the cord between the oven and the wall. Installation Instructions FRAME...
... on the Exhaust Duct Assembly. See Illustration 6. Slide the oven on the oven. See Illustration 6. 4. Avoid pinching the cord between the oven and the wall. Installation Instructions FRAME...

Product Specifications Sheet (English)
Page 2
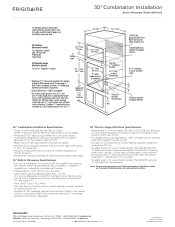
...Frigidaire® Electric Single Wall Oven and /or Warmer Drawer. (Refer to top edge of cabinet square for detailed instructions Optional Accessories • 30" Stainless Steel Trim Kit - (PN # MWTK30KF). • 27" Stainless Steel Trim Kit - (PN # MWTK27KF). Professional and Gallery Microwave FPMO209K F Built-In Microwave...approved to be used in combination with another Frigidaire® built-in product, a minimum clearance of 2-7/8" required from bottom of Built-In Microwave cutout to model-specific Combination Installation Specification pages on adequately wired 120V, dedicated ...
...Frigidaire® Electric Single Wall Oven and /or Warmer Drawer. (Refer to top edge of cabinet square for detailed instructions Optional Accessories • 30" Stainless Steel Trim Kit - (PN # MWTK30KF). • 27" Stainless Steel Trim Kit - (PN # MWTK27KF). Professional and Gallery Microwave FPMO209K F Built-In Microwave...approved to be used in combination with another Frigidaire® built-in product, a minimum clearance of 2-7/8" required from bottom of Built-In Microwave cutout to model-specific Combination Installation Specification pages on adequately wired 120V, dedicated ...
Product Specifications Sheet (English)
Page 3
...wide wood shim of Wall Oven's faceplate, leaving a 2" visible gap between both sides of opening at frigidaire.com for proper combination installation, to ensure that each side of line. • For detailed electrical requirements, refer to model-specific product page ...ON L5V 3E4 • 1-800-265-8352 • frigidaire.ca MOSS_EW 30INST FR 09/09 © 2009 Electrolux Home Products, Inc. High Bottom Trim available. 30" Combination Installation Built-In Microwave / Single Wall Oven 30" Combination Installation Specifications • Always consult local and national electric codes....
...wide wood shim of Wall Oven's faceplate, leaving a 2" visible gap between both sides of opening at frigidaire.com for proper combination installation, to ensure that each side of line. • For detailed electrical requirements, refer to model-specific product page ...ON L5V 3E4 • 1-800-265-8352 • frigidaire.ca MOSS_EW 30INST FR 09/09 © 2009 Electrolux Home Products, Inc. High Bottom Trim available. 30" Combination Installation Built-In Microwave / Single Wall Oven 30" Combination Installation Specifications • Always consult local and national electric codes....
Product Specifications Sheet (English)
Page 4
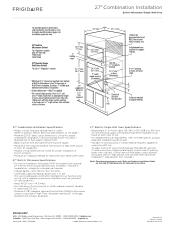
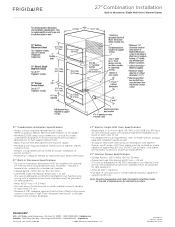
...; 5855 Terry Fox Way • Mississauga, ON L5V 3E4 • 1-800-265-8352 • frigidaire.ca MOSS_EW 27INST FR 09/09 © 2009 Electrolux Home Products, Inc. 27" Combination Installation Built-In Microwave / Single Wall Oven 27" Combination Installation Specifications • Always consult local and national electric codes. (Refer to product-specific electrical specifications...
...; 5855 Terry Fox Way • Mississauga, ON L5V 3E4 • 1-800-265-8352 • frigidaire.ca MOSS_EW 27INST FR 09/09 © 2009 Electrolux Home Products, Inc. 27" Combination Installation Built-In Microwave / Single Wall Oven 27" Combination Installation Specifications • Always consult local and national electric codes. (Refer to product-specific electrical specifications...

Product Specifications Sheet (English)
Page 5
...Oven door depth when open. 30" Built-In Microwave Specifications • For built-in installation, microwave MUST be installed with Warmer Drawer, two 3"-wide x 3/4"-thick planks must be installed as a base, capable of supporting 200 Lbs. FRIGIDAIRE® USA • 250 Bobby Jones Expressway ...3E4 • 1-800-265-8352 • frigidaire.ca MOSS_EW_WD 30INST FR 09/09 © 2009 Electrolux Home Products, Inc. 30" Combination Installation Built-In Microwave / Single Wall Oven / Warmer Drawer 30" Combination Installation Specifications • Always consult local and national ...
...Oven door depth when open. 30" Built-In Microwave Specifications • For built-in installation, microwave MUST be installed with Warmer Drawer, two 3"-wide x 3/4"-thick planks must be installed as a base, capable of supporting 200 Lbs. FRIGIDAIRE® USA • 250 Bobby Jones Expressway ...3E4 • 1-800-265-8352 • frigidaire.ca MOSS_EW_WD 30INST FR 09/09 © 2009 Electrolux Home Products, Inc. 30" Combination Installation Built-In Microwave / Single Wall Oven / Warmer Drawer 30" Combination Installation Specifications • Always consult local and national ...
Product Specifications Sheet (English)
Page 6
...Warmer Drawer, two 3"-wide x 3/4"-thick planks must be installed as noted for proper installation of supporting 100 Lbs. FRIGIDAIRE® USA • 250 Bobby Jones Expressway • Martinez, GA 30907 • 1-800-FRIGIDAIRE • frigidaire.com CANADA • 5855 Terry Fox Way • ...• Minimum 21" clearance needed for Wall Oven door depth when open. 27" Built-In Microwave Specifications • For built-in installation, microwave MUST be installed with ground required on separate circuit fused on both product faceplates. 27" Electric Single Wall Oven Specifications...
...Warmer Drawer, two 3"-wide x 3/4"-thick planks must be installed as noted for proper installation of supporting 100 Lbs. FRIGIDAIRE® USA • 250 Bobby Jones Expressway • Martinez, GA 30907 • 1-800-FRIGIDAIRE • frigidaire.com CANADA • 5855 Terry Fox Way • ...• Minimum 21" clearance needed for Wall Oven door depth when open. 27" Built-In Microwave Specifications • For built-in installation, microwave MUST be installed with ground required on separate circuit fused on both product faceplates. 27" Electric Single Wall Oven Specifications...


