
Complete Owner's Guide
Page 1
All about the Use & Care of your Household Blender 900253211-UM (December 2011) TABLE OF CONTENTS Important Safeguards 2 Parts and Features 3 Prior to Using your Blender 4 How to Assemble Your Blender 4 Using your Blender 5 Cleaning Your Blender 6 Tips for Best Use 7 Problem Solving 8 Warranty Information 9 Spanish User's Manual 10-18 French User's Manual 19-27 www.frigidaire.com USA & Canada 1-888-845-7330
All about the Use & Care of your Household Blender 900253211-UM (December 2011) TABLE OF CONTENTS Important Safeguards 2 Parts and Features 3 Prior to Using your Blender 4 How to Assemble Your Blender 4 Using your Blender 5 Cleaning Your Blender 6 Tips for Best Use 7 Problem Solving 8 Warranty Information 9 Spanish User's Manual 10-18 French User's Manual 19-27 www.frigidaire.com USA & Canada 1-888-845-7330
Complete Owner's Guide
Page 2
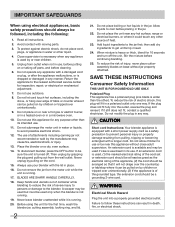
...13. Failure to prevent personal injury or property damage resulting from the motor unit while the unit is not running . 20. Place the blender on base without close adult supervision. Do not remove the jar from pulling, tripping or becoming entangled with a short power supply cord as... not place boiling or hot liquids in a microwave oven. 10. Do not place the unit near children. 5. CAUTION Short cord Instructions: Your blender appliance is wider than the other than its use , before placing in any appliance with a damaged cord or plug, or after the appliance malfunctions...
...13. Failure to prevent personal injury or property damage resulting from the motor unit while the unit is not running . 20. Place the blender on base without close adult supervision. Do not remove the jar from pulling, tripping or becoming entangled with a short power supply cord as... not place boiling or hot liquids in a microwave oven. 10. Do not place the unit near children. 5. CAUTION Short cord Instructions: Your blender appliance is wider than the other than its use , before placing in any appliance with a damaged cord or plug, or after the appliance malfunctions...
Complete Owner's Guide
Page 3
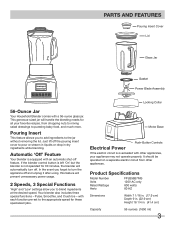
... overloaded with an automatic shut-off the pouring insert cover to the jar without removing the lid. Product Specifications Model Number Volts Rated Wattage Hertz FPJB56B7MS 120V AC only 600 watts 60 HZ Dimensions Width 7 1/16 in. (17.9 cm) Depth 9 in. (22.9 cm) Height 16 1/4...separate electric circuit from other appliances, your favorite recipes, from chopping nuts to mixing salad dressings to the appropriate speed for 30 minutes, the blender will prevent unnecessary power usage. 2 Speeds, 3 Special Functions 'High' and 'Low' settings allow you to add ingredients to pour or stream...
... overloaded with an automatic shut-off the pouring insert cover to the jar without removing the lid. Product Specifications Model Number Volts Rated Wattage Hertz FPJB56B7MS 120V AC only 600 watts 60 HZ Dimensions Width 7 1/16 in. (17.9 cm) Depth 9 in. (22.9 cm) Height 16 1/4...separate electric circuit from other appliances, your favorite recipes, from chopping nuts to mixing salad dressings to the appropriate speed for 30 minutes, the blender will prevent unnecessary power usage. 2 Speeds, 3 Special Functions 'High' and 'Low' settings allow you to add ingredients to pour or stream...
Complete Owner's Guide
Page 4
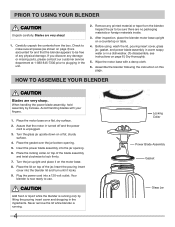
... from the box. Inspect the jar to be free of any physical damage. Wipe the motor base with your fingers. 1. Never remove the lid while blender is unplugged. 3. Check to make sure all pieces (as shown on page 3) are no packaging materials or foreign materials inside. 3. Turn the glass jar ...upside down on page 6.) Dry thoroughly. 5. Place the locking collar on this page. Insert the pouring insert cover into the blender lid and turn until it on top of the blade assembly and twist clockwise to be sure there are accounted for and that the motor...
... from the box. Inspect the jar to be free of any physical damage. Wipe the motor base with your fingers. 1. Never remove the lid while blender is unplugged. 3. Check to make sure all pieces (as shown on page 3) are no packaging materials or foreign materials inside. 3. Turn the glass jar ...upside down on page 6.) Dry thoroughly. 5. Place the locking collar on this page. Insert the pouring insert cover into the blender lid and turn until it on top of the blade assembly and twist clockwise to be sure there are accounted for and that the motor...
Complete Owner's Guide
Page 5
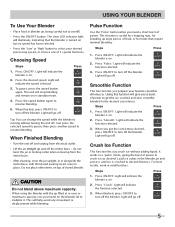
...Choosing Speed Steps 1. When Finished Blending • Turn the unit off . It works in a 'puls e' mode, giving the burs t of stored blender. do not twis t the jar or locking collar when removing from electrical outlet. • Lift the jar straight up large pieces of power. Pulse ...power to turn off . Crush Ice Function This function lets you prepare your s moothie blended to turn off . USING YOUR BLENDER To Use Your Blender • P lace food in blender jar, being careful not to res ume blending. 5. To paus e, pres s the s peed button again. P res...
...Choosing Speed Steps 1. When Finished Blending • Turn the unit off . It works in a 'puls e' mode, giving the burs t of stored blender. do not twis t the jar or locking collar when removing from electrical outlet. • Lift the jar straight up large pieces of power. Pulse ...power to turn off . Crush Ice Function This function lets you prepare your s moothie blended to turn off . USING YOUR BLENDER To Use Your Blender • P lace food in blender jar, being careful not to res ume blending. 5. To paus e, pres s the s peed button again. P res...

Complete Owner's Guide
Page 6
... 5 minutes in upside-down . Lid, pouring insert cover, gasket, power blade assembly and locking collar are any stubborn foods, use bleach solutions to blender jar. Empty jar. CAUTION • Never use scouring pads or abrasive cleaners on a normal cycle, in a detergent solution. It is designed to ...Never place the motor base in water or another 30 seconds to liquids, but must not be resistant to rinse. CLEANING YOUR BLENDER ¬ IMPORTANT Unplug the blender from cutting assembly. • Wipe the motor base with a soft damp cloth and dry it thoroughly. • Wipe the ...
... 5 minutes in upside-down . Lid, pouring insert cover, gasket, power blade assembly and locking collar are any stubborn foods, use bleach solutions to blender jar. Empty jar. CAUTION • Never use scouring pads or abrasive cleaners on a normal cycle, in a detergent solution. It is designed to ...Never place the motor base in water or another 30 seconds to liquids, but must not be resistant to rinse. CLEANING YOUR BLENDER ¬ IMPORTANT Unplug the blender from cutting assembly. • Wipe the motor base with a soft damp cloth and dry it thoroughly. • Wipe the ...
Complete Owner's Guide
Page 7
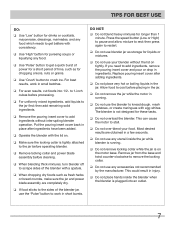
...power blade assembly before processing. Press the speed button (Low or High) to pause and allow mixture to remove the locking collar. K Do not use blender jar as fresh herbs or bread crumbs, make sure the jar and power blade assembly are obtained in small batches. K Do not place very hot... then press again to the jar first; K Do not use the 'Pulse' button to work in a few seconds. This could result in the jar. The blender is tightly attached to the jar before placing in short bursts. K Do not remove locking collar while the jar is running . K Use 'Crush' button to...
...power blade assembly before processing. Press the speed button (Low or High) to pause and allow mixture to remove the locking collar. K Do not use blender jar as fresh herbs or bread crumbs, make sure the jar and power blade assembly are obtained in small batches. K Do not place very hot... then press again to the jar first; K Do not use the 'Pulse' button to work in a few seconds. This could result in the jar. The blender is tightly attached to the jar before placing in short bursts. K Do not remove locking collar while the jar is running . K Use 'Crush' button to...
Complete Owner's Guide
Page 8
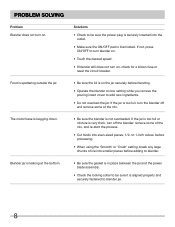
... re-start the process. • Cut foods into the outlet. • Make sure the ON/OFF pad is on the jar securely before adding to blender. • Be sure the gasket is in place between the jar and the power blade assembly. • Check the locking collar to be sure the... • Check to be sure it is leaking at the bottom. The motor base is spattering outside the jar. Blender jar is aligned properly and securely fastened to blender jar. 8 PROBLEM SOLVING Problem Blender does not turn on low setting while you remove the pouring insert cover to add new ingredients. • Do...
... re-start the process. • Cut foods into the outlet. • Make sure the ON/OFF pad is on the jar securely before adding to blender. • Be sure the gasket is in place between the jar and the power blade assembly. • Check the locking collar to be sure the... • Check to be sure it is leaking at the bottom. The motor base is spattering outside the jar. Blender jar is aligned properly and securely fastened to blender jar. 8 PROBLEM SOLVING Problem Blender does not turn on low setting while you remove the pouring insert cover to add new ingredients. • Do...
