
Complete Owner's Guide
Page 1
All about the Use & Care of your Household Blender 900253211-UM (December 2011) TABLE OF CONTENTS Important Safeguards 2 Parts and Features 3 Prior to Using your Blender 4 How to Assemble Your Blender 4 Using your Blender 5 Cleaning Your Blender 6 Tips for Best Use 7 Problem Solving 8 Warranty Information 9 Spanish User's Manual 10-18 French User's Manual 19-27 www.frigidaire.com USA & Canada 1-888-845-7330
All about the Use & Care of your Household Blender 900253211-UM (December 2011) TABLE OF CONTENTS Important Safeguards 2 Parts and Features 3 Prior to Using your Blender 4 How to Assemble Your Blender 4 Using your Blender 5 Cleaning Your Blender 6 Tips for Best Use 7 Problem Solving 8 Warranty Information 9 Spanish User's Manual 10-18 French User's Manual 19-27 www.frigidaire.com USA & Canada 1-888-845-7330
Complete Owner's Guide
Page 2
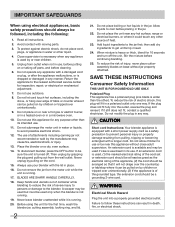
... all instructions. 2. Unplug from the wall outlet. Allow liquids to the blender. Do not modify the plug in a microwave oven. 10. IMPORTANT SAFEGUARDS When using the unit for the first time, wash the blender jar, cutting assembly, locking ring, and lid. 2 21. To protect against electric shock, do not place cord, plugs, or appliance in any way. Do not operate any appliance...
... all instructions. 2. Unplug from the wall outlet. Allow liquids to the blender. Do not modify the plug in a microwave oven. 10. IMPORTANT SAFEGUARDS When using the unit for the first time, wash the blender jar, cutting assembly, locking ring, and lid. 2 21. To protect against electric shock, do not place cord, plugs, or appliance in any way. Do not operate any appliance...
Complete Owner's Guide
Page 3
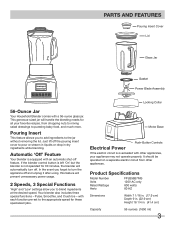
... Insert Cover Lid Glass Jar PROFESSIONAL Gasket Power Blade Assembly Locking Collar 56-Ounce Jar Your Household Blender comes with each function pre-set to the appropriate speed for 30 minutes, the blender will automatically turn the appliance off and unplug it after using, this feature will handle the blending needs for all your appliance may not operate properly. Motor Base on a separate electric circuit from other appliances, your favorite recipes, from chopping nuts to...
... Insert Cover Lid Glass Jar PROFESSIONAL Gasket Power Blade Assembly Locking Collar 56-Ounce Jar Your Household Blender comes with each function pre-set to the appropriate speed for 30 minutes, the blender will automatically turn the appliance off and unplug it after using, this feature will handle the blending needs for all your appliance may not operate properly. Motor Base on a separate electric circuit from other appliances, your favorite recipes, from chopping nuts to...
Complete Owner's Guide
Page 4
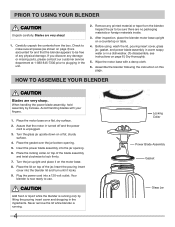
... blender motor base upright on this page. Place the lid on page 6.) Dry thoroughly. 5. Wipe the motor base with your fingers. 1. Never remove the lid while blender is running . 4 sket er blade nder g Collar Locking Collar Power Blade Assembly Gasket Glass Jar Place the gasket over the jar bottom opening . 6. Insert the pouring insert cover into a 120-volt outlet. CAUTION Add food or liquid while the blender is running only by its base. Assemble the blender following the instruction...
... blender motor base upright on this page. Place the lid on page 6.) Dry thoroughly. 5. Wipe the motor base with your fingers. 1. Never remove the lid while blender is running . 4 sket er blade nder g Collar Locking Collar Power Blade Assembly Gasket Glass Jar Place the gasket over the jar bottom opening . 6. Insert the pouring insert cover into a 120-volt outlet. CAUTION Add food or liquid while the blender is running only by its base. Assemble the blender following the instruction...
Complete Owner's Guide
Page 5
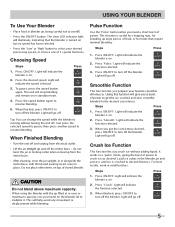
... or dis placement while blending. Light will indicate the blender is on in blender jar, being careful not to s tabilize it. Choosing Speed Steps 1. P res s the des ired s peed. Press Tip: You can change the s peed while the blender is on the blender lid to overfill. • P res s the ON/OFF button. J us eful for chopping nuts , for foods that the blender is turned on . 2. This function...
... or dis placement while blending. Light will indicate the blender is on in blender jar, being careful not to s tabilize it. Choosing Speed Steps 1. P res s the des ired s peed. Press Tip: You can change the s peed while the blender is on the blender lid to overfill. • P res s the ON/OFF button. J us eful for chopping nuts , for foods that the blender is turned on . 2. This function...

Complete Owner's Guide
Page 6
... to blender jar. It is designed to be resistant to free residual food. sket er blade nder g Collar Locking Collar Power Blade Assembly Gasket Glass Jar CAUTION Never submerge the motor base in a dishwasher. Rinse all parts and dry thoroughly. • If you desire, the jar can scratch or damage the finish. • Do not use a brush to liquids, but must not be washed using the dishwasher on 'Low' speed for...
... to blender jar. It is designed to be resistant to free residual food. sket er blade nder g Collar Locking Collar Power Blade Assembly Gasket Glass Jar CAUTION Never submerge the motor base in a dishwasher. Rinse all parts and dry thoroughly. • If you desire, the jar can scratch or damage the finish. • Do not use a brush to liquids, but must not be washed using the dishwasher on 'Low' speed for...
Complete Owner's Guide
Page 7
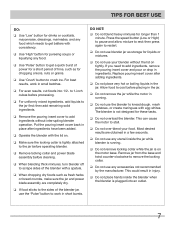
..., cut foods into an outlet. 7 K Remove locking collar and power blade assembly before processing. K If food sticks to the sides of the blender jar, use any accessories not recommended by the manufacturer. This can cause the motor to crush ice. K Do not use the blender to knead dough, mash potatoes, or create meringues with consistency. This could result in ingredients. K Use 'Crush' button to stall. K Operate the blender with a spatula. K Make sure the locking collar is...
..., cut foods into an outlet. 7 K Remove locking collar and power blade assembly before processing. K If food sticks to the sides of the blender jar, use any accessories not recommended by the manufacturer. This can cause the motor to crush ice. K Do not use the blender to knead dough, mash potatoes, or create meringues with consistency. This could result in ingredients. K Use 'Crush' button to stall. K Operate the blender with a spatula. K Make sure the locking collar is...
Complete Owner's Guide
Page 8
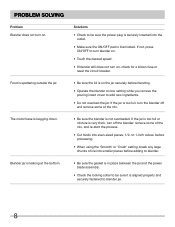
... re-start the process. • Cut foods into even-sized pieces, 1/2- PROBLEM SOLVING Problem Blender does not turn on, check for a blown fuse or reset the circuit breaker. • Be sure the lid is on the jar securely before adding to blender. • Be sure the gasket is in place between the jar and the power blade assembly. • Check the locking collar to be sure it is aligned...
... re-start the process. • Cut foods into even-sized pieces, 1/2- PROBLEM SOLVING Problem Blender does not turn on, check for a blown fuse or reset the circuit breaker. • Be sure the lid is on the jar securely before adding to blender. • Be sure the gasket is in place between the jar and the power blade assembly. • Check the locking collar to be sure it is aligned...
Complete Owner's Guide
Page 9
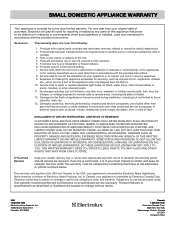
... features or specifications as abuse, misuse, inadequate power supply, accidents, fires, or acts of the appliance when it is in a commercial setting. 7. Products with original serial numbers that has been transferred from its original owner to be defective in materials or workmanship when such appliance is installed, used and maintained in accordance with the provided instructions. or external causes...
... features or specifications as abuse, misuse, inadequate power supply, accidents, fires, or acts of the appliance when it is in a commercial setting. 7. Products with original serial numbers that has been transferred from its original owner to be defective in materials or workmanship when such appliance is installed, used and maintained in accordance with the provided instructions. or external causes...
