Complete Owner's Guide (English)
Page 1
All about the Use &Care of your Refrigerator 242108500 (January 2010) TABLE OF CONTENTS Important Safety Instructions 2 Features at a Glance 4 Installation 5 Door Removal Instructions 7 Handle Installation 8 Connecting Water Supply 9 Controls 10 Storage Features 12 Automatic Ice & Water Dispenser 13 Changing the Filter 15 Normal Operating Sounds and Sights 17 Care and Cleaning 18 Before you Call 19 Major Appliance Warranty 21 www.frigidaire.com USA 1-800-944-9044 www.frigidaire.ca Canada 1-800-265-8352
All about the Use &Care of your Refrigerator 242108500 (January 2010) TABLE OF CONTENTS Important Safety Instructions 2 Features at a Glance 4 Installation 5 Door Removal Instructions 7 Handle Installation 8 Connecting Water Supply 9 Controls 10 Storage Features 12 Automatic Ice & Water Dispenser 13 Changing the Filter 15 Normal Operating Sounds and Sights 17 Care and Cleaning 18 Before you Call 19 Major Appliance Warranty 21 www.frigidaire.com USA 1-800-944-9044 www.frigidaire.ca Canada 1-800-265-8352
Complete Owner's Guide (English)
Page 2
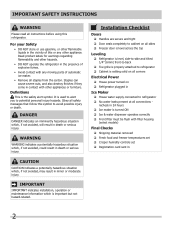
... all sides Freezer door is level across the top Leveling Refrigerator is level, side-to-side and tilted 1/4" (6mm) front-to-back Toe grille is properly attached to refrigerator No water leaks present at all corners Electrical Power House power turned on Refrigerator plugged in Ice Maker House water supply connected to refrigerator Cabinet is turned ON Ice & water dispenser operates correctly Front filter must be flush...
... all sides Freezer door is level across the top Leveling Refrigerator is level, side-to-side and tilted 1/4" (6mm) front-to-back Toe grille is properly attached to refrigerator No water leaks present at all corners Electrical Power House power turned on Refrigerator plugged in Ice Maker House water supply connected to refrigerator Cabinet is turned ON Ice & water dispenser operates correctly Front filter must be flush...
Complete Owner's Guide (English)
Page 3
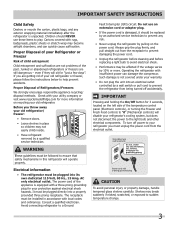
... to sudden temperature change. 3 Consult a qualified electrician. Operating the refrigerator with your utility company or visit www.recyclemyoldfridge.com for your old refrigerator/ freezer: • Remove doors. • Leave shelves in place so children may not easily climb inside. • Have refrigerant removed by 10% or more information on the power cord. CAUTION To avoid personal injury or property damage, handle tempered glass shelves carefully. even if...
... to sudden temperature change. 3 Consult a qualified electrician. Operating the refrigerator with your utility company or visit www.recyclemyoldfridge.com for your old refrigerator/ freezer: • Remove doors. • Leave shelves in place so children may not easily climb inside. • Have refrigerant removed by 10% or more information on the power cord. CAUTION To avoid personal injury or property damage, handle tempered glass shelves carefully. even if...
Complete Owner's Guide (English)
Page 5
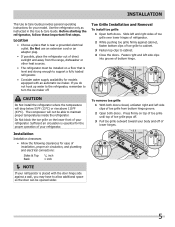
...°F (43°C). Sufficient air circulation is near a grounded electrical outlet. Installation Installation clearances • Allow the following clearances for ease of installation, proper air circulation, and plumbing and electrical connections: Sides & Top Back 3/8 inch 1 inch NOTE If your refrigerator is level and strong enough to support a fully loaded refrigerator. • Consider water supply availability for models equipped with the door hinge side against cabinet, fasten...
...°F (43°C). Sufficient air circulation is near a grounded electrical outlet. Installation Installation clearances • Allow the following clearances for ease of installation, proper air circulation, and plumbing and electrical connections: Sides & Top Back 3/8 inch 1 inch NOTE If your refrigerator is level and strong enough to support a fully loaded refrigerator. • Consider water supply availability for models equipped with the door hinge side against cabinet, fasten...
Complete Owner's Guide (English)
Page 6
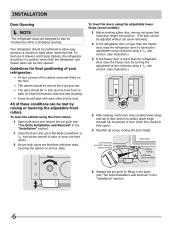
... fully closed to fully open). 5 Reinstall set screw, locking the door height. 7/16" Wrench and 3/32" Hex Key (some models) Door Stop Flange Open Door Hinge Flange Set Screw (some models): 1 Before leveling either door, remove set screw removed). 2 If the refrigerator door is lower than the freezer door, raise the refrigerator door by turning the adjustment screw clockwise using a 7/16 inch wrench. (See illustration.) 3 If the freezer door is lower than the refrigerator door, raise the freezer door by themselves within...
... fully closed to fully open). 5 Reinstall set screw, locking the door height. 7/16" Wrench and 3/32" Hex Key (some models) Door Stop Flange Open Door Hinge Flange Set Screw (some models): 1 Before leveling either door, remove set screw removed). 2 If the refrigerator door is lower than the freezer door, raise the refrigerator door by turning the adjustment screw clockwise using a 7/16 inch wrench. (See illustration.) 3 If the freezer door is lower than the refrigerator door, raise the freezer door by themselves within...
Complete Owner's Guide (English)
Page 7
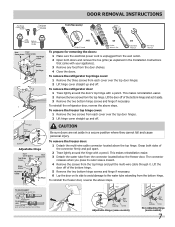
... Wrench Set Adjustable Wrench 3/8" Fixed Wrench To prepare for removing the doors: 1 Make sure the electrical power cord is unplugged from the wall outlet. 2 Open both sides of fitting 2. To remove the refrigerator top hinge cover: 1 Remove the three screws from the connector located below the freezer door. To remove the refrigerator door: 1 Trace lightly around the hinge with your appliance). 3 Remove any food from the door shelves. 4 Close the doors. This makes reinstallation easier. 3 Detach the water tube...
... Wrench Set Adjustable Wrench 3/8" Fixed Wrench To prepare for removing the doors: 1 Make sure the electrical power cord is unplugged from the wall outlet. 2 Open both sides of fitting 2. To remove the refrigerator top hinge cover: 1 Remove the three screws from the connector located below the freezer door. To remove the refrigerator door: 1 Trace lightly around the hinge with your appliance). 3 Remove any food from the door shelves. 4 Close the doors. This makes reinstallation easier. 3 Detach the water tube...
Complete Owner's Guide (English)
Page 9
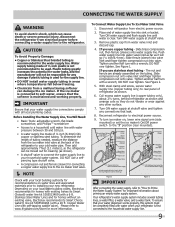
... existing valves its Smart Choice water® line kit 5305510264 (with all local plumbing codes. If you use stainless steel tubing - If you use a selfpiercing type shutoff valve. • A compression nut and ferrule (sleeve) for connecting a copper water supply line to the "I" position (rear mounted). The nut and ferrule are already assembled on , lower wire signal arm (side mounted) or set the ice maker's On/Off power switch to the ice maker inlet valve. ...
... existing valves its Smart Choice water® line kit 5305510264 (with all local plumbing codes. If you use stainless steel tubing - If you use a selfpiercing type shutoff valve. • A compression nut and ferrule (sleeve) for connecting a copper water supply line to the "I" position (rear mounted). The nut and ferrule are already assembled on , lower wire signal arm (side mounted) or set the ice maker's On/Off power switch to the ice maker inlet valve. ...
Complete Owner's Guide (English)
Page 10
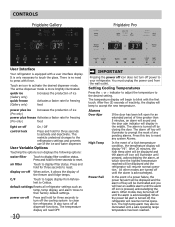
... freezer and fridge temps. C/F Touch to your refrigerator. It also turns off all refrigerator settings such as temp, temp display, and alarm tones to the desired setting. The temperature display will begin to accept the new temperature. The temperature display will read OFF. 10 IMPORTANT Pressing the power off icon does not turn off the cooling system to display filter condition status. After five (5) seconds of the ice and water dispenser. Alarms Door Ajar If the door has been left open...
... freezer and fridge temps. C/F Touch to your refrigerator. It also turns off all refrigerator settings such as temp, temp display, and alarm tones to the desired setting. The temperature display will begin to accept the new temperature. The temperature display will read OFF. 10 IMPORTANT Pressing the power off icon does not turn off the cooling system to display filter condition status. After five (5) seconds of the ice and water dispenser. Alarms Door Ajar If the door has been left open...

Complete Owner's Guide (English)
Page 12
... needs. Replace the shelf by sliding the Chill Drawer Temperature Control in high humidity. In some models) Some models are designed for storing fruits, vegetables, and other deli items. This drawer does not have door bins that keep best when stored with a Cool Drawer for fast cleaning. Items with a Chill Drawer. Use this pan for easy access to prevent freezing. See "Glass Shelves" in clear water and remove excess water before storing. Cantilever Shelf Adjustment Refrigerator shelves...
... needs. Replace the shelf by sliding the Chill Drawer Temperature Control in high humidity. In some models) Some models are designed for storing fruits, vegetables, and other deli items. This drawer does not have door bins that keep best when stored with a Cool Drawer for fast cleaning. Items with a Chill Drawer. Use this pan for easy access to prevent freezing. See "Glass Shelves" in clear water and remove excess water before storing. Cantilever Shelf Adjustment Refrigerator shelves...
Complete Owner's Guide (English)
Page 13
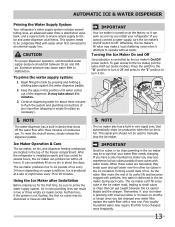
... the ice maker's On/Off power switch. Otherwise, the ice maker's fill valve may require the filter to be used to operate without water. Remember, if your ice maker is jamming with small ice cubes or it can completely fill an ice bin in about three minutes to flush the system and plumbing connections of its useful life and becomes clogged with a new one. Automatic Ice & Water Dispenser Priming the Water Supply System Your refrigerator's water supply...
... the ice maker's On/Off power switch. Otherwise, the ice maker's fill valve may require the filter to be used to operate without water. Remember, if your ice maker is jamming with small ice cubes or it can completely fill an ice bin in about three minutes to flush the system and plumbing connections of its useful life and becomes clogged with a new one. Automatic Ice & Water Dispenser Priming the Water Supply System Your refrigerator's water supply...
Complete Owner's Guide (English)
Page 14
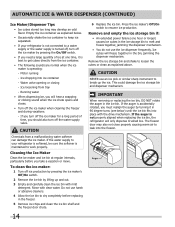
... before replacing in the ice storage bin to a water supply or the water supply is turned off, turn off the water supply valve. Do not use the ice dispenser frequently. Remove the ice storage bin and shake to loosen the cubes or clean as explained below ) until the ice bin fits into place with clear water. Motor running - Water valve opening or closing - Ice loosening from a malfunctioning water softener can damage the ice maker. If the water supply to your refrigerator is not connected to...
... before replacing in the ice storage bin to a water supply or the water supply is turned off, turn off the water supply valve. Do not use the ice dispenser frequently. Remove the ice storage bin and shake to loosen the cubes or clean as explained below ) until the ice bin fits into place with clear water. Motor running - Water valve opening or closing - Ice loosening from a malfunctioning water softener can damage the ice maker. If the water supply to your refrigerator is not connected to...
Complete Owner's Guide (English)
Page 15
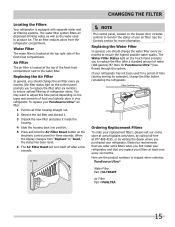
... been used to produce ice. CHANGING THE FILTER Locating the Filters Your refrigerator is equipped with separate water and air filtering systems. The water filter system filters all dispensed drinking water, as well as the water used for a period of time (during moving for example), change the air filter every six months (the filter status light on the freezer door, includes controls to monitor the status of your replacement filters, please visit our online store at www.frigidaire...
... been used to produce ice. CHANGING THE FILTER Locating the Filters Your refrigerator is equipped with separate water and air filtering systems. The water filter system filters all dispensed drinking water, as well as the water used for a period of time (during moving for example), change the air filter every six months (the filter status light on the freezer door, includes controls to monitor the status of your replacement filters, please visit our online store at www.frigidaire...
Complete Owner's Guide (English)
Page 16
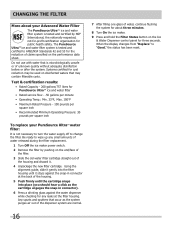
... of claims specified on the Ice & Water Dispenser control panel for about your PureSource UltraTM water filter: It is tested and certified to wipe up any leaks at the back of water released during the filter replacement. 1 Turn Off the ice maker power switch. 2 Remove the filter by NSF International, the nationally respected, not-for-profit certification organization for public health safety. Using the alignment guide, slide it gently into place...
... of claims specified on the Ice & Water Dispenser control panel for about your PureSource UltraTM water filter: It is tested and certified to wipe up any leaks at the back of water released during the filter replacement. 1 Turn Off the ice maker power switch. 2 Remove the filter by NSF International, the nationally respected, not-for-profit certification organization for public health safety. Using the alignment guide, slide it gently into place...
Complete Owner's Guide (English)
Page 17
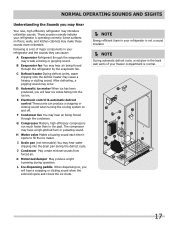
.... H Water valve Makes a buzzing sound each time it opens to fill the ice maker. I Drain pan (not removable) You may hear water dripping into the ice bin. J Condenser May create minimal sounds from forced air. B Evaporator fan You may introduce unfamiliar sounds. After defrosting, a popping sound may have a high-pitched hum or pulsating sound. Following is operating correctly. D Automatic ice maker When ice has been produced, you may Hear Your new, high...
.... H Water valve Makes a buzzing sound each time it opens to fill the ice maker. I Drain pan (not removable) You may hear water dripping into the ice bin. J Condenser May create minimal sounds from forced air. B Evaporator fan You may introduce unfamiliar sounds. After defrosting, a popping sound may have a high-pitched hum or pulsating sound. Following is operating correctly. D Automatic ice maker When ice has been produced, you may Hear Your new, high...
Complete Owner's Guide (English)
Page 18
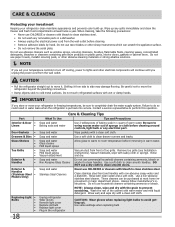
... handles. Contact a service representative to clean drawer runners and tracks. Soap and water Wipe gaskets with sudsy cloth or sponge. Vacuum backside, wipe with a clean soft cloth. Rinse and dry. Use a soft cloth to side may damage flooring. Soap and water Never use razor blades or other electrical components will continue until you set your temperature controls to turn off cooling, power to wring excess water out of warm water. Stainless...
... handles. Contact a service representative to clean drawer runners and tracks. Soap and water Wipe gaskets with sudsy cloth or sponge. Vacuum backside, wipe with a clean soft cloth. Rinse and dry. Use a soft cloth to side may damage flooring. Soap and water Never use razor blades or other electrical components will continue until you set your temperature controls to turn off cooling, power to wring excess water out of warm water. Stainless...
Complete Owner's Guide (English)
Page 19
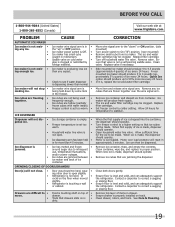
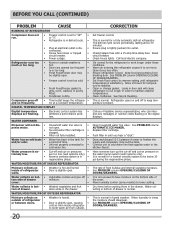
... water line valve. Replace valve if necessary. Move item and release wire signal arm. Remove any ice. The ice and water filter cartridge may be clogged. Set freezer control to correct a sagging or sloping floor. Motor is producing less ice • ing enough ice. Close both doors gently. Remove top layer of items in mechanism. • Saddle valve on cold water • pipe is Off. • • Ice maker has small cube • caught in drawer. Clean drawer...
... water line valve. Replace valve if necessary. Move item and release wire signal arm. Remove any ice. The ice and water filter cartridge may be clogged. Set freezer control to correct a sagging or sloping floor. Motor is producing less ice • ing enough ice. Close both doors gently. Remove top layer of items in mechanism. • Saddle valve on cold water • pipe is Off. • • Ice maker has small cube • caught in drawer. Clean drawer...
Complete Owner's Guide (English)
Page 20
... number codes flashing on pressures • are flashing. • Electronic control system has • detected a performance problem. Connect unit to cold water line that supplies water to run more. See PROBLEM column OPENING/CLOSING OF DOORS/DRAWERS. Move humidity control (some models) to • cold water line. a period of time. • Unit not properly connected to lower setting. Call local electric company. Open doors less often. Clean or change gasket. Replace filter cartridge. Have someone turn up the cut-off to keep temperature constant. The rate...
... number codes flashing on pressures • are flashing. • Electronic control system has • detected a performance problem. Connect unit to cold water line that supplies water to run more. See PROBLEM column OPENING/CLOSING OF DOORS/DRAWERS. Move humidity control (some models) to • cold water line. a period of time. • Unit not properly connected to lower setting. Call local electric company. Open doors less often. Clean or change gasket. Replace filter cartridge. Have someone turn up the cut-off to keep temperature constant. The rate...
Complete Owner's Guide (English)
Page 21
... IMPLIED WARRANTIES, SO THESE LIMITATIONS OR EXCLUSIONS MAY NOT APPLY TO YOU. If You Need Service Keep your receipt, delivery slip, or some other appropriate payment record to repair or replace appliance light bulbs, air filters, water filters, other consumables, or knobs, handles, or other than in ordinary household use of appliance or home incurred during installation, including but not limited to, any refrigerator or freezer...
... IMPLIED WARRANTIES, SO THESE LIMITATIONS OR EXCLUSIONS MAY NOT APPLY TO YOU. If You Need Service Keep your receipt, delivery slip, or some other appropriate payment record to repair or replace appliance light bulbs, air filters, water filters, other consumables, or knobs, handles, or other than in ordinary household use of appliance or home incurred during installation, including but not limited to, any refrigerator or freezer...

Wiring Diagram (All Languages)
Page 1
... wires are removed during servicing, they must be returned to 20cc (.68 oz.). Excessive heat will change the fill time. One turn is complete. Water Fill Volume Remove cover by inserting screwdriver in notch at 500°F. PERFORMANCE DATA NO LOAD & NO DOOR OPENINGS AT MID-POINT CONTROL SETTING (2500 ++ V4) Type A with an Adaptive Defrost Control (ADC). CONDENSER FAN MOTOR Watts RPM Amps 3.1 1100 CW Opposite Shaft 0.03 Running ICE MAKER SPECIFICATIONS Electrical...
... wires are removed during servicing, they must be returned to 20cc (.68 oz.). Excessive heat will change the fill time. One turn is complete. Water Fill Volume Remove cover by inserting screwdriver in notch at 500°F. PERFORMANCE DATA NO LOAD & NO DOOR OPENINGS AT MID-POINT CONTROL SETTING (2500 ++ V4) Type A with an Adaptive Defrost Control (ADC). CONDENSER FAN MOTOR Watts RPM Amps 3.1 1100 CW Opposite Shaft 0.03 Running ICE MAKER SPECIFICATIONS Electrical...

Installation Instructions (All Languages)
Page 1
... drawers and freezer baskets, doors must be able to fully open. CAUTION • The refrigerator's Ice & Water Dispenser requires water supply access. • Plan for your new appliance • Do not use an extension cord or an adapter plug. You may still need : • Access to start with set screw): Open Door Hinge Flange Set Screw (some models) 4 Hinge 1 Before leveling either door, remove set screw that locks door height into groove of bottom hinge. 6 Problems? CAUTION Shifting the refrigerator...
... drawers and freezer baskets, doors must be able to fully open. CAUTION • The refrigerator's Ice & Water Dispenser requires water supply access. • Plan for your new appliance • Do not use an extension cord or an adapter plug. You may still need : • Access to start with set screw): Open Door Hinge Flange Set Screw (some models) 4 Hinge 1 Before leveling either door, remove set screw that locks door height into groove of bottom hinge. 6 Problems? CAUTION Shifting the refrigerator...


