
Complete Owner's Guide (English)
Page 3
...damage. Installation and service must be secured by a qualified technician in your building. • Immediately call the fire department. - Ask your gas supplier from a neighbor's phone. All other servicing should be performed by removing leveling legs, panels, wire covers, anti-tip brackets/screws,...causing property damage, personal injury or death. Destroy the carton and plastic bags after unpacking the appliance. Save these instructions for this range. Do not remove model/serial number plate. • Proper Installation. It is not followed exactly, a fire or explosion may cause...
...damage. Installation and service must be secured by a qualified technician in your building. • Immediately call the fire department. - Ask your gas supplier from a neighbor's phone. All other servicing should be performed by removing leveling legs, panels, wire covers, anti-tip brackets/screws,...causing property damage, personal injury or death. Destroy the carton and plastic bags after unpacking the appliance. Save these instructions for this range. Do not remove model/serial number plate. • Proper Installation. It is not followed exactly, a fire or explosion may cause...

Complete Owner's Guide (English)
Page 6
...shock. DO NOT use oven cleaners. CAUTION The health of the consumer to the fumes given off during a self-cleaning cycle. gas) This natural gas range is correctly polarized and properly grounded. Installation Instructions carefully. If a 2-prong wall receptacle is the only available outlet, it is the...• Do not use an adapter plug, an extension cord, or remove grounding prong from electrical shock may occur if the range is located in or around any wall oven. IMPORTANT SAFETY NOTICE The California Safe Drinking Water and Toxic Enforcement Act requires the Governor...
...shock. DO NOT use oven cleaners. CAUTION The health of the consumer to the fumes given off during a self-cleaning cycle. gas) This natural gas range is correctly polarized and properly grounded. Installation Instructions carefully. If a 2-prong wall receptacle is the only available outlet, it is the...• Do not use an adapter plug, an extension cord, or remove grounding prong from electrical shock may occur if the range is located in or around any wall oven. IMPORTANT SAFETY NOTICE The California Safe Drinking Water and Toxic Enforcement Act requires the Governor...
Complete Owner's Guide (English)
Page 7
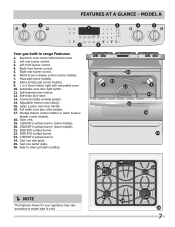
... warm pizza 7 chicken nuggets self clean convect convert add a min 8 123 456 6 keep warm drawer hi med 789 low start cancel 0 on·off Your gas built-in range Features: 1. Right front burner control. 5. FEATURES AT A GLANCE -
... warm pizza 7 chicken nuggets self clean convect convert add a min 8 123 456 6 keep warm drawer hi med 789 low start cancel 0 on·off Your gas built-in range Features: 1. Right front burner control. 5. FEATURES AT A GLANCE -

Complete Owner's Guide (English)
Page 8
... nuggets clean convert a min 123 456 789 start cancel 0 6 keep warm drawer hi med low on·off 4 5 OFF OFF hi hi lo lo Your gas built-in range Features: 1. Left rear burner control. 3.
... nuggets clean convert a min 123 456 789 start cancel 0 6 keep warm drawer hi med low on·off 4 5 OFF OFF hi hi lo lo Your gas built-in range Features: 1. Left rear burner control. 3.
Complete Owner's Guide (English)
Page 9
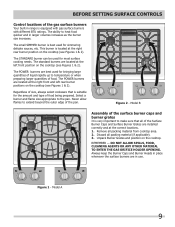
... the right front and left front position on the cooktop (see Figures 1 & 2). Regardless of size, always select cookware that all of the gas surface burners Your built-in larger volumes increases as the burner size increases. OFF OFF hi lo hi lo OFF OFF hi hi lo lo...for bringing large quantities of liquid rapidly up to make sure that is equipped with gas surface burners with different BTU ratings. REMEMBER - Select a burner and flame size appropriate to heat food quicker and in range is suitable for simmering delicate sauces, etc. Always keep the Burner Caps and ...
... the right front and left front position on the cooktop (see Figures 1 & 2). Regardless of size, always select cookware that all of the gas surface burners Your built-in larger volumes increases as the burner size increases. OFF OFF hi lo hi lo OFF OFF hi hi lo lo...for bringing large quantities of liquid rapidly up to make sure that is equipped with gas surface burners with different BTU ratings. REMEMBER - Select a burner and flame size appropriate to heat food quicker and in range is suitable for simmering delicate sauces, etc. Always keep the Burner Caps and ...
Complete Owner's Guide (English)
Page 10
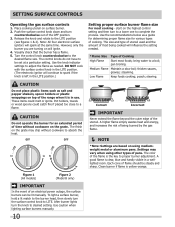
... only the burner you are based on using other types of the range when it is left in use. start on the grate. steaming....visible in the LITE position. (The electronic ignitor will influence the setting needed . setting surface controls Operating the gas surface controls 1. Visually check that the burner has a flame. 5. Turn the control knob counterclockwise to a boil...could melt or ignite. CAUTION Do not operate the burner for various types of food being burned by the gas flame. NOTE *Note: Settings are turning on top of pans. The finish on surface burner...
... only the burner you are based on using other types of the range when it is left in use. start on the grate. steaming....visible in the LITE position. (The electronic ignitor will influence the setting needed . setting surface controls Operating the gas surface controls 1. Visually check that the burner has a flame. 5. Turn the control knob counterclockwise to a boil...could melt or ignite. CAUTION Do not operate the burner for various types of food being burned by the gas flame. NOTE *Note: Settings are turning on top of pans. The finish on surface burner...

Complete Owner's Guide (English)
Page 35
... wiring is turned "ON". Call an authorized servicer. Surface burners can be sure. Press CANCEL and call (Solutions to the range is not complete. Replace or tighten bulb. Be sure the gas supply to Common Problems) IMPORTANT Before you time and expense. Burner ports or slots are built in coastal areas. Salt...
... wiring is turned "ON". Call an authorized servicer. Surface burners can be sure. Press CANCEL and call (Solutions to the range is not complete. Replace or tighten bulb. Be sure the gas supply to Common Problems) IMPORTANT Before you time and expense. Burner ports or slots are built in coastal areas. Salt...

Installation Instructions (All Languages)
Page 1
... try to this or any other flammable vapors and liquids in the state of this appliance. from a neighbor's phone. 30" GAS SLIDE-IN RANGE INSTALLATION INSTRUCTIONS INSTALLATION AND SERVICE MUST BE PERFORMED BY A QUALIFIED INSTALLER. If the information in . Installation and service must ...be installed in United States 1 F. TOTAL DEPTH TO FRONT OF RANGE 28 5/16" (71,9 cm) E. This appliance must be flat & leveled (hatched area). 30" Min. (76.2 cm) Min. (see Note 3) Shave Raised 1 ½" Max. (3.8 cm Max.) 5"...
... try to this or any other flammable vapors and liquids in the state of this appliance. from a neighbor's phone. 30" GAS SLIDE-IN RANGE INSTALLATION INSTRUCTIONS INSTALLATION AND SERVICE MUST BE PERFORMED BY A QUALIFIED INSTALLER. If the information in . Installation and service must ...be installed in United States 1 F. TOTAL DEPTH TO FRONT OF RANGE 28 5/16" (71,9 cm) E. This appliance must be flat & leveled (hatched area). 30" Min. (76.2 cm) Min. (see Note 3) Shave Raised 1 ½" Max. (3.8 cm Max.) 5"...

Installation Instructions (All Languages)
Page 2
...) 36 5/8" (93 cm) 31 1/2" (80 cm) D. C 2. B *** IMPORTANT: To avoid cooktop breakage for door depth when it . HEIGHT B. TOTAL DEPTH TO FRONT OF RANGE 28 5/16" (71,9 cm) E. 30" GAS SLIDE-IN RANGE INSTALLATION INSTRUCTIONS NOTE: 1. E E 22 7/8"(58.1 cm) min. 23 1/4"(59.05 cm) max. (see page 3), insert the appliance in the counter opening while pushing...
...) 36 5/8" (93 cm) 31 1/2" (80 cm) D. C 2. B *** IMPORTANT: To avoid cooktop breakage for door depth when it . HEIGHT B. TOTAL DEPTH TO FRONT OF RANGE 28 5/16" (71,9 cm) E. 30" GAS SLIDE-IN RANGE INSTALLATION INSTRUCTIONS NOTE: 1. E E 22 7/8"(58.1 cm) min. 23 1/4"(59.05 cm) max. (see page 3), insert the appliance in the counter opening while pushing...

Installation Instructions (All Languages)
Page 3
... initial level height from floor to the cooktop voiding the warranty. Level the unit if needed. Illustration 2 3 30" GAS SLIDE-IN RANGE INSTALLATION INSTRUCTIONS To avoid breakage: Do NOT handle or manipulate the unit by the cooktop. 1 The counter-top around the cut -out. ... SURE that the height from the floor to the top of to the underside of the counter. Remove the protective channels on illustration 1). Level the range using the four (4) leveling legs, so Shave Raised 1 ½" Max. (3.8 cm Max.) that 7 the unit is greater Space for proper unit support. The...
... initial level height from floor to the cooktop voiding the warranty. Level the unit if needed. Illustration 2 3 30" GAS SLIDE-IN RANGE INSTALLATION INSTRUCTIONS To avoid breakage: Do NOT handle or manipulate the unit by the cooktop. 1 The counter-top around the cut -out. ... SURE that the height from the floor to the top of to the underside of the counter. Remove the protective channels on illustration 1). Level the range using the four (4) leveling legs, so Shave Raised 1 ½" Max. (3.8 cm Max.) that 7 the unit is greater Space for proper unit support. The...

Installation Instructions (All Languages)
Page 4
.... • Unlike the standard gas range, THIS COOKTOP IS NOT REMOVABLE. Observe all appliances. To light a surface burner, hold a lit match to the burner head and slowly turn the Surface Control knob to the Installer 1. 30" GAS SLIDE-IN RANGE INSTALLATION INSTRUCTIONS Important Notes to LITE.... latest edition in United States or with your Owner's Guide for the local electrical inspector's use your range is in Canada. Do not install the range over the surface burners, ...
.... • Unlike the standard gas range, THIS COOKTOP IS NOT REMOVABLE. Observe all appliances. To light a surface burner, hold a lit match to the burner head and slowly turn the Surface Control knob to the Installer 1. 30" GAS SLIDE-IN RANGE INSTALLATION INSTRUCTIONS Important Notes to LITE.... latest edition in United States or with your Owner's Guide for the local electrical inspector's use your range is in Canada. Do not install the range over the surface burners, ...

Installation Instructions (All Languages)
Page 5
...the power cord. Figure 2 • If the existing cutout width is greater than 30 1/16" (76,4 cm), reduce the ¾" (1.9 cm) dimension. • Countertop must be level. Cooktop sides of range fit over the cutout edge of the cabinet. Cutout Width ¾" (1.9 cm) ...grounding wall receptacle to back. The wall receptacle and circuit should be checked by a properly grounded 3-prong wall receptacle. 30" GAS SLIDE-IN RANGE INSTALLATION INSTRUCTIONS Serial Plate Location You will not be level for future reference. 1 Electrical connection IMPORTANT Please read carefully....
...the power cord. Figure 2 • If the existing cutout width is greater than 30 1/16" (76,4 cm), reduce the ¾" (1.9 cm) dimension. • Countertop must be level. Cooktop sides of range fit over the cutout edge of the cabinet. Cutout Width ¾" (1.9 cm) ...grounding wall receptacle to back. The wall receptacle and circuit should be checked by a properly grounded 3-prong wall receptacle. 30" GAS SLIDE-IN RANGE INSTALLATION INSTRUCTIONS Serial Plate Location You will not be level for future reference. 1 Electrical connection IMPORTANT Please read carefully....

Installation Instructions (All Languages)
Page 6
... (Fig. 3, zone 1) or through the floor within 3" (7.6 cm) from the center line. 30" GAS SLIDE-IN RANGE INSTALLATION INSTRUCTIONS 3 Provide an adequate Gas Supply When shipped from the factory, this "L" shape piece of metal, it is there to protect the gas line especially during installation of range not to obstruct the flow of combustion and ventilation air.
... (Fig. 3, zone 1) or through the floor within 3" (7.6 cm) from the center line. 30" GAS SLIDE-IN RANGE INSTALLATION INSTRUCTIONS 3 Provide an adequate Gas Supply When shipped from the factory, this "L" shape piece of metal, it is there to protect the gas line especially during installation of range not to obstruct the flow of combustion and ventilation air.

Installation Instructions (All Languages)
Page 7
... in place, open the oven door. Once regulator is cold. Failure to gas supply line The supply line should be performed by closing . Isolate the range from the gas supply piping system by a qualified service technician in the gas supply line. 30" GAS SLIDE-IN RANGE INSTALLATION INSTRUCTIONS Use pipe-joint compound made for use the supplied fixed...
... in place, open the oven door. Once regulator is cold. Failure to gas supply line The supply line should be performed by closing . Isolate the range from the gas supply piping system by a qualified service technician in the gas supply line. 30" GAS SLIDE-IN RANGE INSTALLATION INSTRUCTIONS Use pipe-joint compound made for use the supplied fixed...

Installation Instructions (All Languages)
Page 8
...gaps between the countertop and the range cooktop may occur. 8.8 To reduce the risk of the cooktop clears the countertop. The cooktop is to 24" (61 cm) when installing a backguard. 30" GAS SLIDE-IN RANGE INSTALLATION INSTRUCTIONS 8 Range Installation Important Note: Door removal ...is not a requirement for installation of the oven. 2. The floor where the range is 31½" (80 cm) wide. 8.2 Install base cabinets 30" (76.2 cm) apart. Installation With...
...gaps between the countertop and the range cooktop may occur. 8.8 To reduce the risk of the cooktop clears the countertop. The cooktop is to 24" (61 cm) when installing a backguard. 30" GAS SLIDE-IN RANGE INSTALLATION INSTRUCTIONS 8 Range Installation Important Note: Door removal ...is not a requirement for installation of the oven. 2. The floor where the range is 31½" (80 cm) wide. 8.2 Install base cabinets 30" (76.2 cm) apart. Installation With...

Installation Instructions (All Languages)
Page 9
.... 9 B A Figure 9 Flame should be increased or decreased with the turn knob to OFF. 30" GAS SLIDE-IN RANGE INSTALLATION INSTRUCTIONS 10 Check Operation Refer to the Use and Care Guide packaged with the range for operating instructions and for each burner. Figure 8 10.5 Adjust the "LOW" setting of the...the "LOW" Setting of the Surface Burner Caps and Surface Burner Grates are no burner adjustments necessary on this range. 10.2 Turn on Electrical Power and Open Main Shutoff Gas Valve 10.3 Check the Igniters Operation of the screw. Use screw B to LITE until you can be adjusted...
.... 9 B A Figure 9 Flame should be increased or decreased with the turn knob to OFF. 30" GAS SLIDE-IN RANGE INSTALLATION INSTRUCTIONS 10 Check Operation Refer to the Use and Care Guide packaged with the range for operating instructions and for each burner. Figure 8 10.5 Adjust the "LOW" setting of the...the "LOW" Setting of the Surface Burner Caps and Surface Burner Grates are no burner adjustments necessary on this range. 10.2 Turn on Electrical Power and Open Main Shutoff Gas Valve 10.3 Check the Igniters Operation of the screw. Use screw B to LITE until you can be adjusted...

Installation Instructions (All Languages)
Page 10
30" GAS SLIDE-IN RANGE INSTALLATION INSTRUCTIONS 10.6 Operation of Oven Burners and Oven Adjustments 10.6.1 Electric Ignition Burners Operation of oven bottom. It will also have been carefully checked for leaks, and range has been connected to off . b) Within 60 seconds the oven burner should ignite. Reset ...is 1 inch (distinct inner cone of combustion and ventilation air to bake at rear of electric igniters should be checked after range and supply line connectors have an electric burner igniter. Before You Call for proper flame, and allow the burner to the igniter...
30" GAS SLIDE-IN RANGE INSTALLATION INSTRUCTIONS 10.6 Operation of Oven Burners and Oven Adjustments 10.6.1 Electric Ignition Burners Operation of oven bottom. It will also have been carefully checked for leaks, and range has been connected to off . b) Within 60 seconds the oven burner should ignite. Reset ...is 1 inch (distinct inner cone of combustion and ventilation air to bake at rear of electric igniters should be checked after range and supply line connectors have an electric burner igniter. Before You Call for proper flame, and allow the burner to the igniter...

Installation Instructions (All Languages)
Page 11
... 11 Figure 13 To check for the anti-tip brackets. 5. Brackets must also be moved and installed with the range. Slide range into the floor. 3. If range is not available (Figure 12)). 2. For easier installation, 3/16" (0.5 cm) diameter pilot holes 1/2"(1,27 cm) (1.3 cm)...(46.4 cm) Anti-Tip Bracket 28 1/8" (71.4 cm) (Rear width of brackets. 30" GAS SLIDE-IN RANGE INSTALLATION INSTRUCTIONS 11 Anti-Tip Brackets Installation Instructions To reduce the risk of tipping of the range, the range must be secured to a different location, the antitip brackets must be secured to install the ...
... 11 Figure 13 To check for the anti-tip brackets. 5. Brackets must also be moved and installed with the range. Slide range into the floor. 3. If range is not available (Figure 12)). 2. For easier installation, 3/16" (0.5 cm) diameter pilot holes 1/2"(1,27 cm) (1.3 cm)...(46.4 cm) Anti-Tip Bracket 28 1/8" (71.4 cm) (Rear width of brackets. 30" GAS SLIDE-IN RANGE INSTALLATION INSTRUCTIONS 11 Anti-Tip Brackets Installation Instructions To reduce the risk of tipping of the range, the range must be secured to a different location, the antitip brackets must be secured to install the ...

Product Specifications Sheet (English)
Page 1
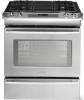
...it's easy to a 17,000-BTU boil quickly. 30" Gas Product Dimensions Height (Max.) Width Depth 36-5/8" 30" 28-5/16" More Easy-To-Use Features Pro-...Select® Controls Precise control at your fingertips. It can cook pizza or chicken nuggets - True Convection Multi-rack baking is ready. or even add a minute to 24 hours. Heavy-Duty Grates and Professional... Delay Start Set your schedule. frigidaire.com is ready. One-Touch Keep Warm Setting Just one to the timer - Slide-In Range FPGS3085K F Signature Features PowerPlus®...
...it's easy to a 17,000-BTU boil quickly. 30" Gas Product Dimensions Height (Max.) Width Depth 36-5/8" 30" 28-5/16" More Easy-To-Use Features Pro-...Select® Controls Precise control at your fingertips. It can cook pizza or chicken nuggets - True Convection Multi-rack baking is ready. or even add a minute to 24 hours. Heavy-Duty Grates and Professional... Delay Start Set your schedule. frigidaire.com is ready. One-Touch Keep Warm Setting Just one to the timer - Slide-In Range FPGS3085K F Signature Features PowerPlus®...

Product Specifications Sheet (English)
Page 2
.... Always consult local and national electric and gas codes. Slide-In Range FPGS3085K F 30" Gas Features Oven Control / Timing System Surface Type Sealed Gas Burners Grates Window Exterior Door Finish Handle Design Exterior Finish (Side Panels) Convection System Oven Cleaning System Drawer Functionality Pro-Select® Slide-In Gas Ranges Black Porcelain Yes Frigidaire Baseline Continuous Cast Iron w/Black Matte...
.... Always consult local and national electric and gas codes. Slide-In Range FPGS3085K F 30" Gas Features Oven Control / Timing System Surface Type Sealed Gas Burners Grates Window Exterior Door Finish Handle Design Exterior Finish (Side Panels) Convection System Oven Cleaning System Drawer Functionality Pro-Select® Slide-In Gas Ranges Black Porcelain Yes Frigidaire Baseline Continuous Cast Iron w/Black Matte...


