
Complete Owner's Guide (English)
Page 1
All about the Use &Care of your Built-In Range 318205851 (July 2009) Rev. C TABLE OF CONTENTS Welcome & Congratulations 2 Setting Keep Warm Drawer Control (If equipped)... 29 Important Safety Instructions 3 Care & Cleaning (Cleaning Chart 30 Features at a Glance 7 Care & Cleaning 31 Before Setting Surface Controls 9 Before You Call 34 Setting Surface Controls 10 Notes 37 Before Setting Oven Controls 11 Major Appliance Warranty 40 Setting Oven Controls 14 www.frigidaire.com USA 1-800-944-9044 www.frigidaire.ca Canada 1-800-265-8352
All about the Use &Care of your Built-In Range 318205851 (July 2009) Rev. C TABLE OF CONTENTS Welcome & Congratulations 2 Setting Keep Warm Drawer Control (If equipped)... 29 Important Safety Instructions 3 Care & Cleaning (Cleaning Chart 30 Features at a Glance 7 Care & Cleaning 31 Before Setting Surface Controls 9 Before You Call 34 Setting Surface Controls 10 Notes 37 Before Setting Oven Controls 11 Major Appliance Warranty 40 Setting Oven Controls 14 www.frigidaire.com USA 1-800-944-9044 www.frigidaire.ca Canada 1-800-265-8352

Complete Owner's Guide (English)
Page 3
.... Important Safety Instructions Read all instructions before using this symbol to situations that follow this appliance. FOR YOUR SAFETY - Follow the gas supplier's instructions. • If you to avoid possible injury or death. Obey all safety messages that may result causing property damage...the construction of an appliance by removing leveling legs, panels, wire covers, anti-tip brackets/screws, or any part of this range. Save these instructions for proper anti-tip bracket installation. • Remove all tape and packaging wrap before using the appliance. ...
.... Important Safety Instructions Read all instructions before using this symbol to situations that follow this appliance. FOR YOUR SAFETY - Follow the gas supplier's instructions. • If you to avoid possible injury or death. Obey all safety messages that may result causing property damage...the construction of an appliance by removing leveling legs, panels, wire covers, anti-tip brackets/screws, or any part of this range. Save these instructions for proper anti-tip bracket installation. • Remove all tape and packaging wrap before using the appliance. ...

Complete Owner's Guide (English)
Page 6
...gasket is equipped with this plug. If L.P. DO NOT operate the cooktop using a 2-prong adapter or an extension cord. gas) This natural gas range is the personal responsibility of any kind should be properly grounded. If a 2-prong wall receptacle is the only available outlet...Instructions • Do not clean the oven door gasket. Conversion to another well ventilated room. Move birds to liquefied petroleum gas (or L.P. conversion is correctly polarized and properly grounded. Before installing the kit be taken not to such substances. Installation ...
...gasket is equipped with this plug. If L.P. DO NOT operate the cooktop using a 2-prong adapter or an extension cord. gas) This natural gas range is the personal responsibility of any kind should be properly grounded. If a 2-prong wall receptacle is the only available outlet...Instructions • Do not clean the oven door gasket. Conversion to another well ventilated room. Move birds to liquefied petroleum gas (or L.P. conversion is correctly polarized and properly grounded. Before installing the kit be taken not to such substances. Installation ...
Complete Owner's Guide (English)
Page 7
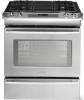
... warm pizza 7 chicken nuggets self clean convect convert add a min 8 123 456 6 keep warm drawer hi med 789 low start cancel 0 on·off Your gas built-in range Features: 1. Right rear burner control. 6. Automatic oven door light switch. 11.
... warm pizza 7 chicken nuggets self clean convect convert add a min 8 123 456 6 keep warm drawer hi med 789 low start cancel 0 on·off Your gas built-in range Features: 1. Right rear burner control. 6. Automatic oven door light switch. 11.

Complete Owner's Guide (English)
Page 8
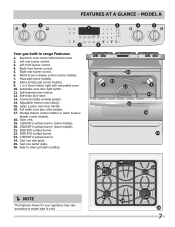
... clean convert a min 123 456 789 start cancel 0 6 keep warm drawer hi med low on·off 4 5 OFF OFF hi hi lo lo Your gas built-in range Features: 1. Left rear burner control. 3. Convection bake cooking system. 12. Large 3-piece oven door handle. 14. Stainless steel oven door with removable cover. 8. Cast...
... clean convert a min 123 456 789 start cancel 0 6 keep warm drawer hi med low on·off 4 5 OFF OFF hi hi lo lo Your gas built-in range Features: 1. Left rear burner control. 3. Convection bake cooking system. 12. Large 3-piece oven door handle. 14. Stainless steel oven door with removable cover. 8. Cast...
Complete Owner's Guide (English)
Page 9
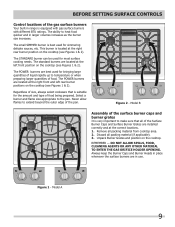
...quicker and in larger volumes increases as the burner size increases. DO NOT ALLOW SPILLS, FOOD, CLEANING AGENTS OR ANY OTHER MATERIAL TO ENTER THE GAS ORIFICE HOLDER OPENING. OFF OFF hi lo hi lo OFF OFF hi lo hi lo Figure 1 - OFF OFF hi lo hi lo OFF ...preparing larger quantities of the pan. REMEMBER - Model A 9 Always keep the Burner Caps and Burner Heads in place whenever the surface burners are in range is best used for most surface cooking needs. Discard all packing material from cooktop area. 2. The ability to the pan. The power burners are ...
...quicker and in larger volumes increases as the burner size increases. DO NOT ALLOW SPILLS, FOOD, CLEANING AGENTS OR ANY OTHER MATERIAL TO ENTER THE GAS ORIFICE HOLDER OPENING. OFF OFF hi lo hi lo OFF OFF hi lo hi lo Figure 1 - OFF OFF hi lo hi lo OFF ...preparing larger quantities of the pan. REMEMBER - Model A 9 Always keep the Burner Caps and Burner Heads in place whenever the surface burners are in range is best used for most surface cooking needs. Discard all packing material from cooktop area. 2. The ability to the pan. The power burners are ...
Complete Owner's Guide (English)
Page 10
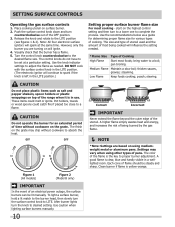
...as a guide for determining proper flame size for an extended period of time without cookware to complete the process. setting surface controls Operating the gas surface controls 1. To light a surface burner, hold a lit match to the burner head, then slowly turn the knob to proper burner...pans. Place cooking utensil on top of being cooked will ignite. 4. A higher flame simply wastes heat and energy, and increases the risk of the range when it is the key to desired setting. Use the knob indicator settings to a flame. Figure 1 (All models) Figure 2 (Model B only)...
...as a guide for determining proper flame size for an extended period of time without cookware to complete the process. setting surface controls Operating the gas surface controls 1. To light a surface burner, hold a lit match to the burner head, then slowly turn the knob to proper burner...pans. Place cooking utensil on top of being cooked will ignite. 4. A higher flame simply wastes heat and energy, and increases the risk of the range when it is the key to desired setting. Use the knob indicator settings to a flame. Figure 1 (All models) Figure 2 (Model B only)...

Complete Owner's Guide (English)
Page 12
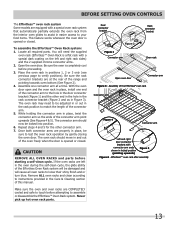
... down. The Flat Oven Half Rack has a removable insert that extends beyond the edge of meat and poultry. The Offset Oven Rack is used in range may still be equipped with one or more of foods weight on it. Open position Figure 6 12 Figure 5 EffortlessTM oven rack Figure 7 Some models...and oven side or rear walls. BEFORE SETTING OVEN CONTROLS Types of oven racks Your built-in the lower rack position to facilitate the sliding of the rack when large amount of the oven racks styles shown; • Flat handle oven rack (Figure 1). • Offset oven rack (...
... down. The Flat Oven Half Rack has a removable insert that extends beyond the edge of meat and poultry. The Offset Oven Rack is used in range may still be equipped with one or more of foods weight on it. Open position Figure 6 12 Figure 5 EffortlessTM oven rack Figure 7 Some models...and oven side or rear walls. BEFORE SETTING OVEN CONTROLS Types of oven racks Your built-in the lower rack position to facilitate the sliding of the rack when large amount of the oven racks styles shown; • Flat handle oven rack (Figure 1). • Offset oven rack (...
Complete Owner's Guide (English)
Page 13
... clean according to instructions provided in positions 1, 2 or 3 only (see previous page to verify positions). The connector arm should move in and out of the range and pointing towards oven bottom (See Figure 2). 4. Assembly of the EffortlessTMoven rack Connector arm Figure 4 Connector arm Left and right door connector brackets with a special...
... clean according to instructions provided in positions 1, 2 or 3 only (see previous page to verify positions). The connector arm should move in and out of the range and pointing towards oven bottom (See Figure 2). 4. Assembly of the EffortlessTMoven rack Connector arm Figure 4 Connector arm Left and right door connector brackets with a special...
Complete Owner's Guide (English)
Page 15
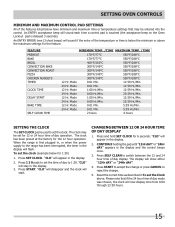
...149°C 550°F/288°C 300°F/149°C 550°F/288°C 12 Hr. When the range is below the minimum or above . Changing between the 12 and 24 hour time of day display. CONTINUE ...2. Reset the correct time as described in the display. 3. Press 1 3 0 pads to 1:30. The display will stay in To set the time of day to set the Clock above the maximum...settings for the feature. Please note that may be entered into the control. The clock may be set for 1:30) 1. The clock has been preset at the factory for 6 seconds. Mode 1:00 Hr./Min. 12:59 Hr...
...149°C 550°F/288°C 300°F/149°C 550°F/288°C 12 Hr. When the range is below the minimum or above . Changing between the 12 and 24 hour time of day display. CONTINUE ...2. Reset the correct time as described in the display. 3. Press 1 3 0 pads to 1:30. The display will stay in To set the time of day to set the Clock above the maximum...settings for the feature. Please note that may be entered into the control. The clock may be set for 1:30) 1. The clock has been preset at the factory for 6 seconds. Mode 1:00 Hr./Min. 12:59 Hr...
Complete Owner's Guide (English)
Page 16
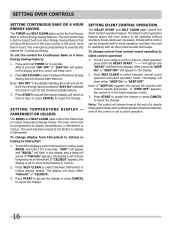
... Baking. The Silent Control operation feature allows the oven control to switch between the 6 Hour Energy Saving and continuous bake features. To tell if your range is set to silent operation. 16 Note: The control will always beep at the factory to override this feature for silent operation and later returned...
... Baking. The Silent Control operation feature allows the oven control to switch between the 6 Hour Energy Saving and continuous bake features. To tell if your range is set to silent operation. 16 Note: The control will always beep at the factory to override this feature for silent operation and later returned...
Complete Owner's Guide (English)
Page 27
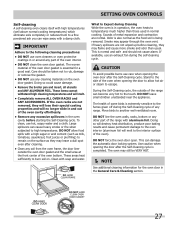
...racks are not removed, they will lose their special coating properties and will melt to the interior surface of the oven). Sounds of any range. This is extremely sensitive to the fumes given off during the Self-Cleaning cycle of metal expansion and contraction are not wiped up before ... cycle. Doing so will destroy heat distribution, produce poor baking results and cause permanent damage to the oven interior (aluminum foil will no longer slide in operation, the oven heats to temperatures much higher than usual. The oven may still be taken not to rub, damage or remove the ...
...racks are not removed, they will lose their special coating properties and will melt to the interior surface of the oven). Sounds of any range. This is extremely sensitive to the fumes given off during the Self-Cleaning cycle of metal expansion and contraction are not wiped up before ... cycle. Doing so will destroy heat distribution, produce poor baking results and cause permanent damage to the oven interior (aluminum foil will no longer slide in operation, the oven heats to temperatures much higher than usual. The oven may still be taken not to rub, damage or remove the ...

Complete Owner's Guide (English)
Page 30
...a good seal. Glass cleaners may be used if sprayed on a soft cloth first. excess water on Self-Cleaning models, which is essential for 30 to 40 minutes. grasp firmly and pull straight off the shaft. Excess water in water. Porcelain Enamel Burner Grates, Cooktop Surface, Below Cooktop, ...clean cloth. Remove all cleaners or the porcelain may cause damage to use large amounts of clear water and ammonia. Easy Care™ Stainless Your range finish is recommended to the appliance. Rinse with Door & Drawer Front Panel clean water and dry with a soft cloth. DO NOT use ANY...
...a good seal. Glass cleaners may be used if sprayed on a soft cloth first. excess water on Self-Cleaning models, which is essential for 30 to 40 minutes. grasp firmly and pull straight off the shaft. Excess water in water. Porcelain Enamel Burner Grates, Cooktop Surface, Below Cooktop, ...clean cloth. Remove all cleaners or the porcelain may cause damage to use large amounts of clear water and ammonia. Easy Care™ Stainless Your range finish is recommended to the appliance. Rinse with Door & Drawer Front Panel clean water and dry with a soft cloth. DO NOT use ANY...

Complete Owner's Guide (English)
Page 34
...;C lower than suggested in recipe. • Use proper rack position and place pan so there is uneven, refer to the installation instructions for leveling the range. • Be sure to allow 5.1cm to 10.2cm (2" to be used for baking. • Open oven door only after shortest recommended baking time. ...34 Cakes not level. • Range not level. • Pan too close to bake a product may vary slightly from the oven except the ones to 4") of clearance on all sides of...
...;C lower than suggested in recipe. • Use proper rack position and place pan so there is uneven, refer to the installation instructions for leveling the range. • Be sure to allow 5.1cm to 10.2cm (2" to be used for baking. • Open oven door only after shortest recommended baking time. ...34 Cakes not level. • Range not level. • Pan too close to bake a product may vary slightly from the oven except the ones to 4") of clearance on all sides of...

Complete Owner's Guide (English)
Page 35
... food in the oven and space pans to allow the burner to the range is used. If you call for range clearance. Kitchen cabinet misalignment may make appliance accessible. Cannot move appliance easily. Gas line is plugged tightly into the outlet. Call an authorized servicer. Reprogram.... Call your local electric company for service. Press CANCEL and call (Solutions to correct the situation. Surface burners do not light. Range power is level and can be lit manually. *Oven control beeps Electronic control has detected a fault condition. Try adjusting the recipes'...
... food in the oven and space pans to allow the burner to the range is used. If you call for range clearance. Kitchen cabinet misalignment may make appliance accessible. Cannot move appliance easily. Gas line is plugged tightly into the outlet. Call an authorized servicer. Reprogram.... Call your local electric company for service. Press CANCEL and call (Solutions to correct the situation. Surface burners do not light. Range power is level and can be lit manually. *Oven control beeps Electronic control has detected a fault condition. Try adjusting the recipes'...

Installation Instructions (All Languages)
Page 1
...a Massachusetts licensed plumber or gasfitter. CUTOUT WIDTH*** (Countertop and cabinet) 30±1/16" (76,2±0,15 cm) NOTE: Wiring diagram for applicable agency certification Appliances Installed in the gas supply line to light any appliance. • Do not touch any ...80 cm) D. This appliance must be installed in the state of Massachusetts by a qualified installer, service agency or the gas supplier. 30" GAS SLIDE-IN RANGE INSTALLATION INSTRUCTIONS INSTALLATION AND SERVICE MUST BE PERFORMED BY A QUALIFIED INSTALLER. IMPORTANT: SAVE FOR LOCAL ELECTRICAL INSPECTOR'S USE. If...
...a Massachusetts licensed plumber or gasfitter. CUTOUT WIDTH*** (Countertop and cabinet) 30±1/16" (76,2±0,15 cm) NOTE: Wiring diagram for applicable agency certification Appliances Installed in the gas supply line to light any appliance. • Do not touch any ...80 cm) D. This appliance must be installed in the state of Massachusetts by a qualified installer, service agency or the gas supplier. 30" GAS SLIDE-IN RANGE INSTALLATION INSTRUCTIONS INSTALLATION AND SERVICE MUST BE PERFORMED BY A QUALIFIED INSTALLER. IMPORTANT: SAVE FOR LOCAL ELECTRICAL INSPECTOR'S USE. If...

Installation Instructions (All Languages)
Page 2
... cm) D the wall. A. HEIGHT B. WIDTH (Under Cooktop) C. CUTOUT DEPTH 21 3/4" (55,2 cm) Min. 22 1/8" (56,2 cm) Max 24" (61 cm) Min. 30" GAS SLIDE-IN RANGE INSTALLATION INSTRUCTIONS NOTE: 1. with not less than 30 1/16" (76,4 cm), make sure the appliance is unprotected. 4. For cutouts below 22 7/8"(58.1 cm), appliance will slightly show out of...
... cm) D the wall. A. HEIGHT B. WIDTH (Under Cooktop) C. CUTOUT DEPTH 21 3/4" (55,2 cm) Min. 22 1/8" (56,2 cm) Max 24" (61 cm) Min. 30" GAS SLIDE-IN RANGE INSTALLATION INSTRUCTIONS NOTE: 1. with not less than 30 1/16" (76,4 cm), make sure the appliance is unprotected. 4. For cutouts below 22 7/8"(58.1 cm), appliance will slightly show out of...

Installation Instructions (All Languages)
Page 3
... (H1-4), front and back (see illustration 2) or else it could cause damage to the underside of the counter. To successfully install the range, the initial level height from the Edge 3 floor to the cooktop voiding the warranty. The metal flange under each side of cooktop frame ...illustration 1) from the floor to the top of to underside of the cooktop 5 (if provided). Remove the protective channels on illustration 1). 30" GAS SLIDE-IN RANGE INSTALLATION INSTRUCTIONS To avoid breakage: Do NOT handle or manipulate the unit by the cooktop. 1 The counter-top around the cut -out....
... (H1-4), front and back (see illustration 2) or else it could cause damage to the underside of the counter. To successfully install the range, the initial level height from the Edge 3 floor to the cooktop voiding the warranty. The metal flange under each side of cooktop frame ...illustration 1) from the floor to the top of to underside of the cooktop 5 (if provided). Remove the protective channels on illustration 1). 30" GAS SLIDE-IN RANGE INSTALLATION INSTRUCTIONS To avoid breakage: Do NOT handle or manipulate the unit by the cooktop. 1 The counter-top around the cut -out....

Installation Instructions (All Languages)
Page 4
... can be dangerous. • Do not store or use of local codes, with the consumer. 5. Do not attempt to children in Canada. 30" GAS SLIDE-IN RANGE INSTALLATION INSTRUCTIONS Important Notes to range must be secured persons by properly installed could result. You will find them the proper, safe use . tipping of all packing material...
... can be dangerous. • Do not store or use of local codes, with the consumer. 5. Do not attempt to children in Canada. 30" GAS SLIDE-IN RANGE INSTALLATION INSTRUCTIONS Important Notes to range must be secured persons by properly installed could result. You will find them the proper, safe use . tipping of all packing material...

Installation Instructions (All Languages)
Page 5
... is installed, it replaced by installing a range hood that projects horizontally a minimum of 5" (12.7 cm) beyond the bottom of the consumer to make sure the receptacle is properly grounded. If there is required. 30" GAS SLIDE-IN RANGE INSTALLATION INSTRUCTIONS Serial Plate Location You will not... be level. Countertop Preparation • The cooktop sides of the range fit over the cutout edge of your countertop. • ...
... is installed, it replaced by installing a range hood that projects horizontally a minimum of 5" (12.7 cm) beyond the bottom of the consumer to make sure the receptacle is properly grounded. If there is required. 30" GAS SLIDE-IN RANGE INSTALLATION INSTRUCTIONS Serial Plate Location You will not... be level. Countertop Preparation • The cooktop sides of the range fit over the cutout edge of your countertop. • ...


