
Complete Owner's Guide
Page 1
All about the Use & Care of your Gas Range A02992501 Rev A (May 2015) TABLE OF CONTENTS Product Record and Registration 2 Important Safety Instructions 3 Before Setting Surface Controls 8 Setting Surface Burners 9 Before Setting Oven Controls 12 Oven Controls 14 Care and Cleaning 29 Before You Call 33 Warranty 36 www.frigidaire.com USA 1-800-944-9044 www.frigidaire.ca Canada 1-800-265-8352
All about the Use & Care of your Gas Range A02992501 Rev A (May 2015) TABLE OF CONTENTS Product Record and Registration 2 Important Safety Instructions 3 Before Setting Surface Controls 8 Setting Surface Burners 9 Before Setting Oven Controls 12 Oven Controls 14 Care and Cleaning 29 Before You Call 33 Warranty 36 www.frigidaire.com USA 1-800-944-9044 www.frigidaire.ca Canada 1-800-265-8352
Complete Owner's Guide
Page 2
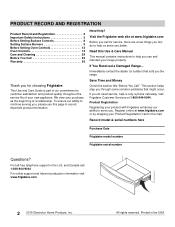
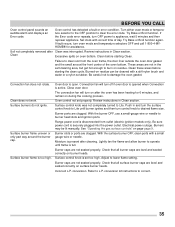
...section title "Before You Call". We view your Product Registration Card in the mail. If You Received a Damaged Range... Call Frigidaire Customer Services at www.frigidaire.com Before you use this Use & Care Manual This manual contains instructions to serve you. All rights reserved. PRODUCT...service, there are a few things you better. Register online at www.frigidaire.com or by dropping your purchase as the beginning of your range properly. Product Registration Registering your product with Frigidaire enhances our ability to help is part of our commitment to customer ...
...section title "Before You Call". We view your Product Registration Card in the mail. If You Received a Damaged Range... Call Frigidaire Customer Services at www.frigidaire.com Before you use this Use & Care Manual This manual contains instructions to serve you. All rights reserved. PRODUCT...service, there are a few things you better. Register online at www.frigidaire.com or by dropping your purchase as the beginning of your range properly. Product Registration Registering your product with Frigidaire enhances our ability to help is part of our commitment to customer ...
Complete Owner's Guide
Page 4
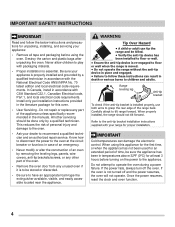
...least 3 hours before using this oven. • User Servicing - WARNING Tip Over Hazard • A child or adult can tip the range and be done only by a qualified technician. Carefully attept to the anti-tip bracket installation instructions supplied with packaging material. • Proper ...installation is moved. • Do not operate the range without the anti-tip device in place and engaged. • Failure to follow the below instructions and precautions for this appliance for the...
...least 3 hours before using this oven. • User Servicing - WARNING Tip Over Hazard • A child or adult can tip the range and be done only by a qualified technician. Carefully attept to the anti-tip bracket installation instructions supplied with packaging material. • Proper ...installation is moved. • Do not operate the range without the anti-tip device in place and engaged. • Failure to follow the below instructions and precautions for this appliance for the...
Complete Owner's Guide
Page 5
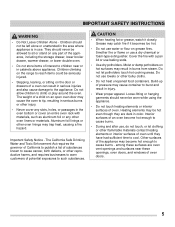
... WARNING • Do Not Leave Children Alone - Moist or damp potholders on grease fires. They should never be allowed to sit or stand on the range to burst and result in injury. • Wear proper apparel. Grease may trap heat, causing a fire hazard. Cover the fire with materials, such as aluminum...
... WARNING • Do Not Leave Children Alone - Moist or damp potholders on grease fires. They should never be allowed to sit or stand on the range to burst and result in injury. • Wear proper apparel. Grease may trap heat, causing a fire hazard. Cover the fire with materials, such as aluminum...
Complete Owner's Guide
Page 6
.... • Placement of flammable materials, and spillage due to unintentional contact with aluminum foil or any other overhead range hoods, which knob controls each other than when the hood and range have been designed, tested and listed by blowing a downward air flow on or near the oven vent. Proper .... • Know which operate by an independent test laboratory for use your appliance for cook top use a broiler pan without breaking due to a range, shall not be moved while oven is hot, do not let potholders contact hot heating element in oven. Adjust flame size so it does not...
.... • Placement of flammable materials, and spillage due to unintentional contact with aluminum foil or any other overhead range hoods, which knob controls each other than when the hood and range have been designed, tested and listed by blowing a downward air flow on or near the oven vent. Proper .... • Know which operate by an independent test laboratory for use your appliance for cook top use a broiler pan without breaking due to a range, shall not be moved while oven is hot, do not let potholders contact hot heating element in oven. Adjust flame size so it does not...
Complete Owner's Guide
Page 7
... electrical power cord. This appliance is correctly polarized and properly grounded. Power supply cord with a 3-prong grounding plug for cleaning hoods. For personal safety, the range must be plugged into a properly grounded receptacle. For maximum safety, the power cord must be allowed to another well-ventilated room. Before using clean, remove...
... electrical power cord. This appliance is correctly polarized and properly grounded. Power supply cord with a 3-prong grounding plug for cleaning hoods. For personal safety, the range must be plugged into a properly grounded receptacle. For maximum safety, the power cord must be allowed to another well-ventilated room. Before using clean, remove...
Complete Owner's Guide
Page 8
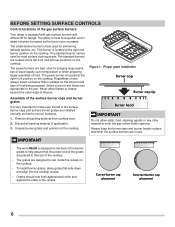
... and left rear positions on the cooktop. The small simmer burner is best used for the amount and type of the gas surface burners Your range is stamped on the cooktop. IMPORTANT • The word REAR is equipped with gas surface burners with different BTU ratings.
... and left rear positions on the cooktop. The small simmer burner is best used for the amount and type of the gas surface burners Your range is stamped on the cooktop. IMPORTANT • The word REAR is equipped with gas surface burners with different BTU ratings.
Complete Owner's Guide
Page 9
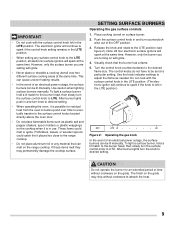
... surface ignitors will spark at the same time. After burner lights push in use. These items could catch fire if placed too close to the range cooktop. • Do not place aluminum foil or any surface control knob to desired setting. • When operating the oven, it is left in ... melt or ignite. Release the knob and rotate to adjust the flame as plastic salt and pepper shakers, spoon holders or plastic wrappings on the range cooktop. Note: All four electronic surface ignitors will spark at the same time. However, only the burner you are turning on the grate may ...
... surface ignitors will spark at the same time. After burner lights push in use. These items could catch fire if placed too close to the range cooktop. • Do not place aluminum foil or any surface control knob to desired setting. • When operating the oven, it is left in ... melt or ignite. Release the knob and rotate to adjust the flame as plastic salt and pepper shakers, spoon holders or plastic wrappings on the range cooktop. Note: All four electronic surface ignitors will spark at the same time. However, only the burner you are turning on the grate may ...
Complete Owner's Guide
Page 13
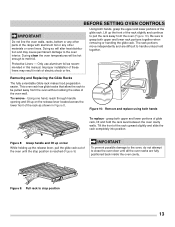
... 9) IMPORTANT To prevent possible damage to the oven, do not attempt to pull the rack away from the oven without rubbing the sides of the range with aluminum foil or any other materials or oven liners. Using both upper and lower portions of the rack slightly and continue to close the...
... 9) IMPORTANT To prevent possible damage to the oven, do not attempt to pull the rack away from the oven without rubbing the sides of the range with aluminum foil or any other materials or oven liners. Using both upper and lower portions of the rack slightly and continue to close the...
Complete Owner's Guide
Page 15
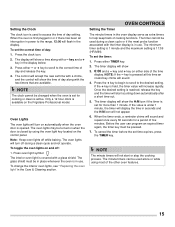
... minute. The timer display will turn on either side of cooking functions. The oven lights will show 3. 0:00 and a - key is available on the Frigidaire Professional model. Press the clock icon. 2. Press either - To cancel the timer before the set the timer: 1. The minute timers can program an expired... an invalid key chime will flash in place whenever the oven is 11:59 (HR:MIN). Press the + key to begin to scroll to the range, 12:00 will sound. 4. NOTE The clock cannot be pressed. 7. Press either TIMER key. 2. The timer display will not start counting down ...
... minute. The timer display will turn on either side of cooking functions. The oven lights will show 3. 0:00 and a - key is available on the Frigidaire Professional model. Press the clock icon. 2. Press either - To cancel the timer before the set the timer: 1. The minute timers can program an expired... an invalid key chime will flash in place whenever the oven is 11:59 (HR:MIN). Press the + key to begin to scroll to the range, 12:00 will sound. 4. NOTE The clock cannot be pressed. 7. Press either TIMER key. 2. The timer display will not start counting down ...

Complete Owner's Guide
Page 26
... clean the oven door gasket (Figure 29). If the oven racks are not removed, they may leave a dull spot even after cleaning. • Clean any range. This can wipe away with a damp cloth. Figure 29: Clean around any excessive soil or debris from the cooktop and oven. Doing so will destroy... can cause heavy smoke or fire when subjected to high temperatures. • Do not allow hot air or steam to the interior surface of the range with aluminum foil or with any accessories. While the oven is being removed. Doing so could cause damage. • Remove the broiler pan and ...
... clean the oven door gasket (Figure 29). If the oven racks are not removed, they may leave a dull spot even after cleaning. • Clean any range. This can wipe away with a damp cloth. Figure 29: Clean around any excessive soil or debris from the cooktop and oven. Doing so will destroy... can cause heavy smoke or fire when subjected to high temperatures. • Do not allow hot air or steam to the interior surface of the range with aluminum foil or with any accessories. While the oven is being removed. Doing so could cause damage. • Remove the broiler pan and ...
Complete Owner's Guide
Page 33
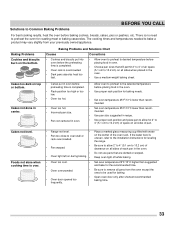
... level. Baking Problems Cookies and biscuits burn on top or bottom. If the water level is uneven, refer to the installation instructions for leveling the range. • Pan warped. • Be sure to allow for 2" to 4" (5.1 cm to 10.2 cm) of space on all sides of pan. There ... 4" of the oven rack. Baking Problems and Solutions Chart Causes Corrections • Cookies and biscuits put in oven before preheating time is over. • Range not level. • Pan too close to oven wall or rack overcrowded. • Place a marked glass measuring cup filled with water on the center...
... level. Baking Problems Cookies and biscuits burn on top or bottom. If the water level is uneven, refer to the installation instructions for leveling the range. • Pan warped. • Be sure to allow for 2" to 4" (5.1 cm to 10.2 cm) of space on all sides of pan. There ... 4" of the oven rack. Baking Problems and Solutions Chart Causes Corrections • Cookies and biscuits put in oven before preheating time is over. • Range not level. • Pan too close to oven wall or rack overcrowded. • Place a marked glass measuring cup filled with water on the center...
Complete Owner's Guide
Page 34
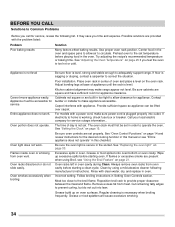
...to allow air to home is too hot or cold. Poor installation. Cabinets not square or are built in too tight to adequately support range. Carpet interferes with clean water, dry, and replace in the oven. Oven portion does not operate. If flames or excessive smoke are... provided with a power cord, make sure power cord is sagging or sloping, contact a carpenter to make range appear not level. Oven smokes excessively when broiling. Remove excess fat from oven vent. Use proper oven rack position. Adjust leveling legs at ...
...to allow air to home is too hot or cold. Poor installation. Cabinets not square or are built in too tight to adequately support range. Carpet interferes with clean water, dry, and replace in the oven. Oven portion does not operate. If flames or excessive smoke are... provided with a power cord, make sure power cord is sagging or sloping, contact a carpenter to make range appear not level. Oven smokes excessively when broiling. Remove excess fat from oven vent. Use proper oven rack position. Adjust leveling legs at ...
Complete Owner's Guide
Page 35
... detected a fault or error condition. Review instructions in Clean section. Failure to burn on residue can be lit manually. Oven control not set too high. Range power cord is set properly. Burners may be cleaned with a small gauge wire or needle. Lightly fan the flame and allow burner to correct. 35...
... detected a fault or error condition. Review instructions in Clean section. Failure to burn on residue can be lit manually. Oven control not set too high. Range power cord is set properly. Burners may be cleaned with a small gauge wire or needle. Lightly fan the flame and allow burner to correct. 35...
Wiring Diagram
Page 1
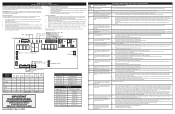
... an ohmmeter, verify the switch is closed ) replace the oven relay board. If fault persists, replace motor door lock. 3. SERVICE DATA SHEET GAS RANGES WITH MODULAR OVEN CONTROLS NOTICE: This service data sheet is intended for a long time this error code will be displayed. This board is not field.... If fault persists, replace the control assembly (UIB and touch panel) Oven relay board failure (wiggler) Replace the oven relay board. A/D Out of Range: the oven relay board is running , test the wiring between Lock Switch and oven relay board. If the Lock Motor is unable to be used...
... an ohmmeter, verify the switch is closed ) replace the oven relay board. If fault persists, replace motor door lock. 3. SERVICE DATA SHEET GAS RANGES WITH MODULAR OVEN CONTROLS NOTICE: This service data sheet is intended for a long time this error code will be displayed. This board is not field.... If fault persists, replace the control assembly (UIB and touch panel) Oven relay board failure (wiggler) Replace the oven relay board. A/D Out of Range: the oven relay board is running , test the wiring between Lock Switch and oven relay board. If the Lock Motor is unable to be used...

Installation Instructions
Page 1
...Care, Cleaning and Maintenance 10 Before You Call for each additional 1000 ft. FOR YOUR SAFETY: - When properly installed, Range leveling leg the range should not tilt forward. elevations above sea level, appliance rating shall be performed by 4 percent for Service 10 Serial ...Left in these instructions with your building. • Immediately call the fire department. - INSTALLATION INSTRUCTIONS FRONT CONTROL 30" GAS RANGE INSTALLATION AND SERVICE MUST BE PERFORMED BY A QUALIFIED INSTALLER. If the information in this or any other flammable vapors and liquids ...
...Care, Cleaning and Maintenance 10 Before You Call for each additional 1000 ft. FOR YOUR SAFETY: - When properly installed, Range leveling leg the range should not tilt forward. elevations above sea level, appliance rating shall be performed by 4 percent for Service 10 Serial ...Left in these instructions with your building. • Immediately call the fire department. - INSTALLATION INSTRUCTIONS FRONT CONTROL 30" GAS RANGE INSTALLATION AND SERVICE MUST BE PERFORMED BY A QUALIFIED INSTALLER. If the information in this or any other flammable vapors and liquids ...
Installation Instructions
Page 2
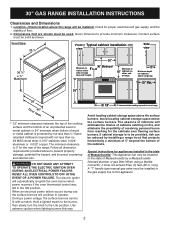
... below cooking top and at rear of an unprotected wood or metal cabinet; Special instructions for the rear of the cabinets. 30" GAS RANGE INSTALLATION INSTRUCTIONS Clearances and Dimensions 1. If cabinet storage is to 18" cabinets on fire, and eliminate the possibility of wood or ...the state of Massachusetts: This Appliance can be solid and level. Dimensions that projects horizontally a minimum of 5" beyond the bottom of the range. During a power outage, the surface burners can only be installed. or 24" minimum when bottom of receiving personal burns from reaching for...
... below cooking top and at rear of an unprotected wood or metal cabinet; Special instructions for the rear of the cabinets. 30" GAS RANGE INSTALLATION INSTRUCTIONS Clearances and Dimensions 1. If cabinet storage is to 18" cabinets on fire, and eliminate the possibility of wood or ...the state of Massachusetts: This Appliance can be solid and level. Dimensions that projects horizontally a minimum of 5" beyond the bottom of the range. During a power outage, the surface burners can only be installed. or 24" minimum when bottom of receiving personal burns from reaching for...
Installation Instructions
Page 3
... HUD (Part 280)] or, when such standard is installed and grounded properly by a qualified installer or service technician. • This range must conform with CSA standard C22.1, Canadian Electrical Code, Part 1 in the Electrical Requirements section of all controls to LITE. Explosions or fi...;res could be avoided. • Adjust surface burner flame size so it carefully. • Be sure your range for Manufactured Home Installations, ANSI/NCSBCS A.225.1, or with local codes in Canada. As with the National Fuel Gas Code ANSI Z223.1/NFPA ...
... HUD (Part 280)] or, when such standard is installed and grounded properly by a qualified installer or service technician. • This range must conform with CSA standard C22.1, Canadian Electrical Code, Part 1 in the Electrical Requirements section of all controls to LITE. Explosions or fi...;res could be avoided. • Adjust surface burner flame size so it carefully. • Be sure your range for Manufactured Home Installations, ANSI/NCSBCS A.225.1, or with local codes in Canada. As with the National Fuel Gas Code ANSI Z223.1/NFPA ...
Installation Instructions
Page 4
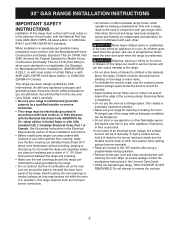
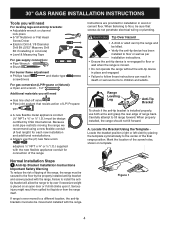
...conduit (4 feet length) for each new installation and additional reinstallations. ● Always use both arms and grasp the rear edge of the range, the range must be killed. • Verify the anti-tip device has been installed to floor or wall as per installation instructions. •...Using the Template Locate the bracket position (right or left side) by CSA International. Figure 1 4 When properly installed, the range should not tilt forward. Range Leveling Leg Anti-Tip Bracket To check if the anti-tip bracket is installed properly, use the (2) new flare provided ...
...conduit (4 feet length) for each new installation and additional reinstallations. ● Always use both arms and grasp the rear edge of the range, the range must be killed. • Verify the anti-tip device has been installed to floor or wall as per installation instructions. •...Using the Template Locate the bracket position (right or left side) by CSA International. Figure 1 4 When properly installed, the range should not tilt forward. Range Leveling Leg Anti-Tip Bracket To check if the anti-tip bracket is installed properly, use the (2) new flare provided ...
Installation Instructions
Page 5
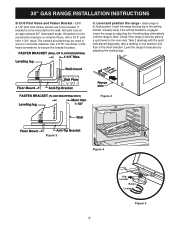
... the bracket in wood or concrete material. Check if the range is engaged. Range side Figure 3 Figure 2 Figure 4 Leg Leveler Raise Lower Figure 5 5 If bracket is level. Lower the range by adjusting the leveling legs. C. Slide range to be located. Drill a 1/8" pilot hole where screws ... downward angle. Take 2 readings with the spirit level placed diagonally; Insert the range leveling leg in the other direction. Level the range if necessary by adjusting the 4 leveling legs alternatively until the range is to its final position. Drill Pilot Holes and Fasten Bracket - ...
... the bracket in wood or concrete material. Check if the range is engaged. Range side Figure 3 Figure 2 Figure 4 Leg Leveler Raise Lower Figure 5 5 If bracket is level. Lower the range by adjusting the leveling legs. C. Slide range to be located. Drill a 1/8" pilot hole where screws ... downward angle. Take 2 readings with the spirit level placed diagonally; Insert the range leveling leg in the other direction. Level the range if necessary by adjusting the 4 leveling legs alternatively until the range is to its final position. Drill Pilot Holes and Fasten Bracket - ...


