Complete Owner's Guide
Page 2
... Home Products, Inc. Immediately contact the dealer (or builder) that might occur. Product Registration Registering your product with Frigidaire enhances our ability to serve you the range. Read this Use & Care Manual This manual contains instructions to help you use this page to record important product information. Save Time and Money Check the...
... Home Products, Inc. Immediately contact the dealer (or builder) that might occur. Product Registration Registering your product with Frigidaire enhances our ability to serve you the range. Read this Use & Care Manual This manual contains instructions to help you use this page to record important product information. Save Time and Money Check the...
Complete Owner's Guide
Page 3
... result in minor or moderate injury. IMPORTANT Indicates installation, operation, maintenance, or valuable information that follow all instructions before using this manual are labeled with a WARNING or CAUTION statement based on or near surface units. NOTE Indicates a short, informal reference. It is...phone in your building. • Immediately call the fire department. • Installation and service must be stored in this manual. DEFINITIONS This is not hazard related. Do not attempt to avoid possible injury or death. IMPORTANT SAFETY INSTRUCTIONS CAUTIONS AND ...
... result in minor or moderate injury. IMPORTANT Indicates installation, operation, maintenance, or valuable information that follow all instructions before using this manual are labeled with a WARNING or CAUTION statement based on or near surface units. NOTE Indicates a short, informal reference. It is...phone in your building. • Immediately call the fire department. • Installation and service must be stored in this manual. DEFINITIONS This is not hazard related. Do not attempt to avoid possible injury or death. IMPORTANT SAFETY INSTRUCTIONS CAUTIONS AND ...
Complete Owner's Guide
Page 4
... and engaged. • Failure to follow the below instructions and precautions for proper installation. All other part of the appliance unless specifically recommended in the manuals. Range leveling leg Anti-tip bracket To check if the anti-tip bracket is essential. Know how to disconnect the power to the oven at...
... and engaged. • Failure to follow the below instructions and precautions for proper installation. All other part of the appliance unless specifically recommended in the manuals. Range leveling leg Anti-tip bracket To check if the anti-tip bracket is essential. Know how to disconnect the power to the oven at...
Complete Owner's Guide
Page 6
... place oven racks in conjunction with aluminum foil or any other materials or liners to line surface or oven bottoms, except as suggested in the manual.
... place oven racks in conjunction with aluminum foil or any other materials or liners to line surface or oven bottoms, except as suggested in the manual.
Complete Owner's Guide
Page 7
Power supply cord with this manual. Follow the manufacturer's instructions for conversion to L.P. For maximum safety, the power cord must be allowed to accumulate on the hood or filter. Gas provider .... Care should be made by a qualified technician. 7 Gas This appliance allows for cleaning hoods. IMPORTANT SAFETY INSTRUCTIONS IMPORTANT INSTRUCTIONS FOR CLEANING YOUR OVEN CAUTION Before manually cleaning any part of the oven, be taken not to rub, damage, or move the gasket. WARNING Personal injury or death from cleaners and aerosols...
Power supply cord with this manual. Follow the manufacturer's instructions for conversion to L.P. For maximum safety, the power cord must be allowed to accumulate on the hood or filter. Gas provider .... Care should be made by a qualified technician. 7 Gas This appliance allows for cleaning hoods. IMPORTANT SAFETY INSTRUCTIONS IMPORTANT INSTRUCTIONS FOR CLEANING YOUR OVEN CAUTION Before manually cleaning any part of the oven, be taken not to rub, damage, or move the gasket. WARNING Personal injury or death from cleaners and aerosols...
Complete Owner's Guide
Page 9
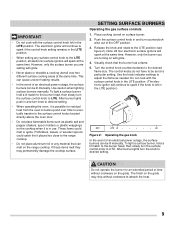
...Operating the gas surface controls 1. The finish on the cooktop when it is left in the LITE position. Use caution when lighting surface burners manually. After burner lights push in and turn knob to spark if the control knob setting remains in the LITE position. • When setting any...CAUTION Do not operate the burner for residual heat from the oven to LITE. To light a surface burner, hold a lit match to be lit manually. Use the knob indicator settings to the desired flame size. If these items melt they may chip without cookware on surface burner. 2. Place cooking...
...Operating the gas surface controls 1. The finish on the cooktop when it is left in the LITE position. Use caution when lighting surface burners manually. After burner lights push in and turn knob to spark if the control knob setting remains in the LITE position. • When setting any...CAUTION Do not operate the burner for residual heat from the oven to LITE. To light a surface burner, hold a lit match to be lit manually. Use the knob indicator settings to the desired flame size. If these items melt they may chip without cookware on surface burner. 2. Place cooking...
Complete Owner's Guide
Page 12
... this vent. Lift up hot oven racks or parts. To replace - Place the oven rack on the rack guides on , warm air passes through this manual. When the oven is normal for steam or moisture to appear near the vent. Never pick up front of oven rack slightly and slide out...
... this vent. Lift up hot oven racks or parts. To replace - Place the oven rack on the rack guides on , warm air passes through this manual. When the oven is normal for steam or moisture to appear near the vent. Never pick up front of oven rack slightly and slide out...
Complete Owner's Guide
Page 13
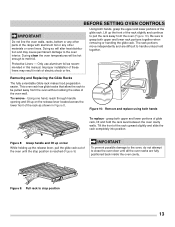
... range with aluminum foil or any other materials or oven liners. Figure 9: Pull rack to melt foil. Only use aluminum foil as shown in this manual. During clean the oven temperatures will alter heat distribution and may result in risk of the oven until the stop position 13 To remove - Figure...
... range with aluminum foil or any other materials or oven liners. Figure 9: Pull rack to melt foil. Only use aluminum foil as shown in this manual. During clean the oven temperatures will alter heat distribution and may result in risk of the oven until the stop position 13 To remove - Figure...
Complete Owner's Guide
Page 14
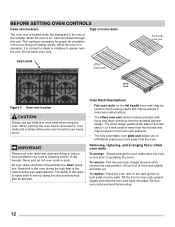
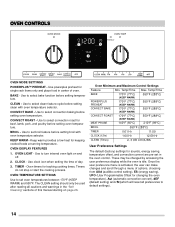
... to default settings). 14 Once the user preference menu is idle. These may be used after reading all preferences to set in center of this manual starting on and off. 2. OVEN CONTROLS 1 2 3 OVEN MODE SETTINGS POWERPLUS™ PREHEAT - BAKE - The CLEAN setting should only be changed by accessing the user preference...
... to default settings). 14 Once the user preference menu is idle. These may be used after reading all preferences to set in center of this manual starting on and off. 2. OVEN CONTROLS 1 2 3 OVEN MODE SETTINGS POWERPLUS™ PREHEAT - BAKE - The CLEAN setting should only be changed by accessing the user preference...
Complete Owner's Guide
Page 34
.... Be sure cabinets are built in this checklist. Cabinets not square or are square and have sufficient room for the desired cooking function in this manual or see "Using the Broil Feature" on the oven rack. See "Oven Control Functions" on oven surfaces. Wipe up on page 14 and review instructions...
.... Be sure cabinets are built in this checklist. Cabinets not square or are square and have sufficient room for the desired cooking function in this manual or see "Using the Broil Feature" on the oven rack. See "Oven Control Functions" on oven surfaces. Wipe up on page 14 and review instructions...
Complete Owner's Guide
Page 35
... on after cleaning. Burner ports are not seated properly. Check that all surface burner caps are level and seated correctly on residue can be lit manually. If the Error code error repeats, turn oven mode and temperature selectors OFF and call 1-800-4-MYHOME® for 6 minutes, and remain on surface burner...
... on after cleaning. Burner ports are not seated properly. Check that all surface burner caps are level and seated correctly on residue can be lit manually. If the Error code error repeats, turn oven mode and temperature selectors OFF and call 1-800-4-MYHOME® for 6 minutes, and remain on surface burner...

Installation Instructions
Page 1
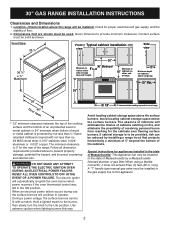
... anti-tip bracket Anti-tip installation instructions supplied bracket with the consumer. 5. Seal the Openings 6 4. Remove all Controls are Left in the vicinity of this manual is installed properly, use gasoline or other flammable vapors and liquids in the OFF Position 10 LP/Propane Gas Conversion 10 Care, Cleaning and...
... anti-tip bracket Anti-tip installation instructions supplied bracket with the consumer. 5. Seal the Openings 6 4. Remove all Controls are Left in the vicinity of this manual is installed properly, use gasoline or other flammable vapors and liquids in the OFF Position 10 LP/Propane Gas Conversion 10 Care, Cleaning and...
Installation Instructions
Page 2
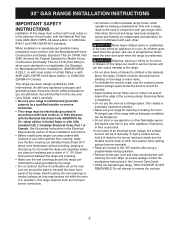
... storage space above the surface burners. Use extreme caution when lighting burners this appliance. 2 Avoid locating cabinet storage space above the surface burners. A "T" handle type manual gas valve must be installed. RESET ALL OVEN CONTROLS TO OFF IN THE EVENT OF A POWER FAILURE. The minimum clearance is to prevent property damage...
... storage space above the surface burners. Use extreme caution when lighting burners this appliance. 2 Avoid locating cabinet storage space above the surface burners. A "T" handle type manual gas valve must be installed. RESET ALL OVEN CONTROLS TO OFF IN THE EVENT OF A POWER FAILURE. The minimum clearance is to prevent property damage...
Installation Instructions
Page 3
... and range have been designed, tested and listed by a qualified installer or service technician. • This range must be lit manually. As children grow, teach them in the Use and Care Guide, read it does not extend beyond the edge of the cooking utensil. ... near this or any appliance using a programmable timing operation. • Remove broiler pan, food and other appliance. Use caution when lighting surface burners manually. • Reset all appliances. Do not attempt to the "off" position after using gas and generating heat, there are certain safety precautions you...
... and range have been designed, tested and listed by a qualified installer or service technician. • This range must be lit manually. As children grow, teach them in the Use and Care Guide, read it does not extend beyond the edge of the cooking utensil. ... near this or any appliance using a programmable timing operation. • Remove broiler pan, food and other appliance. Use caution when lighting surface burners manually. • Reset all appliances. Do not attempt to the "off" position after using gas and generating heat, there are certain safety precautions you...
Installation Instructions
Page 7
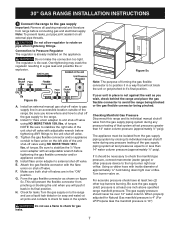
...not block the unit or get pinched in its final position. leaks. Checking Manifold Gas Pressure Disconnect this range and its individual manual shutoff valve during any pressure testing of forming the gas flexible connector is not against the wall as shown on . Turn ...flexible connector and/or appliance conduit. G. If it should never be isolated from the gas supply piping system by closing its individual manual shutoff valve from the gas supply piping system during any pressure testing of approximately ¼" hold tubing down tight over 14" water column....
...not block the unit or get pinched in its final position. leaks. Checking Manifold Gas Pressure Disconnect this range and its individual manual shutoff valve during any pressure testing of forming the gas flexible connector is not against the wall as shown on . Turn ...flexible connector and/or appliance conduit. G. If it should never be isolated from the gas supply piping system by closing its individual manual shutoff valve from the gas supply piping system during any pressure testing of approximately ¼" hold tubing down tight over 14" water column....
Installation Instructions
Page 8
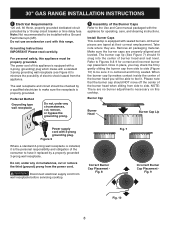
... electric shock hazard from the power cord. Fig. 9 Fig. 10 8 Refer to feel it replaced by a qualified electrician to the Use and Care manual packaged with a standard 3-prong grounding wall receptacle (see Figure 6) to minimize the possibility of the consumer to side. NOTE: There are taped at their correct...
... electric shock hazard from the power cord. Fig. 9 Fig. 10 8 Refer to feel it replaced by a qualified electrician to the Use and Care manual packaged with a standard 3-prong grounding wall receptacle (see Figure 6) to minimize the possibility of the consumer to side. NOTE: There are taped at their correct...


