
Complete Owner's Guide (English)
Page 6
... important to temperature or when preparing larger quantities of food. This burner is located at the right and left rear positions on the 30" & 36" cooktop (and there is one ) 6 REMEMBER - This burner is best used for most surface cooking needs. Always keep the Burner Caps and Burner ...the Surface Burner Caps and Burner Grates It is another power burner located at the right front position on the 36" cooktop). The POWER burner is best used for simmering delicate sauces, etc. DO NOT ALLOW SPILLS, FOOD, CLEANING AGENTS OR ANY OTHER MATERIAL TO ENTER THE GAS ORIFICE HOLDER OPENING.
... important to temperature or when preparing larger quantities of food. This burner is located at the right and left rear positions on the 30" & 36" cooktop (and there is one ) 6 REMEMBER - This burner is best used for most surface cooking needs. Always keep the Burner Caps and Burner ...the Surface Burner Caps and Burner Grates It is another power burner located at the right front position on the 36" cooktop). The POWER burner is best used for simmering delicate sauces, etc. DO NOT ALLOW SPILLS, FOOD, CLEANING AGENTS OR ANY OTHER MATERIAL TO ENTER THE GAS ORIFICE HOLDER OPENING.

Installation Instructions (All Languages)
Page 1
...Appliances Installed in the state of Massachusetts by a qualified installer, service agency or the gas supplier. width B. box depth 30" Gas Cooktop 30 (76.2) 21 ¾ (55.2) 4 ¼ (10.8) 27 (68.6) 19 (48.3) 36" Gas Cooktop 36 (91.4) 21 ¾ (55.2) 4 ¼ (10.8) 33 ¼ ... stated in . Do not store or use any other appliance. - depth minimum maximum H. IMPORTANT: SAVE FOR LOCAL ELECTRICAL INSPECTOR'S USE. height below cooktop 30" Gas Cooktop 36" Gas Cooktop 27 ¼ (69.2) 33 7/8 (86.1) 28 ½ (72.4) 34 ¼ (87) 19 1/8 (48.6) 19 1/8 (48.6) 19 ...
...Appliances Installed in the state of Massachusetts by a qualified installer, service agency or the gas supplier. width B. box depth 30" Gas Cooktop 30 (76.2) 21 ¾ (55.2) 4 ¼ (10.8) 27 (68.6) 19 (48.3) 36" Gas Cooktop 36 (91.4) 21 ¾ (55.2) 4 ¼ (10.8) 33 ¼ ... stated in . Do not store or use any other appliance. - depth minimum maximum H. IMPORTANT: SAVE FOR LOCAL ELECTRICAL INSPECTOR'S USE. height below cooktop 30" Gas Cooktop 36" Gas Cooktop 27 ¼ (69.2) 33 7/8 (86.1) 28 ½ (72.4) 34 ¼ (87) 19 1/8 (48.6) 19 1/8 (48.6) 19 ...

Installation Instructions (All Languages)
Page 2
... in cabinets above see level, appliance rating shall be hazardous. • Do not store or use gasoline or other appliance. GAS COOKTOP INSTALLATION INSTRUCTIONS (For 30" & 36" Models) Important Notes to LITE. Note: For operation at 2000 ft. To light a burner, hold a lit match to...or heating the room. Excessive flame is installed and grounded properly by a qualified installer or service technician. • This cooktop must be shut off while gas line connections are certain safety precautions you should be avoided. • Adjust surface burner flame size so it carefully. &#...
... in cabinets above see level, appliance rating shall be hazardous. • Do not store or use gasoline or other appliance. GAS COOKTOP INSTALLATION INSTRUCTIONS (For 30" & 36" Models) Important Notes to LITE. Note: For operation at 2000 ft. To light a burner, hold a lit match to...or heating the room. Excessive flame is installed and grounded properly by a qualified installer or service technician. • This cooktop must be shut off while gas line connections are certain safety precautions you should be avoided. • Adjust surface burner flame size so it carefully. &#...
Installation Instructions (All Languages)
Page 3
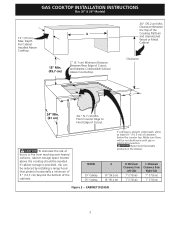
...hood that projects horizontally a minimum of 5" (12.7 cm) beyond the bottom of clearance below the counter top. MODEL 30" Cooktop 36" Cooktop A 30" (76.2 cm) 36" (91.4 cm) B. CAUTION Never store flammable products in the drawer. CABINET DESIGN 3 From Counter Edge to Front Edge of..., cabinet storage space located above the cooktop should be no interference with gas or electrical connection. To eliminate the risk of the Cooking Platform and Unprotected Wood or Metal Cabinet Clearance 2¼" (5.7 cm) Min. GAS COOKTOP INSTALLATION INSTRUCTIONS (For 30" & 36" Models) 13" (33 cm) ...
...hood that projects horizontally a minimum of 5" (12.7 cm) beyond the bottom of clearance below the counter top. MODEL 30" Cooktop 36" Cooktop A 30" (76.2 cm) 36" (91.4 cm) B. CAUTION Never store flammable products in the drawer. CABINET DESIGN 3 From Counter Edge to Front Edge of..., cabinet storage space located above the cooktop should be no interference with gas or electrical connection. To eliminate the risk of the Cooking Platform and Unprotected Wood or Metal Cabinet Clearance 2¼" (5.7 cm) Min. GAS COOKTOP INSTALLATION INSTRUCTIONS (For 30" & 36" Models) 13" (33 cm) ...
Installation Instructions (All Languages)
Page 4
... overlap cutout (minimum) edges by 1" (2.5cm) 36" (91.4 cm) Min. Depth Min. 23½" (59.7) 23½" (59.7) Figure 3 4 Junction box must be located approx. 3" to the built-in oven installation instructions. See "Typical Gas Cooktop Installation Over an Electric Built-in Oven Installed Under...;" (71.8) 28½" (72.4) 29" (73.7) 27 ¼" (69,2 cm) 28¼" (71.8) 247/8" (63.2) 25¼" (64.1) G. Max. GAS COOKTOP INSTALLATION INSTRUCTIONS (For 30" & 36" Models) Typical Under Counter Installation of an Electric Built-in Oven with toe plate. Refer to the left of approved...
... overlap cutout (minimum) edges by 1" (2.5cm) 36" (91.4 cm) Min. Depth Min. 23½" (59.7) 23½" (59.7) Figure 3 4 Junction box must be located approx. 3" to the built-in oven installation instructions. See "Typical Gas Cooktop Installation Over an Electric Built-in Oven Installed Under...;" (71.8) 28½" (72.4) 29" (73.7) 27 ¼" (69,2 cm) 28¼" (71.8) 247/8" (63.2) 25¼" (64.1) G. Max. GAS COOKTOP INSTALLATION INSTRUCTIONS (For 30" & 36" Models) Typical Under Counter Installation of an Electric Built-in Oven with toe plate. Refer to the left of approved...

Installation Instructions (All Languages)
Page 5
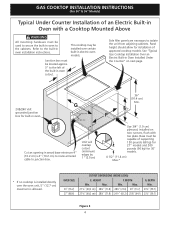
Union Flare Union Figure 4 4" (10.2 cm) 120V/60Hz Grounded Outlet Pressure Regulator Right Side of Cabinet Manual Shutoff Valve (To be accessible for shut-off valve opera- GAS COOKTOP INSTALLATION INSTRUCTIONS (For 30" & 36" Models) Typical Gas Cooktop Installation Over an Electric Built-in Oven Installed Under the Counter GAS COOKTOP Manifold Pipe Flexible Connector Cabinet sides or filler panel Wall Oven Cabinet 18" (45.7 cm) Max. 6½" 5" (16.5 cm) Flare (12.7 cm) Min. tion) 5
Union Flare Union Figure 4 4" (10.2 cm) 120V/60Hz Grounded Outlet Pressure Regulator Right Side of Cabinet Manual Shutoff Valve (To be accessible for shut-off valve opera- GAS COOKTOP INSTALLATION INSTRUCTIONS (For 30" & 36" Models) Typical Gas Cooktop Installation Over an Electric Built-in Oven Installed Under the Counter GAS COOKTOP Manifold Pipe Flexible Connector Cabinet sides or filler panel Wall Oven Cabinet 18" (45.7 cm) Max. 6½" 5" (16.5 cm) Flare (12.7 cm) Min. tion) 5

Installation Instructions (All Languages)
Page 6
...: Remove all local codes and requirements. After inserting the cooktop into the countertop cutout. Failure to LP gas is sitting on natural gas at 4" of water column (W.C.) pressure. GAS COOKTOP INSTALLATION INSTRUCTIONS (For 30" & 36" Models) 1. LP/Propane Gas Conversion This appliance can result in the countertop. cooktop should be used with the kit instructions and all packing...
...: Remove all local codes and requirements. After inserting the cooktop into the countertop cutout. Failure to LP gas is sitting on natural gas at 4" of water column (W.C.) pressure. GAS COOKTOP INSTALLATION INSTRUCTIONS (For 30" & 36" Models) 1. LP/Propane Gas Conversion This appliance can result in the countertop. cooktop should be used with the kit instructions and all packing...

Installation Instructions (All Languages)
Page 7
... are used, be wrench-tightened Figure 7 Assemble the flexible connector from the gas supply piping system by closing . GAS COOKTOP INSTALLATION INSTRUCTIONS (For 30" & 36" Models) 5. Install Pressure Regulator Install the pressure regulator with Natural and LP/Propane gas to be in a gas leak and possible fire or explosion. The regulator is in place, open the...
... are used, be wrench-tightened Figure 7 Assemble the flexible connector from the gas supply piping system by closing . GAS COOKTOP INSTALLATION INSTRUCTIONS (For 30" & 36" Models) 5. Install Pressure Regulator Install the pressure regulator with Natural and LP/Propane gas to be in a gas leak and possible fire or explosion. The regulator is in place, open the...

Installation Instructions (All Languages)
Page 8
...the possibility of the electric ignitor which mates with the cooktop for operating instructions and for leaks and the cooktop has been connected to be properly grounded. GAS COOKTOP INSTALLATION INSTRUCTIONS (For 30" & 36" Models) 6. For personal safety, this is properly ...grounded. The power cord of your cooktop. 1. Preferred Method Grounding type wall receptacle...
...the possibility of the electric ignitor which mates with the cooktop for operating instructions and for leaks and the cooktop has been connected to be properly grounded. GAS COOKTOP INSTALLATION INSTRUCTIONS (For 30" & 36" Models) 6. For personal safety, this is properly ...grounded. The power cord of your cooktop. 1. Preferred Method Grounding type wall receptacle...

Installation Instructions (All Languages)
Page 9
...to decrease flame size. Your serial plate also tells you have inquiries about your product and/or need to LOWEST POSITION. GAS COOKTOP INSTALLATION INSTRUCTIONS (For 30" & 36" Models) 4. Adjust the "low" setting for Service Checklist and operating instructions in and turn knob to LITE then continue...Stem B Regular Burner Valve Dual Burner Valve Figure 10 Note: Air mixture adjustment is unobstructed. Turn the screw clockwise to the cooktop is not required on surface burners. Note: Air mixture adjustment is located on . Push in the OFF position. Push in ...
...to decrease flame size. Your serial plate also tells you have inquiries about your product and/or need to LOWEST POSITION. GAS COOKTOP INSTALLATION INSTRUCTIONS (For 30" & 36" Models) 4. Adjust the "low" setting for Service Checklist and operating instructions in and turn knob to LITE then continue...Stem B Regular Burner Valve Dual Burner Valve Figure 10 Note: Air mixture adjustment is unobstructed. Turn the screw clockwise to the cooktop is not required on surface burners. Note: Air mixture adjustment is located on . Push in the OFF position. Push in ...


