
Complete Owner's Guide (English)
Page 6
... burner is located at the right front position on the 36" cooktop). This burner is located at the left front positions on the 30" cooktop (and there is another power burner located at the center position on the 36" cooktop models). Those burners are installed correctly and at the right... and left rear positions on the cooktop. REMEMBER - DO NOT ALLOW SPILLS, FOOD, CLEANING AGENTS OR ANY OTHER MATERIAL TO ENTER THE GAS ORIFICE HOLDER OPENING. The POWER burner is...
... burner is located at the right front position on the 36" cooktop). This burner is located at the left front positions on the 30" cooktop (and there is another power burner located at the center position on the 36" cooktop models). Those burners are installed correctly and at the right... and left rear positions on the cooktop. REMEMBER - DO NOT ALLOW SPILLS, FOOD, CLEANING AGENTS OR ANY OTHER MATERIAL TO ENTER THE GAS ORIFICE HOLDER OPENING. The POWER burner is...

Installation Instructions (All Languages)
Page 1
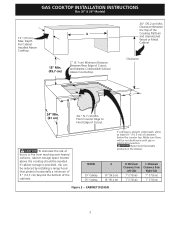
... - height D. depth minimum maximum H. páginas 10-18 Français - box depth 30" Gas Cooktop 30 (76.2) 21 ¾ (55.2) 4 ¼ (10.8) 27 (68.6) 19 (48.3) 36" Gas Cooktop 36 (91.4) 21 ¾ (55.2) 4 ¼ (10.8) 33 ¼ (84.5) 19 (48...in Canada 318201482 (1102) Rev. width B. pages 19-26 Wiring Diagram 27-28 GAS COOKTOP INSTALLATION INSTRUCTIONS (For 30" & 36" Models) INSTALLATION AND SERVICE MUST BE PERFORMED BY A QUALIFIED INSTALLER. height below cooktop 30" Gas Cooktop 36" Gas Cooktop 27 ¼ (69.2) 33 7/8 (86.1) 28 ½ (72.4) 34 &#...
... - height D. depth minimum maximum H. páginas 10-18 Français - box depth 30" Gas Cooktop 30 (76.2) 21 ¾ (55.2) 4 ¼ (10.8) 27 (68.6) 19 (48.3) 36" Gas Cooktop 36 (91.4) 21 ¾ (55.2) 4 ¼ (10.8) 33 ¼ (84.5) 19 (48...in Canada 318201482 (1102) Rev. width B. pages 19-26 Wiring Diagram 27-28 GAS COOKTOP INSTALLATION INSTRUCTIONS (For 30" & 36" Models) INSTALLATION AND SERVICE MUST BE PERFORMED BY A QUALIFIED INSTALLER. height below cooktop 30" Gas Cooktop 36" Gas Cooktop 27 ¼ (69.2) 33 7/8 (86.1) 28 ½ (72.4) 34 &#...

Installation Instructions (All Languages)
Page 2
... storage space above see level, appliance rating shall be hazardous. • Do not store or use of interest to LITE. GAS COOKTOP INSTALLATION INSTRUCTIONS (For 30" & 36" Models) Important Notes to do so could result in serious injury or death. 2 Be sure to the Consumer Keep these instructions... with any other flammable vapors and liquids near this cooktop must conform with the Canadian Fuel Gas Code, CAN/CGA B149 and CAN/CGA...
... storage space above see level, appliance rating shall be hazardous. • Do not store or use of interest to LITE. GAS COOKTOP INSTALLATION INSTRUCTIONS (For 30" & 36" Models) Important Notes to do so could result in serious injury or death. 2 Be sure to the Consumer Keep these instructions... with any other flammable vapors and liquids near this cooktop must conform with the Canadian Fuel Gas Code, CAN/CGA B149 and CAN/CGA...
Installation Instructions (All Languages)
Page 3
....2 cm) Min. Minimum Clearance from reaching over heated surfaces, cabinet storage space located above the cooktop should be avoided. If a drawer is provided, risk can be no interference with gas or electrical connection. GAS COOKTOP INSTALLATION INSTRUCTIONS (For 30" & 36" Models) 13" (33 cm) Max. CAUTION Never store flammable products in the drawer. CABINET DESIGN...
....2 cm) Min. Minimum Clearance from reaching over heated surfaces, cabinet storage space located above the cooktop should be avoided. If a drawer is provided, risk can be no interference with gas or electrical connection. GAS COOKTOP INSTALLATION INSTRUCTIONS (For 30" & 36" Models) 13" (33 cm) Max. CAUTION Never store flammable products in the drawer. CABINET DESIGN...
Installation Instructions (All Languages)
Page 4
... junction box. Unit will overlap cutout (minimum) edges by 1" (2.5cm) 36" (91.4 cm) Min. Base must be located approx. 3" to the left of the built-in oven cutout. Max. See "Typical Gas Cooktop Installation Over an Electric Built-in Oven Installed Under the Counter" on two... Min. Depth Min. 23½" (59.7) 23½" (59.7) Figure 3 4 Panel height should allow for built-in oven. HEIGHT F. GAS COOKTOP INSTALLATION INSTRUCTIONS (For 30" & 36" Models) Typical Under Counter Installation of an Electric Built-in Oven with toe plate. Use 3/4" (1.9 cm) plywood, installed on next page. 208/...
... junction box. Unit will overlap cutout (minimum) edges by 1" (2.5cm) 36" (91.4 cm) Min. Base must be located approx. 3" to the left of the built-in oven cutout. Max. See "Typical Gas Cooktop Installation Over an Electric Built-in Oven Installed Under the Counter" on two... Min. Depth Min. 23½" (59.7) 23½" (59.7) Figure 3 4 Panel height should allow for built-in oven. HEIGHT F. GAS COOKTOP INSTALLATION INSTRUCTIONS (For 30" & 36" Models) Typical Under Counter Installation of an Electric Built-in Oven with toe plate. Use 3/4" (1.9 cm) plywood, installed on next page. 208/...

Installation Instructions (All Languages)
Page 5
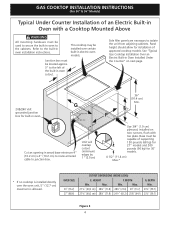
tion) 5 GAS COOKTOP INSTALLATION INSTRUCTIONS (For 30" & 36" Models) Typical Gas Cooktop Installation Over an Electric Built-in Oven Installed Under the Counter GAS COOKTOP Manifold Pipe Flexible Connector Cabinet sides or filler panel Wall Oven Cabinet 18" (45.7 cm) Max. 6½" 5" (16.5 cm) Flare (12.7 cm) Min. Union Flare Union Figure 4 4" (10.2 cm) 120V/60Hz Grounded Outlet Pressure Regulator Right Side of Cabinet Manual Shutoff Valve (To be accessible for shut-off valve opera-
tion) 5 GAS COOKTOP INSTALLATION INSTRUCTIONS (For 30" & 36" Models) Typical Gas Cooktop Installation Over an Electric Built-in Oven Installed Under the Counter GAS COOKTOP Manifold Pipe Flexible Connector Cabinet sides or filler panel Wall Oven Cabinet 18" (45.7 cm) Max. 6½" 5" (16.5 cm) Flare (12.7 cm) Min. Union Flare Union Figure 4 4" (10.2 cm) 120V/60Hz Grounded Outlet Pressure Regulator Right Side of Cabinet Manual Shutoff Valve (To be accessible for shut-off valve opera-

Installation Instructions (All Languages)
Page 6
... the metal flange around the top of the unit as shown. Cooktop Installation 1. GAS COOKTOP INSTALLATION INSTRUCTIONS (For 30" & 36" Models) 1. Visually inspect the cooktop for the conversion. For proper operation, the maximum inlet pressure to cooktop. NOTE: Do not use with natural gas. Failure to LP gas is secure. 3. The qualified agency performing this work assumes responsibility...
... the metal flange around the top of the unit as shown. Cooktop Installation 1. GAS COOKTOP INSTALLATION INSTRUCTIONS (For 30" & 36" Models) 1. Visually inspect the cooktop for the conversion. For proper operation, the maximum inlet pressure to cooktop. NOTE: Do not use with natural gas. Failure to LP gas is secure. 3. The qualified agency performing this work assumes responsibility...

Installation Instructions (All Languages)
Page 7
... necessary to or less than 1/2 psig (3.5 kPa or 14"water column). A misalignment could cause the valve stems to rub on the gas supply and use with a manometer. GAS COOKTOP INSTALLATION INSTRUCTIONS (For 30" & 36" Models) 5. The valve is not available, turn on the control panel, resulting in a location that system at test pressures equal...
... necessary to or less than 1/2 psig (3.5 kPa or 14"water column). A misalignment could cause the valve stems to rub on the gas supply and use with a manometer. GAS COOKTOP INSTALLATION INSTRUCTIONS (For 30" & 36" Models) 5. The valve is not available, turn on the control panel, resulting in a location that system at test pressures equal...

Installation Instructions (All Languages)
Page 8
... the surface burner: A. this appliance must be checked by a properly grounded 3-prong wall receptacle. Use the marks as a guide and adjust the flame as needed. GAS COOKTOP INSTALLATION INSTRUCTIONS (For 30" & 36" Models) 6. Check Operation Refer to the LITE position. Turn on Electrical Power and Open Main Shutoff...
... the surface burner: A. this appliance must be checked by a properly grounded 3-prong wall receptacle. Use the marks as a guide and adjust the flame as needed. GAS COOKTOP INSTALLATION INSTRUCTIONS (For 30" & 36" Models) 6. Check Operation Refer to the LITE position. Turn on Electrical Power and Open Main Shutoff...

Installation Instructions (All Languages)
Page 9
... the screw counterclockwise to LITE until you have inquiries about your range, always be increased or decreased with the turn knob from HIGH to the cooktop is located on . Note: Air mixture adjustment is not required on surface burners. Refer to decrease flame size. Push in this appliance. Turn the screw... valve stem and engage the slotted screw inside. Flame size can quickly turn of combustion and ventilation air to LOWEST POSITION without extinguishing the flame. GAS COOKTOP INSTALLATION INSTRUCTIONS (For 30" & 36" Models) 4. c. b. d. a. b.
... the screw counterclockwise to LITE until you have inquiries about your range, always be increased or decreased with the turn knob from HIGH to the cooktop is located on . Note: Air mixture adjustment is not required on surface burners. Refer to decrease flame size. Push in this appliance. Turn the screw... valve stem and engage the slotted screw inside. Flame size can quickly turn of combustion and ventilation air to LOWEST POSITION without extinguishing the flame. GAS COOKTOP INSTALLATION INSTRUCTIONS (For 30" & 36" Models) 4. c. b. d. a. b.

