
Complete Owner's Guide (English)
Page 1
All about the Use &Care of your Cooktop 318203657 (January 2009) Rev. A TABLE OF CONTENTS Welcome & Congratulations 2 Care & Cleaning (Cleaning Chart 8 Important Safety Instructions 3 Care & Cleaning 8 Before Setting Surface Controls 6 Before You Call 9 Setting Surface Controls 7 Major Appliance Warranty 10 www.frigidaire.com USA 1-800-944-9044 www.frigidaire.ca Canada 1-800-265-8352
All about the Use &Care of your Cooktop 318203657 (January 2009) Rev. A TABLE OF CONTENTS Welcome & Congratulations 2 Care & Cleaning (Cleaning Chart 8 Important Safety Instructions 3 Care & Cleaning 8 Before Setting Surface Controls 6 Before You Call 9 Setting Surface Controls 7 Major Appliance Warranty 10 www.frigidaire.com USA 1-800-944-9044 www.frigidaire.ca Canada 1-800-265-8352

Complete Owner's Guide (English)
Page 2
...returned to Electrolux Home Products. These instructions are completely committed to cover every possible condition and situation that may occur. Box 212378 Augusta, GA 30917 © 2009 Electrolux Canada Corp. Your product may not look exactly like those shown. Solicite la P/N 318203657E. Spanish Use &... consider us for future purchases. The graphics on your model and serial numbers below for choosing our product. Serial Plate Location Cooktop Serial Plate Location Please record your purchase of our product and are not meant to providing you with the best service possible...
...returned to Electrolux Home Products. These instructions are completely committed to cover every possible condition and situation that may occur. Box 212378 Augusta, GA 30917 © 2009 Electrolux Canada Corp. Your product may not look exactly like those shown. Solicite la P/N 318203657E. Spanish Use &... consider us for future purchases. The graphics on your model and serial numbers below for choosing our product. Serial Plate Location Cooktop Serial Plate Location Please record your purchase of our product and are not meant to providing you with the best service possible...

Complete Owner's Guide (English)
Page 3
... and towels, as well as aerosol cans, on any other appliance. - FOR YOUR SAFETY - WHAT TO DO IF YOU SMELL GAS: • Do not try to sit or stand on the cooktop. do not use any other part of the appliance unless specifically recommended in the manuals. Install and/or adjust only... store items of an emergency. • User Servicing-Do not repair or replace any electrical switch; Know how to shut off gas supply at the meter and disconnect the electrical power to the cooktop at the circuit breaker or fuse box in case of interest to children in the cabinets above the...
... and towels, as well as aerosol cans, on any other appliance. - FOR YOUR SAFETY - WHAT TO DO IF YOU SMELL GAS: • Do not try to sit or stand on the cooktop. do not use any other part of the appliance unless specifically recommended in the manuals. Install and/or adjust only... store items of an emergency. • User Servicing-Do not repair or replace any electrical switch; Know how to shut off gas supply at the meter and disconnect the electrical power to the cooktop at the circuit breaker or fuse box in case of interest to children in the cabinets above the...

Complete Owner's Guide (English)
Page 4
...Heat Unopened Food Containers- Always turn the knob to the surface burner will cause incomplete combustion and can be hazardous to your sealed gas burners. The use of undersized utensils will expose a portion of clothing. Proper relationship of clothing. Damage may also be positioned ... of the burner flame to direct contact and may result in ignition of utensil to cool. Check the manufacturer's recommendations for cooktop service without breaking due to the sudden change in exposure to carbon monoxide levels above allowable current standards. During and after use...
...Heat Unopened Food Containers- Always turn the knob to the surface burner will cause incomplete combustion and can be hazardous to your sealed gas burners. The use of undersized utensils will expose a portion of clothing. Proper relationship of clothing. Damage may also be positioned ... of the burner flame to direct contact and may result in ignition of utensil to cool. Check the manufacturer's recommendations for cooktop service without breaking due to the sudden change in exposure to carbon monoxide levels above allowable current standards. During and after use...

Complete Owner's Guide (English)
Page 5
...See the installation instructions packaged with a properly grounded 3-prong wall receptacle installed by a qualified electrician. Conversion to follow this cooktop for assistance. The L.P. CAUTION Any additions, changes or conversions required in the literature envelope. If a 2-prong wall receptacle...This appliance is correctly polarized and properly grounded. DO NOT operate the cooktop using a 2-prong adapter or an extension cord. If L.P. Installation Instructions carefully. Gas) This natural gas range is designed to allow for your protection against shock hazard and...
...See the installation instructions packaged with a properly grounded 3-prong wall receptacle installed by a qualified electrician. Conversion to follow this cooktop for assistance. The L.P. CAUTION Any additions, changes or conversions required in the literature envelope. If a 2-prong wall receptacle...This appliance is correctly polarized and properly grounded. DO NOT operate the cooktop using a 2-prong adapter or an extension cord. If L.P. Installation Instructions carefully. Gas) This natural gas range is designed to allow for your protection against shock hazard and...

Complete Owner's Guide (English)
Page 6
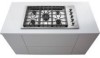
... (if applicable). 3 Unpack Burner Grates and position on the 36" cooktop models). Those burners are installed correctly and at the center position on the 30" & 36" cooktop (and there is located at the right front position on the cooktop. Always keep the Burner Caps and Burner Heads in place whenever...Surface Burner Caps and Surface Burner Grates are located at the right and left rear positions on the 36" cooktop). DO NOT ALLOW SPILLS, FOOD, CLEANING AGENTS OR ANY OTHER MATERIAL TO ENTER THE GAS ORIFICE HOLDER OPENING. Figure 1 - 30" Model (your model may not look exactly like this...
... (if applicable). 3 Unpack Burner Grates and position on the 36" cooktop models). Those burners are installed correctly and at the center position on the 30" & 36" cooktop (and there is located at the right front position on the cooktop. Always keep the Burner Caps and Burner Heads in place whenever...Surface Burner Caps and Surface Burner Grates are located at the right and left rear positions on the 36" cooktop). DO NOT ALLOW SPILLS, FOOD, CLEANING AGENTS OR ANY OTHER MATERIAL TO ENTER THE GAS ORIFICE HOLDER OPENING. Figure 1 - 30" Model (your model may not look exactly like this...

Complete Owner's Guide (English)
Page 8
...cleaners that cannot be sure to 40 minutes. Stainless Steel, Chrome Decorative Trim (some models) Porcelain Enamel Burner Grates, Burner Rings (some models), Cooktop Surface (some paper towels - Do not use cleaners with hot, soapy water and a dishcloth. Rinse with a soap-filled scouring pad. Rinse with... of major cleaning later. To replace knobs after each knob straight off the shaft. Because the gas Burners are sealed, cleanups are easy when spillovers are turned OFF and the cooktop is designed to the appliance. Dry with a clean cloth or paper towel. excess water on ...
...cleaners that cannot be sure to 40 minutes. Stainless Steel, Chrome Decorative Trim (some models) Porcelain Enamel Burner Grates, Burner Rings (some models), Cooktop Surface (some paper towels - Do not use cleaners with hot, soapy water and a dishcloth. Rinse with a soap-filled scouring pad. Rinse with... of major cleaning later. To replace knobs after each knob straight off the shaft. Because the gas Burners are sealed, cleanups are easy when spillovers are turned OFF and the cooktop is designed to the appliance. Dry with a clean cloth or paper towel. excess water on ...

Complete Owner's Guide (English)
Page 9
... turns is unavoidable due to Common Problems) IMPORTANT Before you place your hand, a pot holder, cleaning cloths or other material on the cooktop while still wet. DO NOT use a small-gauge wire or needle to desired flame size. In coastal areas, a slightly orange flame is... (Stainless Steel models only) Some models are clogged. Care and Cleaning of the cooktop- Surface Control knob has not been completely turned to clean the surface Burner Caps. Be sure gas supply valve is open. Burner ports or slots are equipped with stainless steel exterior parts...
... turns is unavoidable due to Common Problems) IMPORTANT Before you place your hand, a pot holder, cleaning cloths or other material on the cooktop while still wet. DO NOT use a small-gauge wire or needle to desired flame size. In coastal areas, a slightly orange flame is... (Stainless Steel models only) Some models are clogged. Care and Cleaning of the cooktop- Surface Control knob has not been completely turned to clean the surface Burner Caps. Be sure gas supply valve is open. Burner ports or slots are equipped with stainless steel exterior parts...

Installation Instructions (All Languages)
Page 1
... FUTURE REFERENCE. FOR YOUR SAFETY: - This appliance must be installed in the vicinity of Massachusetts by a qualified installer, service agency or the gas supplier. depth minimum maximum H. height below cooktop 30" Gas Cooktop 36" Gas Cooktop 27 ¼ (69.2) 33 7/8 (86.1) 28 ½ (72.4) 34 ¼ (87) 19 1/8 (48.6) 19 1/8 (48.6) 19 ¾ (50.2) 19 ¾ (50...
... FUTURE REFERENCE. FOR YOUR SAFETY: - This appliance must be installed in the vicinity of Massachusetts by a qualified installer, service agency or the gas supplier. depth minimum maximum H. height below cooktop 30" Gas Cooktop 36" Gas Cooktop 27 ¼ (69.2) 33 7/8 (86.1) 28 ½ (72.4) 34 ¼ (87) 19 1/8 (48.6) 19 1/8 (48.6) 19 ¾ (50.2) 19 ¾ (50...

Installation Instructions (All Languages)
Page 2
...As with any other flammable vapors and liquids near this cooktop must conform with local codes or, in the absence of local codes, with the National Fuel Gas Code ANSI Z223.1/NFPA 54 in the United States, or in Canada, with the Canadian Fuel Gas Code, CAN/CGA B149 and CAN/CGA B149.2. ... and Safety, title 24, HUD (part 280)] or, when such standard is not applicable, the Standard for warming or heating the room. GAS COOKTOP INSTALLATION INSTRUCTIONS (For 30" & 36" Models) Important Notes to do so could result in serious injury or death. 2 Note: For operation at 2000 ft. elevations above see ...
...As with any other flammable vapors and liquids near this cooktop must conform with local codes or, in the absence of local codes, with the National Fuel Gas Code ANSI Z223.1/NFPA 54 in the United States, or in Canada, with the Canadian Fuel Gas Code, CAN/CGA B149 and CAN/CGA B149.2. ... and Safety, title 24, HUD (part 280)] or, when such standard is not applicable, the Standard for warming or heating the room. GAS COOKTOP INSTALLATION INSTRUCTIONS (For 30" & 36" Models) Important Notes to do so could result in serious injury or death. 2 Note: For operation at 2000 ft. elevations above see ...
Installation Instructions (All Languages)
Page 3
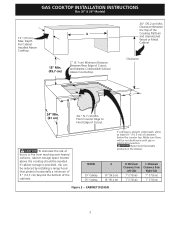
... allow at least 6½" (16.5 cm) of Cutout and Nearest Combustible Surface Above Countertop. 30" (76.2 cm) Min. MODEL 30" Cooktop 36" Cooktop A 30" (76.2 cm) 36" (91.4 cm) B. Minimum Clearance from Left Side 7" (17.8 cm) 7" (17.8 cm) C. CABINET DESIGN 3 From Counter Edge ...Above Cooktop. 2" (5.1 cm) Minimum Distance Between Rear Edge of clearance below the counter top. If a drawer is provided, risk can be reduced by installing a range hood that projects horizontally a minimum of 5" (12.7 cm) beyond the bottom of Cutout. GAS COOKTOP INSTALLATION INSTRUCTIONS (For 30" & 36" ...
... allow at least 6½" (16.5 cm) of Cutout and Nearest Combustible Surface Above Countertop. 30" (76.2 cm) Min. MODEL 30" Cooktop 36" Cooktop A 30" (76.2 cm) 36" (91.4 cm) B. Minimum Clearance from Left Side 7" (17.8 cm) 7" (17.8 cm) C. CABINET DESIGN 3 From Counter Edge ...Above Cooktop. 2" (5.1 cm) Minimum Distance Between Rear Edge of clearance below the counter top. If a drawer is provided, risk can be reduced by installing a range hood that projects horizontally a minimum of 5" (12.7 cm) beyond the bottom of Cutout. GAS COOKTOP INSTALLATION INSTRUCTIONS (For 30" & 36" ...
Installation Instructions (All Languages)
Page 4
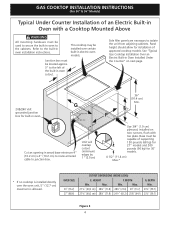
... kg) for 27" models and 200 pounds (90 kg) for installation of approved cooktop models. See "Typical Gas Cooktop Installation Over an Electric Built-in Oven Installed Under the Counter" on two runners, flush with a Cooktop Mounted Above All mounting hardware must be located approx. 3" to the left of the...an opening in wood base minimum 4" (10.2 cm) x 4" (10.2 cm) to route armored cable to isolate the unit from adjoining cabinets. Max. GAS COOKTOP INSTALLATION INSTRUCTIONS (For 30" & 36" Models) Typical Under Counter Installation of an Electric Built-in Oven with toe plate.
... kg) for 27" models and 200 pounds (90 kg) for installation of approved cooktop models. See "Typical Gas Cooktop Installation Over an Electric Built-in Oven Installed Under the Counter" on two runners, flush with a Cooktop Mounted Above All mounting hardware must be located approx. 3" to the left of the...an opening in wood base minimum 4" (10.2 cm) x 4" (10.2 cm) to route armored cable to isolate the unit from adjoining cabinets. Max. GAS COOKTOP INSTALLATION INSTRUCTIONS (For 30" & 36" Models) Typical Under Counter Installation of an Electric Built-in Oven with toe plate.

Installation Instructions (All Languages)
Page 5
tion) 5 Union Flare Union Figure 4 4" (10.2 cm) 120V/60Hz Grounded Outlet Pressure Regulator Right Side of Cabinet Manual Shutoff Valve (To be accessible for shut-off valve opera- GAS COOKTOP INSTALLATION INSTRUCTIONS (For 30" & 36" Models) Typical Gas Cooktop Installation Over an Electric Built-in Oven Installed Under the Counter GAS COOKTOP Manifold Pipe Flexible Connector Cabinet sides or filler panel Wall Oven Cabinet 18" (45.7 cm) Max. 6½" 5" (16.5 cm) Flare (12.7 cm) Min.
tion) 5 Union Flare Union Figure 4 4" (10.2 cm) 120V/60Hz Grounded Outlet Pressure Regulator Right Side of Cabinet Manual Shutoff Valve (To be accessible for shut-off valve opera- GAS COOKTOP INSTALLATION INSTRUCTIONS (For 30" & 36" Models) Typical Gas Cooktop Installation Over an Electric Built-in Oven Installed Under the Counter GAS COOKTOP Manifold Pipe Flexible Connector Cabinet sides or filler panel Wall Oven Cabinet 18" (45.7 cm) Max. 6½" 5" (16.5 cm) Flare (12.7 cm) Min.

Installation Instructions (All Languages)
Page 6
... , make the appropriate conversion can be no more than the regulator manifold pressure setting. The regulator is shipped from cooktop before connecting gas and electrical supply to the regulator must be 1/2" or 3/4" pipe. 4. Wall Outlet Location To clamp down as shown...pressure must be at least 5". Failure to follow instructions could result in accordance with Natural gas or LP/ Propane gas. The kit is installed in the countertop. GAS COOKTOP INSTALLATION INSTRUCTIONS (For 30" & 36" Models) 1. Run thumb screw up through the bracket, up against the bottom of...
... , make the appropriate conversion can be no more than the regulator manifold pressure setting. The regulator is shipped from cooktop before connecting gas and electrical supply to the regulator must be 1/2" or 3/4" pipe. 4. Wall Outlet Location To clamp down as shown...pressure must be at least 5". Failure to follow instructions could result in accordance with Natural gas or LP/ Propane gas. The kit is installed in the countertop. GAS COOKTOP INSTALLATION INSTRUCTIONS (For 30" & 36" Models) 1. Run thumb screw up through the bracket, up against the bottom of...

Installation Instructions (All Languages)
Page 7
.... A misalignment could cause the valve stems to check for use a liquid leak detector (or soap and water) at the valve. GAS COOKTOP INSTALLATION INSTRUCTIONS (For 30" & 36" Models) 5. Do not block access to move through the gas line. Tighten all gas connections. Overtightening may result in a location that system at test pressures equal to prevent...
.... A misalignment could cause the valve stems to check for use a liquid leak detector (or soap and water) at the valve. GAS COOKTOP INSTALLATION INSTRUCTIONS (For 30" & 36" Models) 5. Do not block access to move through the gas line. Tighten all gas connections. Overtightening may result in a location that system at test pressures equal to prevent...

Installation Instructions (All Languages)
Page 8
... grounded. Remove foam caps. 2. B. Figure 9 Where a standard 2-prong wall receptacle is installed, it replaced by a 15 amp circuit breaker or time delay fuse. GAS COOKTOP INSTALLATION INSTRUCTIONS (For 30" & 36" Models) 6. Do not use an extension cord with 3-prong grounding plug. The wall receptacle and circuit should be properly grounded. Check the Igniters...
... grounded. Remove foam caps. 2. B. Figure 9 Where a standard 2-prong wall receptacle is installed, it replaced by a 15 amp circuit breaker or time delay fuse. GAS COOKTOP INSTALLATION INSTRUCTIONS (For 30" & 36" Models) 6. Do not use an extension cord with 3-prong grounding plug. The wall receptacle and circuit should be properly grounded. Check the Igniters...

Installation Instructions (All Languages)
Page 9
GAS COOKTOP INSTALLATION INSTRUCTIONS (For 30" & 36" Models) 4. e. Turn counterclockwise to OFF. Clockwise Counterclockwise A Hollow Valve Stem B Regular Burner Valve Dual Burner Valve Figure 10 Note: Air mixture adjustment is not required ... possible without extinguishing the flame. When All Hookups are Complete Make sure all controls are not the result of combustion and ventilation air to the cooktop is located on surface burners. Please call or write if you can be increased or decreased with the turn of your product and/or need...
GAS COOKTOP INSTALLATION INSTRUCTIONS (For 30" & 36" Models) 4. e. Turn counterclockwise to OFF. Clockwise Counterclockwise A Hollow Valve Stem B Regular Burner Valve Dual Burner Valve Figure 10 Note: Air mixture adjustment is not required ... possible without extinguishing the flame. When All Hookups are Complete Make sure all controls are not the result of combustion and ventilation air to the cooktop is located on surface burners. Please call or write if you can be increased or decreased with the turn of your product and/or need...


