Installation Instructions
Page 1
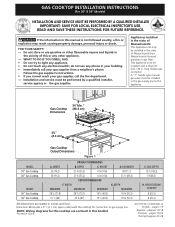
...Min. * Gas Cooktop (86.4 cm) Dimensions A B C E D 3¼" H (8.3 cm) G F Gas Cooktop Cutout Dimensions Figure 1 MODEL 30" Gas Cooktop 36" Gas Cooktop MODEL 30" Gas Cooktop 36" Gas Cooktop PRODUCT DIMENSIONS A. NOTE: Wiring diagrams for connection to this cooktop are stated in . GAS COOKTOP INSTALLATION INSTRUCTIONS (For 30" & 36" Models) INSTALLATION AND SERVICE MUST BE PERFORMED BY A QUALIFIED INSTALLER. If the information in China A01705101 (1406) Rev. Do not store or use any electrical switch; long flexible gas connector. HEIGHT BELOW COOKTOP 8 (20...
...Min. * Gas Cooktop (86.4 cm) Dimensions A B C E D 3¼" H (8.3 cm) G F Gas Cooktop Cutout Dimensions Figure 1 MODEL 30" Gas Cooktop 36" Gas Cooktop MODEL 30" Gas Cooktop 36" Gas Cooktop PRODUCT DIMENSIONS A. NOTE: Wiring diagrams for connection to this cooktop are stated in . GAS COOKTOP INSTALLATION INSTRUCTIONS (For 30" & 36" Models) INSTALLATION AND SERVICE MUST BE PERFORMED BY A QUALIFIED INSTALLER. If the information in China A01705101 (1406) Rev. Do not store or use any electrical switch; long flexible gas connector. HEIGHT BELOW COOKTOP 8 (20...
Installation Instructions
Page 2
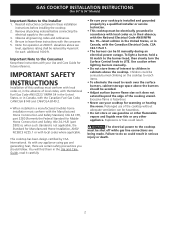
... injury or death. 2 To light a burner, hold a lit match to the burner head, then slowly turn the Surface Control knob to leave these instructions with the Canadian Electrical Code, CSA C22.1 Part 1. • The burners can be hazardous. • Do not store or use your Use and Care Guide for warming or heating the room. Children could be avoided. • Adjust surface burner flame size so it carefully. • Be sure your...
... injury or death. 2 To light a burner, hold a lit match to the burner head, then slowly turn the Surface Control knob to leave these instructions with the Canadian Electrical Code, CSA C22.1 Part 1. • The burners can be hazardous. • Do not store or use your Use and Care Guide for warming or heating the room. Children could be avoided. • Adjust surface burner flame size so it carefully. • Be sure your...
Installation Instructions
Page 3
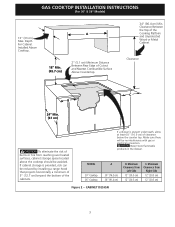
... fire from reaching over heated surfaces, cabinet storage space located above the cooktop should be no interference with gas or electrical connection. Make sure there will be avoided. Depth For Cabinet Installed Above Cooktop. Minimum Clearance from Right Side 12" (30.5 cm) 12" (30.5 cm) Figure 2 - Minimum Clearance from Left Side 12" (30.5 cm) 12" (30.5 cm) C. MODEL 30" Cooktop 36" Cooktop A 30" (76.2 cm) 36" (91...
... fire from reaching over heated surfaces, cabinet storage space located above the cooktop should be no interference with gas or electrical connection. Make sure there will be avoided. Depth For Cabinet Installed Above Cooktop. Minimum Clearance from Right Side 12" (30.5 cm) 12" (30.5 cm) Figure 2 - Minimum Clearance from Left Side 12" (30.5 cm) 12" (30.5 cm) C. MODEL 30" Cooktop 36" Cooktop A 30" (76.2 cm) 36" (91...
Installation Instructions
Page 4
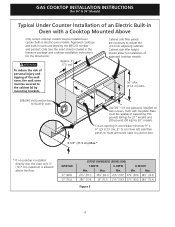
... 3 4 GAS COOKTOP INSTALLATION INSTRUCTIONS (For 30" & 36" Models) Typical Under Counter Installation of an Electric Built-in Oven with toe plate. Cut an opening in wood base minimum 9" x 9" (23 X 23 cm), 2" (5 cm) from adjoining cabinets. Min. OVEN SIZE 27" (68.6) 30" (76.2) CUTOUT DIMENSIONS (INCHES (CM)) F. DEPTH H. Base must be installed over the oven unit, 5" (12.7 cm) maximum is allowed above the floor. F Use 3/4" (1.9 cm) plywood, installed on two runners, flush with a Cooktop Mounted...
... 3 4 GAS COOKTOP INSTALLATION INSTRUCTIONS (For 30" & 36" Models) Typical Under Counter Installation of an Electric Built-in Oven with toe plate. Cut an opening in wood base minimum 9" x 9" (23 X 23 cm), 2" (5 cm) from adjoining cabinets. Min. OVEN SIZE 27" (68.6) 30" (76.2) CUTOUT DIMENSIONS (INCHES (CM)) F. DEPTH H. Base must be installed over the oven unit, 5" (12.7 cm) maximum is allowed above the floor. F Use 3/4" (1.9 cm) plywood, installed on two runners, flush with a Cooktop Mounted...
Installation Instructions
Page 5
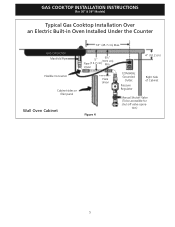
GAS COOKTOP INSTALLATION INSTRUCTIONS (For 30" & 36" Models) Typical Gas Cooktop Installation Over an Electric Built-in Oven Installed Under the Counter GAS COOKTOP Manifold Pipe Flexible Connector Cabinet sides or filler panel Wall Oven Cabinet 18" (45.7 cm) Max. 6½" 5" (16.5 cm) Flare (12.7 cm) Min. tion) 5 Union Flare Union Figure 4 4" (10.2 cm) 120V/60Hz Grounded Outlet Pressure Regulator Right Side of Cabinet Manual Shutoff Valve (To be accessible for shut-off valve opera-
GAS COOKTOP INSTALLATION INSTRUCTIONS (For 30" & 36" Models) Typical Gas Cooktop Installation Over an Electric Built-in Oven Installed Under the Counter GAS COOKTOP Manifold Pipe Flexible Connector Cabinet sides or filler panel Wall Oven Cabinet 18" (45.7 cm) Max. 6½" 5" (16.5 cm) Flare (12.7 cm) Min. tion) 5 Union Flare Union Figure 4 4" (10.2 cm) 120V/60Hz Grounded Outlet Pressure Regulator Right Side of Cabinet Manual Shutoff Valve (To be accessible for shut-off valve opera-
Installation Instructions
Page 6
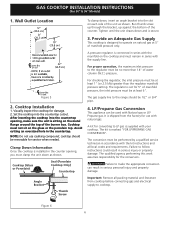
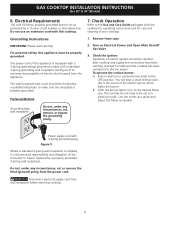
... work assumes responsibility for damage. 2. Figure 6 6 Wall Outlet Location To clamp down and is installed in the counter opening , make the appropriate conversion can be used with your cooktop. For checking the regulator, the inlet pressure must be removable for 5" of the counter. Clamp Down Information Once the cooktop is secure. 3. A pressure regulator is set for service when needed. Figure 5 2. Cooktop (Glass or Porcelain) Seal (Porcelain Cooktop Only) Countertop The gas supply line to the regulator...
... work assumes responsibility for damage. 2. Figure 6 6 Wall Outlet Location To clamp down and is installed in the counter opening , make the appropriate conversion can be used with your cooktop. For checking the regulator, the inlet pressure must be removable for 5" of the counter. Clamp Down Information Once the cooktop is secure. 3. A pressure regulator is set for service when needed. Figure 5 2. Cooktop (Glass or Porcelain) Seal (Porcelain Cooktop Only) Countertop The gas supply line to the regulator...
Installation Instructions
Page 7
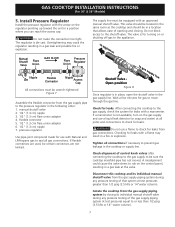
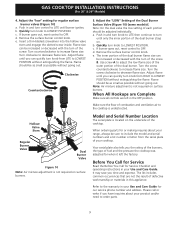
GAS COOKTOP INSTALLATION INSTRUCTIONS (For 30" & 36" Models) 5. If flexible connectors are used, be equipped with an approved manual shutoff valve. The valve is in place, open the shutoff valve in the gas supply line. to appliance Shutoff Valve Open position Figure 8 to gas supply line Once regulator is for leaks with a manometer. Tighten all connections if necessary to rub on or shutting off gas to the appliance. Install Pressure Regulator Install the...
GAS COOKTOP INSTALLATION INSTRUCTIONS (For 30" & 36" Models) 5. If flexible connectors are used, be equipped with an approved manual shutoff valve. The valve is in place, open the shutoff valve in the gas supply line. to appliance Shutoff Valve Open position Figure 8 to gas supply line Once regulator is for leaks with a manometer. Tighten all connections if necessary to rub on or shutting off gas to the appliance. Install Pressure Regulator Install the...
Installation Instructions
Page 8
... grounded. To operate the surface burner: A. The wall receptacle and circuit should be checked by a 15 amp circuit breaker or time delay fuse. Use the marks as a guide and adjust the flame as needed. Remove foam caps. 2. B. Power supply cord with the cooktop for operating instructions and for care and cleaning of electric igniters should be checked after cooktop and supply line connectors have to electric power. Do not, under any circumstances, cut , remove, or bypass the...
... grounded. To operate the surface burner: A. The wall receptacle and circuit should be checked by a 15 amp circuit breaker or time delay fuse. Use the marks as a guide and adjust the flame as needed. Remove foam caps. 2. B. Power supply cord with the cooktop for operating instructions and for care and cleaning of electric igniters should be checked after cooktop and supply line connectors have to electric power. Do not, under any circumstances, cut , remove, or bypass the...
Installation Instructions
Page 9
... it left in and turn knob to LITE then continue to turn knob from the serial plate of the dual burner flame size can quickly turn until burner ignites. If burner goes out, reset control to increase flame size. Remove the surface burner control knob. Note: Air mixture adjustment is located on surface burners. Before You Call for Service Read the Before You Call for regular surface burner valves (Figure 10) a. Flame size can quickly turn control to order parts. 9 Quickly turn of defective workmanship...
... it left in and turn knob to LITE then continue to turn knob from the serial plate of the dual burner flame size can quickly turn until burner ignites. If burner goes out, reset control to increase flame size. Remove the surface burner control knob. Note: Air mixture adjustment is located on surface burners. Before You Call for Service Read the Before You Call for regular surface burner valves (Figure 10) a. Flame size can quickly turn control to order parts. 9 Quickly turn of defective workmanship...

Product Specifications Sheet
Page 1
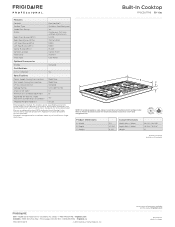
..., sear, and sauté with the other appliances in your kitchen. Durable, Continuous Grates Cook a variety of dishes with ease. Stainless Steel Cooktop The entire cooktop surface is stainless steel to slide a variety of heavy pots and pans across burners. The PowerPlus® Burner delivers strong performance, every time with ease. PrecisionPro ControlsTM Prepare a range of dishes at the same time with 18,200 BTU.
..., sear, and sauté with the other appliances in your kitchen. Durable, Continuous Grates Cook a variety of dishes with ease. Stainless Steel Cooktop The entire cooktop surface is stainless steel to slide a variety of heavy pots and pans across burners. The PowerPlus® Burner delivers strong performance, every time with ease. PrecisionPro ControlsTM Prepare a range of dishes at the same time with 18,200 BTU.
Product Specifications Sheet
Page 2
...8" Granite Countertop Installation Kit available. Compliant1 Yes Specifications Power Supply Connection Location Gas Supply Connection Location LP Gas Conversion Kit Voltage Rating Amps @ 120 Volts2 Minimum Circuit Required (Amps) Approved for installation above any of Justice's 2010 A.D.A. Built-In Cooktop Drop-In Gas Cooktops (Front Controls)FPGC3077RS 30" Gas Features Controls Surface Type Sealed Gas Burners Grates Right Front Burner (BTU) Right Rear Burner (BTU) Left Front Burner (BTU) Left Rear Burner (BTU) Center Burner (BTU) Control Location Knob Color Knob Type Frigidaire...
...8" Granite Countertop Installation Kit available. Compliant1 Yes Specifications Power Supply Connection Location Gas Supply Connection Location LP Gas Conversion Kit Voltage Rating Amps @ 120 Volts2 Minimum Circuit Required (Amps) Approved for installation above any of Justice's 2010 A.D.A. Built-In Cooktop Drop-In Gas Cooktops (Front Controls)FPGC3077RS 30" Gas Features Controls Surface Type Sealed Gas Burners Grates Right Front Burner (BTU) Right Rear Burner (BTU) Left Front Burner (BTU) Left Rear Burner (BTU) Center Burner (BTU) Control Location Knob Color Knob Type Frigidaire...
Product Specifications Sheet
Page 3
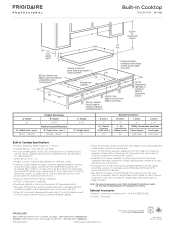
... when using overhead cabinetry, install range hood that projects horizontally a recommended minimum of 5" beyond bottom of cabinets. • Gas Built-In Cooktop model FPGC3077R is present * Includes clearance needed beneath cooktop to either side of cutout and adjacent combustible surface (or backsplash) 25" min. 24" 18" A B min. Optional Accessories • Granite Countertop Installation Kit - (PN # 903103-9010). • Griddle - Built-In Cooktop FPGC3077RS 30" Gas ( L ) min. Recommended location for inspection and service. • Cooktop ships with a separate ground wire...
... when using overhead cabinetry, install range hood that projects horizontally a recommended minimum of 5" beyond bottom of cabinets. • Gas Built-In Cooktop model FPGC3077R is present * Includes clearance needed beneath cooktop to either side of cutout and adjacent combustible surface (or backsplash) 25" min. 24" 18" A B min. Optional Accessories • Granite Countertop Installation Kit - (PN # 903103-9010). • Griddle - Built-In Cooktop FPGC3077RS 30" Gas ( L ) min. Recommended location for inspection and service. • Cooktop ships with a separate ground wire...


