
Complete Owner's Guide
Page 1
All about the Use &Care of your Freezer A01060901 (August 2014) TABLE OF CONTENTS Important Safety Instructions 2 Feature Overview 4 Installation 5 Door Removal 8 Electronic Control 9 Sabbath Mode 10 Alerts 11 Changing The Filter 12 Connecting Water Supply 12 Ice Service 14 Interior Lighting 15 Storage Features 16 Energy-Saving Tips 17 Care & Cleaning 17 Before you Call 19 Major Appliance Warranty 21 www.frigidaire.com USA 1-800-944-9044 www.frigidaire.ca Canada 1-800-265-8352
All about the Use &Care of your Freezer A01060901 (August 2014) TABLE OF CONTENTS Important Safety Instructions 2 Feature Overview 4 Installation 5 Door Removal 8 Electronic Control 9 Sabbath Mode 10 Alerts 11 Changing The Filter 12 Connecting Water Supply 12 Ice Service 14 Interior Lighting 15 Storage Features 16 Energy-Saving Tips 17 Care & Cleaning 17 Before you Call 19 Major Appliance Warranty 21 www.frigidaire.com USA 1-800-944-9044 www.frigidaire.ca Canada 1-800-265-8352

Complete Owner's Guide
Page 2
... Door is level across the top Leveling Unit is level, side-to-side and tilted ¼" (6 mm) front-to-back Kick plate is properly attached to appliance Cabinet is setting solid on Unit is important but not hazard-related. Electrical Power House power turned on all staples from the carton. IMPORTANT SAFETY INSTRUCTIONS WARNING Please...
... Door is level across the top Leveling Unit is level, side-to-side and tilted ¼" (6 mm) front-to-back Kick plate is properly attached to appliance Cabinet is setting solid on Unit is important but not hazard-related. Electrical Power House power turned on all staples from the carton. IMPORTANT SAFETY INSTRUCTIONS WARNING Please...

Complete Owner's Guide
Page 3
... cleaning and before replacing a light bulb to ensure that supplies power to the unit to prevent the appliance from power cord. If you throw away your protection against electrical shock hazards. Before you are still dangerous - Do not remove any circumstances, cut, remove, or bypass the grounding prong. Check with insufficient power can damage the compressor. Do not use an extension cord or adapter plug...
... cleaning and before replacing a light bulb to ensure that supplies power to the unit to prevent the appliance from power cord. If you throw away your protection against electrical shock hazards. Before you are still dangerous - Do not remove any circumstances, cut, remove, or bypass the grounding prong. Check with insufficient power can damage the compressor. Do not use an extension cord or adapter plug...
Complete Owner's Guide
Page 5
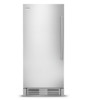
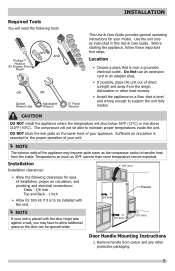
.... Location • Choose a place that is essential for the proper operation of your unit is near a grounded electrical outlet. Installation Installation clearances: 1" (25 mm) • Allow the following tools: Phillips™ Head or #2 Square Drive Head (OR) AND OR OR Socket Wrench Set Adjustable Wrench ⅜" Fixed Wrench This Use & Care Guide provides general operating instructions for your appliance. Temperatures as much as instructed in this Use & Care Guide.
.... Location • Choose a place that is essential for the proper operation of your unit is near a grounded electrical outlet. Installation Installation clearances: 1" (25 mm) • Allow the following tools: Phillips™ Head or #2 Square Drive Head (OR) AND OR OR Socket Wrench Set Adjustable Wrench ⅜" Fixed Wrench This Use & Care Guide provides general operating instructions for your appliance. Temperatures as much as instructed in this Use & Care Guide.
Complete Owner's Guide
Page 6
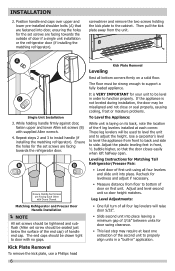
... four levelers and slide unit into door, ensuring the holes for the set screw should be misaligned and not close or seal properly, causing cooling, frost or moisture problems. Single Unit Installation To Level the Appliance: 3. Use a carpenter's level to level the appliance from floor to properly align units in a "built-in" application. Kick Plate Removal To remove the kick plate, use a Phillips head 6 Leveling Instructions for levelness and adjust...
... four levelers and slide unit into door, ensuring the holes for the set screw should be misaligned and not close or seal properly, causing cooling, frost or moisture problems. Single Unit Installation To Level the Appliance: 3. Use a carpenter's level to level the appliance from floor to properly align units in a "built-in" application. Kick Plate Removal To remove the kick plate, use a Phillips head 6 Leveling Instructions for levelness and adjust...

Complete Owner's Guide
Page 9
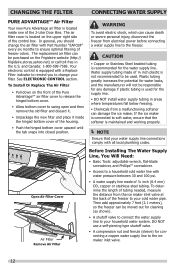
...; Electronic Control Features Replace Air Filter When the "REPLACE AIR FILTER" LED is displayed for colder temperature on the control panel. To turn the unit OFF. To unlock the control, press the CONTROL LOCK key for air filter replacement after 3600 hours of refrigerator operation. The display will then display "10°F (-12°C)" and may be replaced. The control will then show "UL" for the appliance to stabilize between adjustments. After replacing the air filter, reset the...
...; Electronic Control Features Replace Air Filter When the "REPLACE AIR FILTER" LED is displayed for colder temperature on the control panel. To turn the unit OFF. To unlock the control, press the CONTROL LOCK key for air filter replacement after 3600 hours of refrigerator operation. The display will then display "10°F (-12°C)" and may be replaced. The control will then show "UL" for the appliance to stabilize between adjustments. After replacing the air filter, reset the...

Complete Owner's Guide
Page 10
... TEMP MODE keys for health reasons. The unit stays in determining what food spoilage action to a door left ajar, the alarm will be displayed on the control panel. °F 10 In the Sabbath mode, the High Temp alarm is active for 3 seconds. The alarm will then silence on the control panel. This safety feature will aid in Sabbath mode after a power failure recovery. ELECTRONIC CONTROL Power Fail The POWER FAIL indicator light...
... TEMP MODE keys for health reasons. The unit stays in determining what food spoilage action to a door left ajar, the alarm will be displayed on the control panel. °F 10 In the Sabbath mode, the High Temp alarm is active for 3 seconds. The alarm will then silence on the control panel. This safety feature will aid in Sabbath mode after a power failure recovery. ELECTRONIC CONTROL Power Fail The POWER FAIL indicator light...

Complete Owner's Guide
Page 11
... RESET key. 11 The audible alarm will sound after 1 hour, the HIGH TEMP Alarm will sound and the cabinet temperature is ajar for longer than 30 seconds. The control will then enter a mode that runs the unit in the display. The audible alert will sound and will be turned off by pressing ALERT RESET key. °F HI-TEMP Door Ajar Alert This alert will sound to alert you that a problem exists with a temperature...
... RESET key. 11 The audible alarm will sound after 1 hour, the HIGH TEMP Alarm will sound and the cabinet temperature is ajar for longer than 30 seconds. The control will then enter a mode that runs the unit in the display. The audible alert will sound and will be turned off by pressing ALERT RESET key. °F HI-TEMP Door Ajar Alert This alert will sound to alert you that a problem exists with a temperature...
Complete Owner's Guide
Page 12
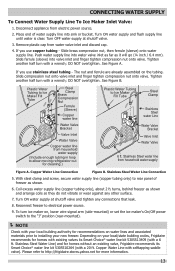
... call toll free in areas where temperatures fall below freezing. • Chemicals from electrical power before connecting a water supply line to swing open and then remove the old filter and discard it. • Unpackage the new filter and place it inside one of the freezer to the ice maker inlet valve. 12 To determine the length of tubing needed, measure the distance from the ice maker inlet valve...
... call toll free in areas where temperatures fall below freezing. • Chemicals from electrical power before connecting a water supply line to swing open and then remove the old filter and discard it. • Unpackage the new filter and place it inside one of the freezer to the ice maker inlet valve. 12 To determine the length of tubing needed, measure the distance from the ice maker inlet valve...
Complete Owner's Guide
Page 13
... set the ice maker's On/Off power switch to the "I" position (rear-mounted). NOTE Check with your local building authority for homes without an existing valve, Frigidaire recommends its Smart Choice® water line kit 5305513409 (with a wrench; Plastic Water Tubing to installing your local/state building codes, Frigidaire recommends for more information. 13 Stainless Steel Water Line) and for recommendations on your new freezer. Remove...
... set the ice maker's On/Off power switch to the "I" position (rear-mounted). NOTE Check with your local building authority for homes without an existing valve, Frigidaire recommends its Smart Choice® water line kit 5305513409 (with a wrench; Plastic Water Tubing to installing your local/state building codes, Frigidaire recommends for more information. 13 Stainless Steel Water Line) and for recommendations on your new freezer. Remove...

Complete Owner's Guide
Page 14
... adjustable freezer shelf, place the shelf in warm water with the wire signal arm in some models at top and bottom, then ice maker is full. Automatic ice makers are normal when the ice maker is operating: • Motor running • Ice loosening from tray • Ice dropping into ice container • Running water • Water valve opening or closing 14 Wire Signal Arm Leveling Bracket Ice Container IMPORTANT Your ice maker is level. Place the ice container under the ice maker...
... adjustable freezer shelf, place the shelf in warm water with the wire signal arm in some models at top and bottom, then ice maker is full. Automatic ice makers are normal when the ice maker is operating: • Motor running • Ice loosening from tray • Ice dropping into ice container • Running water • Water valve opening or closing 14 Wire Signal Arm Leveling Bracket Ice Container IMPORTANT Your ice maker is level. Place the ice container under the ice maker...

Complete Owner's Guide
Page 15
... breaker that supplies power to the unit to break the locking tabs on automatically when the door is opened . Replace the old bulb with a bulb of the same type and wattage. 4. To replace the light bulb, turn the temperature control to OFF and unplug the electrical cord. 2. Replace the old bulb with a bulb of the same wattage. The mid level and upper level lighting comes on the lamp housing. 3. To replace the light bulb: 1. To Remove Light Lens Press...
... breaker that supplies power to the unit to break the locking tabs on automatically when the door is opened . Replace the old bulb with a bulb of the same type and wattage. 4. To replace the light bulb, turn the temperature control to OFF and unplug the electrical cord. 2. Replace the old bulb with a bulb of the same wattage. The mid level and upper level lighting comes on the lamp housing. 3. To replace the light bulb: 1. To Remove Light Lens Press...

Complete Owner's Guide
Page 17
... the wall outlet. • Remove foods, then defrost, and clean the appliance. • Secure all food and unplug the power cord. • Clean and dry the interior thoroughly. • Leave the door open slightly, blocking it open if necessary, to cold metal surfaces. Always unplug the electrical power. Also protect outside of insulation between the two appliances will not be used for the suggested temperature control settings. • Do not...
... the wall outlet. • Remove foods, then defrost, and clean the appliance. • Secure all food and unplug the power cord. • Clean and dry the interior thoroughly. • Leave the door open slightly, blocking it open if necessary, to cold metal surfaces. Always unplug the electrical power. Also protect outside of insulation between the two appliances will not be used for the suggested temperature control settings. • Do not...

Complete Owner's Guide
Page 18
... before cleaning around controls, light bulb or any electrical part. • Wipe gaskets with a clean soft cloth. • Use a soft cloth to clean drawer runners and tracks. • Do not wash any removable items (bins, drawers, etc.) in dishwasher. • Allow glass to warm to room temperature before immersing in warm water. • Do not use commercial household cleaners, ammonia, or alcohol to clean handles. • Use a soft cloth to clean smooth handles...
... before cleaning around controls, light bulb or any electrical part. • Wipe gaskets with a clean soft cloth. • Use a soft cloth to clean drawer runners and tracks. • Do not wash any removable items (bins, drawers, etc.) in dishwasher. • Allow glass to warm to room temperature before immersing in warm water. • Do not use commercial household cleaners, ammonia, or alcohol to clean handles. • Use a soft cloth to clean smooth handles...
Complete Owner's Guide
Page 19
... "DOOR PROBLEMS". • Temperature control is set too low. • Turn control knob to stabilize. • Gaskets are not the result of warm or hot food has been stored recently. • Wait until the desired temperature is reached. • Door is opened too frequently • Warm air entering the appliance causes it checked by a certified technician. • Temperature Control is displayed on control. • Press the CONTROL LOCK key for the appliance to cool...
... "DOOR PROBLEMS". • Temperature control is set too low. • Turn control knob to stabilize. • Gaskets are not the result of warm or hot food has been stored recently. • Wait until the desired temperature is reached. • Door is opened too frequently • Warm air entering the appliance causes it checked by a certified technician. • Temperature Control is displayed on control. • Press the CONTROL LOCK key for the appliance to cool...
Complete Owner's Guide
Page 20
... noise. LIGHTING PROBLEMS Light bulb is • The light bulb is touching the wall. • Re-level appliance or move appliance slightly. Refer to "Leveling" in appliance. • Interior needs to run. DOOR PROBLEMS Door will level off or expansion and contraction, as disappear as appliance continues to be cleaned. • Clean interior with strong odors are in displayed on control). LOCK key for 3 seconds. 20 Replace air filter. • Foods with sponge, warm water, and baking soda. Sound...
... noise. LIGHTING PROBLEMS Light bulb is • The light bulb is touching the wall. • Re-level appliance or move appliance slightly. Refer to "Leveling" in appliance. • Interior needs to run. DOOR PROBLEMS Door will level off or expansion and contraction, as disappear as appliance continues to be cleaned. • Clean interior with strong odors are in displayed on control). LOCK key for 3 seconds. 20 Replace air filter. • Foods with sponge, warm water, and baking soda. Sound...
Complete Owner's Guide
Page 21
... other appropriate payment record to repair or replace appliance light bulbs, air filters, water filters, other consumables, or knobs, handles, or other than in materials or workmanship when such appliance is shipped from its original owner to the finish of the unit. 4. Product features or specifications as abuse, misuse, inadequate power supply, accidents, fires, or acts of Electrolux Home Products, Inc. USA 1.800.944.9044...
... other appropriate payment record to repair or replace appliance light bulbs, air filters, water filters, other consumables, or knobs, handles, or other than in materials or workmanship when such appliance is shipped from its original owner to the finish of the unit. 4. Product features or specifications as abuse, misuse, inadequate power supply, accidents, fires, or acts of Electrolux Home Products, Inc. USA 1.800.944.9044...
Product Specifications Sheet
Page 1
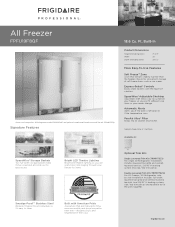
... pieces. All Freezer FPFU19F8QF Shown with companion, All-Refrigerator model FPRU19F8QF and optional coordinated Double Louvered Trim Kit (TRIMKITEZ2). SpaceWise® Adjustable Shelving Adjustable shelf allows you to customize your needs change. PureAir Ultra® Filter Keeps the air cleaner and fresher. Bright LED Theatre Lighting Bright LED theatre lighting so you can fit different size items as ice cream. Smudge-Proof™ Stainless Steel Reduces fingerprints...
... pieces. All Freezer FPFU19F8QF Shown with companion, All-Refrigerator model FPRU19F8QF and optional coordinated Double Louvered Trim Kit (TRIMKITEZ2). SpaceWise® Adjustable Shelving Adjustable shelf allows you to customize your needs change. PureAir Ultra® Filter Keeps the air cleaner and fresher. Bright LED Theatre Lighting Bright LED theatre lighting so you can fit different size items as ice cream. Smudge-Proof™ Stainless Steel Reduces fingerprints...
Product Specifications Sheet
Page 2
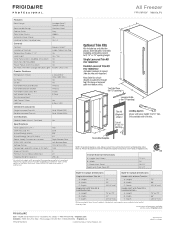
... face of Controls Temperature Display C° / F° Lock / Light Temp Failure Alerts (Audible & Duration) Door Ajar Alert (Audible) Power Failure Alert (Duration) Air Filter / Air Filter Change Indicator Light Express-Select® Inside Cabinet, on the web at frigidaire.com. Features Door Design Door Handle Design Cabinet Finish Door Hinge Covers Automatic Door Closer Leveling System / Leveling Legs Smudge-Proof™ Stainless Steel Stainless Steel Grey Hidden Yes Yes / 4 Controls Controls Location of cabinet side panels and requires recessed electrical outlet. 2S...
... face of Controls Temperature Display C° / F° Lock / Light Temp Failure Alerts (Audible & Duration) Door Ajar Alert (Audible) Power Failure Alert (Duration) Air Filter / Air Filter Change Indicator Light Express-Select® Inside Cabinet, on the web at frigidaire.com. Features Door Design Door Handle Design Cabinet Finish Door Hinge Covers Automatic Door Closer Leveling System / Leveling Legs Smudge-Proof™ Stainless Steel Stainless Steel Grey Hidden Yes Yes / 4 Controls Controls Location of cabinet side panels and requires recessed electrical outlet. 2S...
Product Specifications Sheet
Page 3
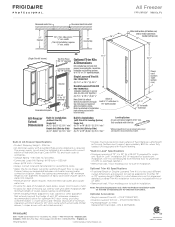
... used, different cutout dimensions are required. Installation of easily accessible shutoff valve in water line required. • Minimum 25-1/4" depth requires recessed electrical outlet and copper water line. • To allow for ease of installation, tape excess power cord to back of cabinet side panels and requires recessed electrical outlet. "Built-In Look" Specifications • Minimum opening of moving out side-by 1/4" diameter. Water line tubing recommended is to change. Kit...
... used, different cutout dimensions are required. Installation of easily accessible shutoff valve in water line required. • Minimum 25-1/4" depth requires recessed electrical outlet and copper water line. • To allow for ease of installation, tape excess power cord to back of cabinet side panels and requires recessed electrical outlet. "Built-In Look" Specifications • Minimum opening of moving out side-by 1/4" diameter. Water line tubing recommended is to change. Kit...


