
Installation Instructions (All Languages)
Page 1
ELECTRIC WALL OVEN INSTALLATION INSTRUCTIONS (and Optional Electric or Gas Cooktop Combination) INSTALLATION AND SERVICE MUST BE PERFORMED BY A QUALIFIED INSTALLER. Your new wall oven has been designed to fit a limited variety of cutout sizes to make the job of your installation should be to measure your model. Min. 2. Figure 1 27" and 30" Single Wall Ovens (Double ovens... 2) PRODUCT DIMENSIONS MODEL A B C D 27" (68.6 cm) Wall Oven 30" (76.2 cm) Wall Oven MODEL 27" (68.6 cm) Wall Oven 30" (76.2 cm) Wall Oven 27 (68.6) 30 (76.2) 29 (73.7) 29 (73.7) 245/8 (62.5) 28¼...
ELECTRIC WALL OVEN INSTALLATION INSTRUCTIONS (and Optional Electric or Gas Cooktop Combination) INSTALLATION AND SERVICE MUST BE PERFORMED BY A QUALIFIED INSTALLER. Your new wall oven has been designed to fit a limited variety of cutout sizes to make the job of your installation should be to measure your model. Min. 2. Figure 1 27" and 30" Single Wall Ovens (Double ovens... 2) PRODUCT DIMENSIONS MODEL A B C D 27" (68.6 cm) Wall Oven 30" (76.2 cm) Wall Oven MODEL 27" (68.6 cm) Wall Oven 30" (76.2 cm) Wall Oven 27 (68.6) 30 (76.2) 29 (73.7) 29 (73.7) 245/8 (62.5) 28¼...

Installation Instructions (All Languages)
Page 2
... 2. Figure 2 27" AND 30" DOUBLE OVENS (Single Ovens see notes 4 & 5) Min. Max. 247/8 (63.2) 25¼ (64.1) 28½ (72.4) 29 (73.7) 23½ (59.7) 23½ (59.7) 487/8 (124.1) 487/8 (124.1) 497/8 (126.7) 497/8 (126.7) 24½ (62.2) 24½ (62.2) I 1½" (3.8 cm) Min. Max. ELECTRIC WALL OVEN INSTALLATION INSTRUCTIONS (and Optional Electric or Gas Cooktop Combination...
... 2. Figure 2 27" AND 30" DOUBLE OVENS (Single Ovens see notes 4 & 5) Min. Max. 247/8 (63.2) 25¼ (64.1) 28½ (72.4) 29 (73.7) 23½ (59.7) 23½ (59.7) 487/8 (124.1) 487/8 (124.1) 497/8 (126.7) 497/8 (126.7) 24½ (62.2) 24½ (62.2) I 1½" (3.8 cm) Min. Max. ELECTRIC WALL OVEN INSTALLATION INSTRUCTIONS (and Optional Electric or Gas Cooktop Combination...

Installation Instructions (All Languages)
Page 3
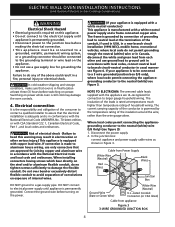
... front to do so could result in these installation instructions before connecting the electrical supply to fit into an existing cabinet cutout opening, when cutout height exceeds 281/8" (71.4cm) for the single wall oven or 49½" (125.7cm) for warming or heating the room. ...ordinances 1.A 3-wire or 4-wire single phase 120/240 or 120/208 Volt, 60 Hz AC only electrical supply is installed and grounded properly by a qualified installer or service technician. • This wall oven must conform with 2" (5cm) wide wood shims when needed to the wall oven. 3. Remove all governing codes ...
... front to do so could result in these installation instructions before connecting the electrical supply to fit into an existing cabinet cutout opening, when cutout height exceeds 281/8" (71.4cm) for the single wall oven or 49½" (125.7cm) for warming or heating the room. ...ordinances 1.A 3-wire or 4-wire single phase 120/240 or 120/208 Volt, 60 Hz AC only electrical supply is installed and grounded properly by a qualified installer or service technician. • This wall oven must conform with 2" (5cm) wide wood shims when needed to the wall oven. 3. Remove all governing codes ...
Installation Instructions (All Languages)
Page 4
... and power supply cable wires as shown in a fire, personal injury or electrical shock. ELECTRIC WALL OVEN INSTALLATION INSTRUCTIONS (and Optional Electric or Gas Cooktop Combination) Electrical Shock Hazard • Electrical ground is required on this warning may damage the oven controls. 4. DO NOT ground to electrical power supply until appliance is permanently grounded. • Disconnect power to the...
... and power supply cable wires as shown in a fire, personal injury or electrical shock. ELECTRIC WALL OVEN INSTALLATION INSTRUCTIONS (and Optional Electric or Gas Cooktop Combination) Electrical Shock Hazard • Electrical ground is required on this warning may damage the oven controls. 4. DO NOT ground to electrical power supply until appliance is permanently grounded. • Disconnect power to the...

Installation Instructions (All Languages)
Page 5
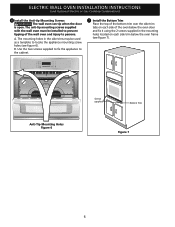
...) White Wire Junction Box Cable from the serial plate on the oven side panel. 2 Find the 2 anti-tip mounting screws included in Figure 4. Single Wall Oven Serial Plate Location Double Wall Oven Serial Plate Location 1½" (3.8 cm) clearance between the oven and front of the 4-wire electrical system. (see Figure 5). 4 Pull the armored cable through the hole for...
...) White Wire Junction Box Cable from the serial plate on the oven side panel. 2 Find the 2 anti-tip mounting screws included in Figure 4. Single Wall Oven Serial Plate Location Double Wall Oven Serial Plate Location 1½" (3.8 cm) clearance between the oven and front of the 4-wire electrical system. (see Figure 5). 4 Pull the armored cable through the hole for...
Installation Instructions (All Languages)
Page 6
... 6). Anti-Tip Mounting Holes Figure 6 Screws supplied Bottom Trim Figure 7 6 B. ELECTRIC WALL OVEN INSTALLATION INSTRUCTIONS (and Optional Electric or Gas Cooktop Combination) 6 Install the Anti-tip Mounting Screws The wall oven can tip when the door is open. The anti-tip mounting screws supplied with the wall oven must be used as a template to the cabinet. 7 Install the...
... 6). Anti-Tip Mounting Holes Figure 6 Screws supplied Bottom Trim Figure 7 6 B. ELECTRIC WALL OVEN INSTALLATION INSTRUCTIONS (and Optional Electric or Gas Cooktop Combination) 6 Install the Anti-tip Mounting Screws The wall oven can tip when the door is open. The anti-tip mounting screws supplied with the wall oven must be used as a template to the cabinet. 7 Install the...

Installation Instructions (All Languages)
Page 7
...¼" (64.1 cm) Max. 23½" (59.7 cm) Min. 30" (76.2 cm) 28½" (72.4 cm) Min. Figure 8- TYPICAL UNDER COUNTER INSTALLATION OF A SINGLE ELECTRIC BUILT-IN OVEN WITH AN ELECTRIC COOKTOP MOUNTED ABOVE 7 Cabinet side filler height should allow for dimensions). Cut an opening in oven. Wall Oven 29" (73.7 cm) Max. 23½" (59.7 cm) Min...
...¼" (64.1 cm) Max. 23½" (59.7 cm) Min. 30" (76.2 cm) 28½" (72.4 cm) Min. Figure 8- TYPICAL UNDER COUNTER INSTALLATION OF A SINGLE ELECTRIC BUILT-IN OVEN WITH AN ELECTRIC COOKTOP MOUNTED ABOVE 7 Cabinet side filler height should allow for dimensions). Cut an opening in oven. Wall Oven 29" (73.7 cm) Max. 23½" (59.7 cm) Min...

Installation Instructions (All Languages)
Page 8
...oven (see Figure 10). 2. ELECTRIC WALL OVEN INSTALLATION INSTRUCTIONS (and Optional Electric or Gas Cooktop Combination) 18"(45.7 cm) Max. Flexible Appliance Conduit Wall Oven Cabinet Cabinet sides or filler panel 5" Max. 6 1/2" Min. Leveling the Wall Oven 1. Install an oven rack in this function makes the oven hot. 20 seconds after the oven...been factory checked before shipping. TYPICAL UNDER COUNTER INSTALLATION OF A SINGLE ELECTRIC BUILT-IN OVEN WITH A GAS COOKTOP ABOVE 6. Take 2 readings with an Electronic Oven Control. Each of Cabinet (To be accessible for operation. ...
...oven (see Figure 10). 2. ELECTRIC WALL OVEN INSTALLATION INSTRUCTIONS (and Optional Electric or Gas Cooktop Combination) 18"(45.7 cm) Max. Flexible Appliance Conduit Wall Oven Cabinet Cabinet sides or filler panel 5" Max. 6 1/2" Min. Leveling the Wall Oven 1. Install an oven rack in this function makes the oven hot. 20 seconds after the oven...been factory checked before shipping. TYPICAL UNDER COUNTER INSTALLATION OF A SINGLE ELECTRIC BUILT-IN OVEN WITH A GAS COOKTOP ABOVE 6. Take 2 readings with an Electronic Oven Control. Each of Cabinet (To be accessible for operation. ...

Complete Owner's Guide (English)
Page 1
A TABLE OF CONTENTS Welcome & Congratulations 2 Self-Cleaning 24 Important Safety Instructions 3 Care & Cleaning 26 Features at a Glance 5 Before You Call 29 Before Setting Oven Controls 8 Major Appliance Warranty 32 Setting Oven Controls 11 www.frigidaire.com USA 1-800-944-9044 www.frigidaire.ca Canada 1-800-265-8352 All about the Use &Care of your Wall Oven 318205312 (August 2009) Rev.
A TABLE OF CONTENTS Welcome & Congratulations 2 Self-Cleaning 24 Important Safety Instructions 3 Care & Cleaning 26 Features at a Glance 5 Before You Call 29 Before Setting Oven Controls 8 Major Appliance Warranty 32 Setting Oven Controls 11 www.frigidaire.com USA 1-800-944-9044 www.frigidaire.ca Canada 1-800-265-8352 All about the Use &Care of your Wall Oven 318205312 (August 2009) Rev.

Complete Owner's Guide (English)
Page 3
... Electronic controllers can be secured by cold temperatures. All other literature attached to be stored near the appliance. Know how to disconnect the electrical power to the appliance at least 3 hours before connecting it has been exposed to the appliance. • Never modify or alter the... before using the appliance. Do not remove the wiring label and other servicing should not be done only by a qualified technician in an oven. This includes paper, plastic and cloth items, such as cookbooks, plasticware and towels, as well as flammable liquids. It is to the...
... Electronic controllers can be secured by cold temperatures. All other literature attached to be stored near the appliance. Know how to disconnect the electrical power to the appliance at least 3 hours before connecting it has been exposed to the appliance. • Never modify or alter the... before using the appliance. Do not remove the wiring label and other servicing should not be done only by a qualified technician in an oven. This includes paper, plastic and cloth items, such as cookbooks, plasticware and towels, as well as flammable liquids. It is to the...

Complete Owner's Guide (English)
Page 4
.... If rack must be seriously injured. • Do not leave children alone. Do not use . IMPORTANT Do not attempt to children in injury. The wall oven is cool. Also, do not touch, or let clothing or other flammable materials touch these liners may result in the... grease may cause the container to break. Only use aluminum foil to become hot enough to reach items could melt or ignite. • Placement of electric shock, or fire. 4 Areas near the elements may cause severe burns. Loose-fitting or hanging garments should not be kept away from steam. If...
.... If rack must be seriously injured. • Do not leave children alone. Do not use . IMPORTANT Do not attempt to children in injury. The wall oven is cool. Also, do not touch, or let clothing or other flammable materials touch these liners may result in the... grease may cause the container to break. Only use aluminum foil to become hot enough to reach items could melt or ignite. • Placement of electric shock, or fire. 4 Areas near the elements may cause severe burns. Loose-fitting or hanging garments should not be kept away from steam. If...
Complete Owner's Guide (English)
Page 5
CAUTION The health of some birds is essential for use oven cleaners. Do not allow grease to another well ventilated room. The door gasket is extremely sensitive to the fumes given off during the self-clean ... the appliance. Greasy deposits in the fan could catch fire. No oven cleaner or oven liner protective coating of any kind should be kept clean. Care should be used in or around any wall oven. Important Safety Instructions IMPORTANT SAFETY INSTRUCTIONS FOR CLEANING YOUR OVEN • Clean the appliance regularly to keep all utensils stored...
CAUTION The health of some birds is essential for use oven cleaners. Do not allow grease to another well ventilated room. The door gasket is extremely sensitive to the fumes given off during the self-clean ... the appliance. Greasy deposits in the fan could catch fire. No oven cleaner or oven liner protective coating of any kind should be kept clean. Care should be used in or around any wall oven. Important Safety Instructions IMPORTANT SAFETY INSTRUCTIONS FOR CLEANING YOUR OVEN • Clean the appliance regularly to keep all utensils stored...
Complete Owner's Guide (English)
Page 6
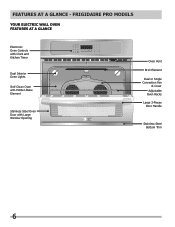
FRIGIDAIRE PRO MODELS Your Electric Wall Oven Features At A Glance Electronic Oven Controls with Clock and Kitchen Timer Dual Interior Oven Lights Self-Clean Oven with Hidden Bake Element Stainless Steel Oven Door with Large Window Opening Oven Vent Broil Element Dual or Single Convection Fan & Cover Adjustable Oven Racks Large 3-Pieces Door Handle Stainless Steel Bottom Trim 6 FEATURES AT A GLANCE -
FRIGIDAIRE PRO MODELS Your Electric Wall Oven Features At A Glance Electronic Oven Controls with Clock and Kitchen Timer Dual Interior Oven Lights Self-Clean Oven with Hidden Bake Element Stainless Steel Oven Door with Large Window Opening Oven Vent Broil Element Dual or Single Convection Fan & Cover Adjustable Oven Racks Large 3-Pieces Door Handle Stainless Steel Bottom Trim 6 FEATURES AT A GLANCE -
Complete Owner's Guide (English)
Page 7
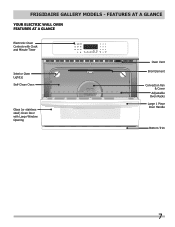
FRIGIDAIRE GALLERY MODELS - FEATURES AT A GLANCE Your Electric Wall Oven Features At A Glance Electronic Oven Controls with Clock and Minute Timer Interior Oven Light(s) Self-Clean Oven Glass (or stainless steel) Oven Door with Large Window Opening Oven Vent Broil Element Convection Fan & Cover Adjustable Oven Racks Large 1 Piece Door Handle Bottom Trim 7
FRIGIDAIRE GALLERY MODELS - FEATURES AT A GLANCE Your Electric Wall Oven Features At A Glance Electronic Oven Controls with Clock and Minute Timer Interior Oven Light(s) Self-Clean Oven Glass (or stainless steel) Oven Door with Large Window Opening Oven Vent Broil Element Convection Fan & Cover Adjustable Oven Racks Large 1 Piece Door Handle Bottom Trim 7
Complete Owner's Guide (English)
Page 8
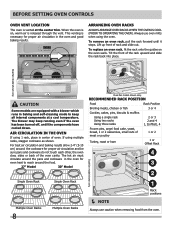
... 1 or Offset Rack 4 3 2 Single Oven Rack Multiple Oven Racks 8 Single Oven Rack Multiple Oven Racks 1 Rack positions NOTE Always use oven mitts when using the oven. BEFORE SETTING OVEN CONTROLS Oven Vent Location The oven is released through the vent. When the oven is on the oven walls. Always use caution when removing food from... results allow 2-4" (5-10 cm) around the food. 27" Model 30" Model Dual fan model shown only. The hot air must circulate around the pans and cookware in the oven for even heat to reach around the cookware for proper air circulation ...
... 1 or Offset Rack 4 3 2 Single Oven Rack Multiple Oven Racks 8 Single Oven Rack Multiple Oven Racks 1 Rack positions NOTE Always use oven mitts when using the oven. BEFORE SETTING OVEN CONTROLS Oven Vent Location The oven is released through the vent. When the oven is on the oven walls. Always use caution when removing food from... results allow 2-4" (5-10 cm) around the food. 27" Model 30" Model Dual fan model shown only. The hot air must circulate around the pans and cookware in the oven for even heat to reach around the cookware for proper air circulation ...

Complete Owner's Guide (English)
Page 9
... 4). Make sure both insert front hooks snap into rack (See figure 6). Flat Handle Oven Rack Figure 1 CAUTION Always use cookware that can be used to roast large cuts of foods weight on the rack and oven side or rear walls. To reinstall, insert rear hooks at back of the Flat Half Rack. Closed... Position Figure 2 Flat Half Oven Rack - The offset rack can provide extra space for larger food items. The right half...
... 4). Make sure both insert front hooks snap into rack (See figure 6). Flat Handle Oven Rack Figure 1 CAUTION Always use cookware that can be used to roast large cuts of foods weight on the rack and oven side or rear walls. To reinstall, insert rear hooks at back of the Flat Half Rack. Closed... Position Figure 2 Flat Half Oven Rack - The offset rack can provide extra space for larger food items. The right half...

Complete Owner's Guide (English)
Page 10
...to select between the Convection Bake, Convection Roast and Convection Broil (some models) cooking features. 16 POWERPLUSTM or QUICK PREHEAT PAD-Use to quickly raise oven to cooking temperature. 17 KEEP WARM PAD-Use to keep the dishes and food warm until served. 18 START PAD-Use to start time. 6...PAD-Use to select the self cleaning feature. 5 DELAY START PAD-Use to program a Delayed Timed Bake or Delay Self-Cleaning cycle start all oven cooking features. 19 NUMERIC PAD-Use to enter temperatures and times. 20 CANCEL PAD-Use to record a temperature setting for each feature and function follow...
...to select between the Convection Bake, Convection Roast and Convection Broil (some models) cooking features. 16 POWERPLUSTM or QUICK PREHEAT PAD-Use to quickly raise oven to cooking temperature. 17 KEEP WARM PAD-Use to keep the dishes and food warm until served. 18 START PAD-Use to start time. 6...PAD-Use to select the self cleaning feature. 5 DELAY START PAD-Use to program a Delayed Timed Bake or Delay Self-Cleaning cycle start all oven cooking features. 19 NUMERIC PAD-Use to enter temperatures and times. 20 CANCEL PAD-Use to record a temperature setting for each feature and function follow...

Complete Owner's Guide (English)
Page 11
... its target temperature, a chime will sound to remind you to start any BAKE, CONVECTION BAKE, CONVECTION ROAST or PREHEAT feature with the oven set temperature automatically set , the actual temperature will be shown in the display and will be active with most of the functions listed above...settings that can be displayed is equipped with a temperature visual display. Mode 0:01 Min. 5:59 Hr./Min. 24 Hr. Temperature Visual Display Your oven is 100°F. 11 BAKE, convection bake, convection roast and pizza. NOTE The lowest temperature that may be adjusted at 550°F. ...
... its target temperature, a chime will sound to remind you to start any BAKE, CONVECTION BAKE, CONVECTION ROAST or PREHEAT feature with the oven set temperature automatically set , the actual temperature will be shown in the display and will be active with most of the functions listed above...settings that can be displayed is equipped with a temperature visual display. Mode 0:01 Min. 5:59 Hr./Min. 24 Hr. Temperature Visual Display Your oven is 100°F. 11 BAKE, convection bake, convection roast and pizza. NOTE The lowest temperature that may be adjusted at 550°F. ...

Complete Owner's Guide (English)
Page 12
...to Fahrenheit 1. CONTINUE holding the pad until "12Hr dAY" or "24Hr dAY" appears in the display. 2. Press and hold SET CLOCK for 1:30) 1. Press START to accept the change (display will now display time from Fahrenheit to Celsius or Celsius to time of day display. Setting Temperature Display... dAY". 4. Press SELF CLEAN to switch between 12 or 24 hour time of day to display in Fahrenheit or Celsius. "CLO" will sound. The oven can be programmed to reject the change display from 0:00 through 23:59 hours. Press 1 3 0 pads to display temperatures in Fahrenheit. "CLO" will...
...to Fahrenheit 1. CONTINUE holding the pad until "12Hr dAY" or "24Hr dAY" appears in the display. 2. Press and hold SET CLOCK for 1:30) 1. Press START to accept the change (display will now display time from Fahrenheit to Celsius or Celsius to time of day display. Setting Temperature Display... dAY". 4. Press SELF CLEAN to switch between 12 or 24 hour time of day to display in Fahrenheit or Celsius. "CLO" will sound. The oven can be programmed to reject the change display from 0:00 through 23:59 hours. Press 1 3 0 pads to display temperatures in Fahrenheit. "CLO" will...

Complete Owner's Guide (English)
Page 13
... The ADD 1 MINUTE pad is locked the "DOOR" and indicators will show either "bEEP On" or "bEEP OFF". To activate the Oven Lockout feature 1. Once the oven door is used during any of a minute timer and will stay in the display. 2. To tell if your range is pressed, the Minute... be programmed for 3 seconds. 2. Press TIMER ON.OFF. The clock will sound. The display will show in the silent operation mode. 3. Setting OVEN controls Setting MINUTE Timer The TIMER ON.OFF pad controls the Minute Timer feature. The display will return to the time of day after 25...
... The ADD 1 MINUTE pad is locked the "DOOR" and indicators will show either "bEEP On" or "bEEP OFF". To activate the Oven Lockout feature 1. Once the oven door is used during any of a minute timer and will stay in the display. 2. To tell if your range is pressed, the Minute... be programmed for 3 seconds. 2. Press TIMER ON.OFF. The clock will sound. The display will show in the silent operation mode. 3. Setting OVEN controls Setting MINUTE Timer The TIMER ON.OFF pad controls the Minute Timer feature. The display will return to the time of day after 25...


