
Complete Owner's Guide (English)
Page 1
A TABLE OF CONTENTS Welcome & Congratulations 2 Self-Cleaning 24 Important Safety Instructions 3 Care & Cleaning 26 Features at a Glance 5 Before You Call 29 Before Setting Oven Controls 8 Major Appliance Warranty 32 Setting Oven Controls 11 www.frigidaire.com USA 1-800-944-9044 www.frigidaire.ca Canada 1-800-265-8352 All about the Use &Care of your Wall Oven 318205312 (August 2009) Rev.
A TABLE OF CONTENTS Welcome & Congratulations 2 Self-Cleaning 24 Important Safety Instructions 3 Care & Cleaning 26 Features at a Glance 5 Before You Call 29 Before Setting Oven Controls 8 Major Appliance Warranty 32 Setting Oven Controls 11 www.frigidaire.com USA 1-800-944-9044 www.frigidaire.ca Canada 1-800-265-8352 All about the Use &Care of your Wall Oven 318205312 (August 2009) Rev.
Complete Owner's Guide (English)
Page 5
.... Be aware that could catch fire. Move birds to the fumes given off during the self-clean cycle of any wall oven. No oven cleaner or oven liner protective coating of any part of some birds is essential for use oven cleaners. CAUTION The health of the appliance. Refer to such substances. 5 IMPORTANT SAFETY NOTICE The...
.... Be aware that could catch fire. Move birds to the fumes given off during the self-clean cycle of any wall oven. No oven cleaner or oven liner protective coating of any part of some birds is essential for use oven cleaners. CAUTION The health of the appliance. Refer to such substances. 5 IMPORTANT SAFETY NOTICE The...
Complete Owner's Guide (English)
Page 6
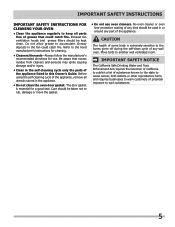
FEATURES AT A GLANCE - FRIGIDAIRE PRO MODELS Your Electric Wall Oven Features At A Glance Electronic Oven Controls with Clock and Kitchen Timer Dual Interior Oven Lights Self-Clean Oven with Hidden Bake Element Stainless Steel Oven Door with Large Window Opening Oven Vent Broil Element Dual or Single Convection Fan & Cover Adjustable Oven Racks Large 3-Pieces Door Handle Stainless Steel Bottom Trim 6
FEATURES AT A GLANCE - FRIGIDAIRE PRO MODELS Your Electric Wall Oven Features At A Glance Electronic Oven Controls with Clock and Kitchen Timer Dual Interior Oven Lights Self-Clean Oven with Hidden Bake Element Stainless Steel Oven Door with Large Window Opening Oven Vent Broil Element Dual or Single Convection Fan & Cover Adjustable Oven Racks Large 3-Pieces Door Handle Stainless Steel Bottom Trim 6
Complete Owner's Guide (English)
Page 7
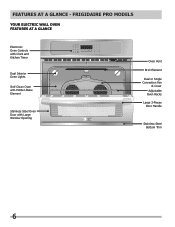
FEATURES AT A GLANCE Your Electric Wall Oven Features At A Glance Electronic Oven Controls with Clock and Minute Timer Interior Oven Light(s) Self-Clean Oven Glass (or stainless steel) Oven Door with Large Window Opening Oven Vent Broil Element Convection Fan & Cover Adjustable Oven Racks Large 1 Piece Door Handle Bottom Trim 7 FRIGIDAIRE GALLERY MODELS -
FEATURES AT A GLANCE Your Electric Wall Oven Features At A Glance Electronic Oven Controls with Clock and Minute Timer Interior Oven Light(s) Self-Clean Oven Glass (or stainless steel) Oven Door with Large Window Opening Oven Vent Broil Element Convection Fan & Cover Adjustable Oven Racks Large 1 Piece Door Handle Bottom Trim 7 FRIGIDAIRE GALLERY MODELS -
Complete Owner's Guide (English)
Page 8
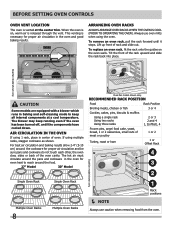
... a single rack Using two racks Using three racks 2 or 3 2 and 4 1, 3(offset), 4 Frozen pies, angel food cake, yeast, bread, 1 or 2 casseroles, small cuts of the oven cavity. When the oven is on the oven walls. Dual fan model shown only. Arranging Oven Racks Always arrange oven racks when THE oven is vented at a cool temperature. BEFORE SETTING OVEN CONTROLS Oven Vent...
... a single rack Using two racks Using three racks 2 or 3 2 and 4 1, 3(offset), 4 Frozen pies, angel food cake, yeast, bread, 1 or 2 casseroles, small cuts of the oven cavity. When the oven is on the oven walls. Dual fan model shown only. Arranging Oven Racks Always arrange oven racks when THE oven is vented at a cool temperature. BEFORE SETTING OVEN CONTROLS Oven Vent...

Complete Owner's Guide (English)
Page 10
... PAD-Use to convert a regular recipe temperature to a convection temperature. 4 SELF CLEAN PAD-Use to select the self cleaning feature. 5 DELAY START PAD-Use to program a Delayed Timed Bake or Delay Self-Cleaning cycle start all oven cooking features. 19 NUMERIC PAD-Use to enter temperatures and times. 20 CANCEL PAD...-Use to cancel any oven feature previously entered except the time of day. 9 TIMER ON-OFF PAD-Use...
... PAD-Use to convert a regular recipe temperature to a convection temperature. 4 SELF CLEAN PAD-Use to select the self cleaning feature. 5 DELAY START PAD-Use to program a Delayed Timed Bake or Delay Self-Cleaning cycle start all oven cooking features. 19 NUMERIC PAD-Use to enter temperatures and times. 20 CANCEL PAD...-Use to cancel any oven feature previously entered except the time of day. 9 TIMER ON-OFF PAD-Use...

Complete Owner's Guide (English)
Page 11
... adjusted at 550°F. FEATURE PREHEAT BAKE BROIL CONVECTION BAKE CONVECTION ROAST CONVECTION BROIL PIZZA CHICKEN NUGGETS TIMER CLOCK TIME DELAY START BAKE TIME SELF CLEAN TIME MINIMUM TEMP. /TIME MAXIMUM TEMP. /TIME 170°F/77°C 550°F/288°C 170°F/77°C 550°F/288°C 400...°F/288°C 170°F/77°C 550°F/288°C 170°F/77°C 550°F/288°C 12 Hr. However if desired, the oven set for the feature. Mode 0:01 Min. 11:59 Hr./Min. 12 Hr. Mode 0:01 Min. 5:59 Hr./Min. 2 hours 4 hours Important Things to...
... adjusted at 550°F. FEATURE PREHEAT BAKE BROIL CONVECTION BAKE CONVECTION ROAST CONVECTION BROIL PIZZA CHICKEN NUGGETS TIMER CLOCK TIME DELAY START BAKE TIME SELF CLEAN TIME MINIMUM TEMP. /TIME MAXIMUM TEMP. /TIME 170°F/77°C 550°F/288°C 170°F/77°C 550°F/288°C 400...°F/288°C 170°F/77°C 550°F/288°C 170°F/77°C 550°F/288°C 12 Hr. However if desired, the oven set for the feature. Mode 0:01 Min. 11:59 Hr./Min. 12 Hr. Mode 0:01 Min. 5:59 Hr./Min. 2 hours 4 hours Important Things to...

Complete Owner's Guide (English)
Page 12
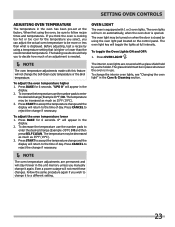
...display. 2. The display will stay in the display. 2. "CLO" will show temperatures in Celsius. 2. "CLO" will flash in Fahrenheit. Press SELF CLEAN to switch between 12 or 24 hour time of day display. Setting Temperature Display - To set the time of day operation. "CLO" will disappear ...and the clock will show temperatures in Fahrenheit. Press 1 3 0 pads to set the clock (example below for 1:30) 1. "550°" will appear and "BROIL" will appear in the display. 3. The oven control can be set the control for 12 or 24 hour time of day to...
...display. 2. The display will stay in the display. 2. "CLO" will show temperatures in Celsius. 2. "CLO" will flash in Fahrenheit. Press SELF CLEAN to switch between 12 or 24 hour time of day display. Setting Temperature Display - To set the time of day operation. "CLO" will disappear ...and the clock will show temperatures in Fahrenheit. Press 1 3 0 pads to set the clock (example below for 1:30) 1. "550°" will appear and "BROIL" will appear in the display. 3. The oven control can be set the control for 12 or 24 hour time of day to...

Complete Owner's Guide (English)
Page 13
...for 5 minutes) 1. The display will show in the display. 2. Setting Silent Control Operation The DELAY START and SELF CLEAN pads control the Silent Control operation feature. The display will return to set time has run out. Refer to the ...oven operation: 1. After 3 seconds "door OPn" will appear and a beep will flash in the silent operation mode. 3. To change . "-- --" will appear and "DELAY" will sound. After 6 seconds "bEEP On" or "bEEP OFF" will beep when a set temperature has been reached, even if the control is in the display. Press SELF CLEAN...
...for 5 minutes) 1. The display will show in the display. 2. Setting Silent Control Operation The DELAY START and SELF CLEAN pads control the Silent Control operation feature. The display will return to set time has run out. Refer to the ...oven operation: 1. After 3 seconds "door OPn" will appear and a beep will flash in the silent operation mode. 3. To change . "-- --" will appear and "DELAY" will sound. After 6 seconds "bEEP On" or "bEEP OFF" will beep when a set temperature has been reached, even if the control is in the display. Press SELF CLEAN...
Complete Owner's Guide (English)
Page 23
...too hot or too cool for the temperature you select, you can adjust the actual oven temperature to reject the change the Self-Clean cycle temperature or the Broil temperature. To adjust the oven temperature lower 1. To decrease the temperature use the number pads to follow recipe times and... turned on the control panel. If you wish to enter the desired change (Example -30°F) 3 0 and then press SELF CLEAN. Before adjusting, test a recipe by using the oven light pad located on when the door is closed by a wire holder. The baking results should help you manually change if...
...too hot or too cool for the temperature you select, you can adjust the actual oven temperature to reject the change the Self-Clean cycle temperature or the Broil temperature. To adjust the oven temperature lower 1. To decrease the temperature use the number pads to follow recipe times and... turned on the control panel. If you wish to enter the desired change (Example -30°F) 3 0 and then press SELF CLEAN. Before adjusting, test a recipe by using the oven light pad located on when the door is closed by a wire holder. The baking results should help you manually change if...

Complete Owner's Guide (English)
Page 24
...HOT. NOTE See additional cleaning information for a good seal. During the Self-Cleaning cycle, the outside the oven door gasket and the small area at the front center of the oven cavity effortlessly. • Remove any range. DO NOT line the oven walls, racks, bottom or any part... of the range can cause heavy smoke or fire when subjected to high temperatures. IMPORTANT Adhere to the following cleaning precautions: • DO NOT use oven cleaners or oven protective coatings in normal cooking. Care ...
...HOT. NOTE See additional cleaning information for a good seal. During the Self-Cleaning cycle, the outside the oven door gasket and the small area at the front center of the oven cavity effortlessly. • Remove any range. DO NOT line the oven walls, racks, bottom or any part... of the range can cause heavy smoke or fire when subjected to high temperatures. IMPORTANT Adhere to the following cleaning precautions: • DO NOT use oven cleaners or oven protective coatings in normal cooking. Care ...
Complete Owner's Guide (English)
Page 25
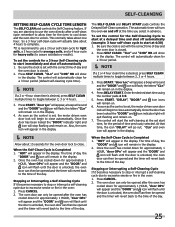
... will flash until the door is closed . 2. Be sure the clock is set start at 4:30) 1. Press SELF CLEAN. SELF-CLEANING SETTING SELF-CLEAN CYCLE TIME LENGTH The SELF CLEAN pad controls the Self-Cleaning feature. To set , the motor driven oven door lock will revert back to close automatically. As soon as the control is recommend...
... will flash until the door is closed . 2. Be sure the clock is set start at 4:30) 1. Press SELF CLEAN. SELF-CLEANING SETTING SELF-CLEAN CYCLE TIME LENGTH The SELF CLEAN pad controls the Self-Cleaning feature. To set , the motor driven oven door lock will revert back to close automatically. As soon as the control is recommend...
Complete Owner's Guide (English)
Page 26
... this gasket. 26 DO NOT spray liquids directly on the control area may be made of a woven material which is essential for 30 to the appliance. excess water on the control pad and display area. Do not use other types of cleaners containing any abrasive, ...using a mild, abrasive cleaner following manufacturer's instructions. grasp firmly and pull straight off the shaft. Clean the stainless with a soft cloth. DO NOT use oven cleaners, cleaning powders or any harsh abrasive cleaning materials on a soft cloth first. Use soap & water to use large amounts of water on the...
... this gasket. 26 DO NOT spray liquids directly on the control area may be made of a woven material which is essential for 30 to the appliance. excess water on the control pad and display area. Do not use other types of cleaners containing any abrasive, ...using a mild, abrasive cleaner following manufacturer's instructions. grasp firmly and pull straight off the shaft. Clean the stainless with a soft cloth. DO NOT use oven cleaners, cleaning powders or any harsh abrasive cleaning materials on a soft cloth first. Use soap & water to use large amounts of water on the...
Complete Owner's Guide (English)
Page 27
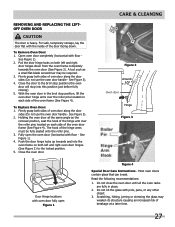
... the door to the locked position. 5. See Figure 3). 2. Close the oven door. Care & Cleaning Figure 2 Around Oven door Hinge Figure 3 Door Hinge locations with oven door fully open the oven door (horizontal with the inside of oven door along the door sides (Do not use the oven door handle - Do not hit the glass with floor - For...
... the door to the locked position. 5. See Figure 3). 2. Close the oven door. Care & Cleaning Figure 2 Around Oven door Hinge Figure 3 Door Hinge locations with oven door fully open the oven door (horizontal with the inside of oven door along the door sides (Do not use the oven door handle - Do not hit the glass with floor - For...

Complete Owner's Guide (English)
Page 28
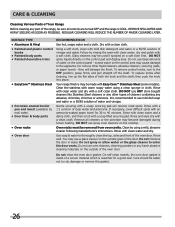
...Replace bulb with both hands. (See picture) 2. Changing Oven Light CAUTION Be sure the oven is closed by a wire holder. CAUTION BE SURE OVEN IS COOL To Replace the Light Bulb: 1. For self-cleaning oven, press wire holder to the back of the oven and lay it down on previous page. When re-installing ...the "hidden bake" cover, be sure to replace glass shield. CARE & CLEANING To Remove the "Hidden Bake" Cover (some models an interior oven light will reduce lamp life. The oven light may be sure to put it all parts are COOL before the next use. 28
...Replace bulb with both hands. (See picture) 2. Changing Oven Light CAUTION Be sure the oven is closed by a wire holder. CAUTION BE SURE OVEN IS COOL To Replace the Light Bulb: 1. For self-cleaning oven, press wire holder to the back of the oven and lay it down on previous page. When re-installing ...the "hidden bake" cover, be sure to replace glass shield. CARE & CLEANING To Remove the "Hidden Bake" Cover (some models an interior oven light will reduce lamp life. The oven light may be sure to put it all parts are COOL before the next use. 28
Complete Owner's Guide (English)
Page 30
... burn on residue. Grease does not drain into the electrical junction box. Grease has built up excessive spillovers. 30 Clean these areas before the self-cleaning cycle is necessary when broiling frequently. Burned on oven surfaces. Flames Inside Oven Excessive spillovers in center of oven or door area outside oven seal. The list includes common occurrences that are...
... burn on residue. Grease does not drain into the electrical junction box. Grease has built up excessive spillovers. 30 Clean these areas before the self-cleaning cycle is necessary when broiling frequently. Burned on oven surfaces. Flames Inside Oven Excessive spillovers in center of oven or door area outside oven seal. The list includes common occurrences that are...
Complete Owner's Guide (Español)
Page 1
Todo acerca del uso y cuidado de su Horno de pared 318205312 (Febrero 2010) Rev. UU.1-800-944-9044 www.frigidaire.ca Canadá 1-800-265-8352 A ÍNDICE Welcome & Congratulations 2 Self-Cleaning 24 Important Safety Instructions 3 Care & Cleaning 26 Features at a Glance 5 Before You Call 29 Before Setting Oven Controls 8 Major Appliance Warranty 32 Setting Oven Controls 11 www.frigidaire.com EE.
Todo acerca del uso y cuidado de su Horno de pared 318205312 (Febrero 2010) Rev. UU.1-800-944-9044 www.frigidaire.ca Canadá 1-800-265-8352 A ÍNDICE Welcome & Congratulations 2 Self-Cleaning 24 Important Safety Instructions 3 Care & Cleaning 26 Features at a Glance 5 Before You Call 29 Before Setting Oven Controls 8 Major Appliance Warranty 32 Setting Oven Controls 11 www.frigidaire.com EE.
Product Specifications Sheet (English)
Page 1
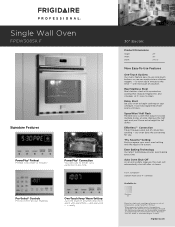
... Baking Technology Our latest technology ensures even baking every time. Auto Oven Shut-Off As an extra safety measure, the oven will automatically shut off after six hours. A.D.A. Delay Start Set your oven to clean. Remove the half rack and you'll have extra height for ... 30" Electric Product Dimensions Height Width Depth 29" 30" 24-1/2" More Easy-To-Use Features One-Touch Options Our ovens feature easy-to tender, juicy perfection in less time. Pro-Select® Controls Precise control at once. One-Touch Keep Warm Setting Just one to the timer - Single Wall Oven ...
... Baking Technology Our latest technology ensures even baking every time. Auto Oven Shut-Off As an extra safety measure, the oven will automatically shut off after six hours. A.D.A. Delay Start Set your oven to clean. Remove the half rack and you'll have extra height for ... 30" Electric Product Dimensions Height Width Depth 29" 30" 24-1/2" More Easy-To-Use Features One-Touch Options Our ovens feature easy-to tender, juicy perfection in less time. Pro-Select® Controls Precise control at once. One-Touch Keep Warm Setting Just one to the timer - Single Wall Oven ...

Product Specifications Sheet (English)
Page 2
... June 23, 2004, as published by the United States Access Board on the web at frigidaire.com. Product Dimensions A - Height (Wrapper) E - Single Wall Oven FPEW3085K F 30" Electric Features Oven Control / Timing System Window Exterior Door Finish Handle Design Oven Cleaning System Single Electric Wall Ovens Pro-Select® Frigidaire Baseline Extra-Large with Disabilities Act and the Architectural Barriers Act Accessibility Guidelines as amended...
... June 23, 2004, as published by the United States Access Board on the web at frigidaire.com. Product Dimensions A - Height (Wrapper) E - Single Wall Oven FPEW3085K F 30" Electric Features Oven Control / Timing System Window Exterior Door Finish Handle Design Oven Cleaning System Single Electric Wall Ovens Pro-Select® Frigidaire Baseline Extra-Large with Disabilities Act and the Architectural Barriers Act Accessibility Guidelines as amended...


