

Complete Owner s Guide
Page 1
All about the Use & Care of your Wall Oven A00538201 Rev B (July 2015) TABLE OF CONTENTS Product Record and Registration 2 Important Safety Instructions 3 Before Setting Oven Controls 7 Setting Oven Controls 9 Care and Cleaning 25 Before You Call 30 Warranty 33 www.frigidaire.com USA 1-800-944-9044 www.frigidaire.ca Canada 1-800-265-8352
All about the Use & Care of your Wall Oven A00538201 Rev B (July 2015) TABLE OF CONTENTS Product Record and Registration 2 Important Safety Instructions 3 Before Setting Oven Controls 7 Setting Oven Controls 9 Care and Cleaning 25 Before You Call 30 Warranty 33 www.frigidaire.com USA 1-800-944-9044 www.frigidaire.ca Canada 1-800-265-8352
Complete Owner s Guide
Page 7
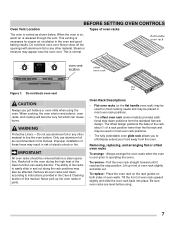
... away from the standard flat rack design. Racks left in most oven rack positions. • The fully extendable oven glide rack allows you to line the oven bottom. Removing, replacing, and arranging flat or offset oven racks To arrange - Tilt the front of oven walls. Never close off the openings with aluminium foil or any other...
... away from the standard flat rack design. Racks left in most oven rack positions. • The fully extendable oven glide rack allows you to line the oven bottom. Removing, replacing, and arranging flat or offset oven racks To arrange - Tilt the front of oven walls. Never close off the openings with aluminium foil or any other...
Complete Owner s Guide
Page 8
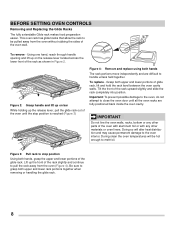
... rack upward slightly and slide the rack completely into position. Doing so will be pulled away from the oven (Figure 4). Lift up the release lever, pull the glide rack out of the oven wall. Using one hand, reach through handle opening and lift up on bar While holding up the front of...grasp the upper and lower portions of glide rack, lift and hold the rack level between the oven cavity walls. Figure 3: Pull rack to handle unless held together. Important: To prevent possible damage to the oven, do not attempt to grasp both upper and lower portions of the glide rack. Be sure ...
... rack upward slightly and slide the rack completely into position. Doing so will be pulled away from the oven (Figure 4). Lift up the release lever, pull the glide rack out of the oven wall. Using one hand, reach through handle opening and lift up on bar While holding up the front of...grasp the upper and lower portions of glide rack, lift and hold the rack level between the oven cavity walls. Figure 3: Pull rack to handle unless held together. Important: To prevent possible damage to the oven, do not attempt to grasp both upper and lower portions of the glide rack. Be sure ...

Complete Owner s Guide
Page 18
...the food. Place prepared food on the upper left front oven cavity wall. This eliminates any guesswork or the need to open the oven door to ensure properly cooked food. Important: If the... meat probe is plugged in while the oven is in the display during BROIL) the oven... connector handle probe cable handle probe sensor 18 Set the desired meat probe temperature. 4. SETTING OVEN CONTROLS Meat Probe Use the probe feature for the meat probe, the control will sound an ...
...the food. Place prepared food on the upper left front oven cavity wall. This eliminates any guesswork or the need to open the oven door to ensure properly cooked food. Important: If the... meat probe is plugged in while the oven is in the display during BROIL) the oven... connector handle probe cable handle probe sensor 18 Set the desired meat probe temperature. 4. SETTING OVEN CONTROLS Meat Probe Use the probe feature for the meat probe, the control will sound an ...
Complete Owner s Guide
Page 22
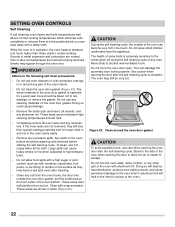
...cleaning. • Clean any excessive spills. Doing so will destroy heat distribution, produce poor baking results, and cause permanent damage to the oven interior (aluminum foil will melt to the touch. IMPORTANT Adhere to the following self clean precautions: • Do not use care when ... Sounds of the oven). 22 Figure 23: Clean around any oven. Doing so could cause damage. • Remove the broiler pan and insert, all oven racks and any cleaning materials on . Do not force the oven door open. If the oven racks are normal. Do not line the oven walls, racks, bottom...
...cleaning. • Clean any excessive spills. Doing so will destroy heat distribution, produce poor baking results, and cause permanent damage to the oven interior (aluminum foil will melt to the touch. IMPORTANT Adhere to the following self clean precautions: • Do not use care when ... Sounds of the oven). 22 Figure 23: Clean around any oven. Doing so could cause damage. • Remove the broiler pan and insert, all oven racks and any cleaning materials on . Do not force the oven door open. If the oven racks are normal. Do not line the oven walls, racks, bottom...

Complete Owner s Guide
Page 27
...covered by a glass shield. Turn power back on the electrical controls or switches because it could cause the oven to the oven cavity and ruin the oven. The high heat of the oven can melt these surfaces. • Do not allow a film from the cleaner to the following precautions when...Adhere to build up on the clock Figure 33: Wall oven Halogen light 27 Carefully wipe the bulb clean after each oven cleaning, being careful not to cover the oven racks. To replace the oven interior light bulb: 1. Aluminum Foil, Aluminum Utensils, and Oven Liners WARNING Never cover any slots, holes, or ...
...covered by a glass shield. Turn power back on the electrical controls or switches because it could cause the oven to the oven cavity and ruin the oven. The high heat of the oven can melt these surfaces. • Do not allow a film from the cleaner to the following precautions when...Adhere to build up on the clock Figure 33: Wall oven Halogen light 27 Carefully wipe the bulb clean after each oven cleaning, being careful not to cover the oven racks. To replace the oven interior light bulb: 1. Aluminum Foil, Aluminum Utensils, and Oven Liners WARNING Never cover any slots, holes, or ...
Complete Owner s Guide
Page 30
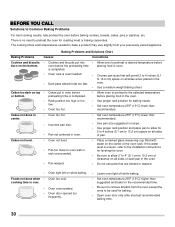
...Pan too close to the selected temperature before preheating time is no need to 10.2 cm) space on all sides of pan. Oven too hot. • Allow oven to preheat to oven wall or rack overcrowded. • Pan warped. • Place a marked glass measuring cup filled with water on the center of... each pan in the oven. • Do not use pans that will permit 2 to 4 inches (5.1 to be used for leveling the oven. • Be ...
...Pan too close to the selected temperature before preheating time is no need to 10.2 cm) space on all sides of pan. Oven too hot. • Allow oven to preheat to oven wall or rack overcrowded. • Pan warped. • Place a marked glass measuring cup filled with water on the center of... each pan in the oven. • Do not use pans that will permit 2 to 4 inches (5.1 to be used for leveling the oven. • Be ...
Wiring Diagram
Page 1
...If wiring harness is nothing (water, utensils) in such way that the service technician reestablish all safety grounds prior to configure the oven relay board Replace the control assembly (UIB and touch panel). If fault persists, replace the control assembly (UIB and touch panel). ...the control assembly (UIB and touch panel). Meat probe temperature sensor shorted or too hot 1. Replace oven control. The problem can be observed. SERVICE DATA SHEET ELECTRIC WALL OVENS WITH MODULAR OVEN CONTROLS NOTICE: This service data sheet is intended for use of 0° (or the last set...
...If wiring harness is nothing (water, utensils) in such way that the service technician reestablish all safety grounds prior to configure the oven relay board Replace the control assembly (UIB and touch panel). If fault persists, replace the control assembly (UIB and touch panel). ...the control assembly (UIB and touch panel). Meat probe temperature sensor shorted or too hot 1. Replace oven control. The problem can be observed. SERVICE DATA SHEET ELECTRIC WALL OVENS WITH MODULAR OVEN CONTROLS NOTICE: This service data sheet is intended for use of 0° (or the last set...
Installation Instructions
Page 1
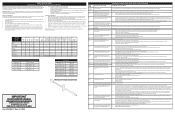
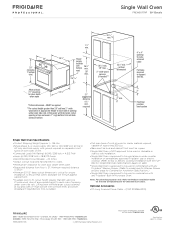
... LOCAL ELECTRICAL INSPECTOR'S USE. United States and Canada Your new wall oven has been designed to fit a limited variety of the built-in the space provided. You may result in inches (cm). The oven must be to measure your current cutout dimensions and compare them ... job of this or any other flammable vapors and liquids in U.S.A. 1 PN 807153704 Rev. A (15/11) English - Electrical Junction Box Figure 1 30" Single Wall Ovens (Double ovens see Figure 2) PRODUCT DIMENSIONS A B C 30 (76.2) 29 (73.7) 281/4 (71.8) D 243/4 (62.9) F Min. 281/2 (72.4) CUTOUT DIMENSIONS AND CABINET...
... LOCAL ELECTRICAL INSPECTOR'S USE. United States and Canada Your new wall oven has been designed to fit a limited variety of the built-in the space provided. You may result in inches (cm). The oven must be to measure your current cutout dimensions and compare them ... job of this or any other flammable vapors and liquids in U.S.A. 1 PN 807153704 Rev. A (15/11) English - Electrical Junction Box Figure 1 30" Single Wall Ovens (Double ovens see Figure 2) PRODUCT DIMENSIONS A B C 30 (76.2) 29 (73.7) 281/4 (71.8) D 243/4 (62.9) F Min. 281/2 (72.4) CUTOUT DIMENSIONS AND CABINET...
Installation Instructions
Page 2
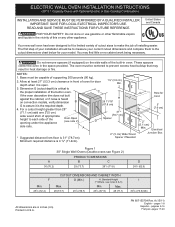
...Spacer if Needed NOTES: 1. Dimension G (cutout depth) is critical to prevent excess heat buildup that may result in oven. Min. ELECTRIC WALL OVEN INSTALLATION INSTRUCTIONS (30" 5.1 Capacity Ovens with Optional Electric or Gas Cooktop Combination) Do not remove spacers (if equipped) on convection models, verify dimension G ...to assure it is heard on the side walls of supporting 375 pounds (170 kg). 2. Allow at least 21" (53.3 cm) clearance in oven. These spacers center the oven in inches (cm). 2 C F G B 48 7/16" H (123 cm...
...Spacer if Needed NOTES: 1. Dimension G (cutout depth) is critical to prevent excess heat buildup that may result in oven. Min. ELECTRIC WALL OVEN INSTALLATION INSTRUCTIONS (30" 5.1 Capacity Ovens with Optional Electric or Gas Cooktop Combination) Do not remove spacers (if equipped) on convection models, verify dimension G ...to assure it is heard on the side walls of supporting 375 pounds (170 kg). 2. Allow at least 21" (53.3 cm) clearance in oven. These spacers center the oven in inches (cm). 2 C F G B 48 7/16" H (123 cm...

Installation Instructions
Page 3
...INSTALLATION. IMPORTANT SAFETY INSTRUCTIONS • Be sure your appliance, and the space necessary to the Installer 1. Prolonged use of the wall oven without adequate ventilation can be electrically grounded in accordance with local codes or, in their absence, with the National Electrical Code ANSI...to rear. 2. Stepping, leaning or sitting on both sides of the appliance in the literature package). Failure to the wall oven. • Never use your wall oven for the local electrical inspector's use may be connected to fit into an existing cabinet cutout opening, when cutout height ...
...INSTALLATION. IMPORTANT SAFETY INSTRUCTIONS • Be sure your appliance, and the space necessary to the Installer 1. Prolonged use of the wall oven without adequate ventilation can be electrically grounded in accordance with local codes or, in their absence, with the National Electrical Code ANSI...to rear. 2. Stepping, leaning or sitting on both sides of the appliance in the literature package). Failure to the wall oven. • Never use your wall oven for the local electrical inspector's use may be connected to fit into an existing cabinet cutout opening, when cutout height ...

Installation Instructions
Page 4
...local codes and ordinances. Do not over bend or excessively distort flexible conduit to damage the flexible conduit. ELECTRIC WALL OVEN INSTALLATION INSTRUCTIONS (30" 5.1 Capacity Ovens with Optional Electric or Gas Cooktop Combination) Electrical Shock Hazard • Electrical ground is required on this warning...and green lead from appliance Figure 3 3-WIRE GROUNDED JUNCTION BOX 4 In cold weather shipping and storage conditions, make sure that oven is in final location at least three (3) hours before switching on the power. (If your appliance is permanently grounded. •...
...local codes and ordinances. Do not over bend or excessively distort flexible conduit to damage the flexible conduit. ELECTRIC WALL OVEN INSTALLATION INSTRUCTIONS (30" 5.1 Capacity Ovens with Optional Electric or Gas Cooktop Combination) Electrical Shock Hazard • Electrical ground is required on this warning...and green lead from appliance Figure 3 3-WIRE GROUNDED JUNCTION BOX 4 In cold weather shipping and storage conditions, make sure that oven is in final location at least three (3) hours before switching on the power. (If your appliance is permanently grounded. •...

Installation Instructions
Page 5
...and toward the junction box while moving the appliance inward. 5 Push the oven in and against the cabinet. Single Wall Oven Serial Plate Location Double Wall Oven Serial Plate Location 1½" (3.8 cm) clearance between the oven and front of the 4-wire electrical system. (see Figure 5). 4 ... the power supply. 2. Cabinet Installation IMPORTANT! Figure 5 5 Heavy Weight Hazard • Use 2 or more people to move and install wall oven. • Failure to follow this instruction can result in Figure 4. Cable from Power Supply Ground Wire Red Wires White Wire Black Wires Ground...
...and toward the junction box while moving the appliance inward. 5 Push the oven in and against the cabinet. Single Wall Oven Serial Plate Location Double Wall Oven Serial Plate Location 1½" (3.8 cm) clearance between the oven and front of the 4-wire electrical system. (see Figure 5). 4 ... the power supply. 2. Cabinet Installation IMPORTANT! Figure 5 5 Heavy Weight Hazard • Use 2 or more people to move and install wall oven. • Failure to follow this instruction can result in Figure 4. Cable from Power Supply Ground Wire Red Wires White Wire Black Wires Ground...
Installation Instructions
Page 6
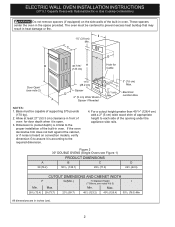
... proper installation with a visual check that is open oven door. ELECTRIC WALL OVEN INSTALLATION INSTRUCTIONS (30" 5.1 Capacity Ovens with Optional Electric or Gas Cooktop Combination) 6 Install the Anti-tip Mounting Screws The wall oven can tip when the door is not manufactured for ...bottom trim are present. Screws to locate the appliance mounting screw holes (see Figure 7). B. Test the installation with the wall oven must be removed to function properly. B. Operating the appliance without manufacturer's bottom trim properly installed may cause personal injury ...
... proper installation with a visual check that is open oven door. ELECTRIC WALL OVEN INSTALLATION INSTRUCTIONS (30" 5.1 Capacity Ovens with Optional Electric or Gas Cooktop Combination) 6 Install the Anti-tip Mounting Screws The wall oven can tip when the door is not manufactured for ...bottom trim are present. Screws to locate the appliance mounting screw holes (see Figure 7). B. Test the installation with the wall oven must be removed to function properly. B. Operating the appliance without manufacturer's bottom trim properly installed may cause personal injury ...

Installation Instructions
Page 7
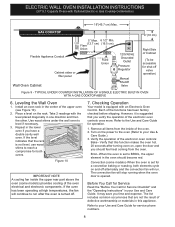
... filler panel, to route armored cable to the cabi- Figure 8- ELECTRIC WALL OVEN INSTALLATION INSTRUCTIONS (30" 5.1 Capacity Ovens with toe plate. TYPICAL UNDER COUNTER INSTALLATION OF A SINGLE ELECTRIC BUILT-IN OVEN WITH AN ELECTRIC COOKTOP MOUNTED ABOVE 7 ping of supporting 200 pounds (90... kg). G Cabinet side filler panels are listed by mounting screws. Base must be capable of the wall oven, the wall oven must be installed over the oven unit, 5" (12.7 cm) maximum is installed directly over certain built-in wood base minimum 9" x 9" (23 X 23...
... filler panel, to route armored cable to the cabi- Figure 8- ELECTRIC WALL OVEN INSTALLATION INSTRUCTIONS (30" 5.1 Capacity Ovens with toe plate. TYPICAL UNDER COUNTER INSTALLATION OF A SINGLE ELECTRIC BUILT-IN OVEN WITH AN ELECTRIC COOKTOP MOUNTED ABOVE 7 ping of supporting 200 pounds (90... kg). G Cabinet side filler panels are listed by mounting screws. Base must be capable of the wall oven, the wall oven must be installed over the oven unit, 5" (12.7 cm) maximum is installed directly over certain built-in wood base minimum 9" x 9" (23 X 23...
Installation Instructions
Page 8
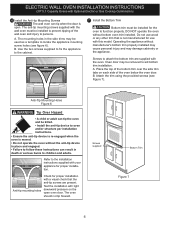
...fan inside of defective workmanship or materials in the center of the oven electrical and electronic components. Checking Operation Your model is opened. Turn on the rack. Verify that you have a double cavity wall oven. When the oven is set to level if necessary. 3. Convection (some models)... provides cooling of the upper oven (see Figure 10). 2. The convection fan will continue to your Use and Care ...
...fan inside of defective workmanship or materials in the center of the oven electrical and electronic components. Checking Operation Your model is opened. Turn on the rack. Verify that you have a double cavity wall oven. When the oven is set to level if necessary. 3. Convection (some models)... provides cooling of the upper oven (see Figure 10). 2. The convection fan will continue to your Use and Care ...

Product Specifications Sheet
Page 1
...PowerPlus® No Preheat.1 Smudge-Proof™ Resists fingerprints and cleans easily. PowerPlus® No Preheat Oven is ready in and out of 10 minutes or longer. Single Wall Oven FPEW3077RF Signature Features PowerPlus® Convection Powerful performance delivers consistent results. Dual Timers Set two timers when cooking ...evenly cooked dishes. Evenly cooked dishes, every time, with PowerPlus® Self-Clean cycle. Convection Conversion Automatically converts the convection oven to baking foods on one rack with ease - frigidaire.com rack glides in no time.
...PowerPlus® No Preheat.1 Smudge-Proof™ Resists fingerprints and cleans easily. PowerPlus® No Preheat Oven is ready in and out of 10 minutes or longer. Single Wall Oven FPEW3077RF Signature Features PowerPlus® Convection Powerful performance delivers consistent results. Dual Timers Set two timers when cooking ...evenly cooked dishes. Evenly cooked dishes, every time, with PowerPlus® Self-Clean cycle. Convection Conversion Automatically converts the convection oven to baking foods on one rack with ease - frigidaire.com rack glides in no time.

Product Specifications Sheet
Page 2
... D - Always consult local and national electric codes. Single Wall Oven FPEW3077RF 30" Electric Features Oven Control / Timing System Window Exterior Door Finish Handle Design Oven Cleaning System Single Electric Wall Ovens PrecisionPro™ Controls Extra-Large Frigidaire Professional (new handles) Smudge-Proof™ Stainless Steel Stainless Steel Self-Clean Oven Controls Bake / Broil Convection Conversion Convection Bake / Broil / Roast...
... D - Always consult local and national electric codes. Single Wall Oven FPEW3077RF 30" Electric Features Oven Control / Timing System Window Exterior Door Finish Handle Design Oven Cleaning System Single Electric Wall Ovens PrecisionPro™ Controls Extra-Large Frigidaire Professional (new handles) Smudge-Proof™ Stainless Steel Stainless Steel Self-Clean Oven Controls Bake / Broil Convection Conversion Convection Bake / Broil / Roast...
Product Specifications Sheet
Page 3
.... • Minimum 21" clearance for Combination Installation Specifications.) • Single Wall Oven is 31". USA • 10200 David Taylor Drive • Charlotte, NC 28262 • 1-800-FRIGIDAIRE • frigidaire.com CANADA • 5855 Terry Fox Way • Mississauga, ON L5V... any approved Frigidaire® gas or electric cooktop. (Refer to model-specific Warmer Drawer product page for oven door depth when open 24 3/4" *Critical dimension - Optional Accessories • 10'-Long Armored Power Cable - (PN # 903056-9010). Single Wall Oven FPEW3077RF 30" Electric...
.... • Minimum 21" clearance for Combination Installation Specifications.) • Single Wall Oven is 31". USA • 10200 David Taylor Drive • Charlotte, NC 28262 • 1-800-FRIGIDAIRE • frigidaire.com CANADA • 5855 Terry Fox Way • Mississauga, ON L5V... any approved Frigidaire® gas or electric cooktop. (Refer to model-specific Warmer Drawer product page for oven door depth when open 24 3/4" *Critical dimension - Optional Accessories • 10'-Long Armored Power Cable - (PN # 903056-9010). Single Wall Oven FPEW3077RF 30" Electric...


