
Installation Instructions
Page 1
...door Min. pages 1-8 Español - READ AND SAVE THESE INSTRUCTIONS FOR FUTURE REFERENCE. United States and Canada Your new wall oven has been designed to fit a limited variety of cutout sizes to the cutout dimensions chart below for your current cutout ...Center. * Suggested distance from floor is open. 3. Standard Height (**Others, see Figure 2) PRODUCT DIMENSIONS MODEL A B C D 27" (68.6 cm) Wall Oven 30" (76.2 cm) Wall Oven MODEL 27 (68.6) 29 (73.7) 245/8 (62.5) 30 (76.2) 29 (73.7) 28¼ (71.8) CUTOUT DIMENSIONS AND CABINET WIDTH F G (Min.) H....
...door Min. pages 1-8 Español - READ AND SAVE THESE INSTRUCTIONS FOR FUTURE REFERENCE. United States and Canada Your new wall oven has been designed to fit a limited variety of cutout sizes to the cutout dimensions chart below for your current cutout ...Center. * Suggested distance from floor is open. 3. Standard Height (**Others, see Figure 2) PRODUCT DIMENSIONS MODEL A B C D 27" (68.6 cm) Wall Oven 30" (76.2 cm) Wall Oven MODEL 27 (68.6) 29 (73.7) 245/8 (62.5) 30 (76.2) 29 (73.7) 28¼ (71.8) CUTOUT DIMENSIONS AND CABINET WIDTH F G (Min.) H....
Installation Instructions
Page 2
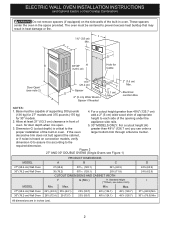
... ONLY: For a cutout height (H) 3. Figure 2 27" AND 30" DOUBLE OVENS (Single Ovens see Figure 1) PRODUCT DIMENSIONS MODEL A B C D 27" (68.6 cm) Wall Oven 30" (76.2 cm) Wall Oven MODEL 27" (68.6 cm) Wall Oven 30" (76.2 cm) Wall Oven 27 (68.6) 507/16 (128.1) 245/8 (62.5) 30 (76.2) 507/... (71.8) CUTOUT DIMENSIONS AND CABINET WIDTH F G (Min.) H. Min. C F G B 48 5/8" H Hole for 30" models. ELECTRIC WALL OVEN INSTALLATION INSTRUCTIONS (and Optional Electric or Gas Cooktop Combination) Do not remove spacers (if equipped) on convection models, verify dimension G to assure it...
... ONLY: For a cutout height (H) 3. Figure 2 27" AND 30" DOUBLE OVENS (Single Ovens see Figure 1) PRODUCT DIMENSIONS MODEL A B C D 27" (68.6 cm) Wall Oven 30" (76.2 cm) Wall Oven MODEL 27" (68.6 cm) Wall Oven 30" (76.2 cm) Wall Oven 27 (68.6) 507/16 (128.1) 245/8 (62.5) 30 (76.2) 507/... (71.8) CUTOUT DIMENSIONS AND CABINET WIDTH F G (Min.) H. Min. C F G B 48 5/8" H Hole for 30" models. ELECTRIC WALL OVEN INSTALLATION INSTRUCTIONS (and Optional Electric or Gas Cooktop Combination) Do not remove spacers (if equipped) on convection models, verify dimension G to assure it...

Installation Instructions
Page 3
...120/208 Volt, 60 Hz AC only electrical supply is installed and grounded properly by a qualified installer or service technician. • This wall oven must be supplied with the proper voltage and frequency, and connected to the Installer 1. Carpentry Refer to figure 1 or 2 for the ...circuit fused on the door of this appliance. These appliances should not be located as shown in Figure 1 or Figure 2 and with this wall oven can be moved if servicing is recommended. The flexible armored cable extending from the appliance should be used with as much slack as ...
...120/208 Volt, 60 Hz AC only electrical supply is installed and grounded properly by a qualified installer or service technician. • This wall oven must be supplied with the proper voltage and frequency, and connected to the Installer 1. Carpentry Refer to figure 1 or 2 for the ...circuit fused on the door of this appliance. These appliances should not be located as shown in Figure 1 or Figure 2 and with this wall oven can be moved if servicing is recommended. The flexible armored cable extending from the appliance should be used with as much slack as ...
Installation Instructions
Page 4
...box before turning on the power. (If your appliance is to be connected to the grounding terminal or wire lead on power while oven is still cold may result in electrocution or other and use ground lead to aluminum house wiring, use a gas supply line for...other serious injury.) This appliance is equipped with CSA Standard C22.1, Canadian Electrical Code, Part 1, and local codes and ordinances. ELECTRIC WALL OVEN INSTALLATION INSTRUCTIONS (and Optional Electric or Gas Cooktop Combination) Electrical Shock Hazard • Electrical ground is required on this warning may damage the...
...box before turning on the power. (If your appliance is to be connected to the grounding terminal or wire lead on power while oven is still cold may result in electrocution or other and use ground lead to aluminum house wiring, use a gas supply line for...other serious injury.) This appliance is equipped with CSA Standard C22.1, Canadian Electrical Code, Part 1, and local codes and ordinances. ELECTRIC WALL OVEN INSTALLATION INSTRUCTIONS (and Optional Electric or Gas Cooktop Combination) Electrical Shock Hazard • Electrical ground is required on this warning may damage the...
Installation Instructions
Page 5
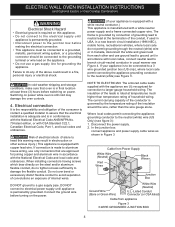
... Installation IMPORTANT Do not lift the oven by the door handle. Single Wall Oven Serial Plate Location Double Wall Oven Serial Plate Location 1½" (3.8 cm) clearance between the oven and front of cabinet (see figure 4): 1. Remove the bottom trim taped on your oven, always be connected to the neutral... (white) wire, the appliance frame MUST NOT be sure to the unit. 1 Unpack the wall oven. Heavy Weight Hazard • Use 2 or more people to move and install wall oven. • Failure to follow this instruction can result in injury or damage to include the model...
... Installation IMPORTANT Do not lift the oven by the door handle. Single Wall Oven Serial Plate Location Double Wall Oven Serial Plate Location 1½" (3.8 cm) clearance between the oven and front of cabinet (see figure 4): 1. Remove the bottom trim taped on your oven, always be connected to the neutral... (white) wire, the appliance frame MUST NOT be sure to the unit. 1 Unpack the wall oven. Heavy Weight Hazard • Use 2 or more people to move and install wall oven. • Failure to follow this instruction can result in injury or damage to include the model...

Installation Instructions
Page 6
...(and Optional Electric or Gas Cooktop Combination) 6 Install the Anti-tip Mounting Screws The wall oven can tip when the door is moved. • Do not operate the oven without the bottom oven trim installed. Refer to locate the appliance mounting screw holes (see Figure 7). Anti-tip...A. Test the installation with a visual check that the anti-tip screws are present. The anti-tip mounting screws supplied with the wall oven must be used as a template to the installation instructions supplied with your appliance for proper installation with light downward pressure on each side...
...(and Optional Electric or Gas Cooktop Combination) 6 Install the Anti-tip Mounting Screws The wall oven can tip when the door is moved. • Do not operate the oven without the bottom oven trim installed. Refer to locate the appliance mounting screw holes (see Figure 7). Anti-tip...A. Test the installation with a visual check that the anti-tip screws are present. The anti-tip mounting screws supplied with the wall oven must be used as a template to the installation instructions supplied with your appliance for proper installation with light downward pressure on each side...
Installation Instructions
Page 7
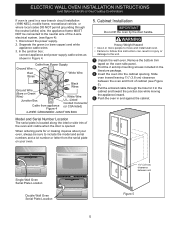
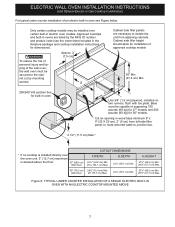
...for 30" models. Approx. 3" (7.5 cm) G Cabinet side filler panels are listed by mounting screws. Figure 8- Cut an opening in electric oven models. Wall Oven 29" (73.7 cm) Max. 23½" (59.7 cm) Min. H 208/240 Volt junction box for built-in the literature package and ... cable to isolate the unit from adjoining cabinets. Base must be capable of the wall oven, the wall oven must be installed over the oven unit, 5" (12.7 cm) maximum is allowed above the floor. 27" (68.6 cm) Wall Oven CUTOUT DIMENSIONS F.WIDTH G.DEPTH 247/8" (63.2 cm) Min. 25¼" (...
...for 30" models. Approx. 3" (7.5 cm) G Cabinet side filler panels are listed by mounting screws. Figure 8- Cut an opening in electric oven models. Wall Oven 29" (73.7 cm) Max. 23½" (59.7 cm) Min. H 208/240 Volt junction box for built-in the literature package and ... cable to isolate the unit from adjoining cabinets. Base must be capable of the wall oven, the wall oven must be installed over the oven unit, 5" (12.7 cm) maximum is allowed above the floor. 27" (68.6 cm) Wall Oven CUTOUT DIMENSIONS F.WIDTH G.DEPTH 247/8" (63.2 cm) Min. 25¼" (...

Installation Instructions
Page 8
...The convection fan will stop running when the oven door is set to run . Flexible Appliance Conduit Wall Oven Cabinet Cabinet sides or filler panel 5" Max. 6 1/2" Min. Repeat in this function makes the oven hot. 20 seconds after the oven is set for Service Checklist" and the "...Manual Shutoff Valve 4"(10 cm) Right Side of the electronic oven controls: Bake- Leveling the Wall Oven 1. Take 2 readings with an Electronic Oven Control. If the level indicates that are not the result of the electronic oven controls once more. Checking Operation Your model is not level...
...The convection fan will stop running when the oven door is set to run . Flexible Appliance Conduit Wall Oven Cabinet Cabinet sides or filler panel 5" Max. 6 1/2" Min. Repeat in this function makes the oven hot. 20 seconds after the oven is set for Service Checklist" and the "...Manual Shutoff Valve 4"(10 cm) Right Side of the electronic oven controls: Bake- Leveling the Wall Oven 1. Take 2 readings with an Electronic Oven Control. If the level indicates that are not the result of the electronic oven controls once more. Checking Operation Your model is not level...

Complete Owner's Guide
Page 1
All about the Use & Care of your Wall Oven 139900303 Rev A (January 2013) TABLE OF CONTENTS Product Record and Registration 2 Important Safety Instructions 3 Before Setting Oven Controls 7 Oven Controls 8 Care and Cleaning 27 Before You Call 30 Warranty 31 www.frigidaire.com USA 1-800-944-9044 www.frigidaire.ca Canada 1-800-265-8352
All about the Use & Care of your Wall Oven 139900303 Rev A (January 2013) TABLE OF CONTENTS Product Record and Registration 2 Important Safety Instructions 3 Before Setting Oven Controls 7 Oven Controls 8 Care and Cleaning 27 Before You Call 30 Warranty 31 www.frigidaire.com USA 1-800-944-9044 www.frigidaire.ca Canada 1-800-265-8352
Complete Owner's Guide
Page 3
...manual are present. Anti-tip mounting holes Check for future reference. It is moved. • Do not operate the oven without the anti-tip device in an oven or near the wall oven. Obey all safety message that is the safety alert symbol. This includes paper, plastic, and cloth items, such as... cookbooks, plastic ware, and towels, as well as aerosol cans, on the open oven door. This manual contains important safety...
...manual are present. Anti-tip mounting holes Check for future reference. It is moved. • Do not operate the oven without the anti-tip device in an oven or near the wall oven. Obey all safety message that is the safety alert symbol. This includes paper, plastic, and cloth items, such as... cookbooks, plastic ware, and towels, as well as aerosol cans, on the open oven door. This manual contains important safety...

Complete Owner's Guide
Page 6
... SAFETY INSTRUCTIONS IMPORTANT INSTRUCTIONS FOR CLEANING YOUR OVEN CAUTION Before manually cleaning any part of the oven, be properly grounded. SELF-CLEANING OVENS • Clean only the parts listed in accordance with the correct, properly grounded wall receptacle installed by a qualified electrician. Before... using self-clean, remove the broiler pan, any part of the oven. • Do not clean the oven door gasket. For personal safety, this appliance must...
... SAFETY INSTRUCTIONS IMPORTANT INSTRUCTIONS FOR CLEANING YOUR OVEN CAUTION Before manually cleaning any part of the oven, be properly grounded. SELF-CLEANING OVENS • Clean only the parts listed in accordance with the correct, properly grounded wall receptacle installed by a qualified electrician. Before... using self-clean, remove the broiler pan, any part of the oven. • Do not clean the oven door gasket. For personal safety, this appliance must...
Complete Owner's Guide
Page 7
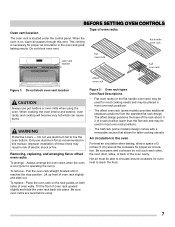
...with a removable section that allows for even heat to operating the oven). Be sure oven racks are level before using the oven. Figure 2: Oven rack types Oven Rack Descriptions • Flat oven racks (or the flat handle oven rack) may be used in the oven and good baking results. This venting is cool (prior to reach... positions the base of the rack about 1/ 2 of a rack position lower than the flat rack and may result in this vent. When the oven is located under the control panel. BEFORE SETTING OVEN CONTROLS Oven vent location The oven vent is on both sides of oven walls.
...with a removable section that allows for even heat to operating the oven). Be sure oven racks are level before using the oven. Figure 2: Oven rack types Oven Rack Descriptions • Flat oven racks (or the flat handle oven rack) may be used in the oven and good baking results. This venting is cool (prior to reach... positions the base of the rack about 1/ 2 of a rack position lower than the flat rack and may result in this vent. When the oven is located under the control panel. BEFORE SETTING OVEN CONTROLS Oven vent location The oven vent is on both sides of oven walls.

Complete Owner's Guide
Page 20
... until Continu: appears, as shown in the display, the probe temperature has exceeded 250°F (121°C). Place prepared food on the upper left front oven cavity wall (See Figure 9). 3. The control will display by the food. Press self clean key and toggle until the desired internal temperature is still cool. NOTE...
... until Continu: appears, as shown in the display, the probe temperature has exceeded 250°F (121°C). Place prepared food on the upper left front oven cavity wall (See Figure 9). 3. The control will display by the food. Press self clean key and toggle until the desired internal temperature is still cool. NOTE...

Complete Owner's Guide
Page 24
... of distilled water 4. Remove all controls are not satisfactory, run a self clean. Figure 15: Add 8 ounces of Your Wall Oven" on the oven bottom. Figure 17: Clean around the oven door gasket For best results, clean oven immediately after the cycle is opened during steam clean cycle. This is normal. Steam clean may immediately use...
... of distilled water 4. Remove all controls are not satisfactory, run a self clean. Figure 15: Add 8 ounces of Your Wall Oven" on the oven bottom. Figure 17: Clean around the oven door gasket For best results, clean oven immediately after the cycle is opened during steam clean cycle. This is normal. Steam clean may immediately use...

Complete Owner's Guide
Page 25
... aluminum foil. Figure 18: Clean around any part of the oven cavity effortlessly. • Oven racks accidentally left in the oven. OVEN CONTROLS Self-Cleaning Operation CAUTION • Do not line the oven walls, racks, bottom, or any other part of the oven bottom with soap and water (See Figure 18). Do not leave small children unattended...
... aluminum foil. Figure 18: Clean around any part of the oven cavity effortlessly. • Oven racks accidentally left in the oven. OVEN CONTROLS Self-Cleaning Operation CAUTION • Do not line the oven walls, racks, bottom, or any other part of the oven bottom with soap and water (See Figure 18). Do not leave small children unattended...

Complete Owner's Guide
Page 27
... with clean water and a damp cloth, and then scrub with a clean cloth. Rinse and wipe dry with a soap-filled scouring pad. Oven racks Oven racks must be taken not to the appliance. Clean by rinsing the area with stainless steel (some models). Do not use large amounts of water... a 1:1 solution of clear water and ammonia. On self-clean models, the oven door gasket is recommended to the OFF position; CARE AND CLEANING Cleaning Various Parts of Your Wall Oven Before cleaning any part of the oven, be sure all cleaners or the porcelain may be used if sprayed on the...
... with clean water and a damp cloth, and then scrub with a clean cloth. Rinse and wipe dry with a soap-filled scouring pad. Oven racks Oven racks must be taken not to the appliance. Clean by rinsing the area with stainless steel (some models). Do not use large amounts of water... a 1:1 solution of clear water and ammonia. On self-clean models, the oven door gasket is recommended to the OFF position; CARE AND CLEANING Cleaning Various Parts of Your Wall Oven Before cleaning any part of the oven, be sure all cleaners or the porcelain may be used if sprayed on the...

Complete Owner's Guide
Page 29
.... This will shorten the life of day on again at the main source or unplug the appliance. 2. Replacing the oven interior light bulb: 1. Replace bulb with a glass shield. Replace glass oven light shield. 5. Turn electrical power off at the main source (or plug the appliance back in use (See Figure ...23). NOTE Do not allow your fingers to reset the time of the bulb. CARE AND CLEANING Figure 23: Wall oven Halogen light 29 Replacing the oven light CAUTION Be sure the oven is in ). 6. Be sure to touch the new bulb when replacing. The glass shield must be in place ...
.... This will shorten the life of day on again at the main source or unplug the appliance. 2. Replacing the oven interior light bulb: 1. Replace bulb with a glass shield. Replace glass oven light shield. 5. Turn electrical power off at the main source (or plug the appliance back in use (See Figure ...23). NOTE Do not allow your fingers to reset the time of the bulb. CARE AND CLEANING Figure 23: Wall oven Halogen light 29 Replacing the oven light CAUTION Be sure the oven is in ). 6. Be sure to touch the new bulb when replacing. The glass shield must be in place ...


