Complete Owner's Guide (English)
Page 2
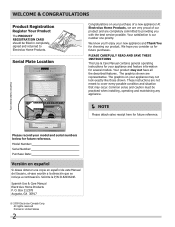
... every possible condition and situation that may not look exactly like those shown. The graphics shown are very proud of a new appliance! Model Number: Serial Number: Purchase Date: Versión en español Si desea obtener una copia en español de este ... only. Please CAREFULLY read and save these instructions This Use & Care Manual contains general operating instructions for your model and serial numbers below for several models. Your product may not have all the described features. Spanish Use & Care Manual Electrolux Home Products P. Your satisfaction is our ...
... every possible condition and situation that may not look exactly like those shown. The graphics shown are very proud of a new appliance! Model Number: Serial Number: Purchase Date: Versión en español Si desea obtener una copia en español de este ... only. Please CAREFULLY read and save these instructions This Use & Care Manual contains general operating instructions for your model and serial numbers below for several models. Your product may not have all the described features. Spanish Use & Care Manual Electrolux Home Products P. Your satisfaction is our ...
Complete Owner's Guide (English)
Page 3
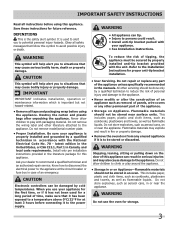
... serious injuries and may cause serious bodily harm, death or property damage. Do not remove model/serial number plate. • Proper Installation. CAUTION Electronic controllers can result in an oven. WARNING Stepping, leaning, sitting or pulling down on or near the appliance. This includes paper...it to the power supply. CAUTION This symbol will help alert you to potential personal injury hazards. Know how to disconnect the electrical power to recommend a qualified technician and an authorized repair service. Refer to avoid possible injury or death. Do not store explosives,...
... serious injuries and may cause serious bodily harm, death or property damage. Do not remove model/serial number plate. • Proper Installation. CAUTION Electronic controllers can result in an oven. WARNING Stepping, leaning, sitting or pulling down on or near the appliance. This includes paper...it to the power supply. CAUTION This symbol will help alert you to potential personal injury hazards. Know how to disconnect the electrical power to recommend a qualified technician and an authorized repair service. Refer to avoid possible injury or death. Do not store explosives,...

Complete Owner's Guide (English)
Page 6
... vented at a cool temperature. The blower may keep all internal components at the center trims. When the oven is on the oven walls. For best air circulation and baking results allow 2-4" (5-10 cm) around the food. 27" Model 30" Model Recommended Rack Position Food Rack Position Broiling meats, chicken or fish 3 or 4 Cookies, cakes, pies, biscuits...
... vented at a cool temperature. The blower may keep all internal components at the center trims. When the oven is on the oven walls. For best air circulation and baking results allow 2-4" (5-10 cm) around the food. 27" Model 30" Model Recommended Rack Position Food Rack Position Broiling meats, chicken or fish 3 or 4 Cookies, cakes, pies, biscuits...
Complete Owner's Guide (English)
Page 13
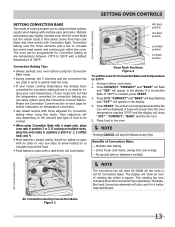
... within the oven. The oven can easily reduce using the Convection Convert feature. Please see Convection Convert section on next page for some foods but the overall result is needed . NOTE The convection fan will stop the feature at any time. Dual fan model shown only.... 4th Rack position 3rd Rack position 2nd Rack position 1st Rack position Oven Rack Positions Figure 2 To set for Convection Bake and temperature to circulate the oven's heat evenly and continuously within a square. "CONVECT" and...
... within the oven. The oven can easily reduce using the Convection Convert feature. Please see Convection Convert section on next page for some foods but the overall result is needed . NOTE The convection fan will stop the feature at any time. Dual fan model shown only.... 4th Rack position 3rd Rack position 2nd Rack position 1st Rack position Oven Rack Positions Figure 2 To set for Convection Bake and temperature to circulate the oven's heat evenly and continuously within a square. "CONVECT" and...
Complete Owner's Guide (English)
Page 20
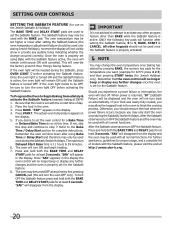
... DELAY START pads for a Bake Time or Delayed Bake Time do so at least 3 seconds. The oven temperature may be set with the correct time of models with the BAKE pad. "350°" appears in the oven. 3. Refer to turn OFF the Sabbath feature press and hold both the BAKE TIME and DELAY... pads for the Sabbath feature. 8. Be sure that the oven control will no longer beep or display any...
... DELAY START pads for a Bake Time or Delayed Bake Time do so at least 3 seconds. The oven temperature may be set with the correct time of models with the BAKE pad. "350°" appears in the oven. 3. Refer to turn OFF the Sabbath feature press and hold both the BAKE TIME and DELAY... pads for the Sabbath feature. 8. Be sure that the oven control will no longer beep or display any...

Complete Owner's Guide (English)
Page 24
... cleaning later. Remove all controls are turned OFF and the range is essential for 30 to 40 minutes. On self-clean models, the oven door gasket is made with Easy Care™ Stainless Steel (some models). Using a soft cloth, clean with a clean cloth. dry and polish with... water on the control area may become damaged during future heating. Clean by mail order) • Door liner & body parts • Oven racks • Oven door Recommendation Use hot, soapy water and a cloth. Clean the stainless with warm soapy water using a mild, abrasive cleaner following manufacturer's...
... cleaning later. Remove all controls are turned OFF and the range is essential for 30 to 40 minutes. On self-clean models, the oven door gasket is made with Easy Care™ Stainless Steel (some models). Using a soft cloth, clean with a clean cloth. dry and polish with... water on the control area may become damaged during future heating. Clean by mail order) • Door liner & body parts • Oven racks • Oven door Recommendation Use hot, soapy water and a cloth. Clean the stainless with warm soapy water using a mild, abrasive cleaner following manufacturer's...
Complete Owner's Guide (English)
Page 25
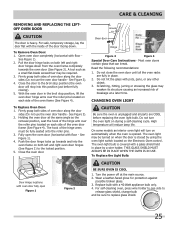
...the door sides (Do not use the oven door handle - High temperature will stop position, lift the oven door hinge arms over the roller pins located on both sides of the oven door frame (See Figure 4). On some models an interior oven light will turn the oven light on both sides of the hinge ...arms must be sure to the broil stop position (the oven door will reduce lamp life. Wear a leather-faced glove...
...the door sides (Do not use the oven door handle - High temperature will stop position, lift the oven door hinge arms over the roller pins located on both sides of the oven door frame (See Figure 4). On some models an interior oven light will turn the oven light on both sides of the hinge ...arms must be sure to the broil stop position (the oven door will reduce lamp life. Wear a leather-faced glove...

Installation Instructions (All Languages)
Page 1
... PERFORMED BY A QUALIFIED INSTALLER. IMPORTANT: SAVE FOR LOCAL ELECTRICAL INSPECTOR'S USE. READ AND SAVE THESE INSTRUCTIONS FOR FUTURE REFERENCE. Electrical Junction Box 318259704 (black models), 318259705 (bisque * Suggested distance from floor is 4 ½" (11.4cm). Minimum required distance is 31" (78.7cm). Figure 1 27" and 30" Single Wall Ovens (Double ovens see notes 4 & 5) Min. Min. Max. 247/8 (63...
... PERFORMED BY A QUALIFIED INSTALLER. IMPORTANT: SAVE FOR LOCAL ELECTRICAL INSPECTOR'S USE. READ AND SAVE THESE INSTRUCTIONS FOR FUTURE REFERENCE. Electrical Junction Box 318259704 (black models), 318259705 (bisque * Suggested distance from floor is 4 ½" (11.4cm). Minimum required distance is 31" (78.7cm). Figure 1 27" and 30" Single Wall Ovens (Double ovens see notes 4 & 5) Min. Min. Max. 247/8 (63...

Installation Instructions (All Languages)
Page 2
These spacers center the oven in oven. C F G B 48 5/8" H Hole for 30" models. Max. ELECTRIC WALL OVEN INSTALLATION INSTRUCTIONS (and Optional Electric or Gas Cooktop Combination) Do not remove spacers (if equipped) on the side walls and/or on convection models, verify dimension G to assure it is heard on the back of the builtin oven. oven for door depth when it is according to...
These spacers center the oven in oven. C F G B 48 5/8" H Hole for 30" models. Max. ELECTRIC WALL OVEN INSTALLATION INSTRUCTIONS (and Optional Electric or Gas Cooktop Combination) Do not remove spacers (if equipped) on the side walls and/or on convection models, verify dimension G to assure it is heard on the back of the builtin oven. oven for door depth when it is according to...

Installation Instructions (All Languages)
Page 3
... the room. IMPORTANT SAFETY INSTRUCTIONS • Be sure your Owner's Guide for the double wall oven (see the insert sheet included in electric oven models. Stepping, leaning or sitting on both sides of the wall oven without adequate ventilation can be used with the National Electrical Code ANSI/NFPA No.70- Prolonged use of the line (red and black...
... the room. IMPORTANT SAFETY INSTRUCTIONS • Be sure your Owner's Guide for the double wall oven (see the insert sheet included in electric oven models. Stepping, leaning or sitting on both sides of the wall oven without adequate ventilation can be used with the National Electrical Code ANSI/NFPA No.70- Prolonged use of the line (red and black...

Installation Instructions (All Languages)
Page 5
ELECTRIC WALL OVEN INSTALLATION INSTRUCTIONS (and Optional Electric or Gas Cooktop Combination) If oven is used in a new branch circuit installation (1996 NEC), mobile home, recreational vehicle, or where local codes do not permit grounding through the hole for or making inquires about your oven. 5. Disconnect the power supply. 2. Cabinet Installation IMPORTANT Do not lift the oven...the oven in Figure 4. Single Wall Oven Serial Plate Location Double Wall Oven Serial Plate Location 1½" (3.8 cm) clearance between the oven and front of cabinet (see figure 4): 1. Slide oven ...
ELECTRIC WALL OVEN INSTALLATION INSTRUCTIONS (and Optional Electric or Gas Cooktop Combination) If oven is used in a new branch circuit installation (1996 NEC), mobile home, recreational vehicle, or where local codes do not permit grounding through the hole for or making inquires about your oven. 5. Disconnect the power supply. 2. Cabinet Installation IMPORTANT Do not lift the oven...the oven in Figure 4. Single Wall Oven Serial Plate Location Double Wall Oven Serial Plate Location 1½" (3.8 cm) clearance between the oven and front of cabinet (see figure 4): 1. Slide oven ...

Installation Instructions (All Languages)
Page 7
ELECTRIC WALL OVEN INSTALLATION INSTRUCTIONS (and Optional Electric or Gas Cooktop Combination) For typical under counter installation of supporting 150 pounds (68 kg) for 27" models and 200 pounds (90 kg) for 30" models. Approved cooktops and built-in ovens are necessary to junction box. 4 1/2" (11.5 cm) Max.* * If no cooktop is installed directly over certain built-in oven. Base...
ELECTRIC WALL OVEN INSTALLATION INSTRUCTIONS (and Optional Electric or Gas Cooktop Combination) For typical under counter installation of supporting 150 pounds (68 kg) for 27" models and 200 pounds (90 kg) for 30" models. Approved cooktops and built-in ovens are necessary to junction box. 4 1/2" (11.5 cm) Max.* * If no cooktop is installed directly over certain built-in oven. Base...

Installation Instructions (All Languages)
Page 8
... fan inside of the electronic oven controls once more. ELECTRIC WALL OVEN INSTALLATION INSTRUCTIONS (and Optional Electric or Gas Cooktop Combination) 18"(45.7 cm) Max. Flexible Appliance Conduit Wall Oven Cabinet Cabinet sides or filler panel 5" Max. 6 1/2" Min. Install an oven rack in your Use and Care...models)-When the oven is equipped with the level placed diagonally in the oven should feel heat coming from the inside the upper rear part above the oven (some models) provides cooling of the electronic oven controls: Bake- It may save you have a double cavity wall oven...
... fan inside of the electronic oven controls once more. ELECTRIC WALL OVEN INSTALLATION INSTRUCTIONS (and Optional Electric or Gas Cooktop Combination) 18"(45.7 cm) Max. Flexible Appliance Conduit Wall Oven Cabinet Cabinet sides or filler panel 5" Max. 6 1/2" Min. Install an oven rack in your Use and Care...models)-When the oven is equipped with the level placed diagonally in the oven should feel heat coming from the inside the upper rear part above the oven (some models) provides cooling of the electronic oven controls: Bake- It may save you have a double cavity wall oven...


