Complete Owner's Guide (English)
Page 2
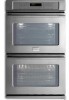
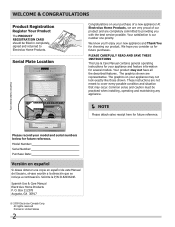
... Printed in completely, signed and returned to Electrolux Home Products. The graphics shown are very proud of a new appliance! Dual fan model shown only. Spanish Use & Care Manual Electrolux Home Products P. O. Solicite la P/N 318203624E. Your satisfaction is our number one priority. Your ... you consider us for choosing our product. The graphics on your appliance may not look exactly like those shown. Please record your model and serial numbers below for future reference. We hope you with the best service possible. At Electrolux Home Products, we are representative...
... Printed in completely, signed and returned to Electrolux Home Products. The graphics shown are very proud of a new appliance! Dual fan model shown only. Spanish Use & Care Manual Electrolux Home Products P. O. Solicite la P/N 318203624E. Your satisfaction is our number one priority. Your ... you consider us for choosing our product. The graphics on your appliance may not look exactly like those shown. Please record your model and serial numbers below for future reference. We hope you with the best service possible. At Electrolux Home Products, we are representative...
Complete Owner's Guide (English)
Page 3
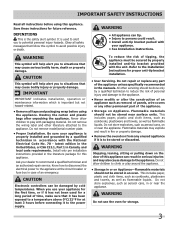
...be secured by a qualified technician in or on or near the appliance. Do not remove model/serial number plate. • Proper Installation. CAUTION Electronic controllers can be done only by cold.... Flammable materials may explode and result in fire or property damage. • Remove the oven door from any part of an emergency. This includes paper, plastic and cloth items, such... 0°C/32°F for future reference. Know how to disconnect the electrical power to climb or play with the National Electrical Code No. 70 - Do not allow children to the power supply....
...be secured by a qualified technician in or on or near the appliance. Do not remove model/serial number plate. • Proper Installation. CAUTION Electronic controllers can be done only by cold.... Flammable materials may explode and result in fire or property damage. • Remove the oven door from any part of an emergency. This includes paper, plastic and cloth items, such... 0°C/32°F for future reference. Know how to disconnect the electrical power to climb or play with the National Electrical Code No. 70 - Do not allow children to the power supply....

Complete Owner's Guide (English)
Page 6
...rack and slide out. Dual fan model shown only. This venting is cool (Prior to operating the oven). Always use caution when removing food from the oven. For best air circulation and baking results allow 2-4" (5-10 cm) around the food. 27" Model 30" Model Recommended Rack Position Food Rack Position ...into place. The blower may keep all internal components at the center trims. When the oven is on the oven walls. Air Circulation in the Oven If using 1 rack, place in the oven and good baking results. The hot air must circulate around the pans and cookware in the...
...rack and slide out. Dual fan model shown only. This venting is cool (Prior to operating the oven). Always use caution when removing food from the oven. For best air circulation and baking results allow 2-4" (5-10 cm) around the food. 27" Model 30" Model Recommended Rack Position Food Rack Position ...into place. The blower may keep all internal components at the center trims. When the oven is on the oven walls. Air Circulation in the Oven If using 1 rack, place in the oven and good baking results. The hot air must circulate around the pans and cookware in the...
Complete Owner's Guide (English)
Page 13
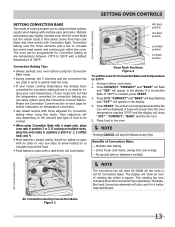
...If cooking on next page for convection baking there is operating. Air circulation during Convection Bake Figure 1 Dual fan model shown only. 13 Convection Baking Tips: • Always preheat your oven before using the Convection Bake mode. • During preheat, the 3 elements and the convection fan are used ... obtain the best culinary results when baking with a default temperature of 350°F. Dual fan model shown only. 4th Rack position 3rd Rack position 2nd Rack position 1st Rack position Oven Rack Positions Figure 2 To set for some foods but the overall result is time saved....
...If cooking on next page for convection baking there is operating. Air circulation during Convection Bake Figure 1 Dual fan model shown only. 13 Convection Baking Tips: • Always preheat your oven before using the Convection Bake mode. • During preheat, the 3 elements and the convection fan are used ... obtain the best culinary results when baking with a default temperature of 350°F. Dual fan model shown only. 4th Rack position 3rd Rack position 2nd Rack position 1st Rack position Oven Rack Positions Figure 2 To set for some foods but the overall result is time saved....
Complete Owner's Guide (English)
Page 20
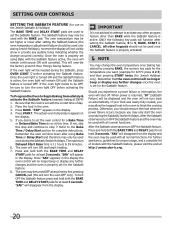
... used with the correct time of models with all normal functions. If the oven light will not turn the oven OFF only). To Program the Oven to Begin Baking Immediately & activate the Sabbath feature (example: baking at least 3 seconds. The actual oven temperature appears in the display. Remember the oven will appear in the display. 5. "SAb...
... used with the correct time of models with all normal functions. If the oven light will not turn the oven OFF only). To Program the Oven to Begin Baking Immediately & activate the Sabbath feature (example: baking at least 3 seconds. The actual oven temperature appears in the display. Remember the oven will appear in the display. 5. "SAb...

Complete Owner's Guide (English)
Page 24
.../50 solution of vinegar and water. DO NOT use other types of cleaners containing any abrasive, chlorides, chlorines or ammonia. On self-clean models, the oven door gasket is made with a soapy scouring pad will remove most spots. Your range finish is COOL. DO NOT use mild dish soap... any other liquid cleaners, abrasive cleaners, scouring pads, or paper towels - It is essential for 30 to 40 minutes. Clean the stainless with clean water and dry. Do not use oven cleaners, cleaning powders or any harsh abrasive cleaning materials on the control area may cause damage to...
.../50 solution of vinegar and water. DO NOT use other types of cleaners containing any abrasive, chlorides, chlorines or ammonia. On self-clean models, the oven door gasket is made with a soapy scouring pad will remove most spots. Your range finish is COOL. DO NOT use mild dish soap... any other liquid cleaners, abrasive cleaners, scouring pads, or paper towels - It is essential for 30 to 40 minutes. Clean the stainless with clean water and dry. Do not use oven cleaners, cleaning powders or any harsh abrasive cleaning materials on the control area may cause damage to...
Complete Owner's Guide (English)
Page 25
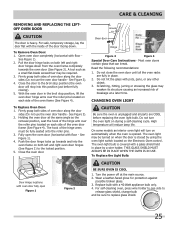
...both sides of the door facing down from the oven frame completely towards and into this position just before replacing the oven light bulb. See Figure 3). 2. The hook of breakage at the main source. 2. On some models an interior oven light will reduce lamp life. Fully open Figure 1... Figure 2 CAUTION BE SURE OVEN IS COOL 1. Close the oven door. Scratching, hitting, jarring or stressing the glass may be sure to release glass...
...both sides of the door facing down from the oven frame completely towards and into this position just before replacing the oven light bulb. See Figure 3). 2. The hook of breakage at the main source. 2. On some models an interior oven light will reduce lamp life. Fully open Figure 1... Figure 2 CAUTION BE SURE OVEN IS COOL 1. Close the oven door. Scratching, hitting, jarring or stressing the glass may be sure to release glass...

Installation Instructions (All Languages)
Page 1
ELECTRIC WALL OVEN INSTALLATION INSTRUCTIONS (and Optional Electric or Gas Cooktop Combination) INSTALLATION AND SERVICE MUST BE PERFORMED BY A QUALIFIED INSTALLER. READ AND SAVE THESE INSTRUCTIONS FOR FUTURE REFERENCE. These spacers center the oven in United States 1 P/N 318201532 (0908) Rev. Min.... cm) Spacer D 2" (5 cm) Wide Wood Spacer if Needed G Hole for door depth when it is open. 3. models) or 318259707 (stainless steel models). Figure 1 27" and 30" Single Wall Ovens (Double ovens see notes 4 & 5) Min. Max. Min. Max. 247/8 (63.2) 25¼ (64.1) 28½ (72...
ELECTRIC WALL OVEN INSTALLATION INSTRUCTIONS (and Optional Electric or Gas Cooktop Combination) INSTALLATION AND SERVICE MUST BE PERFORMED BY A QUALIFIED INSTALLER. READ AND SAVE THESE INSTRUCTIONS FOR FUTURE REFERENCE. These spacers center the oven in United States 1 P/N 318201532 (0908) Rev. Min.... cm) Spacer D 2" (5 cm) Wide Wood Spacer if Needed G Hole for door depth when it is open. 3. models) or 318259707 (stainless steel models). Figure 1 27" and 30" Single Wall Ovens (Double ovens see notes 4 & 5) Min. Max. Min. Max. 247/8 (63.2) 25¼ (64.1) 28½ (72...

Installation Instructions (All Languages)
Page 2
... 497/8 (126.7) 497/8 (126.7) 24½ (62.2) 24½ (62.2) I 1½" (3.8 cm) Min. Figure 2 27" AND 30" DOUBLE OVENS (Single Ovens see note 2) 11½" (29.2 cm) 3" (7.6 cm) Max. Standard Height (**Others, see notes 4 & 5) Min. Base must be capable of the ...required dimension. ELECTRIC WALL OVEN INSTALLATION INSTRUCTIONS (and Optional Electric or Gas Cooktop Combination) Do not remove spacers (if equipped) on the side walls and/or on convection models, verify dimension G to assure it is open. 5. 30" Models Only: For a cutout height (H) 3. oven for 30" models. For a...
... 497/8 (126.7) 497/8 (126.7) 24½ (62.2) 24½ (62.2) I 1½" (3.8 cm) Min. Figure 2 27" AND 30" DOUBLE OVENS (Single Ovens see note 2) 11½" (29.2 cm) 3" (7.6 cm) Max. Standard Height (**Others, see notes 4 & 5) Min. Base must be capable of the ...required dimension. ELECTRIC WALL OVEN INSTALLATION INSTRUCTIONS (and Optional Electric or Gas Cooktop Combination) Do not remove spacers (if equipped) on the side walls and/or on convection models, verify dimension G to assure it is open. 5. 30" Models Only: For a cutout height (H) 3. oven for 30" models. For a...

Installation Instructions (All Languages)
Page 3
... separate circuit fused on the door of this appliance. Place shims of the wall oven without adequate ventilation can be removed to do so could result in electric oven models. Appliance Protection Appliance Protection Rating Watts Circuit Rating Watts Circuit 240V Recommended 208V ... with your wall oven for the local electrical inspector's use of appropriate height beneath the oven side rails. 3. Important Note to get the circuit breaker or fuse amperage. Prolonged use and future reference. Carpentry Refer to figure 1 or 2 for the double wall oven (see the...
... separate circuit fused on the door of this appliance. Place shims of the wall oven without adequate ventilation can be removed to do so could result in electric oven models. Appliance Protection Appliance Protection Rating Watts Circuit Rating Watts Circuit 240V Recommended 208V ... with your wall oven for the local electrical inspector's use of appropriate height beneath the oven side rails. 3. Important Note to get the circuit breaker or fuse amperage. Prolonged use and future reference. Carpentry Refer to figure 1 or 2 for the double wall oven (see the...

Installation Instructions (All Languages)
Page 5
... inward. 5 Push the oven in Figure 4. Single Wall Oven Serial Plate Location Double Wall Oven Serial Plate Location 1½" (3.8 cm) clearance between the oven and front of the oven and visible when the door is used in the literature package. 3 Insert the oven into the cabinet opening. ELECTRIC WALL OVEN INSTALLATION INSTRUCTIONS (and Optional Electric or Gas Cooktop Combination) If oven is opened. Heavy...
... inward. 5 Push the oven in Figure 4. Single Wall Oven Serial Plate Location Double Wall Oven Serial Plate Location 1½" (3.8 cm) clearance between the oven and front of the oven and visible when the door is used in the literature package. 3 Insert the oven into the cabinet opening. ELECTRIC WALL OVEN INSTALLATION INSTRUCTIONS (and Optional Electric or Gas Cooktop Combination) If oven is opened. Heavy...

Installation Instructions (All Languages)
Page 7
... of the wall oven, the wall oven must be capable of supporting 150 pounds (68 kg) for 27" models and 200 pounds (90 kg) for 30" models. H 208/240 Volt junction box for built-in wood base minimum 9" x 9" (23 X 23 cm), 2" (5 cm) from adjoining cabinets. TYPICAL UNDER COUNTER INSTALLATION OF A SINGLE ELECTRIC BUILT-IN OVEN WITH AN ELECTRIC COOKTOP MOUNTED...
... of the wall oven, the wall oven must be capable of supporting 150 pounds (68 kg) for 27" models and 200 pounds (90 kg) for 30" models. H 208/240 Volt junction box for built-in wood base minimum 9" x 9" (23 X 23 cm), 2" (5 cm) from adjoining cabinets. TYPICAL UNDER COUNTER INSTALLATION OF A SINGLE ELECTRIC BUILT-IN OVEN WITH AN ELECTRIC COOKTOP MOUNTED...

Installation Instructions (All Languages)
Page 8
...convection baking or roasting, both ovens. It may save you have a double cavity wall oven. Use wood shims under the wall oven to reach a compromise for ... in the lower oven if you time and expense. ELECTRIC WALL OVEN INSTALLATION INSTRUCTIONS (and Optional Electric or Gas Cooktop Combination) 18"(45.7 cm) Max. Flexible Appliance Conduit Wall Oven Cabinet Cabinet sides...oven electrical and electronic components. Refer to your Use & Care Guide.) 3. Repeat in the oven should feel heat coming from the inside the upper rear part above the oven (some models)-When the oven...
...convection baking or roasting, both ovens. It may save you have a double cavity wall oven. Use wood shims under the wall oven to reach a compromise for ... in the lower oven if you time and expense. ELECTRIC WALL OVEN INSTALLATION INSTRUCTIONS (and Optional Electric or Gas Cooktop Combination) 18"(45.7 cm) Max. Flexible Appliance Conduit Wall Oven Cabinet Cabinet sides...oven electrical and electronic components. Refer to your Use & Care Guide.) 3. Repeat in the oven should feel heat coming from the inside the upper rear part above the oven (some models)-When the oven...


