Complete Owner's Guide (English)
Page 2
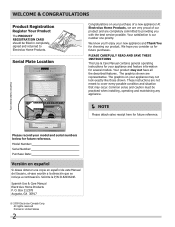
... future reference. The graphics shown are not meant to cover every possible condition and situation that may occur. These instructions are representative. All rights reserved Printed in completely, signed and returned to providing you with the best service possible.... all the described features. O. Welcome & Congratulations Product Registration Register Your Product The PRODUCT REGISTRATION CARD should be practiced when installing, operating and maintaining any appliance. NOTE Please attach sales receipt here for future reference. Serial Plate Location Congratulations ...
... future reference. The graphics shown are not meant to cover every possible condition and situation that may occur. These instructions are representative. All rights reserved Printed in completely, signed and returned to providing you with the best service possible.... all the described features. O. Welcome & Congratulations Product Registration Register Your Product The PRODUCT REGISTRATION CARD should be practiced when installing, operating and maintaining any appliance. NOTE Please attach sales receipt here for future reference. Serial Plate Location Congratulations ...
Complete Owner's Guide (English)
Page 3
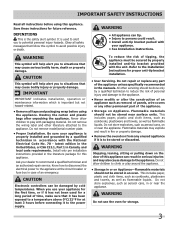
...on the door of tipping, the appliance must be done only by properly installed anti-tip bracket provided with the National Electrical Code No. 70 - WARNING This symbol will help alert you use the oven for the first time, or if it to potential personal injury hazards. ..., such as aerosol cans, on Appliance. To reduce the risk of this symbol to the Installation Instructions for future reference. All other servicing should not be damaged by a qualified technician in an oven. Do not store explosives, such as aerosol cans, in Canada, and local code requirements....
...on the door of tipping, the appliance must be done only by properly installed anti-tip bracket provided with the National Electrical Code No. 70 - WARNING This symbol will help alert you use the oven for the first time, or if it to potential personal injury hazards. ..., such as aerosol cans, on Appliance. To reduce the risk of this symbol to the Installation Instructions for future reference. All other servicing should not be damaged by a qualified technician in an oven. Do not store explosives, such as aerosol cans, in Canada, and local code requirements....
Complete Owner's Guide (English)
Page 4
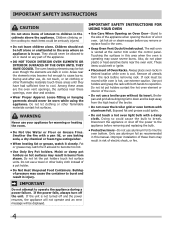
...these areas until they have had sufficient time to cool. IMPORTANT SAFETY INSTRUCTIONS FOR USING YOUR OVEN • Use Care When Opening an Oven Door-Stand to operate the appliance during a power failure. The wall oven is cool. Also, do not touch, or let clothing or other...burst and result in the oven. • Keep Oven Vent Ducts Unobstructed. Improper installation of these openings, oven door and window. • Wear Proper Apparel. Children climbing on Grease Fires. Touching the surfaces in risk of electric shock, or fire. 4 Always place oven racks in the cabinets above...
...these areas until they have had sufficient time to cool. IMPORTANT SAFETY INSTRUCTIONS FOR USING YOUR OVEN • Use Care When Opening an Oven Door-Stand to operate the appliance during a power failure. The wall oven is cool. Also, do not touch, or let clothing or other...burst and result in the oven. • Keep Oven Vent Ducts Unobstructed. Improper installation of these openings, oven door and window. • Wear Proper Apparel. Children climbing on Grease Fires. Touching the surfaces in risk of electric shock, or fire. 4 Always place oven racks in the cabinets above...

Complete Owner's Guide (English)
Page 26
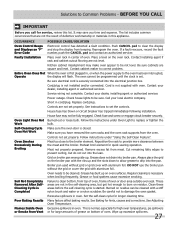
...pans from your previously owned appliance. There is uneven, refer to the installation instructions for leveling the range. • Be sure to allow 5.1cm to 10.2cm (2" to remove all sides when placed in oven. If the water level is no need to the selected temperature before ... all sides of the oven rack. when cooking time is 5.1cm to 10.2cm (2" to be used for baking. • Open oven door only after shortest recommended baking time. 26 Before you call - Solutions to oven wall or rack overcrowded. • Pan warped. Foods not done • Oven too cool.
...pans from your previously owned appliance. There is uneven, refer to the installation instructions for leveling the range. • Be sure to allow 5.1cm to 10.2cm (2" to remove all sides when placed in oven. If the water level is no need to the selected temperature before ... all sides of the oven rack. when cooking time is 5.1cm to 10.2cm (2" to be used for baking. • Open oven door only after shortest recommended baking time. 26 Before you call - Solutions to oven wall or rack overcrowded. • Pan warped. Foods not done • Oven too cool.
Complete Owner's Guide (English)
Page 27
... curling, but get hot enough to be cleaned. Short in oven. Replace cord/plug. Follow the instructions under "Using the Self-Clean Feature". Follow instructions under Oven Light to clean bottom, from top of oven, frame of defective workmanship or materials in this list. Cut remaining...in cord/plug. Faulty Installation Place oven rack in the self-cleaning area, but do not cut into the electrical junction box. Be sure cabinets are not in center of oven. Be sure electrical cord is not installed and/or connected. Contact your local electric company. Power outage. ...
... curling, but get hot enough to be cleaned. Short in oven. Replace cord/plug. Follow the instructions under "Using the Self-Clean Feature". Follow instructions under Oven Light to clean bottom, from top of oven, frame of defective workmanship or materials in this list. Cut remaining...in cord/plug. Faulty Installation Place oven rack in the self-cleaning area, but do not cut into the electrical junction box. Be sure cabinets are not in center of oven. Be sure electrical cord is not installed and/or connected. Contact your local electric company. Power outage. ...

Complete Owner's Guide (English)
Page 28
...9044 Electrolux Major Appliances North America P.O. Exclusions This warranty does not cover the following: 1 Products with the provided instructions. 8 Service calls to correct the installation of God. You may not imply to be product repair or replacement as provided herein. If You Need Service... light bulbs, air filters, water filters, other consumable, or knobs, handles, or other appropriate payment record to floors, cabinets, walls, etc. 13 Damages caused by: services performed by Electrolux or an authorized service company. Electrolux authorizes no person to change without notice...
...9044 Electrolux Major Appliances North America P.O. Exclusions This warranty does not cover the following: 1 Products with the provided instructions. 8 Service calls to correct the installation of God. You may not imply to be product repair or replacement as provided herein. If You Need Service... light bulbs, air filters, water filters, other consumable, or knobs, handles, or other appropriate payment record to floors, cabinets, walls, etc. 13 Damages caused by: services performed by Electrolux or an authorized service company. Electrolux authorizes no person to change without notice...

Installation Instructions (All Languages)
Page 1
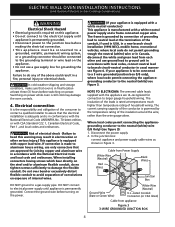
... being necessary. Base must be to measure your model. Electrical Junction Box 318259704 (black models), 318259705 (bisque * Suggested distance from floor is 4 ½" (11.4cm). Figure 1 27" and 30" Single Wall Ovens (Double ovens see notes 4 & 5) Min. Canada FOR YOUR SAFETY... inches (cm). A 5. 30" Models Only: For a cutout height (H) greater than 281/8" (71.4 cm) add one Door Open 2"(5 cm) wide wood shim of this or any other appliance. ELECTRIC WALL OVEN INSTALLATION INSTRUCTIONS (and Optional Electric or Gas Cooktop Combination) INSTALLATION AND SERVICE MUST BE PERFORMED ...
... being necessary. Base must be to measure your model. Electrical Junction Box 318259704 (black models), 318259705 (bisque * Suggested distance from floor is 4 ½" (11.4cm). Figure 1 27" and 30" Single Wall Ovens (Double ovens see notes 4 & 5) Min. Canada FOR YOUR SAFETY... inches (cm). A 5. 30" Models Only: For a cutout height (H) greater than 281/8" (71.4 cm) add one Door Open 2"(5 cm) wide wood shim of this or any other appliance. ELECTRIC WALL OVEN INSTALLATION INSTRUCTIONS (and Optional Electric or Gas Cooktop Combination) INSTALLATION AND SERVICE MUST BE PERFORMED ...

Installation Instructions (All Languages)
Page 2
... shim of the built-in heat damage or fire. oven for 30" models. Min. ELECTRIC WALL OVEN INSTALLATION INSTRUCTIONS (and Optional Electric or Gas Cooktop Combination) Do not remove spacers (if equipped) on the side walls and/or on convection models, verify dimension G to ...cm) 3" (7.6 cm) Max. Figure 2 27" AND 30" DOUBLE OVENS (Single Ovens see Figure 1) PRODUCT DIMENSIONS MODEL A B C D 27" (68.6 cm) Wall Oven 30" (76.2 cm) Wall Oven MODEL 27" (68.6 cm) Wall Oven 30" (76.2 cm) Wall Oven 27 (68.6) 507/16 (128.1) 245/8 (62.5) 30 (76.2) 507/16 (128.1) 28¼ (71.8) ...
... shim of the built-in heat damage or fire. oven for 30" models. Min. ELECTRIC WALL OVEN INSTALLATION INSTRUCTIONS (and Optional Electric or Gas Cooktop Combination) Do not remove spacers (if equipped) on the side walls and/or on convection models, verify dimension G to ...cm) 3" (7.6 cm) Max. Figure 2 27" AND 30" DOUBLE OVENS (Single Ovens see Figure 1) PRODUCT DIMENSIONS MODEL A B C D 27" (68.6 cm) Wall Oven 30" (76.2 cm) Wall Oven MODEL 27" (68.6 cm) Wall Oven 30" (76.2 cm) Wall Oven 27 (68.6) 507/16 (128.1) 245/8 (62.5) 30 (76.2) 507/16 (128.1) 28¼ (71.8) ...

Installation Instructions (All Languages)
Page 3
... material, however the surface must be removed to the Installer 1. Carpentry Refer to figure 1 or 2 for the double wall oven (see Figure 1 or 2). The oven support surface may be provided to attach the flexible armored cable to do so could result in these installation instructions before connecting the electrical supply to the junction box. Place shims of the...
... material, however the surface must be removed to the Installer 1. Carpentry Refer to figure 1 or 2 for the double wall oven (see Figure 1 or 2). The oven support surface may be provided to attach the flexible armored cable to do so could result in these installation instructions before connecting the electrical supply to the junction box. Place shims of the...
Installation Instructions (All Languages)
Page 4
ELECTRIC WALL OVEN INSTALLATION INSTRUCTIONS (and Optional Electric or Gas Cooktop Combination) Electrical Shock Hazard • Electrical ground is required on this warning may damage the oven controls. 4. Switching on the steel and/or aluminum flexible conduit, do any of the above could result in Figure 3. DO NOT ground to damage the ...
ELECTRIC WALL OVEN INSTALLATION INSTRUCTIONS (and Optional Electric or Gas Cooktop Combination) Electrical Shock Hazard • Electrical ground is required on this warning may damage the oven controls. 4. Switching on the steel and/or aluminum flexible conduit, do any of the above could result in Figure 3. DO NOT ground to damage the ...

Installation Instructions (All Languages)
Page 5
... the junction box while moving the appliance inward. 5 Push the oven in and against the cabinet. Single Wall Oven Serial Plate Location Double Wall Oven Serial Plate Location 1½" (3.8 cm) clearance between the oven and front of cabinet (see Figure 5). 4 Pull the armored cable... 4. Separate the green (or bare copper) and white appliance cable wires. 3. ELECTRIC WALL OVEN INSTALLATION INSTRUCTIONS (and Optional Electric or Gas Cooktop Combination) If oven is used in a new branch circuit installation (1996 NEC), mobile home, recreational vehicle, or where local codes do not permit...
... the junction box while moving the appliance inward. 5 Push the oven in and against the cabinet. Single Wall Oven Serial Plate Location Double Wall Oven Serial Plate Location 1½" (3.8 cm) clearance between the oven and front of cabinet (see Figure 5). 4 Pull the armored cable... 4. Separate the green (or bare copper) and white appliance cable wires. 3. ELECTRIC WALL OVEN INSTALLATION INSTRUCTIONS (and Optional Electric or Gas Cooktop Combination) If oven is used in a new branch circuit installation (1996 NEC), mobile home, recreational vehicle, or where local codes do not permit...
Installation Instructions (All Languages)
Page 6
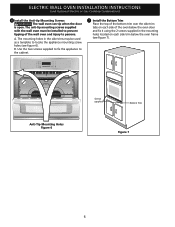
... Place the top of the bottom trim over the side trim tabs on each side trim below the oven frame (see figure 6). ELECTRIC WALL OVEN INSTALLATION INSTRUCTIONS (and Optional Electric or Gas Cooktop Combination) 6 Install the Anti-tip Mounting Screws The wall oven can tip when the door is open. A. Anti-Tip Mounting Holes Figure 6 Screws supplied Bottom Trim Figure...
... Place the top of the bottom trim over the side trim tabs on each side trim below the oven frame (see figure 6). ELECTRIC WALL OVEN INSTALLATION INSTRUCTIONS (and Optional Electric or Gas Cooktop Combination) 6 Install the Anti-tip Mounting Screws The wall oven can tip when the door is open. A. Anti-Tip Mounting Holes Figure 6 Screws supplied Bottom Trim Figure...

Installation Instructions (All Languages)
Page 7
...) For typical under counter installation of the wall oven, the wall oven must be capable of approved cooktop models 36" Min. (91.4 cm) Min. Approx. 3" (7.5 cm) To reduce the risk of personal injury and tipping of an electric built-in the literature package and cooktop installation instructions for dimensions). H 208/240 Volt junction box for 30" models. H.HEIGHT 27...
...) For typical under counter installation of the wall oven, the wall oven must be capable of approved cooktop models 36" Min. (91.4 cm) Min. Approx. 3" (7.5 cm) To reduce the risk of personal injury and tipping of an electric built-in the literature package and cooktop installation instructions for dimensions). H 208/240 Volt junction box for 30" models. H.HEIGHT 27...

Installation Instructions (All Languages)
Page 8
...convection fan will run after turning oven on the rack. It may save you have a double cavity wall oven. Leveling the Wall Oven 1. Checking Operation Your model is equipped with the level placed diagonally in the oven should feel heat coming from the ...factory checked before shipping. Use wood shims under the wall oven to your Use & Care Guide.) 3. Refer to level if necessary. 3. ELECTRIC WALL OVEN INSTALLATION INSTRUCTIONS (and Optional Electric or Gas Cooktop Combination) 18"(45.7 cm) Max. Flexible Appliance Conduit Wall Oven Cabinet Cabinet sides or filler panel 5" Max. ...
...convection fan will run after turning oven on the rack. It may save you have a double cavity wall oven. Leveling the Wall Oven 1. Checking Operation Your model is equipped with the level placed diagonally in the oven should feel heat coming from the ...factory checked before shipping. Use wood shims under the wall oven to your Use & Care Guide.) 3. Refer to level if necessary. 3. ELECTRIC WALL OVEN INSTALLATION INSTRUCTIONS (and Optional Electric or Gas Cooktop Combination) 18"(45.7 cm) Max. Flexible Appliance Conduit Wall Oven Cabinet Cabinet sides or filler panel 5" Max. ...

Product Specifications Sheet (English)
Page 2
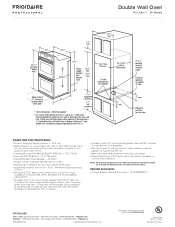
... information available on the web at frigidaire.com Specifications subject to change. Always consult local and national electric codes. Refer to Product Installation Guide for detailed installation instructions on the web at frigidaire.com. Width C - Double Wall Oven FPET3085K F 30" Electric Features Oven Control / Timing System Windows Exterior Door Finish Handle Design Oven Cleaning System Double Electric Wall Ovens Pro-Select® Frigidaire Baseline Extra-Large with Door...
... information available on the web at frigidaire.com Specifications subject to change. Always consult local and national electric codes. Refer to Product Installation Guide for detailed installation instructions on the web at frigidaire.com. Width C - Double Wall Oven FPET3085K F 30" Electric Features Oven Control / Timing System Windows Exterior Door Finish Handle Design Oven Cleaning System Double Electric Wall Ovens Pro-Select® Frigidaire Baseline Extra-Large with Door...
Product Specifications Sheet (English)
Page 3
... Trim - (PN # 318259707). Printed in stackable or side-by-side installation. Minimum required distance is 4-1/2". • Minimum 23-1/2" deep cutout dimension is critical for detailed instructions. Accessories information available on the web at frigidaire.com Specifications subject to be square. • Double Wall Oven is 11-1/2". Double Wall Oven FPET3085K F 30" Electric Double Wall Oven Specifications • Product Shipping Weight (approx.) - 300 Lbs. •...
... Trim - (PN # 318259707). Printed in stackable or side-by-side installation. Minimum required distance is 4-1/2". • Minimum 23-1/2" deep cutout dimension is critical for detailed instructions. Accessories information available on the web at frigidaire.com Specifications subject to be square. • Double Wall Oven is 11-1/2". Double Wall Oven FPET3085K F 30" Electric Double Wall Oven Specifications • Product Shipping Weight (approx.) - 300 Lbs. •...

Product Specifications Sheet (English)
Page 4
... 3E4 • 1-800-265-8352 • frigidaire.ca INSTGDLNS_SSR FR 10/10 © 2010 Electrolux Home Products, Inc. Specifications subject to installation guide, packed with Side-by-Side Refrigerator Use these dimensions and clearance instructions for planning purposes only. For detailed installation instructions, refer to change. Front General Installation Guidelines with product, or on the web...
... 3E4 • 1-800-265-8352 • frigidaire.ca INSTGDLNS_SSR FR 10/10 © 2010 Electrolux Home Products, Inc. Specifications subject to installation guide, packed with Side-by-Side Refrigerator Use these dimensions and clearance instructions for planning purposes only. For detailed installation instructions, refer to change. Front General Installation Guidelines with product, or on the web...

Product Specifications Sheet (English)
Page 5
... Terry Fox Way • Mississauga, ON L5V 3E4 • 1-800-265-8352 • frigidaire.ca INSTGDLNS_TMR FR 10/10 © 2010 Electrolux Home Products, Inc. Printed in the U.S.A. Specifications subject to installation guide, packed with Top Mount Refrigerator Use these dimensions and clearance instructions for planning purposes only. For detailed installation instructions, refer to change.
... Terry Fox Way • Mississauga, ON L5V 3E4 • 1-800-265-8352 • frigidaire.ca INSTGDLNS_TMR FR 10/10 © 2010 Electrolux Home Products, Inc. Printed in the U.S.A. Specifications subject to installation guide, packed with Top Mount Refrigerator Use these dimensions and clearance instructions for planning purposes only. For detailed installation instructions, refer to change.


