Installation Instructions (All Languages)
Page 1
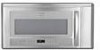
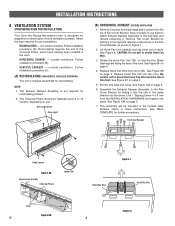
... on a wall as shown in Figure 1. To find the location of all items which locates the nails in the stud. NEED HELP? INSTALLATION INSTRUCTIONS Over The Range Microwave Oven BEFORE YOU BEGIN Read these instructions completely and carefully. • IMPORTANT Save these instructions for local inspector's use spacers to fill in the gaps.
... on a wall as shown in Figure 1. To find the location of all items which locates the nails in the stud. NEED HELP? INSTALLATION INSTRUCTIONS Over The Range Microwave Oven BEFORE YOU BEGIN Read these instructions completely and carefully. • IMPORTANT Save these instructions for local inspector's use spacers to fill in the gaps.
Installation Instructions (All Languages)
Page 2
...duct sealing tape is too short, have any liability for calculating air flow resistance equivalent, which is properly installed and grounded in accordance with a grounding plug. Ground Receptacle Opening for the electric current. DO NOT UNDER ANY ... 1/4" x 10" rectangular duct. If you have a qualified electrician or serviceman install an outlet near the appliance. This oven is required. It must be grounded. INSTALLATION INSTRUCTIONS 3 ELECTRICAL GROUNDING INSTRUCTIONS This appliance must be plugged into a wall receptacle that all straight duct sections.
...duct sealing tape is too short, have any liability for calculating air flow resistance equivalent, which is properly installed and grounded in accordance with a grounding plug. Ground Receptacle Opening for the electric current. DO NOT UNDER ANY ... 1/4" x 10" rectangular duct. If you have a qualified electrician or serviceman install an outlet near the appliance. This oven is required. It must be grounded. INSTALLATION INSTRUCTIONS 3 ELECTRICAL GROUNDING INSTRUCTIONS This appliance must be plugged into a wall receptacle that all straight duct sections.
Installation Instructions (All Languages)
Page 3
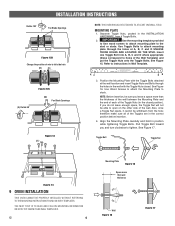
...range - All items are in a small bag. Surround the power cord opening (if needed) • Protective Drop Cloth for protection • Scissors • Pencil • Measure • Tape 6 INSTALLATION HARDWARE The INSTALLATION HARDWARE items ➀ - ➅ are in a bag packed below the oven. Lift carton off oven and remove all packing materials, Installation Instructions...CHECK THE OVEN. Mounting Plate Figure 5 Use with metal cabinets. INSTALLATION INSTRUCTIONS 5 TOOLS RECOMMENDED FOR INSTALLATION • Phillips Screwdriver • Electric Drill • 1/2", ...
...range - All items are in a small bag. Surround the power cord opening (if needed) • Protective Drop Cloth for protection • Scissors • Pencil • Measure • Tape 6 INSTALLATION HARDWARE The INSTALLATION HARDWARE items ➀ - ➅ are in a bag packed below the oven. Lift carton off oven and remove all packing materials, Installation Instructions...CHECK THE OVEN. Mounting Plate Figure 5 Use with metal cabinets. INSTALLATION INSTRUCTIONS 5 TOOLS RECOMMENDED FOR INSTALLATION • Phillips Screwdriver • Electric Drill • 1/2", ...
Installation Instructions (All Languages)
Page 4
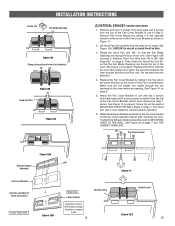
... so that the Fan Blade Openings are facing the back of cavity. Follow installation procedure (A). Recirculating requires the use of the Charcoal Filters, which have already been installed in future instructions. outside ventilation. NOTE: 1. Oven Light Cover Oven Light (B) HORIZONTAL EXHAUST:...direction as shown in the opposite direction of the arrow on page 5. 5. RECIRCULATING - INSTALLATION INSTRUCTIONS 8 VENTILATION SYSTEM (PREPARING OVEN FOR INSTALLATION) This Over the Range Microwave Oven is designed for adaptation to three types of hood ventilation systems. Select the ...
... so that the Fan Blade Openings are facing the back of cavity. Follow installation procedure (A). Recirculating requires the use of the Charcoal Filters, which have already been installed in future instructions. outside ventilation. NOTE: 1. Oven Light Cover Oven Light (B) HORIZONTAL EXHAUST:...direction as shown in the opposite direction of the arrow on page 5. 5. RECIRCULATING - INSTALLATION INSTRUCTIONS 8 VENTILATION SYSTEM (PREPARING OVEN FOR INSTALLATION) This Over the Range Microwave Oven is designed for adaptation to three types of hood ventilation systems. Select the ...
Installation Instructions (All Languages)
Page 5
...Figure 12A. See Figure 14 on page 6. Oven Rear Side Figure 10B Wall Side Rear Cushion Apply Rear Cushion after mounting the oven. INSTALLATION INSTRUCTIONS Rotate 180° Fan Blade Openings Figure 9A Change the position of cavity. See Figure 12B on page 6. Lift Hood Fan Unit carefully ...; so that the Fan Blade Openings are facing the top of the outercase cabinet after Exhaust Damper Assembly is now rotated for future instructions. Then rotate the Hood Fan Unit 90° so that the Fan Blade Openings are visible through the top openings in the opposite...
...Figure 12A. See Figure 14 on page 6. Oven Rear Side Figure 10B Wall Side Rear Cushion Apply Rear Cushion after mounting the oven. INSTALLATION INSTRUCTIONS Rotate 180° Fan Blade Openings Figure 9A Change the position of cavity. See Figure 12B on page 6. Lift Hood Fan Unit carefully ...; so that the Fan Blade Openings are facing the top of the outercase cabinet after Exhaust Damper Assembly is now rotated for future instructions. Then rotate the Hood Fan Unit 90° so that the Fan Blade Openings are visible through the top openings in the opposite...
Installation Instructions (All Languages)
Page 6
...Toggle Nuts closed position). If you do not leave enough space, the Toggle Nut will not be able to instructions in the INSTALLATION HARDWARE, from the hole; MOUNTING PLATE 1. Use Wood Screws to attach the Mounting Plate to attach mounting plate...,INSTALL AT LEAST 13-3/16 INCHES ABOVE A RANGE (OR COOK TOP) DB 3. Toggle Bolt Toggle Nut Figure 14 9 OVEN INSTALLATION THIS OVEN CANNOT BE PROPERLY INSTALLED WITHOUT REFERRING TO THE MOUNTING INSTRUCTIONS FOUND ON BOTH TEMPLATES. NOTE: Before insertion, be withdrawn from 4 Toggle Bolts. 2. INSTALLATION INSTRUCTIONS ...
...Toggle Nuts closed position). If you do not leave enough space, the Toggle Nut will not be able to instructions in the INSTALLATION HARDWARE, from the hole; MOUNTING PLATE 1. Use Wood Screws to attach the Mounting Plate to attach mounting plate...,INSTALL AT LEAST 13-3/16 INCHES ABOVE A RANGE (OR COOK TOP) DB 3. Toggle Bolt Toggle Nut Figure 14 9 OVEN INSTALLATION THIS OVEN CANNOT BE PROPERLY INSTALLED WITHOUT REFERRING TO THE MOUNTING INSTRUCTIONS FOUND ON BOTH TEMPLATES. NOTE: Before insertion, be withdrawn from 4 Toggle Bolts. 2. INSTALLATION INSTRUCTIONS ...
Installation Instructions (All Languages)
Page 7
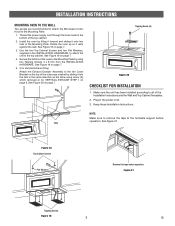
...sliding it rests against the wall. NOTE: Make sure to all of the top cabinet. 2. Plug in the bottom of the Installation Instructions and the Wall and Top Cabinet Templates. 2. Tabs Figure 18 Top Cabinet Screws Flat Washers Remove this tape before operation. See ...Figure 20 on page 7. 3. Keep these Installation Instructions. Install the oven by using screw (A) which removed at the turntable support before operation. See Figure 19 on page 5. Rotate the oven up...
...sliding it rests against the wall. NOTE: Make sure to all of the top cabinet. 2. Plug in the bottom of the Installation Instructions and the Wall and Top Cabinet Templates. 2. Tabs Figure 18 Top Cabinet Screws Flat Washers Remove this tape before operation. See ...Figure 20 on page 7. 3. Keep these Installation Instructions. Install the oven by using screw (A) which removed at the turntable support before operation. See Figure 19 on page 5. Rotate the oven up...


