
Installation Instructions
Page 2
Shipment/Installation 6 Parts Included 6 Tools You Will Need 7 Mounting Space 7 Step-by-step installation guide Placement of Mounting Plate 8-10 Removing the Mounting Plate 8 Finding the Wall Studs 8 ...-22 A Outside Top Exhaust 12-14 Attach Mounting Plate to Wall 12 Preparation of Top Cabinet 13 Checking for Proper Damper Operation 13 Mount the Microwave Oven ..........13, 14 Adjust the Exhaust Adaptor 14 Connecting Ductwork 14 B Outside Back Exhaust 15-18 Preparing Rear Wall for Outside Back Exhaust 15 Remove...
Shipment/Installation 6 Parts Included 6 Tools You Will Need 7 Mounting Space 7 Step-by-step installation guide Placement of Mounting Plate 8-10 Removing the Mounting Plate 8 Finding the Wall Studs 8 ...-22 A Outside Top Exhaust 12-14 Attach Mounting Plate to Wall 12 Preparation of Top Cabinet 13 Checking for Proper Damper Operation 13 Mount the Microwave Oven ..........13, 14 Adjust the Exhaust Adaptor 14 Connecting Ductwork 14 B Outside Back Exhaust 15-18 Preparing Rear Wall for Outside Back Exhaust 15 Remove...
Installation Instructions
Page 6
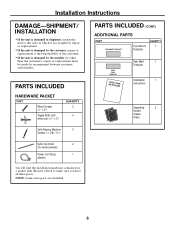
...the unit is damaged in shipment, return the unit to make sure you have all these parts. PARTS INCLUDED HARDWARE PACKET PART Wood Screws (1⁄4" x 2") Toggle Bolts (and wing nuts) (3⁄16" x 3") QUANTITY 2 4 PARTS INCLUDED (CONT.) ADDITIONAL PARTS PART TOP CABINET TEMPLATE Top Cabinet Template QUANTITY 1 REAR WALL TEMPLATE ININSSTTRAULCLTAITOIONNS Rear Wall 1 Template ... (if other than the customer), repair or replacement must be made by arrangement between customer and installer. NOTE: Some extra parts are included. 6 Check to the store in a packet with the unit.
...the unit is damaged in shipment, return the unit to make sure you have all these parts. PARTS INCLUDED HARDWARE PACKET PART Wood Screws (1⁄4" x 2") Toggle Bolts (and wing nuts) (3⁄16" x 3") QUANTITY 2 4 PARTS INCLUDED (CONT.) ADDITIONAL PARTS PART TOP CABINET TEMPLATE Top Cabinet Template QUANTITY 1 REAR WALL TEMPLATE ININSSTTRAULCLTAITOIONNS Rear Wall 1 Template ... (if other than the customer), repair or replacement must be made by arrangement between customer and installer. NOTE: Some extra parts are included. 6 Check to the store in a packet with the unit.
Installation Instructions
Page 20
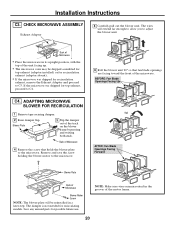
... Exhaust Adaptor 5 Carefully pull out the blower unit. C4. Save any unused parts for recirculating models. If the microwave was shipped for top exhaust, proceed to C5. Back of Microwave • Place the microwave in a later step. ADAPTING MICROWAVE BLOWER FOR RECIRCULATION 1 Remove tape securing damper. 2 Raise damper flap. Back of the track on the...
... Exhaust Adaptor 5 Carefully pull out the blower unit. C4. Save any unused parts for recirculating models. If the microwave was shipped for top exhaust, proceed to C5. Back of Microwave • Place the microwave in a later step. ADAPTING MICROWAVE BLOWER FOR RECIRCULATION 1 Remove tape securing damper. 2 Raise damper flap. Back of the track on the...


