Get support for Frigidaire FMV157GS - Microwave

Frigidaire FMV157GS Support Question

Frigidaire FMV157GS Support Question

Find answers below for this question about Frigidaire FMV157GS - Microwave.
Need a Frigidaire FMV157GS manual? We have 1 online manual for this item!
Question posted by jziebro on July 15th, 2014

What Is The Part Number For The Hood Thermostat On A Frigidaire 157gs

The person who posted this question about this Frigidaire product did not include a detailed explanation. Please use the "Request More Information" button to the right if more details would help you to answer this question.

Current Answers

Answer #1: Posted by OnlineOutreachSpecialist on July 24th, 2014 12:46 PM
This answer was accepted by the poster of the original question.
OnlineOutreachSpecialist

Member since:
March 30th, 2011

Points: 2,848,320
1,100
points
Hey jziebro, I appreciate your post!

I see you are trying to locate the part number for a hood thermostat on your Frigidaire microwave, FMV157GS. I have reviewed the part manual breakdown and I am unable to locate a part labeled hood thermostat. I can provide you information I have which is for 5304464073 (Thermostat), 5304464074 (Thermostat, cutout, oven cavity), 5304464092 (Thermostat, cutout, transformer), or 5304464094 (Thermostat, cutout, vent motor). I hope this is helpful. –Chris


Online Outreach Specialist

Related Frigidaire FMV157GS Manual Pages

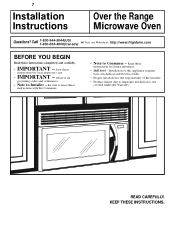
Installation Instructions - Page 1

...800-944-9044(US) 1-800-668-4606(Canada) or Visit our Website at: http://www.frigidaire.com BEFORE YOU BEGIN Read these instructions for future reference. • Skill level - READ CAREFULLY... installation is not covered under the Warranty. 7 Installation Instructions Over the Range Microwave Oven Questions? Save these instructions completely and carefully. • IMPORTANT -
Installation Instructions - Page 2

... Mounting Plate to Wall 19 Preparation of Top Cabinet 19 Check Microwave Assembly 20 Adapting Microwave Blower for Recirculation 20, 21 Mount the Microwave Oven ..........21, 22 Installing the Charcoal Filter 22 Before You Use Your Microwave 23 2 Installation Instructions CONTENTS General information Important Safety Instructions 3 Electrical Requirements 3 Hood Exhaust 4, 5 Damage -
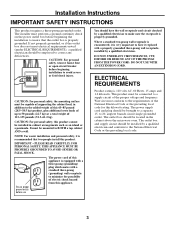
Installation Instructions - Page 3

....7 kg) or a total weight of supporting the cabinet load, in the cabinet above the microwave oven. CAUTION: For personal safety, remove house fuse or open circuit breaker before beginning installation to 20...: For personal safety, this 63-85 pound (28.5-38.5 kg) product, plus additional oven loads of up to the added weight of electric shock hazard from this kilowatt rating. FOR...
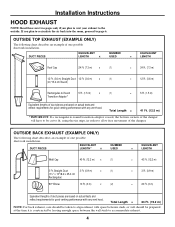
Installation Instructions - Page 4

...based on actual tests and reflect requirements for good venting performance with any vent hood. Total Length = 41 Ft. (12.5 m) * IMPORTANT: If a ... Read these next two pages only if you plan to recirculate the air back into the room, proceed to page 6. DUCT PIECES EQUIVALENT NUMBER EQUIVALENT LENGTH x USED = LENGTH Roof Cap 24 Ft. (7.3 m) x (1) = 24 Ft. (7.3 m) 12 Ft. (3.6 m)...
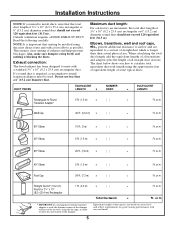
Installation Instructions - Page 5

... of duct pieces are based on actual tests and reflect requirements for good venting performance with any vent hood. or m Ft. or m Straight Duct 6" (15.2 cm) Round or 31⁄4" x 10... blocking the ducts. Do not use less than their actual physical size. DUCT PIECES EQUIVALENT NUMBER EQUIVALENT LENGTH x USED = LENGTH Rectangular-to allow free movement of the damper. 5 Equivalent...
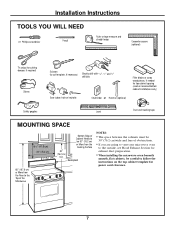
Installation Instructions - Page 7

... must be 30" (76.2 cm)wide and free of obstructions. • If you are going to vent your microwave oven to the outside, see Hood Exhaust Section for exhaust duct preparation. • When installing the microwave oven beneath smooth, flat cabinets, be careful to follow the instructions on the top cabinet template for power cord...
Installation Instructions - Page 8

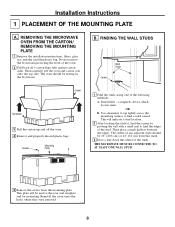
REMOVING THE MICROWAVE OVEN FROM THE CARTON/ REMOVING THE MOUNTING PLATE 1 Remove the installation instructions, filters, glass tray and ...Studs Center Carton Styrofoam 3 Pull the carton up and off the oven. 4 Remove and properly discard plastic bags. Do not remove the Styrofoam protecting the front of the following methods: A. THE MICROWAVE MUST BE CONNECTED TO AT LEAST ONE WALL STUD. 5 Remove...
Installation Instructions - Page 9

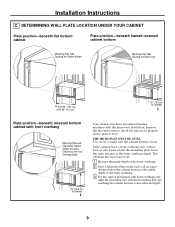
...; (91.4 cm) 30″ (76.2 cm) to Cooktop Plate position-beneath recessed bottom cabinet with front overhang Mounting Plate with the microwave installation. Remove the decorative trim to install the microwave properly and to Cooktop Your cabinets may have a front overhang only, with this horizontal line, not touching the cabinet bottom as...
Installation Instructions - Page 11

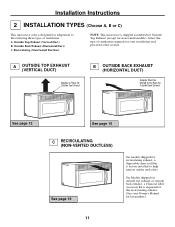
...Installation Instructions 2 INSTALLATION TYPES (Choose A, B or C) This microwave oven is designed for adaptation to help remove smoke and odors. A...(NON-VENTED DUCTLESS) See page 19 On models shipped for kit number.) 11 Select the type of ventilation: A. Recirculating (Non-Vented Ductless) NOTE: This microwave is shipped assembled for Outside Top Exhaust (except for your Owner's ...
Installation Instructions - Page 12

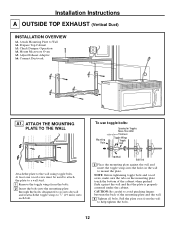
... the holes designated to go into the holes in the wall to mount the plate. Attach Mounting Plate to help tighten the bolts. 12 Mount Microwave Oven A5. Connect Ductwork A1.
Installation Instructions - Page 13

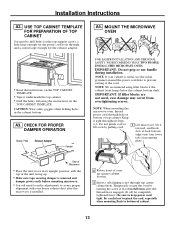
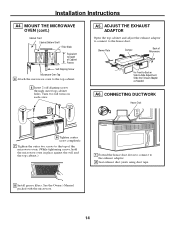
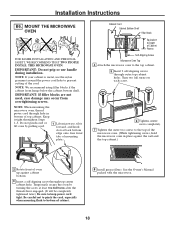
... onto four lower tabs of the cord. NOTE: When mounting the microwave oven, thread power cord through top center cabinet hole. MOUNT THE MICROWAVE OVEN FOR EASIER INSTALLATION AND PERSONAL SAFETY, WE RECOMMEND THAT TWO PEOPLE INSTALL THIS MICROWAVE OVEN. Back of Microwave • Place the microwave in its upright position, with your cabinet is installed. 2 Rotate front...
Installation Instructions - Page 14

...-aligning screws through outer top cabinet holes. See the Owner's Manual packed with the microwave. 14 Installation Instructions A4. Turn two full turns on each screw. Blower Plate Damper Back of the microwave oven. (While tightening screws, hold the microwave oven in place against the wall and the top cabinet.) 1 Extend the house duct down...
Installation Instructions - Page 15

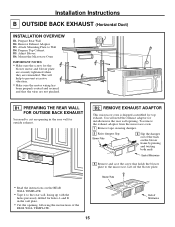
... B4. B1. B2. You will help to cut an opening in the wall plate. • Cut the opening . Attach Mounting Plate to the microwave. REMOVE EXHAUST ADAPTOR This microwave oven is shipped assembled for the blower motor and blower plate are securely tightened when they are not pinched. Remove Exhaust Adaptor B3. Mount...
Installation Instructions - Page 17

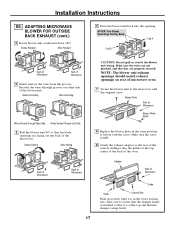
... or stretch the blower unit wiring. Make sure the screw is tight. 9 Attach the exhaust adaptor to the rear of the oven. Reroute the wires through grooves on rear of microwave oven. 7 Secure the blower unit to assure that the damper hinge is installed so that fan blade openings are properly secured. Back...
Installation Instructions - Page 18

... not used, case damage may occur from overtightening screws. Cabinet Front Cabinet Bottom Shelf Filler Block Equivalent to Depth of Cabinet Recess Self-Aligning Screw Microwave Oven Top 4 Attach the microwave oven to prevent cutting of the cord. Be careful not to pinch the cord, especially when mounting flush to the top of the...
Installation Instructions - Page 19

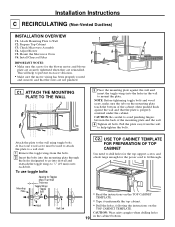
... Bolt End C2. This will help tighten the bolts. Attach the plate to mount the plate. Check Microwave Assembly C4. CAUTION: Wear safety goggles when drilling holes 19 in the wall to the wall using toggle... the mounting plate and the wall. 4 Tighten all bolts. Mount the Microwave Oven C6. Installation Instructions C RECIRCULATING (Non-Vented Ductless) INSTALLATION OVERVIEW C1.
Installation Instructions - Page 20

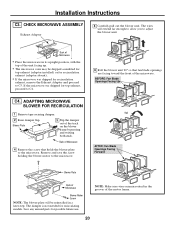
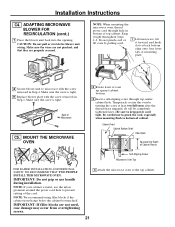
... top of the unit facing up. • The microwave oven may be reinstalled in the grooves of Microwave Blower Motor Screw NOTE: The blower plate will extend far enough to allow you to C5. CHECK MICROWAVE ASSEMBLY Exhaust Adaptor 5 Carefully pull out the blower unit. C4. ADAPTING MICROWAVE BLOWER FOR RECIRCULATION 1 Remove tape securing damper...
Installation Instructions - Page 21

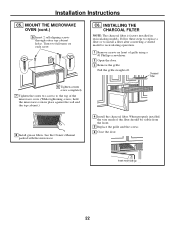
... are properly secured. Make sure the wires are not pinched, and that they are not used, case damage may occur from overtightening screws. 4 Attach the microwave oven to keep power cord tight. Keep it forward, and hook slots at least two full turns after the threads have engaged. (It will be completely...
Installation Instructions - Page 22

... cabinet.) 8 Install grease filters. Charcoal Filter 6 Tighten center screw completely. 7 Tighten the outer two screws to recirculating operation. 1 Remove screws on each screw. MOUNT THE MICROWAVE OVEN (cont.) 5 Insert 2 self-aligning screws through outer top cabinet holes. Follow these steps to replace a filter or to install a filter after converting a vented model to...
Installation Instructions - Page 23

... INSPECTOR'S USE. Installation Instructions BEFORE YOU USE YOUR MICROWAVE 1. Read the Owner's Manual. Replace house fuse or turn breaker back on. 7. Install turntable and ring in cavity. 4. Plug power cord into a dedicated 15- ININSSTTARLULCATTIIOONNS 5. to instructions. ININSSTTARLULCATTIIOONNS 6. Make sure the microwave oven has been installed according to 20-amp electrical...

Similar Questions

Ask a New Question
Use the box below to post a new question about this Frigidaire product .
Points & Prizes
  • You can earn points for nearly everything you do on HelpOwl.com
  • You can trade in those points for gift cards at leading retailers such as Amazon.com and Walmart
  • It's that simple!
See How it Works
Create a Free Account

Frigidaire Manuals

Find free Frigidaire FMV157GS - Microwave manuals and user guides available at ManualOwl.com. Try out our unique manual viewer allowing you to interact with manuals from directly within your browser!

Frigidaire Reviews

View thousands of Frigidaire user reviews and customer ratings available at ReviewOwl.com.

Contact Information

Complete Frigidaire customer service contact information including steps to reach representatives, hours of operation, customer support links and more from ContactHelp.com.

Scoreboard Ratings

See detailed Frigidaire customer service rankings, employee comments and much more from our sister site.

Frigidaire Recalls

Find comprehensive Frigidaire recall information updated hourly on RecallOwl.com.