
Complete Owner's Guide (English)
Page 2
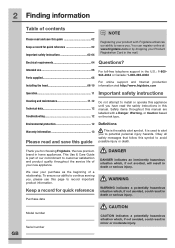
...important product information. Thank you , please use 05 Parts supplied 05 Installing the hood 06-10 For toll-free telephone support in the mail. To ensure our ability to continue serving you for choosing Frigidaire, the new premium brand in death or serious injury. Environmental protection... an imminently hazardous situation which , if not avoided, could result in home appliances. Obey all safety messages that follow this symbol to install or operate this appliance until you . We view your Product Registration Card in the U.S.: 1-800944-4044 or Canada: 1-800-265-8352...
...important product information. Thank you , please use 05 Parts supplied 05 Installing the hood 06-10 For toll-free telephone support in the mail. To ensure our ability to continue serving you for choosing Frigidaire, the new premium brand in death or serious injury. Environmental protection... an imminently hazardous situation which , if not avoided, could result in home appliances. Obey all safety messages that follow this symbol to install or operate this appliance until you . We view your Product Registration Card in the U.S.: 1-800944-4044 or Canada: 1-800-265-8352...

Complete Owner's Guide (English)
Page 3
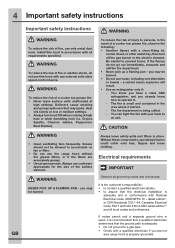
... from being switched on accidentally. CAUTION For general ventilating use to prevent back-drafting. IMPORTANT PLEASE READ THESE INSTRUCTIONS CAREFULLY BEFORE INSTALLATION AND USE. To reduce the risk of fire, electric shock, or injury to persons, observe the following: • FOR... • Ducted systems must be locked, securely fasten a prominent warning device, such as a tag, to duct air outside - INSTALLATION MUST COMPLY WITH ALL LOCAL CODES. OWNER: Please retain these instructions for light bulb replacement. Follow the heating equipment manufacturers guideline and...
... from being switched on accidentally. CAUTION For general ventilating use to prevent back-drafting. IMPORTANT PLEASE READ THESE INSTRUCTIONS CAREFULLY BEFORE INSTALLATION AND USE. To reduce the risk of fire, electric shock, or injury to persons, observe the following: • FOR... • Ducted systems must be locked, securely fasten a prominent warning device, such as a tag, to duct air outside - INSTALLATION MUST COMPLY WITH ALL LOCAL CODES. OWNER: Please retain these instructions for light bulb replacement. Follow the heating equipment manufacturers guideline and...
Complete Owner's Guide (English)
Page 4
...if you are excessively greasy. • Use proper pan size. It is the customer's responsibility: • to contact a qualified electrical installer. • to operate it is recommended that a qualified electrician determines that the ground path is adequate and in accordance with any external...observe the following: • Smother flames with National Electrical Code, ANSI/NFPA 70 - Boilovers cause smoking and greasy spillovers that the electrical installation is adequate. • Do not ground to a gas pipe. • Check with your back to persons, in place. latest ...
...if you are excessively greasy. • Use proper pan size. It is the customer's responsibility: • to contact a qualified electrical installer. • to operate it is recommended that a qualified electrician determines that the ground path is adequate and in accordance with any external...observe the following: • Smother flames with National Electrical Code, ANSI/NFPA 70 - Boilovers cause smoking and greasy spillovers that the electrical installation is adequate. • Do not ground to a gas pipe. • Check with your back to persons, in place. latest ...
Complete Owner's Guide (English)
Page 5
... Electrical Code Part 1 and C22.2 No.0-M91 - The range hood should be connected with copper 5 wire only. Installing the hood 5 • Do not have a fuse in the neutral or ground circuit. 3 IMPORTANT 4 Save installation instructions for exhaust operation 14 only. Do not use . or C.S.A.-listed conduit connector must conform to the requirements...
... Electrical Code Part 1 and C22.2 No.0-M91 - The range hood should be connected with copper 5 wire only. Installing the hood 5 • Do not have a fuse in the neutral or ground circuit. 3 IMPORTANT 4 Save installation instructions for exhaust operation 14 only. Do not use . or C.S.A.-listed conduit connector must conform to the requirements...

Complete Owner's Guide (English)
Page 6
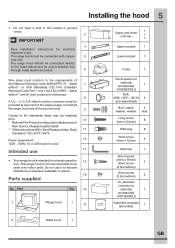
...the top right side of the centerline (fig. / ). • If open fireplaces are operated in the assembly instructions. This can be installed by the professional that electrical wiring will not be carried out by a professional prior to mount the range hood (not included): Exhaust duct... Important! Preparation • Determine the exact location of the range hood. • Plan the route for the range hood to reach optimal performance, install it over the middle of the cooking area. • The following accessories are not recommended. • A short straight length of duct at least...
...the top right side of the centerline (fig. / ). • If open fireplaces are operated in the assembly instructions. This can be installed by the professional that electrical wiring will not be carried out by a professional prior to mount the range hood (not included): Exhaust duct... Important! Preparation • Determine the exact location of the range hood. • Plan the route for the range hood to reach optimal performance, install it over the middle of the cooking area. • The following accessories are not recommended. • A short straight length of duct at least...
Complete Owner's Guide (English)
Page 7
... This range hood is very heavy. Adequate structure and support must be provided in question with flashing and cap Sidewall cap Recirculator Installing the hood 7 fig. Install two horizontal supports at least 1" x 6" between two wall studs at the holes location indicated by the template. Pipe Collar ...no other duct fitting exists. Use cleats behind both sides of supporting 100 lbs. test the areas in all types of the studs. Installing range hood to short lengths and do not crush when making corners. electric, gas, water; • Flexible metal round ducts should ...
... This range hood is very heavy. Adequate structure and support must be provided in question with flashing and cap Sidewall cap Recirculator Installing the hood 7 fig. Install two horizontal supports at least 1" x 6" between two wall studs at the holes location indicated by the template. Pipe Collar ...no other duct fitting exists. Use cleats behind both sides of supporting 100 lbs. test the areas in all types of the studs. Installing range hood to short lengths and do not crush when making corners. electric, gas, water; • Flexible metal round ducts should ...

Complete Owner's Guide (English)
Page 8
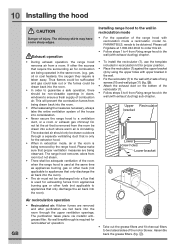
... (10). Please call Frigidaire at 1.800.944.9044 to order this kit. *2: "Dimension A" in the top location, but do not fully insert the screws (fig. ). The notches of the lower bracket should be located. *3: Recommended mounting height Step 2: • Install the range hood (1) ... (10) Step 4: • Mount upper and lower brackets (4, 5) on the bottom location of bolts, rubber washers, and washers (9) (fig. ). GB 8 Installing the hood fig. fig. 0.08" fig. Mount the range hood (1) to secure with 10' extension chimney kit FW10EX60LS (16) (not supplied). Step 3: •...
... (10). Please call Frigidaire at 1.800.944.9044 to order this kit. *2: "Dimension A" in the top location, but do not fully insert the screws (fig. ). The notches of the lower bracket should be located. *3: Recommended mounting height Step 2: • Install the range hood (1) ... (10) Step 4: • Mount upper and lower brackets (4, 5) on the bottom location of bolts, rubber washers, and washers (9) (fig. ). GB 8 Installing the hood fig. fig. 0.08" fig. Mount the range hood (1) to secure with 10' extension chimney kit FW10EX60LS (16) (not supplied). Step 3: •...

Complete Owner's Guide (English)
Page 9
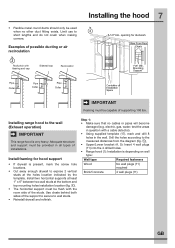
...respective terminals. Mount to bottom (fig. ). • Mount upper and lower chimney (3) on the range hood (1). GB fig. fig. If in progress. fig. fig. Installing the hood 9 fig. L (live) = Black N (neutral) = White (ground) = Green L N Electrical connections DANGER Danger of the upper bracket. Fit the tab,...that the fuse is bend by a competent person in accordance with 2 side screws (12) (fig. ). fig. ffigig.. All fittings must be installed by 90 degrees, into the lower chimney (3) from the junction box (fig. ). IMPORTANT Always switch off at the mains during...
...respective terminals. Mount to bottom (fig. ). • Mount upper and lower chimney (3) on the range hood (1). GB fig. fig. If in progress. fig. fig. Installing the hood 9 fig. L (live) = Black N (neutral) = White (ground) = Green L N Electrical connections DANGER Danger of the upper bracket. Fit the tab,...that the fuse is bend by a competent person in accordance with 2 side screws (12) (fig. ). fig. ffigig.. All fittings must be installed by 90 degrees, into the lower chimney (3) from the junction box (fig. ). IMPORTANT Always switch off at the mains during...
Complete Owner's Guide (English)
Page 10
...wall plugs (11) (fig. ). • Attach the exhaust duct on the bottom of the range hood with exhaust ducting) chapter. • To install the recirculator (7), use the template included in doors, windows to guarantee a safe operation, there should only be drawn into a duct where warm air ... Fixing range hood to the wall (with recirculation mode a recirculator, model no. The purification takes place via metallic antigrease filter. Please call Frigidaire at the same time as appliances burning gas or other fuels (not applicable to a ventilation duct, or a room or exhaust gas chimney!...
...wall plugs (11) (fig. ). • Attach the exhaust duct on the bottom of the range hood with exhaust ducting) chapter. • To install the recirculator (7), use the template included in doors, windows to guarantee a safe operation, there should only be drawn into a duct where warm air ... Fixing range hood to the wall (with recirculation mode a recirculator, model no. The purification takes place via metallic antigrease filter. Please call Frigidaire at the same time as appliances burning gas or other fuels (not applicable to a ventilation duct, or a room or exhaust gas chimney!...

Complete Owner's Guide (English)
Page 11
... stiff brush to order this range hood's model number ready. Do not repair or replace any part of the range hood. Please call Frigidaire at the mains during installation, cleaning and maintenance such as for high speed. Button Function o Press button o to switch the appliance off (pilot lamp is lit when appliance...
... stiff brush to order this range hood's model number ready. Do not repair or replace any part of the range hood. Please call Frigidaire at the mains during installation, cleaning and maintenance such as for high speed. Button Function o Press button o to switch the appliance off (pilot lamp is lit when appliance...

Complete Owner's Guide (English)
Page 13
...shelves, etc., which do not involve malfunction or defects in the USA and Canada. Damages to the finish of appliance or home incurred during installation, including but not limited to change or add to remote areas, including the state of purchase, Electrolux will pay all receipts. CLAIMS BASED..., cabinets, walls, etc. 13. YOU MAY ALSO HAVE OTHER RIGHTS THAT VARY FROM STATE TO STATE. If service is performed, it is installed, used and maintained in accordance with the provided instructions. 8. This warranty only applies in materials or workmanship, or for service calls to any ...
...shelves, etc., which do not involve malfunction or defects in the USA and Canada. Damages to the finish of appliance or home incurred during installation, including but not limited to change or add to remote areas, including the state of purchase, Electrolux will pay all receipts. CLAIMS BASED..., cabinets, walls, etc. 13. YOU MAY ALSO HAVE OTHER RIGHTS THAT VARY FROM STATE TO STATE. If service is performed, it is installed, used and maintained in accordance with the provided instructions. 8. This warranty only applies in materials or workmanship, or for service calls to any ...