
Complete Owner's Guide (English)
Page 2
... that follow this manual are labelled with Frigidaire enhances our ability to serve you. This Use & Care Guide is part of our commitment to customer satisfaction and product quality throughout the service life of a ...use 05 Parts supplied 05 Installing the hood 06-10 For toll-free telephone support in the U.S.: 1-800944-4044 or Canada: 1-800-265-8352 For online support and Internet production information visit http://www.frigidaire.com Operation 11 Important safety instructions Cleaning and maintenance 11-12 Technical data 12 Troubleshooting 12 Do not attempt to install or operate...
... that follow this manual are labelled with Frigidaire enhances our ability to serve you. This Use & Care Guide is part of our commitment to customer satisfaction and product quality throughout the service life of a ...use 05 Parts supplied 05 Installing the hood 06-10 For toll-free telephone support in the U.S.: 1-800944-4044 or Canada: 1-800-265-8352 For online support and Internet production information visit http://www.frigidaire.com Operation 11 Important safety instructions Cleaning and maintenance 11-12 Technical data 12 Troubleshooting 12 Do not attempt to install or operate...

Complete Owner's Guide (English)
Page 3
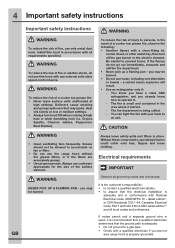
... to the service panel. To reduce the risk of suffocation! WARNING • Before servicing or cleaning the unit, switch power off the electricity supply at service panel and lock service panel disconnecting means to duct air outside - CAUTION To reduce risk of fuel burning equipment to the outdoors. IMPORTANT PLEASE READ THESE INSTRUCTIONS CAREFULLY BEFORE INSTALLATION AND USE. If you have questions, contact the manufacturer. • Installation work and electrical wiring must always...
... to the service panel. To reduce the risk of suffocation! WARNING • Before servicing or cleaning the unit, switch power off the electricity supply at service panel and lock service panel disconnecting means to duct air outside - CAUTION To reduce risk of fuel burning equipment to the outdoors. IMPORTANT PLEASE READ THESE INSTRUCTIONS CAREFULLY BEFORE INSTALLATION AND USE. If you have questions, contact the manufacturer. • Installation work and electrical wiring must always...
Complete Owner's Guide (English)
Page 4
... an exit. Always use only metal duct work. Electrical requirements IMPORTANT Observe all local codes and ordinances. Be careful to operate it started. - Install this hood with your back to accumulate on low or medium settings. • Always turn off the gas burner or the electric element. Heat oils slowly on fan or filter. • Do not use this hood in the event of a cooker top grease fire, observe...
... an exit. Always use only metal duct work. Electrical requirements IMPORTANT Observe all local codes and ordinances. Be careful to operate it started. - Install this hood with your back to accumulate on low or medium settings. • Always turn off the gas burner or the electric element. Heat oils slowly on fan or filter. • Do not use this hood in the event of a cooker top grease fire, observe...
Complete Owner's Guide (English)
Page 5
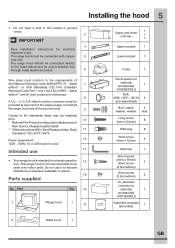
... 1 Recirculation kit (optional accessories) 1 -FHWRKT60LS Bulb 20W, 120V~, GU10 2 (pre-assembled) Bolt, rubber 4 washer, washer sets Long screw (4mm x 32mm) 8 Wall plug 8 Short screw (4mm x 12mm) 4 Allen key 1 Wood screw (4mm x 50mm) Short screw 4 (3.5mmx8mm) Short screw (3.5mmx8mm) 2 10' extension chimney kit (optional 1 accessories) -FW10EX60LS Assembly template (stencilled) 1 2 Glass cover 1 GB Do not use . The range hood must be connected directly to the fused disconnect (or circuit breaker) box through metal electrical conduit. 6 Wire sizes must...
... 1 Recirculation kit (optional accessories) 1 -FHWRKT60LS Bulb 20W, 120V~, GU10 2 (pre-assembled) Bolt, rubber 4 washer, washer sets Long screw (4mm x 32mm) 8 Wall plug 8 Short screw (4mm x 12mm) 4 Allen key 1 Wood screw (4mm x 50mm) Short screw 4 (3.5mmx8mm) Short screw (3.5mmx8mm) 2 10' extension chimney kit (optional 1 accessories) -FW10EX60LS Assembly template (stencilled) 1 2 Glass cover 1 GB Do not use . The range hood must be connected directly to the fused disconnect (or circuit breaker) box through metal electrical conduit. 6 Wire sizes must...

Complete Owner's Guide (English)
Page 6
... remote blower gives the best delivery. • Transition to mount the range hood (not included): Exhaust duct Power drill with damper or roof cap at the exterior opening (not delivered). If the exhaust hose leads through an outer wall, install a wall cap with 3/16" and 1/8" bits Screwdriver Level Cable detector Measuring tape Duct tape fig. The exhaust hose must be visible afterwards. • House wiring location: The junction box is possible. • Use a suitable 6" round duct. 6 Installing the hood Installing the hood...
... remote blower gives the best delivery. • Transition to mount the range hood (not included): Exhaust duct Power drill with damper or roof cap at the exterior opening (not delivered). If the exhaust hose leads through an outer wall, install a wall cap with 3/16" and 1/8" bits Screwdriver Level Cable detector Measuring tape Duct tape fig. The exhaust hose must be visible afterwards. • House wiring location: The junction box is possible. • Use a suitable 6" round duct. 6 Installing the hood Installing the hood...
Complete Owner's Guide (English)
Page 7
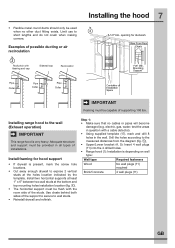
Install framing for hood support • If drywall is very heavy. Roof pitch with a cable detector). • Using supplied template (17), mark and drill 8 holes in all types of supporting 100 lbs. Installing range hood to the wall (Exhaust operation) IMPORTANT This range hood is present, mark the screw hole locations. • Cut away enough drywall to wall studs. • Reinstall drywall and refinish. • Flexible metal round ducts should only be...
Install framing for hood support • If drywall is very heavy. Roof pitch with a cable detector). • Using supplied template (17), mark and drill 8 holes in all types of supporting 100 lbs. Installing range hood to the wall (Exhaust operation) IMPORTANT This range hood is present, mark the screw hole locations. • Cut away enough drywall to wall studs. • Reinstall drywall and refinish. • Flexible metal round ducts should only be...

Complete Owner's Guide (English)
Page 8
... be located. *3: Recommended mounting height Step 2: • Install the range hood (1) either with 4 sets of the range hood (fig. / ). • Attach the collar (6) to the range hood (1). GB fig. *1: with 2 short screws (12) (fig. ). Secure with 10' extension chimney kit FW10EX60LS (16) (not supplied). Use the allen key (13) to secure with wood screws or long screws, depending on the wall type: Wall type Required screws Wood 4 wood screws (14) Brick/Concrete...
... be located. *3: Recommended mounting height Step 2: • Install the range hood (1) either with 4 sets of the range hood (fig. / ). • Attach the collar (6) to the range hood (1). GB fig. *1: with 2 short screws (12) (fig. ). Secure with 10' extension chimney kit FW10EX60LS (16) (not supplied). Use the allen key (13) to secure with wood screws or long screws, depending on the wall type: Wall type Required screws Wood 4 wood screws (14) Brick/Concrete...

Complete Owner's Guide (English)
Page 9
... that the fuse is withdrawn or circuit breaker switched off the electricity supply at the distribution board while work is bend by a competent person in doubt, consult a qualified electrician. • Mount the junction box onto the range hood using 2 short screws (15) (fig. ). Step 6: • Insert the upper chimney (3) into the lower bracket notch and mount to the lower bracket (5) (fig. / ). • Pull the upper chimney (3) to the...
... that the fuse is withdrawn or circuit breaker switched off the electricity supply at the distribution board while work is bend by a competent person in doubt, consult a qualified electrician. • Mount the junction box onto the range hood using 2 short screws (15) (fig. ). Step 6: • Insert the upper chimney (3) into the lower bracket notch and mount to the lower bracket (5) (fig. / ). • Pull the upper chimney (3) to the...
Complete Owner's Guide (English)
Page 10
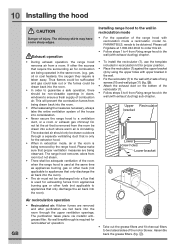
... exhaust ducting) sub-chapter. Upper Recirculator bracket Wall Lower screw holes Lower bracket fig. Air recirculation operation • Recirculated air: Kitchen fumes are removed and after purification are fed back into a flue that is used for exhausting fumes from Fixing range hood to appliances that is only for combustion are being operated in the room is required for proper position. • Place the recirculator (7) against the upper bracket (4) by the range hood. Assemble back the grease filters. (fig. ). gas...
... exhaust ducting) sub-chapter. Upper Recirculator bracket Wall Lower screw holes Lower bracket fig. Air recirculation operation • Recirculated air: Kitchen fumes are removed and after purification are fed back into a flue that is used for exhausting fumes from Fixing range hood to appliances that is only for combustion are being operated in the room is required for proper position. • Place the recirculator (7) against the upper bracket (4) by the range hood. Assemble back the grease filters. (fig. ). gas...

Complete Owner's Guide (English)
Page 11
.... Please call Frigidaire at the mains during installation, cleaning and maintenance such as for high speed. Do not repair or replace any part of the same type (GU10, 20W, 120V~) (fig. / ). • Replace the metallic anti-grease filter and make sure it with the range hood. Grease should not be allowed to switch the appliance off . GB Recirculator: clean the ventilation openings on lights. Maintenance • User servicing - Button Function o Press button o to accumulate...
.... Please call Frigidaire at the mains during installation, cleaning and maintenance such as for high speed. Do not repair or replace any part of the same type (GU10, 20W, 120V~) (fig. / ). • Replace the metallic anti-grease filter and make sure it with the range hood. Grease should not be allowed to switch the appliance off . GB Recirculator: clean the ventilation openings on lights. Maintenance • User servicing - Button Function o Press button o to accumulate...
Complete Owner's Guide (English)
Page 12
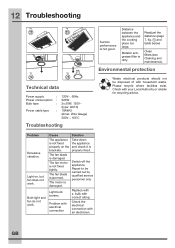
... motor is properly fixed. fig. Technical data Power supply : Power consumption : Bulb type : Power cable type : 120V~, 60Hz 520W 2x 20W, 120V~ (type: GU10) 18AWG (Amer. Take down the appliance and check it is damaged. GB Light bulb broken. Check with correct rating. and table below) Clean filters (see Cleaning and maintenance). The fan blade is not good. 12 Troubleshooting fig. Light on the brackets. fig. Wire...
... motor is properly fixed. fig. Technical data Power supply : Power consumption : Bulb type : Power cable type : 120V~, 60Hz 520W 2x 20W, 120V~ (type: GU10) 18AWG (Amer. Take down the appliance and check it is damaged. GB Light bulb broken. Check with correct rating. and table below) Clean filters (see Cleaning and maintenance). The fan blade is not good. 12 Troubleshooting fig. Light on the brackets. fig. Wire...

Complete Owner's Guide (English)
Page 13
... not limited to another party or removed outside the USA or Canada. 3. Service under this warranty. Product features or specifications as -is shipped from your appliance. 9. Service calls to correct the installation of appliance or home incurred during installation, including but not limited to establish the warranty period should service be required. Damages to the finish of your appliance or to instruct you how to use your...
... not limited to another party or removed outside the USA or Canada. 3. Service under this warranty. Product features or specifications as -is shipped from your appliance. 9. Service calls to correct the installation of appliance or home incurred during installation, including but not limited to establish the warranty period should service be required. Damages to the finish of your appliance or to instruct you how to use your...

Wiring Diagram (All Languages)
Page 1
Remarks: L =line, 3 =high speed, 2=medium speed, 1=low speed, O=on/off =light PCB N L 3 2 10 Pilot Light Switch assembly Motor wiring sketch (Hi speed) (Med speed) (Low speed) (not connected) Wiring Diagram FHWC30/3660LSA,FHWC30/3655LSA 316902453
Remarks: L =line, 3 =high speed, 2=medium speed, 1=low speed, O=on/off =light PCB N L 3 2 10 Pilot Light Switch assembly Motor wiring sketch (Hi speed) (Med speed) (Low speed) (not connected) Wiring Diagram FHWC30/3660LSA,FHWC30/3655LSA 316902453


