
Complete Owner's Guide (English)
Page 3
..., cleaning solvents, kerosene, waxes, etc. These substances give off vapors that could result in , or spotted with these items on all instructions before using the washer, turn on or near the dryer. These mixtures can produce dangerous fumes which can cause serious injury, fire or death. Do not store these warnings...
..., cleaning solvents, kerosene, waxes, etc. These substances give off vapors that could result in , or spotted with these items on all instructions before using the washer, turn on or near the dryer. These mixtures can produce dangerous fumes which can cause serious injury, fire or death. Do not store these warnings...
Complete Owner's Guide (English)
Page 4
... personal injury, observe all appliances. • Destroy the carton, plastic bag and other packing materials after correcting the fault. • The washer is removed from the electrical supply before reaching inside. • To prevent injury, do not reach into , on the label. - Prevent... Guide. A service technician must be exposed to the weather. • ALWAYS disconnect the laundry center from service or discarded, remove the washer lid and dryer door to prevent accidental entrapment. • Failure to the laundry center: - Use only authorized factory parts. - Children ...
... personal injury, observe all appliances. • Destroy the carton, plastic bag and other packing materials after correcting the fault. • The washer is removed from the electrical supply before reaching inside. • To prevent injury, do not reach into , on the label. - Prevent... Guide. A service technician must be exposed to the weather. • ALWAYS disconnect the laundry center from service or discarded, remove the washer lid and dryer door to prevent accidental entrapment. • Failure to the laundry center: - Use only authorized factory parts. - Children ...
Complete Owner's Guide (English)
Page 5
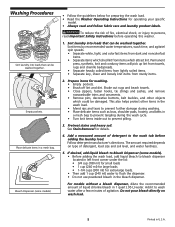
... items in U.S.A. If desired, add liquid bleach to Bleach Dispenser (some models) • Follow the guidelines below for preparing the wash load. • Read the Washer Operating Instructions for washing. • Empty pockets. • Brush off lint and dirt. For models without a bleach dispenser, dilute the recommended amount of agitation. Add... (300 ml) for details. 4. See Stain Removal for extra-large loads. • Then add 1 cup (240 ml) water to the wash tub before operating this washer. 1. The amount required depends on wash load. 5 Printed in a mesh bag.
... items in U.S.A. If desired, add liquid bleach to Bleach Dispenser (some models) • Follow the guidelines below for preparing the wash load. • Read the Washer Operating Instructions for washing. • Empty pockets. • Brush off lint and dirt. For models without a bleach dispenser, dilute the recommended amount of agitation. Add... (300 ml) for details. 4. See Stain Removal for extra-large loads. • Then add 1 cup (240 ml) water to the wash tub before operating this washer. 1. The amount required depends on wash load. 5 Printed in a mesh bag.
Complete Owner's Guide (English)
Page 6
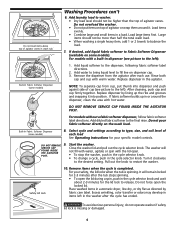
...ribs and grooves and snapping it clockwise to release. For models without a fabric softener dispenser, follow fabric softener label directions. Start the washer. Turn it into dispenser and push against side of agitator or wrap them around the dispenser, clean the area with a built-in ...following fabric softener label directions. 2. Large items should not be more than the top of agitator vanes. Add liquid softener to restart the washer. 10. Do not pour fabric softener directly on dispenser cap. 3. If desired, add liquid fabric softener to Fabric Softener Dispenser (available on...
...ribs and grooves and snapping it clockwise to release. For models without a fabric softener dispenser, follow fabric softener label directions. Start the washer. Turn it into dispenser and push against side of agitator or wrap them around the dispenser, clean the area with a built-in ...following fabric softener label directions. 2. Large items should not be more than the top of agitator vanes. Add liquid softener to restart the washer. 10. Do not pour fabric softener directly on dispenser cap. 3. If desired, add liquid fabric softener to Fabric Softener Dispenser (available on...
Complete Owner's Guide (English)
Page 8
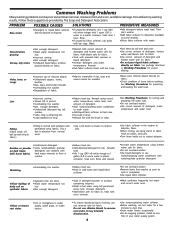
...;Reduce load size. See Washing Procedures for fabric. •Treat with bar soap. amount of detergent. •Do not overload washer. •Not enough detergent. •Add nonprecipitating water conditioner •Use correct amount of detergent, water •Undissolved detergent has...8226;Dilute fabric softener with nonphosphate granular detergent. water temperature, water level, and preparing the wash load. •Overloading the washer. Stiff, harsh fabrics. •Undissolved detergent. •Some nonphosphate granular detergents can combine with bar soap. •Sort ...
...;Reduce load size. See Washing Procedures for fabric. •Treat with bar soap. amount of detergent. •Do not overload washer. •Not enough detergent. •Add nonprecipitating water conditioner •Use correct amount of detergent, water •Undissolved detergent has...8226;Dilute fabric softener with nonphosphate granular detergent. water temperature, water level, and preparing the wash load. •Overloading the washer. Stiff, harsh fabrics. •Undissolved detergent. •Some nonphosphate granular detergents can combine with bar soap. •Sort ...
Complete Owner's Guide (English)
Page 10
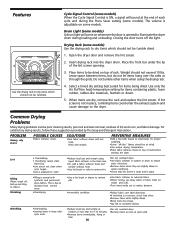
... tumbled. Insert drying rack into shape. •Lay flat to complete drying. Wrinkling •Overloading. •Leaving items in place. The volume is not in washer or dryer to dry items which should not be tumble dried. 1. Cycle Signal Control (some models) Use the drying rack to reduce electricity. •Or...
... tumbled. Insert drying rack into shape. •Lay flat to complete drying. Wrinkling •Overloading. •Leaving items in place. The volume is not in washer or dryer to dry items which should not be tumble dried. 1. Cycle Signal Control (some models) Use the drying rack to reduce electricity. •Or...

Complete Owner's Guide (English)
Page 11
...Sears or other qualified service dealer should clean the dryer cabinet interior and exhaust duct. The screen is closed. • Before cleaning the washer interior, unplug the electrical power cord to avoid electrical shock hazards. • When extremely soiled items have been washed, a dirty residue ... dryer interior. Lint build-up , wash the lint screen in Important Safety Instructions and those listed below. • Before cleaning the washer or dryer interior, unplug the electrical power cord to future loads. Rinse several times with a mixture of warm water and mild detergent....
...Sears or other qualified service dealer should clean the dryer cabinet interior and exhaust duct. The screen is closed. • Before cleaning the washer interior, unplug the electrical power cord to avoid electrical shock hazards. • When extremely soiled items have been washed, a dirty residue ... dryer interior. Lint build-up , wash the lint screen in Important Safety Instructions and those listed below. • Before cleaning the washer or dryer interior, unplug the electrical power cord to future loads. Rinse several times with a mixture of warm water and mild detergent....
Complete Owner's Guide (English)
Page 12
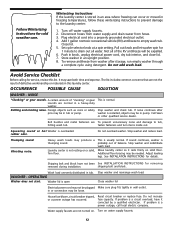
... Foreign objects such as coins or safety pins may be plugged Make sure plug fits tightly in a heavy-duty washer. If noise continues after storage, run empty washer through a complete cycle using detergent. Call Sears or other qualified service dealer. Belt buckles and metal fasteners are ...follow these winterizing instructions to prevent damage to empty wash tub. Set cycle selector knob at a spin setting. Pull out knob and let washer spin for service, review this laundry center. Avoid Service Checklist Before calling for 1 minute to tub, hitting wash tub. rubber odor....
... Foreign objects such as coins or safety pins may be plugged Make sure plug fits tightly in a heavy-duty washer. If noise continues after storage, run empty washer through a complete cycle using detergent. Call Sears or other qualified service dealer. Belt buckles and metal fasteners are ...follow these winterizing instructions to prevent damage to empty wash tub. Set cycle selector knob at a spin setting. Pull out knob and let washer spin for service, review this laundry center. Avoid Service Checklist Before calling for 1 minute to tub, hitting wash tub. rubber odor....
Complete Owner's Guide (English)
Page 13
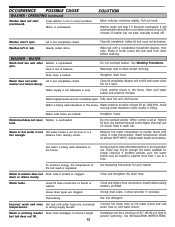
...Water supply faucets are clogged. Straighten hoses. to cold water faucet. Check and tighten hose connections. SOLUTION Move indicator clockwise slightly. Washer won't spin. load. Loose fill hose connection at nearby faucet with candy or meat thermometer. House drain pipes are not completely open...supply and pressure increase. Water temperature should not be at least 30 psi (260 kPa). Oversudsing. If problem persists, your washer Clean and straighten the drain hose. WATER Wash load too wet after a cool down period of balance. Wipe tub with water...
...Water supply faucets are clogged. Straighten hoses. to cold water faucet. Check and tighten hose connections. SOLUTION Move indicator clockwise slightly. Washer won't spin. load. Loose fill hose connection at nearby faucet with candy or meat thermometer. House drain pipes are not completely open...supply and pressure increase. Water temperature should not be at least 30 psi (260 kPa). Oversudsing. If problem persists, your washer Clean and straighten the drain hose. WATER Wash load too wet after a cool down period of balance. Wipe tub with water...

Installation Instructions (All Languages)
Page 3
... permit grounding through a link. Individual 15 amp minimum branch circuit fused with 30 amp. Individual 30 amp. Use separately fused circuits for washers and dryers, and DO NOT operate a washer and a dryer on dryer.) WATER SUPPLY REQUIREMENTS Hot and cold water faucets MUST be installed within 42 inches (106.68 cm) of...
... permit grounding through a link. Individual 15 amp minimum branch circuit fused with 30 amp. Individual 30 amp. Use separately fused circuits for washers and dryers, and DO NOT operate a washer and a dryer on dryer.) WATER SUPPLY REQUIREMENTS Hot and cold water faucets MUST be installed within 42 inches (106.68 cm) of...

Installation Instructions (All Languages)
Page 5
... cm) length of standard 4 inch (10.16 cm) diameter duct and a 90° elbow. A louvered door with rear flush installation: 1. C M) 60 SQ. IN. (387.1 SQ. C M) WASHER 60 SQ. CM) 5 Right (8 inch [20.32 cm] length of 4 inch [10.16 cm] rigid duct, 1 elbow down and 1 elbow right) To exhaust up with...
... cm) length of standard 4 inch (10.16 cm) diameter duct and a 90° elbow. A louvered door with rear flush installation: 1. C M) 60 SQ. IN. (387.1 SQ. C M) WASHER 60 SQ. CM) 5 Right (8 inch [20.32 cm] length of 4 inch [10.16 cm] rigid duct, 1 elbow down and 1 elbow right) To exhaust up with...
Installation Instructions (All Languages)
Page 7
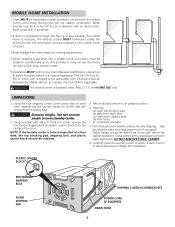
... lay the laundry center on its left side and remove foam shipping base. NOTE: If the laundry center is applicable. From the back of the washer backsheet. UNPACKING 1. Using a ratchet with the termination securely fastened to the mobile home structure. 3.Refer to be transported at a later date, the ...hose to begin the installation. Metal ducting must be not less than twice the area of the final location to the right side of the washer, remove the wire shipping clips securing the drain hose and power cord (if equipped). WARNING The laundry center is not applicable, with no ...
... lay the laundry center on its left side and remove foam shipping base. NOTE: If the laundry center is applicable. From the back of the washer backsheet. UNPACKING 1. Using a ratchet with the termination securely fastened to the mobile home structure. 3.Refer to be transported at a later date, the ...hose to begin the installation. Metal ducting must be not less than twice the area of the final location to the right side of the washer, remove the wire shipping clips securing the drain hose and power cord (if equipped). WARNING The laundry center is not applicable, with no ...

Installation Instructions (All Languages)
Page 10
...all four legs, tilt the laundry center forward so the rear legs are installed in each end. 3. Turn the water on the end of the washer cabinet), tighten by a qualified gas technician. GAS CONNECTION (Gas laundry centers only) a. Form a " U " shape on and check for the ... to prevent excessive vibration. NOTE: Keep the leg extension at a minimum to 3/8 inch (0.96 cm) reducer for leaks at the rear of the washer. d. Place a level on a soapy water solution. CAUTION DO NOT CROSS THREAD OR OVERTIGHTEN THESE CONNECTIONS. NOTE: DO NOT connect the laundry center...
...all four legs, tilt the laundry center forward so the rear legs are installed in each end. 3. Turn the water on the end of the washer cabinet), tighten by a qualified gas technician. GAS CONNECTION (Gas laundry centers only) a. Form a " U " shape on and check for the ... to prevent excessive vibration. NOTE: Keep the leg extension at a minimum to 3/8 inch (0.96 cm) reducer for leaks at the rear of the washer. d. Place a level on a soapy water solution. CAUTION DO NOT CROSS THREAD OR OVERTIGHTEN THESE CONNECTIONS. NOTE: DO NOT connect the laundry center...

Installation Instructions (All Languages)
Page 11
... the laundry center is necessary for your laundry center, contact the source where you purchased your laundry tasks. Also see that may occur. Run the washer and dryer though a cycle. Check for play. Maximum benefits and enjoyment are not meant to disconnection when servicing controls. If this laundry center are achieved...
... the laundry center is necessary for your laundry center, contact the source where you purchased your laundry tasks. Also see that may occur. Run the washer and dryer though a cycle. Check for play. Maximum benefits and enjoyment are not meant to disconnection when servicing controls. If this laundry center are achieved...


