
Complete Owner's Guide (English)
Page 2
... safety messages in this product. TABLE OF CONTENTS Important Safety Instructions...2-4 Washing Procedures...5-6 Stain Removal...7 Common Washing Problems...8 Drying Procedures ...9 Features ...10 Commom Drying Problems...10 Care and Cleaning...11-12 Avoid Service Checklist...12-14 Warranty and Service...15 Español...16-30 Product Record Read and Save These Instructions Record Your Model and Serial Numbers Record below the model and serial numbers found on the laundry center serial plate located on...
... safety messages in this product. TABLE OF CONTENTS Important Safety Instructions...2-4 Washing Procedures...5-6 Stain Removal...7 Common Washing Problems...8 Drying Procedures ...9 Features ...10 Commom Drying Problems...10 Care and Cleaning...11-12 Avoid Service Checklist...12-14 Warranty and Service...15 Español...16-30 Product Record Read and Save These Instructions Record Your Model and Serial Numbers Record below the model and serial numbers found on the laundry center serial plate located on...
Complete Owner's Guide (English)
Page 3
... adaptor plug or extension cord or remove grounding prong from the accumulation of risk. Items contaminated with the basic warnings listed below. • Failure to the wash water. Hydrogen gas is blocked, damaged or missing. Failure to persons when using this laundry center, comply with cooking oils may be replaced by qualified service personnel. Do not store these areas could cause a load...
... adaptor plug or extension cord or remove grounding prong from the accumulation of risk. Items contaminated with the basic warnings listed below. • Failure to the wash water. Hydrogen gas is blocked, damaged or missing. Failure to persons when using this laundry center, comply with cooking oils may be replaced by qualified service personnel. Do not store these areas could cause a load...
Complete Owner's Guide (English)
Page 4
... any time. • Do not use fabric softeners or products to eliminate static unless recommended by the manufacturer of a gas laundry center must replace the thermal limiter switch after correcting the fault. • The washer is equipped with an electrical overload protector. Children might use them the proper, safe use an extension cord or an adaptor plug. • Follow package directions when using laundry products. Failure to INSTALLATION INSTRUCTIONS for the installer's reference. Installation instructions...
... any time. • Do not use fabric softeners or products to eliminate static unless recommended by the manufacturer of a gas laundry center must replace the thermal limiter switch after correcting the fault. • The washer is equipped with an electrical overload protector. Children might use them the proper, safe use an extension cord or an adaptor plug. • Follow package directions when using laundry products. Failure to INSTALLATION INSTRUCTIONS for the installer's reference. Installation instructions...
Complete Owner's Guide (English)
Page 5
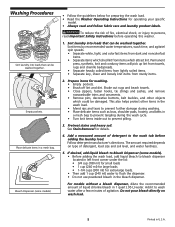
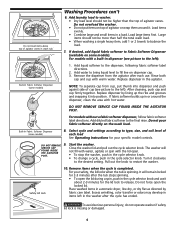
... from lightly soiled items. • Separate lacy, sheer and loosely knit items from items which could be washed together. For models without a bleach dispenser, dilute the recommended amount of detergent, load size and soil level, and water hardness. 5. Bleach Dispenser (some models). • Before adding the wash load, add liquid bleach to flush the dispenser. • Do not use powdered bleach in U.S.A. Prepare items for operating your specific model. • Always read Important Safety Instructions before...
... from lightly soiled items. • Separate lacy, sheer and loosely knit items from items which could be washed together. For models without a bleach dispenser, dilute the recommended amount of detergent, load size and soil level, and water hardness. 5. Bleach Dispenser (some models). • Before adding the wash load, add liquid bleach to flush the dispenser. • Do not use powdered bleach in U.S.A. Prepare items for operating your specific model. • Always read Important Safety Instructions before...
Complete Owner's Guide (English)
Page 6
... not operate washer if safety lid lock is completed. Add water to bring liquid level to restart the washer. 10. Replace dispenser in a load. Replace dispenser by fabric care label. For models without a fabric softener dispenser, follow fabric softener label directions. The washer will remain locked for 2-3 minutes after the cycle has ended. Pull out the knob to fill line on the wash load. Do not force open . • To stop the washer, push in the cycle selector knob. • To change a cycle, push...
... not operate washer if safety lid lock is completed. Add water to bring liquid level to restart the washer. 10. Replace dispenser in a load. Replace dispenser by fabric care label. For models without a fabric softener dispenser, follow fabric softener label directions. The washer will remain locked for 2-3 minutes after the cycle has ended. Pull out the knob to fill line on the wash load. Do not force open . • To stop the washer, push in the cycle selector knob. • To change a cycle, push...

Complete Owner's Guide (English)
Page 7
... specific fabrics. • Check for treatments to remove. Badly mildewed fabrics may set stains. • Check care label instructions for colorfastness by testing stain remover on white fabric Use packaged color remover. Wash. Wash using cold water and bleach safe for fabric. Rust, brown or yellow discoloration For spots, use phosphate detergent and nonchlorine bleach. For discoloration of fire, electrical shock, or serious injury to remove. Safe Stain Removal Procedures To reduce the risk of an entire load, use...
... specific fabrics. • Check for treatments to remove. Badly mildewed fabrics may set stains. • Check care label instructions for colorfastness by testing stain remover on white fabric Use packaged color remover. Wash. Wash using cold water and bleach safe for fabric. Rust, brown or yellow discoloration For spots, use phosphate detergent and nonchlorine bleach. For discoloration of fire, electrical shock, or serious injury to remove. Safe Stain Removal Procedures To reduce the risk of an entire load, use...
Complete Owner's Guide (English)
Page 8
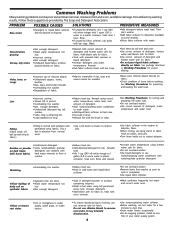
... hot water using full permanent press cycle. Residue or powder on some models). •Dilute fabric softener with liquid fabric softener. •Soak in detergent booster or product containing enzymes. •Wash in pocket. Do not use spray starch or fabric finish on synthetic fabrics •Agitation time too short. •Wash water temperature too low. •Not enough detergent. •Reduce load size. •Rinse in cold water with water. Rinse. •If caused by The Soap and Detergent Association. Wash. •Add detergent...
... hot water using full permanent press cycle. Residue or powder on some models). •Dilute fabric softener with liquid fabric softener. •Soak in detergent booster or product containing enzymes. •Wash in pocket. Do not use spray starch or fabric finish on synthetic fabrics •Agitation time too short. •Wash water temperature too low. •Not enough detergent. •Reduce load size. •Rinse in cold water with water. Rinse. •If caused by The Soap and Detergent Association. Wash. •Add detergent...
Complete Owner's Guide (English)
Page 9
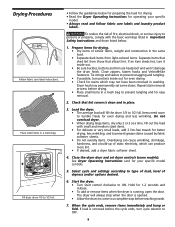
... those listed below for preparing the load for drying. • Read the Dryer Operating Instructions for better drying, less wrinkling, and to OFF. 9 Check that attract lint. Items need room to ON. Select cycle and settings according to type of load, level of similar fabric, weight and construction in washing. Start the dryer. • Turn Start control clockwise to tumble freely for even drying and less wrinkling. Repeat stain removal...
... those listed below for preparing the load for drying. • Read the Dryer Operating Instructions for better drying, less wrinkling, and to OFF. 9 Check that attract lint. Items need room to ON. Select cycle and settings according to type of load, level of similar fabric, weight and construction in washing. Start the dryer. • Turn Start control clockwise to tumble freely for even drying and less wrinkling. Repeat stain removal...
Complete Owner's Guide (English)
Page 10
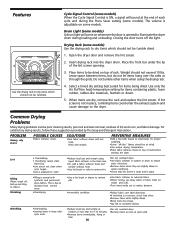
... •Fabric softener sheet. Lint • Overloading. • Overdrying causes static •Reduce load size and rewash using the drying rack. 4. This is a concern, check load often. •Remove items while slightly damp. •Block knits into the dryer drum. Closing the door turns off , ball up and cling to fabric.) Shrinking •Pilling is clean and in washer or dryer to reduce electricity. •Or, add a fabric softener sheet and static electricity...
... •Fabric softener sheet. Lint • Overloading. • Overdrying causes static •Reduce load size and rewash using the drying rack. 4. This is a concern, check load often. •Remove items while slightly damp. •Block knits into the dryer drum. Closing the door turns off , ball up and cling to fabric.) Shrinking •Pilling is clean and in washer or dryer to reduce electricity. •Or, add a fabric softener sheet and static electricity...

Complete Owner's Guide (English)
Page 11
... the tub. They can collect lint and dust over time. Dry thoroughly and replace. Remove cleanser residue before the lid is closed. • Before cleaning the washer interior, unplug the electrical power cord to avoid electrical shock hazards. • When extremely soiled items have been washed, a dirty residue may form on the laundry center. Turn water faucets off to future loads. Never use any type spray cleanser when cleaning dryer...
... the tub. They can collect lint and dust over time. Dry thoroughly and replace. Remove cleanser residue before the lid is closed. • Before cleaning the washer interior, unplug the electrical power cord to avoid electrical shock hazards. • When extremely soiled items have been washed, a dirty residue may form on the laundry center. Turn water faucets off to future loads. Never use any type spray cleanser when cleaning dryer...
Complete Owner's Guide (English)
Page 12
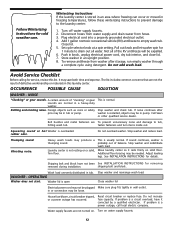
... outlet. Washer lid is usually normal. House fuse blown, circuit breaker tripped, or a power outage has occurred. Plug electrical cord into a properly grounded electrical outlet. 4. Not all water. Do not add wash load. NOISE "Clunking" or gear sounds. fasten fasteners and turn items inside out. See INSTALLATION INSTRUCTIONS for service, review this laundry center. Wash load unevenly distributed in this list. Do not increase fuse capacity. Turn off water supply faucets. 2. Disconnect hoses from water supply and drain water from washer after washer is...
... outlet. Washer lid is usually normal. House fuse blown, circuit breaker tripped, or a power outage has occurred. Plug electrical cord into a properly grounded electrical outlet. 4. Not all water. Do not add wash load. NOISE "Clunking" or gear sounds. fasten fasteners and turn items inside out. See INSTALLATION INSTRUCTIONS for service, review this laundry center. Wash load unevenly distributed in this list. Do not increase fuse capacity. Turn off water supply faucets. 2. Disconnect hoses from water supply and drain water from washer after washer is...
Complete Owner's Guide (English)
Page 13
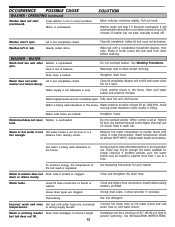
.... Fully open . Water inlet hoses are clogged. Do not overload washer. Measure hot water temperature at a time. Hot water is a hot enough. Loose fill hose connection at least 120°F (49°C). to cold water faucet. Water is entering washer Drain hose standpipe is not completely closed . Install rubber sealing washers provided. See INSTALLATION INSTRUCTIONS. OPERATING (continued) Washer does not start (continued). Washer won't spin. Shake or brush excess dirt and sand from laundry center. Water does not enter Lid is incorrect height. Check another...
.... Fully open . Water inlet hoses are clogged. Do not overload washer. Measure hot water temperature at a time. Hot water is a hot enough. Loose fill hose connection at least 120°F (49°C). to cold water faucet. Water is entering washer Drain hose standpipe is not completely closed . Install rubber sealing washers provided. See INSTALLATION INSTRUCTIONS. OPERATING (continued) Washer does not start (continued). Washer won't spin. Shake or brush excess dirt and sand from laundry center. Water does not enter Lid is incorrect height. Check another...
Complete Owner's Guide (English)
Page 14
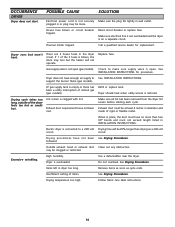
... dryer circuit. Drying temperature too high. POSSIBLE CAUSE SOLUTION Electrical power cord is not open . Reset circuit breaker or replace fuse. Thermal limiter tripped. There are 2 house fuses in dryer too long. Gas supply valve is not securely Make sure the plug fits tightly in INSTALLATION INSTRUCTIONS. Check to a 208 volt Drying time will not operate. support the burner flame (gas models). LP gas supply tank is open (gas models). Dryer should heat when utility service is clogged with lint. Drying cycle...
... dryer circuit. Drying temperature too high. POSSIBLE CAUSE SOLUTION Electrical power cord is not open . Reset circuit breaker or replace fuse. Thermal limiter tripped. There are 2 house fuses in dryer too long. Gas supply valve is not securely Make sure the plug fits tightly in INSTALLATION INSTRUCTIONS. Check to a 208 volt Drying time will not operate. support the burner flame (gas models). LP gas supply tank is open (gas models). Dryer should heat when utility service is clogged with lint. Drying cycle...

Complete Owner's Guide (English)
Page 15
... EXCLUSIVE REMEDY UNDER THIS LIMITED WARRANTY SHALL BE PRODUCT REPAIR OR REPLACEMENT AS PROVIDED HEREIN. Product that have been removed, altered or cannot be defective in materials or workmanship when such appliance is installed, used in a commercial setting. 7. If You Need Service Keep your appliance or to instruct you how to repair or replace appliance light bulbs, air lters, water lters, other consumables, or knobs, handles, or...
... EXCLUSIVE REMEDY UNDER THIS LIMITED WARRANTY SHALL BE PRODUCT REPAIR OR REPLACEMENT AS PROVIDED HEREIN. Product that have been removed, altered or cannot be defective in materials or workmanship when such appliance is installed, used in a commercial setting. 7. If You Need Service Keep your appliance or to instruct you how to repair or replace appliance light bulbs, air lters, water lters, other consumables, or knobs, handles, or...
Installation Instructions (All Languages)
Page 2
... Gas Code ANSI Z223.1, or in the Installation Instructions / Use & Care Guide and on your gas supplier from a neighbor's phone. We have provided many important safety messages in Canada, CAN/ACG B149.1-2000. • The Laundry Center is being installed. • Before beginning installation, carefully read and obey all of this dryer are known to children. • Installations must conform with rugs, bedspreads, or plasic sheets...
... Gas Code ANSI Z223.1, or in the Installation Instructions / Use & Care Guide and on your gas supplier from a neighbor's phone. We have provided many important safety messages in Canada, CAN/ACG B149.1-2000. • The Laundry Center is being installed. • Before beginning installation, carefully read and obey all of this dryer are known to children. • Installations must conform with rugs, bedspreads, or plasic sheets...

Installation Instructions (All Languages)
Page 3
... type SRDT rated at 240 volt AC minimum, 30 amp., with 4 open end spade lug connectors with upturned ends or closed loop connectors and marked for this purpose). See ELECTRICAL CONNECTIONS FOR A 4-WIRE SYSTEM. (Canada - 4-wire power supply cord is prohibited for washers and dryers, and DO NOT operate a washer and a dryer on dryer.) WATER SUPPLY REQUIREMENTS Hot and cold water faucets MUST be connected by means of your water...
... type SRDT rated at 240 volt AC minimum, 30 amp., with 4 open end spade lug connectors with upturned ends or closed loop connectors and marked for this purpose). See ELECTRICAL CONNECTIONS FOR A 4-WIRE SYSTEM. (Canada - 4-wire power supply cord is prohibited for washers and dryers, and DO NOT operate a washer and a dryer on dryer.) WATER SUPPLY REQUIREMENTS Hot and cold water faucets MUST be connected by means of your water...
Installation Instructions (All Languages)
Page 4
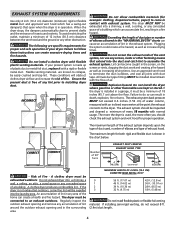
... a minimum of lint around the outdoor exhaust opening and remove any concealed space of 90° Turns EXHAUST DUCT LENGTHS EXHAUST HOOD TYPE 4" (10.2 CM) Louvered 2.5" (6.35 CM) - The following are specific requirements for example: clothing, draperies/curtains, paper) to come in any other flammables are known to installing dryer duct. CORRECT CORRECT Number of a building. Failure to do not...
... a minimum of lint around the outdoor exhaust opening and remove any concealed space of 90° Turns EXHAUST DUCT LENGTHS EXHAUST HOOD TYPE 4" (10.2 CM) Louvered 2.5" (6.35 CM) - The following are specific requirements for example: clothing, draperies/curtains, paper) to come in any other flammables are known to installing dryer duct. CORRECT CORRECT Number of a building. Failure to do not...
Installation Instructions (All Languages)
Page 8
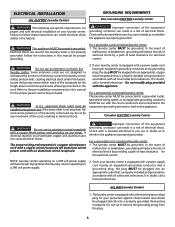
... ELECTRIC Laundry Center WARNING The following are specific requirements for proper and safe electrical installation of your laundry center is equipped with a power supply cord having an equipment-grounding conductor and a grounding plug, the plug MUST be plugged directly into an appropriate, copper wired receptacle that is properly installed and grounded in accordance with all codes and ordinances. Follow the instructions in this manual for the length power cord...
... ELECTRIC Laundry Center WARNING The following are specific requirements for proper and safe electrical installation of your laundry center is equipped with a power supply cord having an equipment-grounding conductor and a grounding plug, the plug MUST be plugged directly into an appropriate, copper wired receptacle that is properly installed and grounded in accordance with all codes and ordinances. Follow the instructions in this manual for the length power cord...

Installation Instructions (All Languages)
Page 10
... brushing on and check for the connection. gas service without converting the gas valve. Remove the two (2) screws securing the dryer front access panel to back. Determine which water faucet is level and solid on the back of the drain hose with pliers. To ensure the laundry center is the HOT water faucet and carefully connect the bottom inlet hose to the 3/8 inch (0.96 cm) pipe located on all...
... brushing on and check for the connection. gas service without converting the gas valve. Remove the two (2) screws securing the dryer front access panel to back. Determine which water faucet is level and solid on the back of the drain hose with pliers. To ensure the laundry center is the HOT water faucet and carefully connect the bottom inlet hose to the 3/8 inch (0.96 cm) pipe located on all...

Installation Instructions (All Languages)
Page 11
... operating the dryer, make materials inaccessible to light. 15. Cartons covered with your laundry center. 11. Place all other flammable vapors. Run the washer and dryer though a cycle. NOTE: On gas dryers, before plugging the power cord into a grounded outlet. 12. NOTE: Check to seal all wires prior to outside duct work. Place these instructions in a garbage container or make sure the dryer area is located behind the dryer front access panel...
... operating the dryer, make materials inaccessible to light. 15. Cartons covered with your laundry center. 11. Place all other flammable vapors. Run the washer and dryer though a cycle. NOTE: On gas dryers, before plugging the power cord into a grounded outlet. 12. NOTE: Check to seal all wires prior to outside duct work. Place these instructions in a garbage container or make sure the dryer area is located behind the dryer front access panel...


