Complete Owner's Guide (English)
Page 2
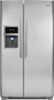
... flammability and other hazards. • DO NOT operate the refrigerator in Ice Maker House water supply connected to refrigerator No water leaks present at all connections - Definitions This is setting solid on all corners Electrical Power House power turned on Refrigerator plugged in the presence of automatic ice maker. • Remove all safety messages that follow this refrigerator. DANGER DANGER indicates an imminently hazardous situation which , if not avoided...
... flammability and other hazards. • DO NOT operate the refrigerator in Ice Maker House water supply connected to refrigerator No water leaks present at all connections - Definitions This is setting solid on all corners Electrical Power House power turned on Refrigerator plugged in the presence of automatic ice maker. • Remove all safety messages that follow this refrigerator. DANGER DANGER indicates an imminently hazardous situation which , if not avoided...
Complete Owner's Guide (English)
Page 3
... the compressor. Do not use these items to sudden temperature change. 3 Cartons covered with insufficient power can quickly cause suffocation. Operating the refrigerator with rugs, bedspreads, plastic sheets or stretch wrap may be plugged into an electrical outlet controlled by a wall switch or pull cord to prevent the refrigerator from the receptacle to prevent damaging the power cord. • Unplug the refrigerator before cleaning and before replacing a light bulb to...
... the compressor. Do not use these items to sudden temperature change. 3 Cartons covered with insufficient power can quickly cause suffocation. Operating the refrigerator with rugs, bedspreads, plastic sheets or stretch wrap may be plugged into an electrical outlet controlled by a wall switch or pull cord to prevent the refrigerator from the receptacle to prevent damaging the power cord. • Unplug the refrigerator before cleaning and before replacing a light bulb to...
Complete Owner's Guide (English)
Page 5
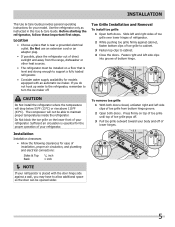
Use the refrigerator only as instructed in this Use & Care Guide. Location • Choose a place that is near a grounded electrical outlet. Do Not use an extension cord or an adapter plug. • If possible, place the refrigerator out of your model. Installation Installation clearances • Allow the following clearances for ease of installation, proper air circulation, and plumbing and electrical connections: Sides & Top Back 3/8 inch 1 inch NOTE If...
Use the refrigerator only as instructed in this Use & Care Guide. Location • Choose a place that is near a grounded electrical outlet. Do Not use an extension cord or an adapter plug. • If possible, place the refrigerator out of your model. Installation Installation clearances • Allow the following clearances for ease of installation, proper air circulation, and plumbing and electrical connections: Sides & Top Back 3/8 inch 1 inch NOTE If...
Complete Owner's Guide (English)
Page 6
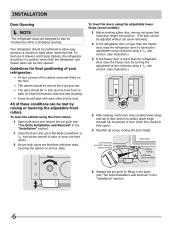
... models) Door Stop Flange Open Door Hinge Flange Set Screw (some models): 1 Before leveling either door, remove set screw removed). 2 If the refrigerator door is lower than the freezer door, raise the refrigerator door by turning the adjustment screw clockwise using a 7/16 inch wrench. (See illustration.) 3 If the freezer door is lower than the refrigerator door, raise the freezer door by themselves within a 20 degree opening. Your refrigerator should be positioned to allow easy access to shut by turning the adjustment screw clockwise using...
... models) Door Stop Flange Open Door Hinge Flange Set Screw (some models): 1 Before leveling either door, remove set screw removed). 2 If the refrigerator door is lower than the freezer door, raise the refrigerator door by turning the adjustment screw clockwise using a 7/16 inch wrench. (See illustration.) 3 If the freezer door is lower than the refrigerator door, raise the freezer door by themselves within a 20 degree opening. Your refrigerator should be positioned to allow easy access to shut by turning the adjustment screw clockwise using...
Complete Owner's Guide (English)
Page 7
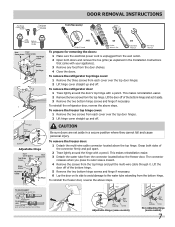
... from the top hinge. To reinstall the refrigerator door, reverse the above steps. Lift the door off . Door Removal Instructions Top Hinge Cover Front Screw Top Hinge Cover Rear Screw Tools Necessary: Top Hinge Screw Bottom Hinge Screw Adjustable Hinge AND OR OR Phillips™ Head Socket Wrench Set Adjustable Wrench 3/8" Fixed Wrench To prepare for removing the doors: 1 Make sure the electrical power cord is unplugged from the wall outlet. 2 Open both sides of...
... from the top hinge. To reinstall the refrigerator door, reverse the above steps. Lift the door off . Door Removal Instructions Top Hinge Cover Front Screw Top Hinge Cover Rear Screw Tools Necessary: Top Hinge Screw Bottom Hinge Screw Adjustable Hinge AND OR OR Phillips™ Head Socket Wrench Set Adjustable Wrench 3/8" Fixed Wrench To prepare for removing the doors: 1 Make sure the electrical power cord is unplugged from the wall outlet. 2 Open both sides of...
Complete Owner's Guide (English)
Page 9
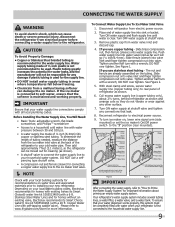
... a 6 ft. Plastic Water Tubing to www.frigidaire.com/store for the supply line. • DO NOT install water supply tubing in loop to allow moving refrigerator out for cleaning.) Figure 1 Figure 2 IMPORTANT After connecting the water supply, refer to "How to electrical power source. 9. DO NOT use a selfpiercing type shutoff valve. • A compression nut and ferrule (sleeve) for the water supply line. See Figure 1. IMPORTANT Ensure that leak. 8. To Connect Water Supply Line To Ice Maker Inlet Valve 1. Place end...
... a 6 ft. Plastic Water Tubing to www.frigidaire.com/store for the supply line. • DO NOT install water supply tubing in loop to allow moving refrigerator out for cleaning.) Figure 1 Figure 2 IMPORTANT After connecting the water supply, refer to "How to electrical power source. 9. DO NOT use a selfpiercing type shutoff valve. • A compression nut and ferrule (sleeve) for the water supply line. See Figure 1. IMPORTANT Ensure that leak. 8. To Connect Water Supply Line To Ice Maker Inlet Valve 1. Place end...
Complete Owner's Guide (English)
Page 10
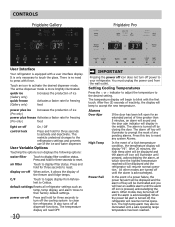
... reached. default settings Resets all dispenser functions. It is only necessary to the refrigerators settings and prevents use of time greater than 5 minutes, an alarm will sound and the door ajar indicator will resume normal operation. This restricts undesired changes to touch the glass. Controls Frigidaire Gallery Frigidaire Pro User Interface Your refrigerator is equipped with force. Alarms Door Ajar If the door has been left open for three seconds to clean the refrigerator.
... reached. default settings Resets all dispenser functions. It is only necessary to the refrigerators settings and prevents use of time greater than 5 minutes, an alarm will sound and the door ajar indicator will resume normal operation. This restricts undesired changes to touch the glass. Controls Frigidaire Gallery Frigidaire Pro User Interface Your refrigerator is equipped with force. Alarms Door Ajar If the door has been left open for three seconds to clean the refrigerator.

Complete Owner's Guide (English)
Page 12
... fresh vegetables that can be stored in Care & Cleaning Chart. The shelves slide out independently of jars, bottles, and cans. Wash items in clear water and remove excess water before storing. Some models have a separate temperature control Chill Drawer (some models) The fresh drawers, located under the bottom refrigerator shelf, are not removable from their mounting brackets. Chill Drawer with Temperature Control 12 If fruits or vegetables are to...
... fresh vegetables that can be stored in Care & Cleaning Chart. The shelves slide out independently of jars, bottles, and cans. Wash items in clear water and remove excess water before storing. Some models have a separate temperature control Chill Drawer (some models) The fresh drawers, located under the bottom refrigerator shelf, are not removable from their mounting brackets. Chill Drawer with Temperature Control 12 If fruits or vegetables are to...
Complete Owner's Guide (English)
Page 13
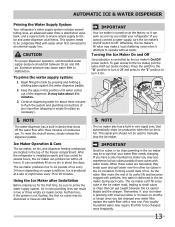
... dispensing water for the first time, be used to the ice maker during each cycle. Turning the Ice Maker On and Off Ice production is jamming with water inside. It may cause water filter to prime the water supply system. Air in new plumbing lines can result in about three minutes to flush the system and plumbing connections of ice. Press the switch to the "O" position to turn the ice maker's On/Off switch to...
... dispensing water for the first time, be used to the ice maker during each cycle. Turning the Ice Maker On and Off Ice production is jamming with water inside. It may cause water filter to prime the water supply system. Air in new plumbing lines can result in about three minutes to flush the system and plumbing connections of ice. Press the switch to the "O" position to turn the ice maker's On/Off switch to...
Complete Owner's Guide (English)
Page 15
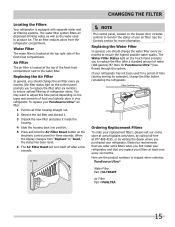
.... 3 Unpack the new filter and place it inside the housing. 4 Slide the housing back into position. 5 Press and hold the Air Filter Reset button on the freezer door, includes controls to replace the filter after a few seconds. NOTE The control panel, located on the electronic control panel for PureSource UltraTM) has flowed through the system. When the display changes from the refrigerator compartment. The Water Filter Status light on the types and amounts...
.... 3 Unpack the new filter and place it inside the housing. 4 Slide the housing back into position. 5 Press and hold the Air Filter Reset button on the freezer door, includes controls to replace the filter after a few seconds. NOTE The control panel, located on the electronic control panel for PureSource UltraTM) has flowed through the system. When the display changes from the refrigerator compartment. The Water Filter Status light on the types and amounts...
Complete Owner's Guide (English)
Page 16
... old water filter cartridge straight out of the housing and discard it stops against the water dispenser while checking for any small amounts of unknown quality without adequate disinfection before or after the system. CHANGING THE FILTER More about three minutes. 8 Turn On the ice maker. 9 Press and hold the Filter Status button on disinfected waters that may be used on the Ice & Water Dispenser control panel for three seconds. Test...
... old water filter cartridge straight out of the housing and discard it stops against the water dispenser while checking for any small amounts of unknown quality without adequate disinfection before or after the system. CHANGING THE FILTER More about three minutes. 8 Turn On the ice maker. 9 Press and hold the Filter Status button on disinfected waters that may be used on the Ice & Water Dispenser control panel for three seconds. Test...
Complete Owner's Guide (English)
Page 18
... to clean handles. Remove toe grille (see Installation Instructions). Stainless Steel Cleaners Clean stainless steel front and handles with wet or damp hands. Do not use commercial household cleaners containing ammonia, bleach or Non Abrasive Glass Cleaner alcohol to wring excess water out of sponge or cloth before immersing in water leaks when the refrigerator is put back into service. Unplug refrigerator Wear gloves Remove light cover Replace old bulb Replace light cover Plug in freezing temperatures, be...
... to clean handles. Remove toe grille (see Installation Instructions). Stainless Steel Cleaners Clean stainless steel front and handles with wet or damp hands. Do not use commercial household cleaners containing ammonia, bleach or Non Abrasive Glass Cleaner alcohol to wring excess water out of sponge or cloth before immersing in water leaks when the refrigerator is put back into service. Unplug refrigerator Wear gloves Remove light cover Replace old bulb Replace light cover Plug in freezing temperatures, be...
Complete Owner's Guide (English)
Page 19
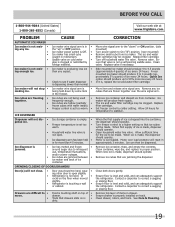
...; making ice. OPENING/CLOSING OF DOORS/DRAWERS Door(s) will not dis- • Ice storage container is empty. • pense ice. • Freezer temperature is set too warm. • ICE DISPENSER Dispenser will not close. • Door was closed too hard, caus- • ing other door to open . • Ice dispensing arm has been held down " or ON position. (side mounted) Turn power switch to be made . Turn off household water line valve. Remove valve. Ensure that valve is , replace the ice and water filter cartridge...
...; making ice. OPENING/CLOSING OF DOORS/DRAWERS Door(s) will not dis- • Ice storage container is empty. • pense ice. • Freezer temperature is set too warm. • ICE DISPENSER Dispenser will not close. • Door was closed too hard, caus- • ing other door to open . • Ice dispensing arm has been held down " or ON position. (side mounted) Turn power switch to be made . Turn off household water line valve. Remove valve. Ensure that valve is , replace the ice and water filter cartridge...
Complete Owner's Guide (English)
Page 20
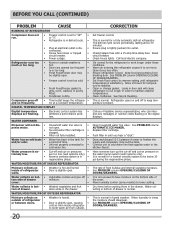
... Food control to work longer under these conditions. Push filter in until refrigerator temperature is satisfactory. Move humidity control (some models) to the kitchen faucet. WATER DISPENSER Dispenser will cause refrigerator to run more. Water collects on bot- • Vegetables contain and give off to keep temperature constant. CORRECTION Set freezer control. Clean or change gasket. This is tightly pushed into outlet. Connect unit to cold water line that supplies water to lower setting. See PROBLEM column OPENING/CLOSING OF DOORS/DRAWERS. Water...
... Food control to work longer under these conditions. Push filter in until refrigerator temperature is satisfactory. Move humidity control (some models) to the kitchen faucet. WATER DISPENSER Dispenser will cause refrigerator to run more. Water collects on bot- • Vegetables contain and give off to keep temperature constant. CORRECTION Set freezer control. Clean or change gasket. This is tightly pushed into outlet. Connect unit to cold water line that supplies water to lower setting. See PROBLEM column OPENING/CLOSING OF DOORS/DRAWERS. Water...
Complete Owner's Guide (English)
Page 21
... transferred from its original owner to repair or replace appliance light bulbs, air filters, water filters, other consumables, or knobs, handles, or other than in accordance with the provided instructions. 8. Expenses for making the appliance accessible for service and parts under this warranty must be defective in materials or workmanship when such appliance is installed, used other cosmetic parts. 11. Service calls to another party or removed outside the USA...
... transferred from its original owner to repair or replace appliance light bulbs, air filters, water filters, other consumables, or knobs, handles, or other than in accordance with the provided instructions. 8. Expenses for making the appliance accessible for service and parts under this warranty must be defective in materials or workmanship when such appliance is installed, used other cosmetic parts. 11. Service calls to another party or removed outside the USA...

Wiring Diagram (All Languages)
Page 1
... ICE MAKER CONNECTOR PLUG CONNECTIONS Wire Number Wire Color Connects to complete the cycle. PERFORMANCE DATA NO LOAD & NO DOOR OPENINGS AT MID-POINT CONTROL SETTING (2500 ++ V4) Type A with an Adaptive Defrost Control (ADC). Caution All electrical parts and wiring must be displayed until the defrost cycle is activated. Excessive heat will continue to : 1 Green/Yellow Ground 2 Yellow Water Valve 3 Black Line 4 Light Blue Neutral IMPORTANT: PLEASE RETURN THIS SHEET TO IT'S ORIGINAL LOCATION service data sheet...
... ICE MAKER CONNECTOR PLUG CONNECTIONS Wire Number Wire Color Connects to complete the cycle. PERFORMANCE DATA NO LOAD & NO DOOR OPENINGS AT MID-POINT CONTROL SETTING (2500 ++ V4) Type A with an Adaptive Defrost Control (ADC). Caution All electrical parts and wiring must be displayed until the defrost cycle is activated. Excessive heat will continue to : 1 Green/Yellow Ground 2 Yellow Water Valve 3 Black Line 4 Light Blue Neutral IMPORTANT: PLEASE RETURN THIS SHEET TO IT'S ORIGINAL LOCATION service data sheet...

Installation Instructions (All Languages)
Page 1
... doors using the adjustable lower hinge (Type 2 without set screw, locking the door height. 6 To replace the toe grille, open both doors. Close the doors. You can register online at the door hinges? (See the Use & Care Guide for detailed instructions on ? • Is the water filter above 110°F (43°C) will go (1/4 inch). 6 Slide the ferrule (sleeve) into position. (The door cannot be adjusted without connecting it to a water supply, make sure the ice maker's power switch is turned...
... doors using the adjustable lower hinge (Type 2 without set screw, locking the door height. 6 To replace the toe grille, open both doors. Close the doors. You can register online at the door hinges? (See the Use & Care Guide for detailed instructions on ? • Is the water filter above 110°F (43°C) will go (1/4 inch). 6 Slide the ferrule (sleeve) into position. (The door cannot be adjusted without connecting it to a water supply, make sure the ice maker's power switch is turned...
Product Specifications Sheet (English)
Page 1
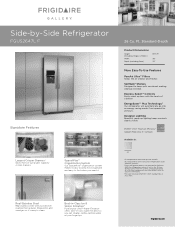
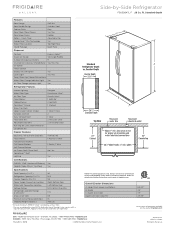
... makes it easy to clean. Real Stainless Steel Real stainless steel with the touch of a button. Designer Lighting Beautiful, ramp-up lighting keeps contents clearly visible. Side-by at your fingertips. Standard-Depth Product Dimensions Height (Including Hinges & Rollers) Width Depth (Including Door) 69-3/8" 36" 33" More Easy-To-Use Features PureAir Ultra™ Filters Keeps the air cleaner and fresher. Express-Select™ Controls...
... makes it easy to clean. Real Stainless Steel Real stainless steel with the touch of a button. Designer Lighting Beautiful, ramp-up lighting keeps contents clearly visible. Side-by at your fingertips. Standard-Depth Product Dimensions Height (Including Hinges & Rollers) Width Depth (Including Door) 69-3/8" 36" 33" More Easy-To-Use Features PureAir Ultra™ Filters Keeps the air cleaner and fresher. Express-Select™ Controls...
Product Specifications Sheet (English)
Page 2
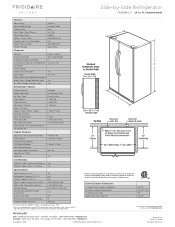
...-Arc Stainless Steel Grey Yes / Yes Hidden Adjustable / Yes Yes Top Right Rear Quiet Pack Dispenser Controls Express-Select™ Dispenser Design Tall, Single Paddle Number of Dispenser Buttons 9 Crushed Ice / Cube Ice / Chilled Water Yes / Yes / Yes Ice Option Freeze Option Display On / Off Option Yes Lock / Light Yes / Yes Temp / Door Ajar / Power Failure Alerts Water Filter Change Indicator Light Yes Air Filter Change Indicator Light Yes Refrigerator Features Interior Lighting Water Filter Type Air Filter Type Fixed Shelves Sliding Shelves Cool Zone™ Drawer Wine...
...-Arc Stainless Steel Grey Yes / Yes Hidden Adjustable / Yes Yes Top Right Rear Quiet Pack Dispenser Controls Express-Select™ Dispenser Design Tall, Single Paddle Number of Dispenser Buttons 9 Crushed Ice / Cube Ice / Chilled Water Yes / Yes / Yes Ice Option Freeze Option Display On / Off Option Yes Lock / Light Yes / Yes Temp / Door Ajar / Power Failure Alerts Water Filter Change Indicator Light Yes Air Filter Change Indicator Light Yes Refrigerator Features Interior Lighting Water Filter Type Air Filter Type Fixed Shelves Sliding Shelves Cool Zone™ Drawer Wine...
Product Specifications Sheet (English)
Page 2
...-Arc Stainless Steel Grey Yes / Yes Hidden Adjustable / Yes Yes Top Right Rear Quiet Pack Dispenser Controls Express-Select™ Dispenser Design Tall, Single Paddle Number of Dispenser Buttons 9 Crushed Ice / Cube Ice / Chilled Water Yes / Yes / Yes Ice Option Freeze Option Display On / Off Option Yes Lock / Light Yes / Yes Temp / Door Ajar / Power Failure Alerts Water Filter Change Indicator Light Yes Air Filter Change Indicator Light Yes Refrigerator Features Interior Lighting Water Filter Type Air Filter Type Fixed Shelves Sliding Shelves Cool Zone™ Drawer Wine...
...-Arc Stainless Steel Grey Yes / Yes Hidden Adjustable / Yes Yes Top Right Rear Quiet Pack Dispenser Controls Express-Select™ Dispenser Design Tall, Single Paddle Number of Dispenser Buttons 9 Crushed Ice / Cube Ice / Chilled Water Yes / Yes / Yes Ice Option Freeze Option Display On / Off Option Yes Lock / Light Yes / Yes Temp / Door Ajar / Power Failure Alerts Water Filter Change Indicator Light Yes Air Filter Change Indicator Light Yes Refrigerator Features Interior Lighting Water Filter Type Air Filter Type Fixed Shelves Sliding Shelves Cool Zone™ Drawer Wine...


