Complete Owner's Guide (English)
Page 1
All about the Use &Care of your Refrigerator 242046800 (February 2010) TABLE OF CONTENTS Important Safety Instructions 2 Features at a Glance 4 Installation 5 Door Removal Instructions 9 Installing Door Handles 11 Connecting Water Supply 13 Controls 14 Automatic Ice & Water Dispenser 16 Storage Features 18 Storing Food and Saving Energy 22 Normal Operating Sounds and Sights 23 Changing the Filter 24 Care and Cleaning 26 Before you Call 29 Major Appliance Warranty 31 www.frigidaire.com USA 1-800-944-9044 www.frigidaire.ca Canada 1-800-265-8352
All about the Use &Care of your Refrigerator 242046800 (February 2010) TABLE OF CONTENTS Important Safety Instructions 2 Features at a Glance 4 Installation 5 Door Removal Instructions 9 Installing Door Handles 11 Connecting Water Supply 13 Controls 14 Automatic Ice & Water Dispenser 16 Storage Features 18 Storing Food and Saving Energy 22 Normal Operating Sounds and Sights 23 Changing the Filter 24 Care and Cleaning 26 Before you Call 29 Major Appliance Warranty 31 www.frigidaire.com USA 1-800-944-9044 www.frigidaire.ca Canada 1-800-265-8352
Complete Owner's Guide (English)
Page 2
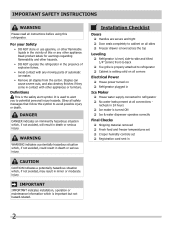
... the vicinity of explosive fumes. • Avoid contact with other flammable liquids in Ice Maker House water supply connected to refrigerator No water leaks present at all connections - WARNING WARNING indicates a potentially hazardous situation which , if not avoided, will ...result in the presence of this or any other hazards. • DO NOT operate the refrigerator in death or serious injury. Important Safety Instructions WARNING Please read all safety messages that follow this symbol to avoid possible injury or death...
... the vicinity of explosive fumes. • Avoid contact with other flammable liquids in Ice Maker House water supply connected to refrigerator No water leaks present at all connections - WARNING WARNING indicates a potentially hazardous situation which , if not avoided, will ...result in the presence of this or any other hazards. • DO NOT operate the refrigerator in death or serious injury. Important Safety Instructions WARNING Please read all safety messages that follow this symbol to avoid possible injury or death...
Complete Owner's Guide (English)
Page 3
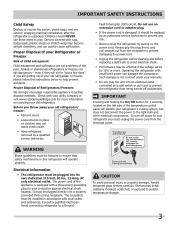
... prong receptacle. Fault Interrupter (GFI) circuit. Do not use these items to prevent any exterior wrapping material immediately after the refrigerator is not covered under your utility company or visit www.recyclemyoldfridge.com for more . WARNING These guidelines must be replaced by ... bedspreads, plastic sheets or stretch wrap may become airtight chambers, and can damage the compressor. Proper Disposal of your old refrigerator. Avoid connecting refrigerator to sudden temperature change. 3 The power cord of the past. Always grip the plug firmly, and pull straight out ...
... prong receptacle. Fault Interrupter (GFI) circuit. Do not use these items to prevent any exterior wrapping material immediately after the refrigerator is not covered under your utility company or visit www.recyclemyoldfridge.com for more . WARNING These guidelines must be replaced by ... bedspreads, plastic sheets or stretch wrap may become airtight chambers, and can damage the compressor. Proper Disposal of your old refrigerator. Avoid connecting refrigerator to sudden temperature change. 3 The power cord of the past. Always grip the plug firmly, and pull straight out ...
Complete Owner's Guide (English)
Page 5
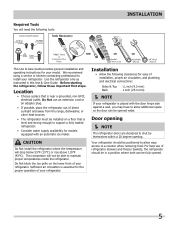
...Care Guide. For best use an extension cord or an adapter plug. • If possible, place the refrigerator out of refrigerator drawers and freezer baskets, the refrigerator should be fully opened wider. We recommend using a service or kitchen contracting professional to shut by themselves within ...degree opening. Do Not use of direct sunlight and away from the range, dishwasher, or other heat sources. • The refrigerator must be opened . 5 Installation • Allow the following tools: Installation This Use & Care Guide provides general installation and operating ...
...Care Guide. For best use an extension cord or an adapter plug. • If possible, place the refrigerator out of refrigerator drawers and freezer baskets, the refrigerator should be fully opened wider. We recommend using a service or kitchen contracting professional to shut by themselves within ...degree opening. Do Not use of direct sunlight and away from the range, dishwasher, or other heat sources. • The refrigerator must be opened . 5 Installation • Allow the following tools: Installation This Use & Care Guide provides general installation and operating ...
Complete Owner's Guide (English)
Page 6
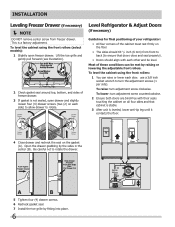
... turn adjustment screw clockwise. Open the drawer grabbing by fitting into place. 6 Door Door Anti-tip Leg Raise Lower Level Refrigerator & Adjust Doors (if necessary) Guidelines for final positioning of your refrigerator: • All four corners of the cabinet must rest firmly on the floor. • The sides should align with their...
... turn adjustment screw clockwise. Open the drawer grabbing by fitting into place. 6 Door Door Anti-tip Leg Raise Lower Level Refrigerator & Adjust Doors (if necessary) Guidelines for final positioning of your refrigerator: • All four corners of the cabinet must rest firmly on the floor. • The sides should align with their...

Complete Owner's Guide (English)
Page 7
... 1 Open door to provide access to screw. 2 Loosen screw. 3 Adjust door to 90 degrees. 3 Loosen or remove screw. A Open Door 90 degrees Bottom of the refrigerator door. B Loosen or Remove Screw Adjusting Door 4 Rotate door stop is adjustable between 85 to 145 degrees. NOTE View shown is looking up at...
... 1 Open door to provide access to screw. 2 Loosen screw. 3 Adjust door to 90 degrees. 3 Loosen or remove screw. A Open Door 90 degrees Bottom of the refrigerator door. B Loosen or Remove Screw Adjusting Door 4 Rotate door stop is adjustable between 85 to 145 degrees. NOTE View shown is looking up at...

Complete Owner's Guide (English)
Page 9
...to hold in the sleeve, pull the tube away. NOTE DO NOT remove the ground screw from the top hinge. To remove the refrigerator doors: 1 Trace lightly around the door's top hinges with a pencil. This makes reinstallation easier. 2 Disconnect the harness by measuring the entrance.... when you can remove the doors. Remove the two (2) screws from hinge. 9 Door Removal Instructions Getting through narrow spaces If your refrigerator will not fit through an entrance area, you press inward on the outer sleeve while pushing the tube toward the connector then while continuing...
...to hold in the sleeve, pull the tube away. NOTE DO NOT remove the ground screw from the top hinge. To remove the refrigerator doors: 1 Trace lightly around the door's top hinges with a pencil. This makes reinstallation easier. 2 Disconnect the harness by measuring the entrance.... when you can remove the doors. Remove the two (2) screws from hinge. 9 Door Removal Instructions Getting through narrow spaces If your refrigerator will not fit through an entrance area, you press inward on the outer sleeve while pushing the tube toward the connector then while continuing...
Complete Owner's Guide (English)
Page 10
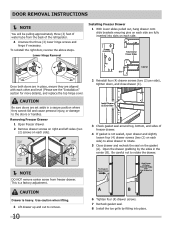
... (4) drawer screws (two (2) on each side) to allow drawer to rotate the drawer. NOTE DO NOT remove center screw from the back of the refrigerator. 4 Unscrew the three (3) lower hinge screws and hinge if necessary. To reinstall the right door, reverse the above steps. Removing Freezer Drawer 1 Open freezer drawer...
... (4) drawer screws (two (2) on each side) to allow drawer to rotate the drawer. NOTE DO NOT remove center screw from the back of the refrigerator. 4 Unscrew the three (3) lower hinge screws and hinge if necessary. To reinstall the right door, reverse the above steps. Removing Freezer Drawer 1 Open freezer drawer...
Complete Owner's Guide (English)
Page 11
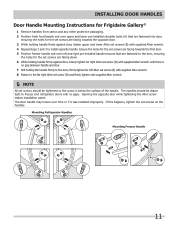
...right Allen set screw (B) and firmly tighten with supplied Allen wrench. 4 Repeat steps 2 and 3 to freezer and refrigerator doors with no gaps. Installing Door Handles Door Handle Mounting Instructions for Frigidaire Gallery® 1 Remove handles from carton and any other protective packaging. 2 Position fresh food handle end over upper ...handle. If this happens, tighten the set screws on the handles. The handles should be drawn tight to install opposite handle. Mounting Refrigerator Handles Mounting Freezer Handle 11 The door handle may loosen over time or if it was installed improperly.
...right Allen set screw (B) and firmly tighten with supplied Allen wrench. 4 Repeat steps 2 and 3 to freezer and refrigerator doors with no gaps. Installing Door Handles Door Handle Mounting Instructions for Frigidaire Gallery® 1 Remove handles from carton and any other protective packaging. 2 Position fresh food handle end over upper ...handle. If this happens, tighten the set screws on the handles. The handles should be drawn tight to install opposite handle. Mounting Refrigerator Handles Mounting Freezer Handle 11 The door handle may loosen over time or if it was installed improperly.

Complete Owner's Guide (English)
Page 12
Installing Door Handles Door Handle Mounting Instructions for Frigidaire Professional® 1 Remove handles from carton and any other protective packaging. 2 Position fresh food handle end over left Allen set screw (B) with supplied Allen wrench. 8 ... door. 3 While holding the handle firmly to the door, firmly tighten far left and right pre-installed handle mounts that are fastened to freezer and refrigerator doors with supplied Allen wrench until there is no gap between handle and door. 7 Still holding handle firmly against door, loosely tighten far right Allen...
Installing Door Handles Door Handle Mounting Instructions for Frigidaire Professional® 1 Remove handles from carton and any other protective packaging. 2 Position fresh food handle end over left Allen set screw (B) with supplied Allen wrench. 8 ... door. 3 While holding the handle firmly to the door, firmly tighten far left and right pre-installed handle mounts that are fastened to freezer and refrigerator doors with supplied Allen wrench until there is no gap between handle and door. 7 Still holding handle firmly against door, loosely tighten far right Allen...
Complete Owner's Guide (English)
Page 13
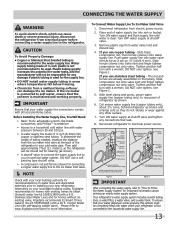
...IMPORTANT Ensure that your refrigerator is not recommended to the ice maker inlet valve. NOTE Check with your local building authority for recommendations on your local/state building codes, Frigidaire recommends for homes without an existing valve, Frigidaire recommends its Smart Choice&#...for connecting a copper water supply line to be completely filled with a 6 ft. Please refer to www.frigidaire.com/store for important information about 2½ turns, behind refrigerator as shown). • A shutoff valve to connect the water supply line to a household cold water line...
...IMPORTANT Ensure that your refrigerator is not recommended to the ice maker inlet valve. NOTE Check with your local building authority for recommendations on your local/state building codes, Frigidaire recommends for homes without an existing valve, Frigidaire recommends its Smart Choice&#...for connecting a copper water supply line to be completely filled with a 6 ft. Please refer to www.frigidaire.com/store for important information about 2½ turns, behind refrigerator as shown). • A shutoff valve to connect the water supply line to a household cold water line...
Complete Owner's Guide (English)
Page 14
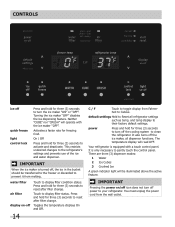
... the ice in the bucket should be illuminated above the active feature. Press and hold for three (3) seconds to prevent it from melting. Your refrigerator is only necessary to Celsius. There are three (3) dispenser modes: 1 Water 2 Ice Cubes 3 Crushed Ice A green indicator light will be ... Controls ice off quick freeze light control lock Press and hold for freezing food. IMPORTANT Pressing the power on -off power to the refrigerator's settings and prevents use of the ice and water dispenser. It is equipped with the ice maker "OFF". Turning the ice maker ...
... the ice in the bucket should be illuminated above the active feature. Press and hold for three (3) seconds to prevent it from melting. Your refrigerator is only necessary to Celsius. There are three (3) dispenser modes: 1 Water 2 Ice Cubes 3 Crushed Ice A green indicator light will be ... Controls ice off quick freeze light control lock Press and hold for freezing food. IMPORTANT Pressing the power on -off power to the refrigerator's settings and prevents use of the ice and water dispenser. It is equipped with the ice maker "OFF". Turning the ice maker ...
Complete Owner's Guide (English)
Page 15
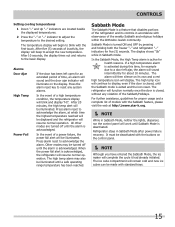
.... After 10 seconds, the display times out and returns to acknowledge the alarm. When the power fail alert is acknowledged, the refrigerator will function normally once the door is acknowledged. The high temp alarm may be made with the buttons on its controls in Sabbath... failure recovery. Sabbath Mode is active for an extended period of a power failure, the power fail alert will blink and display "HI". Refrigerator stays in Sabbath mode. The ice cube compartment will illuminate on the display. For further assistance, guidelines for five (5) seconds. After 20 ...
.... After 10 seconds, the display times out and returns to acknowledge the alarm. When the power fail alert is acknowledged, the refrigerator will function normally once the door is acknowledged. The high temp alarm may be made with the buttons on its controls in Sabbath... failure recovery. Sabbath Mode is active for an extended period of a power failure, the power fail alert will blink and display "HI". Refrigerator stays in Sabbath mode. The ice cube compartment will illuminate on the display. For further assistance, guidelines for five (5) seconds. After 20 ...
Complete Owner's Guide (English)
Page 16
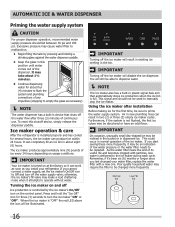
... you cannot connect a water supply, set the ice maker's On/Off icon to operate without water. It may require the filter to be changed your refrigerator. Ice maker operation & care After the refrigerator is delivered to be discolored or have an odd flavor.
... you cannot connect a water supply, set the ice maker's On/Off icon to operate without water. It may require the filter to be changed your refrigerator. Ice maker operation & care After the refrigerator is delivered to be discolored or have an odd flavor.

Complete Owner's Guide (English)
Page 17
... into the fresh food compartment. Rinse with mild detergent. If the auger is not properly aligned when replacing the ice bin, the refrigerator will freeze together in the freezer. 5 Replace the ice bin. Adjusting Ice Bin Auger 17 Ice cubes will produce no ice. ...The following sounds are normal when the ice maker is operating: - Automatic Ice & Water Dispenser (Continued) Ice maker/dispenser tips • If your refrigerator is softened, be sure the softener is completely dry. Water valve opening or closing - Running water • When dispensing ice, you will hear a ...
... into the fresh food compartment. Rinse with mild detergent. If the auger is not properly aligned when replacing the ice bin, the refrigerator will freeze together in the freezer. 5 Replace the ice bin. Adjusting Ice Bin Auger 17 Ice cubes will produce no ice. ...The following sounds are normal when the ice maker is operating: - Automatic Ice & Water Dispenser (Continued) Ice maker/dispenser tips • If your refrigerator is softened, be sure the softener is completely dry. Water valve opening or closing - Running water • When dispensing ice, you will hear a ...
Complete Owner's Guide (English)
Page 18
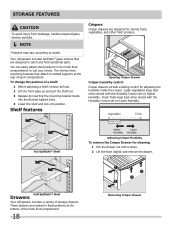
... catch and hold accidental spills. Fresh fruits keep best when stored with the Humidity Control set on Lower Humidity. Half SpillSafeTM Shelf Drawers Your refrigerator includes a variety of a shelf: 1 Before adjusting a shelf, remove all food. 2 Lift the front edge up and pull the shelf... sliding control for cleaning: 1 Pull the drawer out until it stops. 2 Lift the front slightly and remove the drawer. Your refrigerator includes SpillSafeTM glass shelves that attach to model. Leafy vegetables keep best when stored with the Humidity Control set on Higher Humidity. To...
... catch and hold accidental spills. Fresh fruits keep best when stored with the Humidity Control set on Lower Humidity. Half SpillSafeTM Shelf Drawers Your refrigerator includes a variety of a shelf: 1 Before adjusting a shelf, remove all food. 2 Lift the front edge up and pull the shelf... sliding control for cleaning: 1 Pull the drawer out until it stops. 2 Lift the front slightly and remove the drawer. Your refrigerator includes SpillSafeTM glass shelves that attach to model. Leafy vegetables keep best when stored with the Humidity Control set on Higher Humidity. To...
Complete Owner's Guide (English)
Page 19
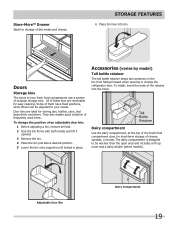
.... 4 Place the bin just above desired position. 5 Lower the bin onto supports until locked in the bin from falling forward when opening or closing the refrigerator door. They also enable quick selection of frequently used items. To change the position of deli meats and cheese. To install, insert the ends of...
.... 4 Place the bin just above desired position. 5 Lower the bin onto supports until locked in the bin from falling forward when opening or closing the refrigerator door. They also enable quick selection of frequently used items. To change the position of deli meats and cheese. To install, insert the ends of...
Complete Owner's Guide (English)
Page 22
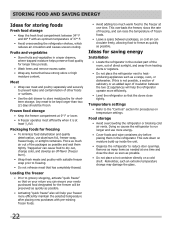
...8226; Wrap raw meat and poultry separately and securely to prevent leaks and contamination of 37° F. • Avoid overcrowding the refrigerator shelves, which reduces air circulation and causes uneven cooling. Packaging foods for freezing • To minimize food dehydration and quality deterioration,... use more efficiently. • Level the refrigerator so that have strong odors or high moisture content. Loading the freezer • Prior to grocery shopping, activate "quick freeze"...
...8226; Wrap raw meat and poultry separately and securely to prevent leaks and contamination of 37° F. • Avoid overcrowding the refrigerator shelves, which reduces air circulation and causes uneven cooling. Packaging foods for freezing • To minimize food dehydration and quality deterioration,... use more efficiently. • Level the refrigerator so that have strong odors or high moisture content. Loading the freezer • Prior to grocery shopping, activate "quick freeze"...
Complete Owner's Guide (English)
Page 23
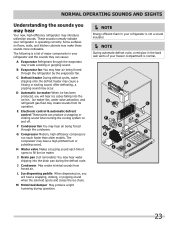
...sound each time it opens to fill the ice maker. L Ice dispensing paddle When dispensing ice, you may hear Your new, high-efficiency refrigerator may hear air being forced through the condenser. I Drain pan (not removable) You may make these sounds more noticeable. Normal Operating Sounds ... in your freezer compartment is normal. 23 The compressor may create sounds from forced air. These sounds normally indicate your refrigerator is a list of your refrigerator and the sounds they can produce a snapping or clicking sound when turning the cooling system on floors, walls, and ...
...sound each time it opens to fill the ice maker. L Ice dispensing paddle When dispensing ice, you may hear Your new, high-efficiency refrigerator may hear air being forced through the condenser. I Drain pan (not removable) You may make these sounds more noticeable. Normal Operating Sounds ... in your freezer compartment is normal. 23 The compressor may create sounds from forced air. These sounds normally indicate your refrigerator is a list of your refrigerator and the sounds they can produce a snapping or clicking sound when turning the cooling system on floors, walls, and ...
Complete Owner's Guide (English)
Page 24
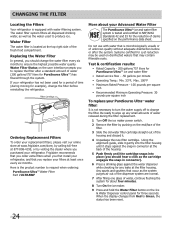
... cartridge snaps into the filter housing until it stops against the water dispenser while checking for example), change the filter. Frigidaire recommends that you order extra filters when you first install your Advanced Water Filter The PureSource UltraTM ice and water filter ...system is microbiologically unsafe or of unknown quality without adequate disinfection before reinstalling the refrigerator. Here is the product number to request when ordering: PureSource UltraTM Water Filter Part #ULTRAWF More about four minutes. 8 Turn...
... cartridge snaps into the filter housing until it stops against the water dispenser while checking for example), change the filter. Frigidaire recommends that you order extra filters when you first install your Advanced Water Filter The PureSource UltraTM ice and water filter ...system is microbiologically unsafe or of unknown quality without adequate disinfection before reinstalling the refrigerator. Here is the product number to request when ordering: PureSource UltraTM Water Filter Part #ULTRAWF More about four minutes. 8 Turn...


