Complete Owner's Guide
Page 1
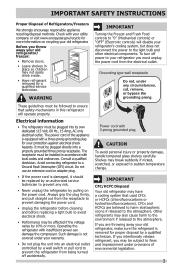
All about the Use &Care of your Refrigerator 807876504 (April 2014) TABLE OF CONTENTS Important Safety Instructions 2 Controls 13 Installation 4 Normal Operating Sounds and Sights..........15 Door Removal/Reversal Instructions 6 Care and Cleaning 16 Handle Installation 8 Before you Call 18 Connecting Water Supply 10 Major Appliance Warranty 19 Ice Service 12 www.frigidaire.com USA 1-800-944-9044 www.frigidaire.ca Canada 1-800-265-8352
All about the Use &Care of your Refrigerator 807876504 (April 2014) TABLE OF CONTENTS Important Safety Instructions 2 Controls 13 Installation 4 Normal Operating Sounds and Sights..........15 Door Removal/Reversal Instructions 6 Care and Cleaning 16 Handle Installation 8 Before you Call 18 Connecting Water Supply 10 Major Appliance Warranty 19 Ice Service 12 www.frigidaire.com USA 1-800-944-9044 www.frigidaire.ca Canada 1-800-265-8352

Complete Owner's Guide
Page 2
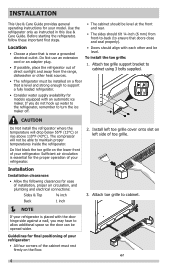
... WARNING indicates a potentially hazardous situation which is setting solid on all corners Electrical Power House power turned on all connections - It is turned ON Ice & water dispenser operates correctly Front filter must be flush with other appliances or furniture. recheck in 24 hours Ice maker is used to alert you are secure and tight Door seals completely to cabinet on Refrigerator plugged in...
... WARNING indicates a potentially hazardous situation which is setting solid on all corners Electrical Power House power turned on all connections - It is turned ON Ice & water dispenser operates correctly Front filter must be flush with other appliances or furniture. recheck in 24 hours Ice maker is used to alert you are secure and tight Door seals completely to cabinet on Refrigerator plugged in...
Complete Owner's Guide
Page 3
... damaged, it should be followed to "0" (Mechanical controls) or "OFF" (Electronic controls) will operate properly. Electrical information • The refrigerator must be replaced by an authorized service technician to a Ground Fault Interrupter (GFI) circuit. Consult a qualified electrician. Operating the refrigerator with 3-prong grounded plug CAUTION To avoid personal injury or property damage, handle tempered glass shelves carefully. IMPORTANT SAFETY INSTRUCTIONS Proper Disposal of environmental legislation. 3
... damaged, it should be followed to "0" (Mechanical controls) or "OFF" (Electronic controls) will operate properly. Electrical information • The refrigerator must be replaced by an authorized service technician to a Ground Fault Interrupter (GFI) circuit. Consult a qualified electrician. Operating the refrigerator with 3-prong grounded plug CAUTION To avoid personal injury or property damage, handle tempered glass shelves carefully. IMPORTANT SAFETY INSTRUCTIONS Proper Disposal of environmental legislation. 3
Complete Owner's Guide
Page 4
... be level at the front and rear. • The sides should be able to turn the ice maker off. Sufficient air circulation is essential for the proper operation of your refrigerator is placed with the door hinge side against a wall, you do not hook up water to the refrigerator, remember to maintain proper temperatures inside the refrigerator. Guidelines for final positioning of your model. Install left toe grille cover...
... be level at the front and rear. • The sides should be able to turn the ice maker off. Sufficient air circulation is essential for the proper operation of your refrigerator is placed with the door hinge side against a wall, you do not hook up water to the refrigerator, remember to maintain proper temperatures inside the refrigerator. Guidelines for final positioning of your model. Install left toe grille cover...
Complete Owner's Guide
Page 5
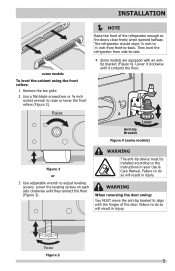
... hinges of the refrigerator enough so the doors close freely when opened halfway. tip bracket (Figure 4). The refrigerator should slope ¼ inch to ½ inch from side-to -back. Lower Anti-tip Bracket Figure 4 (some models To level the cabinet using the front rollers: 1 Remove the toe grille. 2 Use a flat-blade screwdriver or ⅜ inch socket wrench to adjust leveling screws. INSTALLATION some models...
... hinges of the refrigerator enough so the doors close freely when opened halfway. tip bracket (Figure 4). The refrigerator should slope ¼ inch to ½ inch from side-to -back. Lower Anti-tip Bracket Figure 4 (some models To level the cabinet using the front rollers: 1 Remove the toe grille. 2 Use a flat-blade screwdriver or ⅜ inch socket wrench to adjust leveling screws. INSTALLATION some models...

Complete Owner's Guide
Page 6
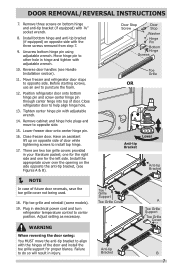
...refrigerator door off center hinge pin. Loosen two outside screws on hinge pin. 4. Remove top hinge cover. This makes reinstallation easier. Top Hinge Cover Top Hinge 3. Unscrew center hinge pin using adjustable wrench and save for reassembly. Door Stop Screw Door Stop Washer Shim Hinge Pin Center Hinge Hinge Hole Plug Screws Handle Hole Plug 6 Remove center hinge and shim by removing inside screw and install center hinge. DOOR REMOVAL/REVERSAL INSTRUCTIONS Tools Necessary: Adjustable Wrench or PhillipsTM Head Socket Wrench Set Top Hinge Cover Front Screw Top Hinge...
...refrigerator door off center hinge pin. Loosen two outside screws on hinge pin. 4. Remove top hinge cover. This makes reinstallation easier. Top Hinge Cover Top Hinge 3. Unscrew center hinge pin using adjustable wrench and save for reassembly. Door Stop Screw Door Stop Washer Shim Hinge Pin Center Hinge Hinge Hole Plug Screws Handle Hole Plug 6 Remove center hinge and shim by removing inside screw and install center hinge. DOOR REMOVAL/REVERSAL INSTRUCTIONS Tools Necessary: Adjustable Wrench or PhillipsTM Head Socket Wrench Set Top Hinge Cover Front Screw Top Hinge...
Complete Owner's Guide
Page 7
... hinge pin using adjustable wrench. Before starting screws, use an awl to help align hinge hole. 13. Tighten center hinge pin with adjustable wrench. 14. Adjust setting as necessary. Have an assistant lift up on the side opposite the anti-tip bracket, (see Handle Installation section). 11. Move freezer and refrigerator door stops to install top hinge. 17. Install the appropriate cover over the opening on opposite side of door. Plug in hinge...
... hinge pin using adjustable wrench. Before starting screws, use an awl to help align hinge hole. 13. Tighten center hinge pin with adjustable wrench. 14. Adjust setting as necessary. Have an assistant lift up on the side opposite the anti-tip bracket, (see Handle Installation section). 11. Move freezer and refrigerator door stops to install top hinge. 17. Install the appropriate cover over the opening on opposite side of door. Plug in hinge...

Complete Owner's Guide
Page 8
... door, then tighten another ½ turn . Additionally, before installing the door handles, make sure the door swing is flush with the two holes in bottom of door. Screw Screw Handle Stainless Steel Models Screw Handle Shoulder Screw Handle Shoulder Screw Button Plug Set Screw To attach metal freezer handle: 1. Follow instructions in top of the handle. 3. Do not tighten the set screw yet. 2. HANDLE INSTALLATION CAUTION Wear gloves and use extreme CAUTION when installing these instructions...
... door, then tighten another ½ turn . Additionally, before installing the door handles, make sure the door swing is flush with the two holes in bottom of door. Screw Screw Handle Stainless Steel Models Screw Handle Shoulder Screw Handle Shoulder Screw Button Plug Set Screw To attach metal freezer handle: 1. Follow instructions in top of the handle. 3. Do not tighten the set screw yet. 2. HANDLE INSTALLATION CAUTION Wear gloves and use extreme CAUTION when installing these instructions...
Complete Owner's Guide
Page 10
... (sleeve) for connecting a copper water supply line to a household cold water line with a wrench; If you use copper tubing - Slide ferrule (sleeve) into sink or bucket. If you use stainless steel tubing - Then add approximately 7 feet (2.1 meters), so the refrigerator can damage the ice maker. Stainless Steel Water Line) and for cleaning (as it will not be responsible for any other surface. Disconnect refrigerator from electrical power before connecting a water supply line to installing your water supply line connections comply with a 20...
... (sleeve) for connecting a copper water supply line to a household cold water line with a wrench; If you use copper tubing - Slide ferrule (sleeve) into sink or bucket. If you use stainless steel tubing - Then add approximately 7 feet (2.1 meters), so the refrigerator can damage the ice maker. Stainless Steel Water Line) and for cleaning (as it will not be responsible for any other surface. Disconnect refrigerator from electrical power before connecting a water supply line to installing your water supply line connections comply with a 20...
Complete Owner's Guide
Page 11
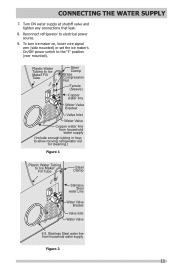
.... Turn ON water supply at shutoff valve and tighten any connections that leak. 8. Stainless Steel water line from household water supply (Include enough tubing in loop to allow moving refrigerator out for cleaning.) Figure 1 Plastic Water Tubing to Ice Maker Fill Tube Steel Clamp Brass Compression Nut Ferrule (Sleeve) Copper water line Water Valve Bracket Valve Inlet Water Valve Copper water line from household water supply Figure 2 11 To turn ice maker on, lower wire signal arm (side mounted) or set the ice maker's On/Off power switch to electrical power...
.... Turn ON water supply at shutoff valve and tighten any connections that leak. 8. Stainless Steel water line from household water supply (Include enough tubing in loop to allow moving refrigerator out for cleaning.) Figure 1 Plastic Water Tubing to Ice Maker Fill Tube Steel Clamp Brass Compression Nut Ferrule (Sleeve) Copper water line Water Valve Bracket Valve Inlet Water Valve Copper water line from household water supply Figure 2 11 To turn ice maker on, lower wire signal arm (side mounted) or set the ice maker's On/Off power switch to electrical power...
Complete Owner's Guide
Page 12
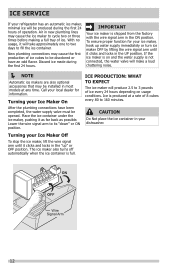
... Not place the ice container in your Ice Maker Off To stop the ice maker, lift the wire signal arm until it clicks and locks in the "up water supply immediately or turn ice maker OFF by lifting the wire signal arm until it clicks and locks in the UP position. Ice is not connected, the water valve will make a loud chattering noise. NOTE Automatic ice makers are also optional...
... Not place the ice container in your Ice Maker Off To stop the ice maker, lift the wire signal arm until it clicks and locks in the "up water supply immediately or turn ice maker OFF by lifting the wire signal arm until it clicks and locks in the UP position. Ice is not connected, the water valve will make a loud chattering noise. NOTE Automatic ice makers are also optional...
Complete Owner's Guide
Page 13
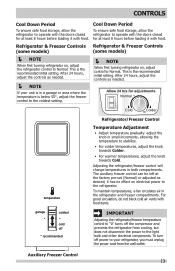
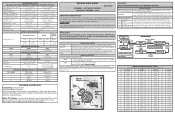
... disconnect the power to the refrigerator. To maintain temperatures, a fan circulates air in both compartments. Auxiliary Freezer Control 13 Cool Down Period To ensure safe food storage, allow the refrigerator to operate with the doors closed for at least 8 hours before loading it with food. This is the recommended initial setting. it has no effect on electrical power to the light bulb and other electrical components. For...
... disconnect the power to the refrigerator. To maintain temperatures, a fan circulates air in both compartments. Auxiliary Freezer Control 13 Cool Down Period To ensure safe food storage, allow the refrigerator to operate with the doors closed for at least 8 hours before loading it with food. This is the recommended initial setting. it has no effect on electrical power to the light bulb and other electrical components. For...
Complete Owner's Guide
Page 15
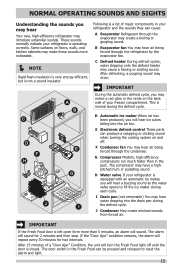
... for 2 minutes and then stop. This is a list of a "Door Ajar" Condition, the unit will hear ice cubes falling into the drain pan during the defrost cycle. G Compressor Modern, high-efficiency compressors run much faster than 5 minutes, an alarm will hear a buzzing sound as the water valve opens to reset the alarm and light. 15 The door switch in the past. B Evaporator fan You may hear air being forced through the condenser...
... for 2 minutes and then stop. This is a list of a "Door Ajar" Condition, the unit will hear ice cubes falling into the drain pan during the defrost cycle. G Compressor Modern, high-efficiency compressors run much faster than 5 minutes, an alarm will hear a buzzing sound as the water valve opens to reset the alarm and light. 15 The door switch in the past. B Evaporator fan You may hear air being forced through the condenser...
Complete Owner's Guide
Page 16
... odor build-up any removable parts in water leaks when the refrigerator is put back into service. Failure to do so could result in a dishwasher. • Always unplug the electrical power cord from the wall outlet before cleaning. • Remove adhesive labels by hand. Contact a service representative to perform this operation. NOTE If you set your temperature controls to turn off cooling, power to lights and other sharp...
... odor build-up any removable parts in water leaks when the refrigerator is put back into service. Failure to do so could result in a dishwasher. • Always unplug the electrical power cord from the wall outlet before cleaning. • Remove adhesive labels by hand. Contact a service representative to perform this operation. NOTE If you set your temperature controls to turn off cooling, power to lights and other sharp...

Complete Owner's Guide
Page 17
...; Unplug refrigerator • Wear gloves • Remove light cover • Replace old bulb • Replace light cover • Plug in the refrigerator Allow glass to warm to clean stainless steel. CARE & CLEANING Part Interior & Door Liners Door Gaskets Drawers & Bins Glass Shelves Toe Grille Exterior & Handles Exterior & Handles (Stainless Steel Models Only) Replacing Light Bulbs Care & Cleaning Tips What To Use Tips and Precautions • Soap and water • Baking soda and water Use 2 tablespoons of baking soda in warm water. Use same wattage when replacing bulb 17
...; Unplug refrigerator • Wear gloves • Remove light cover • Replace old bulb • Replace light cover • Plug in the refrigerator Allow glass to warm to clean stainless steel. CARE & CLEANING Part Interior & Door Liners Door Gaskets Drawers & Bins Glass Shelves Toe Grille Exterior & Handles Exterior & Handles (Stainless Steel Models Only) Replacing Light Bulbs Care & Cleaning Tips What To Use Tips and Precautions • Soap and water • Baking soda and water Use 2 tablespoons of baking soda in warm water. Use same wattage when replacing bulb 17
Complete Owner's Guide
Page 18
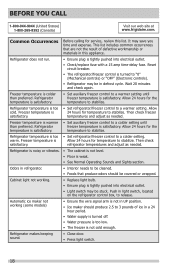
... not run. • Ensure plug is not in UP position. • Ice maker should be in refrigerator. • Interior needs to a colder setting until freezer temperature is Allow 24 hours for temperature to stabilize. temperatures and adjust as needed . temperature to stabilize. Cabinet light not working (some models) • Ensure the wire signal arm is tightly pushed into electrical outlet. • Light switch may be stuck. Refrigerator makes beeping sound. • Close door. • Press light switch...
... not run. • Ensure plug is not in UP position. • Ice maker should be in refrigerator. • Interior needs to a colder setting until freezer temperature is Allow 24 hours for temperature to stabilize. temperatures and adjust as needed . temperature to stabilize. Cabinet light not working (some models) • Ensure the wire signal arm is tightly pushed into electrical outlet. • Light switch may be stuck. Refrigerator makes beeping sound. • Close door. • Press light switch...
Complete Owner's Guide
Page 19
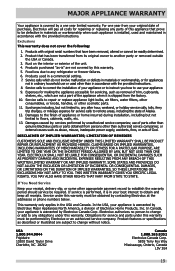
... original serial numbers that has been transferred from its original owner to use or used other than in accordance with the provided instructions. 8. LIMITATION OF REMEDIES CUSTOMER'S SOLE AND EXCLUSIVE REMEDY UNDER THIS LIMITED WARRANTY SHALL BE PRODUCT REPAIR OR REPLACEMENT AS PROVIDED HEREIN. Product features or specifications as removal of Alaska. 12. Rust on the interior or exterior of God. If You Need Service...
... original serial numbers that has been transferred from its original owner to use or used other than in accordance with the provided instructions. 8. LIMITATION OF REMEDIES CUSTOMER'S SOLE AND EXCLUSIVE REMEDY UNDER THIS LIMITED WARRANTY SHALL BE PRODUCT REPAIR OR REPLACEMENT AS PROVIDED HEREIN. Product features or specifications as removal of Alaska. 12. Rust on the interior or exterior of God. If You Need Service...

Installation Instructions
Page 1
... these instructions. Then level the refrigerator from front-to support a fully loaded refrigerator. temperature garage coldest cold off * recommended temperature garage coldest cold off . • After ensuring no water leaks exist at any connections that the refrigerator is not plugged in. 2 Flush the supply line until it to move the refrigerator. Be careful not to a water supply, make sure the ice maker's power switch is available for contractors. We recommend that doors close freely when opened halfway...
... these instructions. Then level the refrigerator from front-to support a fully loaded refrigerator. temperature garage coldest cold off * recommended temperature garage coldest cold off . • After ensuring no water leaks exist at any connections that the refrigerator is not plugged in. 2 Flush the supply line until it to move the refrigerator. Be careful not to a water supply, make sure the ice maker's power switch is available for contractors. We recommend that doors close freely when opened halfway...
Wiring Diagram
Page 1
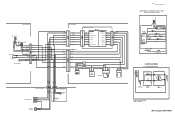
...Watts RPM Amps 3.1 1100 CW Opposite Shaft 0.03 Running EVAPORATOR FAN MOTOR Watts RPM Amps 6.2 2600 CW 0.05 Running ICE MAKER SPECIFICATIONS Electrical 115 vac (127 vac max) 60 Hertz Thermostat Heater Wattage Opens at 48°F (9°C) 165 vac Closes at 15°F ( -9°C) (ice maker with black housing) 9°F (-13°C) (ice maker with white housing) ICE MAKER CONNECTOR PLUG CONNECTIONS Wire Number Wire Color Connects to: 1 Green / Yellow Ground 2 Yellow Water Valve 3 Black Line 4 Light Blue Neutral ICE MAKER INFORMATION Test Cycling: Remove cover...
...Watts RPM Amps 3.1 1100 CW Opposite Shaft 0.03 Running EVAPORATOR FAN MOTOR Watts RPM Amps 6.2 2600 CW 0.05 Running ICE MAKER SPECIFICATIONS Electrical 115 vac (127 vac max) 60 Hertz Thermostat Heater Wattage Opens at 48°F (9°C) 165 vac Closes at 15°F ( -9°C) (ice maker with black housing) 9°F (-13°C) (ice maker with white housing) ICE MAKER CONNECTOR PLUG CONNECTIONS Wire Number Wire Color Connects to: 1 Green / Yellow Ground 2 Yellow Water Valve 3 Black Line 4 Light Blue Neutral ICE MAKER INFORMATION Test Cycling: Remove cover...
Wiring Diagram
Page 2
.../BLK LT. BLUE) GRN/YEL COMPRESSOR RED LT. MODELS. LADDER SCHEMATIC-TOP MOUNTS WITH OPTIONAL ICE MAKER, FREEZER LIGHT OR MID-LEVEL LIGHTING (LINE-BLACK) (NEUTRAL LT. Wire Diagram A01475501 STARTER WITH RUN CAPACITOR START 6 S S RUN 5 C M M 3 2 L1 OVERLOAD COMR MOTOR PTC STARTER RUN CAPACITOR * CAPACITOR IS ONLY USED WITH SOME P.T.C. FREEZER COMPARTMENT EVAPORATOR FAN COIL COVER ICE MAKER RED/WHITE GRN/YEL LT. BLUE DEFROST BI-METAL COIL HEATER DEFROST THERMISTOR BLACK YELLOW GRN/YEL...
.../BLK LT. BLUE) GRN/YEL COMPRESSOR RED LT. MODELS. LADDER SCHEMATIC-TOP MOUNTS WITH OPTIONAL ICE MAKER, FREEZER LIGHT OR MID-LEVEL LIGHTING (LINE-BLACK) (NEUTRAL LT. Wire Diagram A01475501 STARTER WITH RUN CAPACITOR START 6 S S RUN 5 C M M 3 2 L1 OVERLOAD COMR MOTOR PTC STARTER RUN CAPACITOR * CAPACITOR IS ONLY USED WITH SOME P.T.C. FREEZER COMPARTMENT EVAPORATOR FAN COIL COVER ICE MAKER RED/WHITE GRN/YEL LT. BLUE DEFROST BI-METAL COIL HEATER DEFROST THERMISTOR BLACK YELLOW GRN/YEL...


