Complete Owner's Guide
Page 5
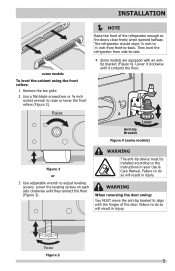
...) Figure 2 or 3 Use adjustable wrench to do so will result in injury. Then level the refrigerator from front-to the instructions in your Use & Care Manual. tip bracket (Figure 4). Lower the leveling screws on each side clockwise until it contacts the floor. The refrigerator should slope ¼ inch to ½ inch...
...) Figure 2 or 3 Use adjustable wrench to do so will result in injury. Then level the refrigerator from front-to the instructions in your Use & Care Manual. tip bracket (Figure 4). Lower the leveling screws on each side clockwise until it contacts the floor. The refrigerator should slope ¼ inch to ½ inch...

Installation Instructions
Page 1
... Secure the copper tube to move the refrigerator beyond its cabinet enclosure. Shifting the refrigerator from side to the instructions in your Use & Care Manual. Be careful not to a cold water line with ¼-inch (6.4mm) OD. CAUTION IMPORTANT If you are secure and tight Door... 3 of the refrigerator enough so the doors close and seal properly). • Doors should align with the installation of your Use & Care Manual. Once the refrigerator is more details). • Shifting the refrigerator from side to side may damage flooring. 3 Connect Water Supply What you ...
... Secure the copper tube to move the refrigerator beyond its cabinet enclosure. Shifting the refrigerator from side to the instructions in your Use & Care Manual. Be careful not to a cold water line with ¼-inch (6.4mm) OD. CAUTION IMPORTANT If you are secure and tight Door... 3 of the refrigerator enough so the doors close and seal properly). • Doors should align with the installation of your Use & Care Manual. Once the refrigerator is more details). • Shifting the refrigerator from side to side may damage flooring. 3 Connect Water Supply What you ...
Wiring Diagram
Page 1
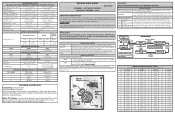
...Beep Test 1: 2 Beeps Test 2: Power ON Press Door Switch Compressor ON Enters Service 2 Times Mode 2 Beeps Press Door Switch 2 Times Manual Defrost 2 Beeps to confirm the next test has started. The door switch must be returned to the possibility of "Door Ajar" condition, the...13°C) (ice maker with white housing) ICE MAKER CONNECTOR PLUG CONNECTIONS Wire Number Wire Color Connects to the defrost heater at 135°F. MANUAL DEFROST Unit will distort the plastic liner. It will interrupt power to : 1 Green / Yellow Ground 2 Yellow Water Valve 3 Black Line 4...
...Beep Test 1: 2 Beeps Test 2: Power ON Press Door Switch Compressor ON Enters Service 2 Times Mode 2 Beeps Press Door Switch 2 Times Manual Defrost 2 Beeps to confirm the next test has started. The door switch must be returned to the possibility of "Door Ajar" condition, the...13°C) (ice maker with white housing) ICE MAKER CONNECTOR PLUG CONNECTIONS Wire Number Wire Color Connects to the defrost heater at 135°F. MANUAL DEFROST Unit will distort the plastic liner. It will interrupt power to : 1 Green / Yellow Ground 2 Yellow Water Valve 3 Black Line 4...


