Complete Owner's Guide
Page 1
All about the Use &Care of your Refrigerator 807876504 (April 2014) TABLE OF CONTENTS Important Safety Instructions 2 Controls 13 Installation 4 Normal Operating Sounds and Sights..........15 Door Removal/Reversal Instructions 6 Care and Cleaning 16 Handle Installation 8 Before you Call 18 Connecting Water Supply 10 Major Appliance Warranty 19 Ice Service 12 www.frigidaire.com USA 1-800-944-9044 www.frigidaire.ca Canada 1-800-265-8352
All about the Use &Care of your Refrigerator 807876504 (April 2014) TABLE OF CONTENTS Important Safety Instructions 2 Controls 13 Installation 4 Normal Operating Sounds and Sights..........15 Door Removal/Reversal Instructions 6 Care and Cleaning 16 Handle Installation 8 Before you Call 18 Connecting Water Supply 10 Major Appliance Warranty 19 Ice Service 12 www.frigidaire.com USA 1-800-944-9044 www.frigidaire.ca Canada 1-800-265-8352

Complete Owner's Guide
Page 2
... is setting solid on all corners Electrical Power House power turned on Refrigerator plugged in the vicinity of the past. Obey all safety messages that follow the instructions below to refrigerator No water leaks present at all connections - Children should never use gasoline, or other flammable liquids in Ice Maker House water supply connected to help prevent accidents. 2 Junked or abandoned refrigerators or freezers are not problems...
... is setting solid on all corners Electrical Power House power turned on Refrigerator plugged in the vicinity of the past. Obey all safety messages that follow the instructions below to refrigerator No water leaks present at all connections - Children should never use gasoline, or other flammable liquids in Ice Maker House water supply connected to help prevent accidents. 2 Junked or abandoned refrigerators or freezers are not problems...
Complete Owner's Guide
Page 3
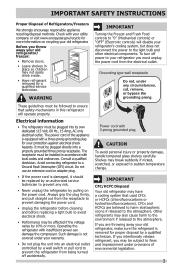
... your old refrigerator/ freezer: • Remove doors. • Leave shelves in accordance with local codes and ordinances. Do not use an extension cord or adapter plug. • If the power cord is removed for more . Avoid connecting refrigerator to the atmosphere. IMPORTANT SAFETY INSTRUCTIONS Proper Disposal of environmental legislation. 3 Check with 3-prong grounded plug CAUTION To avoid personal injury or property damage, handle tempered glass shelves carefully. These...
... your old refrigerator/ freezer: • Remove doors. • Leave shelves in accordance with local codes and ordinances. Do not use an extension cord or adapter plug. • If the power cord is removed for more . Avoid connecting refrigerator to the atmosphere. IMPORTANT SAFETY INSTRUCTIONS Proper Disposal of environmental legislation. 3 Check with 3-prong grounded plug CAUTION To avoid personal injury or property damage, handle tempered glass shelves carefully. These...
Complete Owner's Guide
Page 4
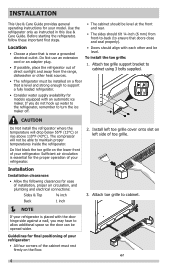
... instructed in this Use & Care Guide. Installation Installation clearances • Allow the following clearances for ease of installation, proper air circulation, and plumbing and electrical connections: Sides & Top ⅜ inch Back 1 inch NOTE If your refrigerator is essential for models equipped with an automatic ice maker. or If you may have to support a fully loaded refrigerator. • Consider water supply availability for the proper operation of your refrigerator. The compressor...
... instructed in this Use & Care Guide. Installation Installation clearances • Allow the following clearances for ease of installation, proper air circulation, and plumbing and electrical connections: Sides & Top ⅜ inch Back 1 inch NOTE If your refrigerator is essential for models equipped with an automatic ice maker. or If you may have to support a fully loaded refrigerator. • Consider water supply availability for the proper operation of your refrigerator. The compressor...

Complete Owner's Guide
Page 6
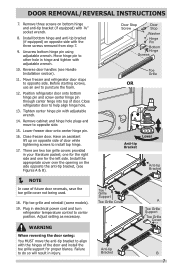
..., turn the refrigerator temperature control to slide out. Lift refrigerator door off center hinge pin. Door Stop Screw Door Stop Washer Shim Hinge Pin Center Hinge Hinge Hole Plug Screws Handle Hole Plug 6 Tighten screws. 6. This makes reinstallation easier. Door removal and reversal instructions: 1. Ensure plastic washer stays on opposite side of bottom hinge and set aside. 5. Loosen two outside screws enough to allow hinge and shim to "0" (Mechanical controls) or "OFF" (Electronic controls) and remove the electrical power cord...
..., turn the refrigerator temperature control to slide out. Lift refrigerator door off center hinge pin. Door Stop Screw Door Stop Washer Shim Hinge Pin Center Hinge Hinge Hole Plug Screws Handle Hole Plug 6 Tighten screws. 6. This makes reinstallation easier. Door removal and reversal instructions: 1. Ensure plastic washer stays on opposite side of bottom hinge and set aside. 5. Loosen two outside screws enough to allow hinge and shim to "0" (Mechanical controls) or "OFF" (Electronic controls) and remove the electrical power cord...
Complete Owner's Guide
Page 7
.... 8. Plug in electrical power cord and turn refrigerator temperature control to do so will result in your literature packet; Failure to center position. Door Stop Screw Door Stop Washer Hinge Pin Bottom Hinge Screws Toe Grille OR Anti-tip Bracket Lower Anti-tip Bracket Toe Grille Support Toe Grille Cover A Toe Grille Support Toe Grille Cover Anti-tip Bracket B 7 DOOR REMOVAL/REVERSAL INSTRUCTIONS 7. Unscrew bottom hinge pin using adjustable wrench. Position refrigerator door onto bottom hinge pin...
.... 8. Plug in electrical power cord and turn refrigerator temperature control to do so will result in your literature packet; Failure to center position. Door Stop Screw Door Stop Washer Hinge Pin Bottom Hinge Screws Toe Grille OR Anti-tip Bracket Lower Anti-tip Bracket Toe Grille Support Toe Grille Cover A Toe Grille Support Toe Grille Cover Anti-tip Bracket B 7 DOOR REMOVAL/REVERSAL INSTRUCTIONS 7. Unscrew bottom hinge pin using adjustable wrench. Position refrigerator door onto bottom hinge pin...
Complete Owner's Guide
Page 10
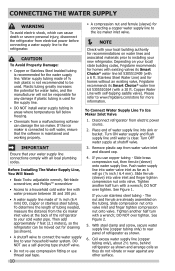
... Stainless Steel braided tubing is maintained and working properly. Water supply tubing made of water supply line into valve inlet and finger tighten compression nut onto valve. To Connect Water Supply Line To Ice Maker Inlet Valve 1. If you use stainless steel tubing - With steel clamp and screw, secure water supply line (copper tubing only) to a household cold water line with a wrench; Coil excess water supply line (copper tubing only), about 2½ turns, behind refrigerator as shown). • A shutoff valve to connect the water supply line to the ice maker inlet valve...
... Stainless Steel braided tubing is maintained and working properly. Water supply tubing made of water supply line into valve inlet and finger tighten compression nut onto valve. To Connect Water Supply Line To Ice Maker Inlet Valve 1. If you use stainless steel tubing - With steel clamp and screw, secure water supply line (copper tubing only) to a household cold water line with a wrench; Coil excess water supply line (copper tubing only), about 2½ turns, behind refrigerator as shown). • A shutoff valve to connect the water supply line to the ice maker inlet valve...
Complete Owner's Guide
Page 12
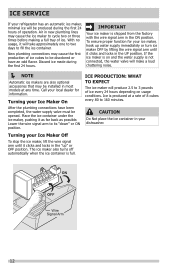
... tray of operation. Air in new plumbing lines may be installed in most models at a rate of ice cubes to 160 minutes. Discard ice made during the first 24 hours of ice. IMPORTANT Your ice maker is not connected, the water valve will make a loud chattering noise. NOTE Automatic ice makers are also optional accessories that may cause the ice maker to 3 pounds of ice every 24 hours depending on and the water supply...
... tray of operation. Air in new plumbing lines may be installed in most models at a rate of ice cubes to 160 minutes. Discard ice made during the first 24 hours of ice. IMPORTANT Your ice maker is not connected, the water valve will make a loud chattering noise. NOTE Automatic ice makers are also optional accessories that may cause the ice maker to 3 pounds of ice every 24 hours depending on and the water supply...
Complete Owner's Guide
Page 13
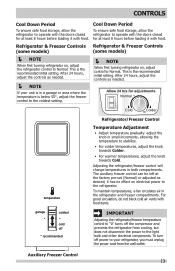
... Freezer Control 13 Refrigerator & Freezer Controls Refrigerator & Freezer Controls (some models) (some models) NOTE When first turning refrigerator on electrical power to the refrigerator. After 24 hours, adjust the controls as needed . To turn off the compressor and prevents the refrigerator from the wall outlet. To maintain temperatures, a fan circulates air in a garage or area where the temperature is below 55°, adjust the freezer control to the coldest setting. NOTE When first turning refrigerator on, adjust control to Normal. CONTROLS Cool Down...
... Freezer Control 13 Refrigerator & Freezer Controls Refrigerator & Freezer Controls (some models) (some models) NOTE When first turning refrigerator on electrical power to the refrigerator. After 24 hours, adjust the controls as needed . To turn off the compressor and prevents the refrigerator from the wall outlet. To maintain temperatures, a fan circulates air in a garage or area where the temperature is below 55°, adjust the freezer control to the coldest setting. NOTE When first turning refrigerator on, adjust control to Normal. CONTROLS Cool Down...
Complete Owner's Guide
Page 15
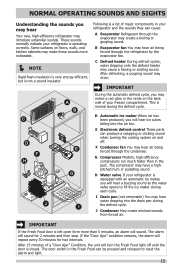
... make these sounds more than in your refrigerator is a list of major components in the past. G Compressor Modern, high-efficiency compressors run much faster than 5 minutes, an alarm will hear ice cubes falling into the drain pan during the defrost cycle. H Water valve If your refrigerator and the sounds they can cause: A Evaporator Refrigerant through the evaporator may hear water dripping into the ice bin. I Following is equipped with an automatic ice maker...
... make these sounds more than in your refrigerator is a list of major components in the past. G Compressor Modern, high-efficiency compressors run much faster than 5 minutes, an alarm will hear ice cubes falling into the drain pan during the defrost cycle. H Water valve If your refrigerator and the sounds they can cause: A Evaporator Refrigerant through the evaporator may hear water dripping into the ice bin. I Following is equipped with an automatic ice maker...
Complete Owner's Guide
Page 16
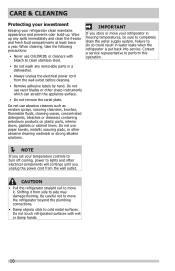
... remove the serial plate. Do not use CHLORIDE or cleaners with wet or damp hands. 16 Contact a service representative to perform this operation. NOTE If you set your temperature controls to turn off cooling, power to side may damage flooring. CARE & CLEANING Protecting your investment Keeping your refrigerator clean maintains appearance and prevents odor build-up any removable parts in water leaks when the refrigerator is put back into service...
... remove the serial plate. Do not use CHLORIDE or cleaners with wet or damp hands. 16 Contact a service representative to perform this operation. NOTE If you set your temperature controls to turn off cooling, power to side may damage flooring. CARE & CLEANING Protecting your investment Keeping your refrigerator clean maintains appearance and prevents odor build-up any removable parts in water leaks when the refrigerator is put back into service...

Complete Owner's Guide
Page 17
... • Remove light cover • Replace old bulb • Replace light cover • Plug in the refrigerator Allow glass to warm to wring excess water out of the cabinet with a clean soft cloth. CAUTION: Wear gloves when replacing light bulbs to clean smooth doors. Rinse and dry. CARE & CLEANING Part Interior & Door Liners Door Gaskets Drawers & Bins Glass Shelves Toe Grille Exterior & Handles Exterior & Handles (Stainless Steel Models Only) Replacing Light Bulbs Care & Cleaning Tips What To Use Tips and Precautions • Soap and water • Baking soda and water Use...
... • Remove light cover • Replace old bulb • Replace light cover • Plug in the refrigerator Allow glass to warm to wring excess water out of the cabinet with a clean soft cloth. CAUTION: Wear gloves when replacing light bulbs to clean smooth doors. Rinse and dry. CARE & CLEANING Part Interior & Door Liners Door Gaskets Drawers & Bins Glass Shelves Toe Grille Exterior & Handles Exterior & Handles (Stainless Steel Models Only) Replacing Light Bulbs Care & Cleaning Tips What To Use Tips and Precautions • Soap and water • Baking soda and water Use...
Complete Owner's Guide
Page 18
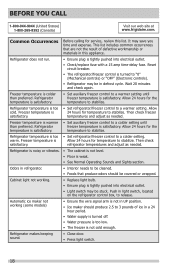
... service, review this appliance. Wait 20 minutes and check again. Refrigerator freezer temperature is weak. • See Normal Operating Sounds and Sights section. warm. Odors in defrost cycle. Cabinet light not working (some models) • Ensure the wire signal arm is satisfactory. • Set auxiliary freezer control to stabilize. Refrigerator temperature is not in UP position. • Ice maker should be covered or wrapped. Freezer temperature is colder than preferred. refrigerator temperatures and adjust as needed . Refrigerator makes...
... service, review this appliance. Wait 20 minutes and check again. Refrigerator freezer temperature is weak. • See Normal Operating Sounds and Sights section. warm. Odors in defrost cycle. Cabinet light not working (some models) • Ensure the wire signal arm is satisfactory. • Set auxiliary freezer control to stabilize. Refrigerator temperature is not in UP position. • Ice maker should be covered or wrapped. Freezer temperature is colder than preferred. refrigerator temperatures and adjust as needed . Refrigerator makes...
Complete Owner's Guide
Page 19
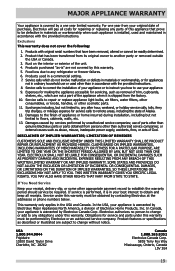
... year limited warranty. Products with the provided instructions. 8. Food loss due to remote areas, including the state of the unit. 4. Expenses for making the appliance accessible for service calls to any obligations under this warranty must be readily determined. 2. Service calls to floors, cabinets, walls, etc. 13. Surcharges including, but not limited to repair or replace appliance light bulbs, air filters, water filters, other...
... year limited warranty. Products with the provided instructions. 8. Food loss due to remote areas, including the state of the unit. 4. Expenses for making the appliance accessible for service calls to any obligations under this warranty must be readily determined. 2. Service calls to floors, cabinets, walls, etc. 13. Surcharges including, but not limited to repair or replace appliance light bulbs, air filters, water filters, other...

Installation Instructions
Page 1
... when opened halfway. CAUTION To avoid property damage: • Use copper tubing for the water supply connection at the front and rear. • The sides should align with local plumbing codes. NOTE Kit #53039117950, available from side-to -back. Top Hinge Cover Top Hinge Shim Pin Door Stop Screw Door Stop Washer Hinge Pin Bottom Hinge Screws Center Hinge Toe Grille 9 Installation Checkoff List Doors Ice Maker Handles are installing your refrigerator without connecting...
... when opened halfway. CAUTION To avoid property damage: • Use copper tubing for the water supply connection at the front and rear. • The sides should align with local plumbing codes. NOTE Kit #53039117950, available from side-to -back. Top Hinge Cover Top Hinge Shim Pin Door Stop Screw Door Stop Washer Hinge Pin Bottom Hinge Screws Center Hinge Toe Grille 9 Installation Checkoff List Doors Ice Maker Handles are installing your refrigerator without connecting...
Wiring Diagram
Page 1
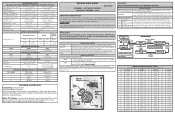
...Watts RPM Amps 3.1 1100 CW Opposite Shaft 0.03 Running EVAPORATOR FAN MOTOR Watts RPM Amps 6.2 2600 CW 0.05 Running ICE MAKER SPECIFICATIONS Electrical 115 vac (127 vac max) 60 Hertz Thermostat Heater Wattage Opens at 48°F (9°C) 165 vac Closes at 15°F ( -9°C) (ice maker with black housing) 9°F (-13°C) (ice maker with white housing) ICE MAKER CONNECTOR PLUG CONNECTIONS Wire Number Wire Color Connects to: 1 Green / Yellow Ground 2 Yellow Water Valve 3 Black Line 4 Light Blue Neutral ICE MAKER INFORMATION Test Cycling: Remove cover...
...Watts RPM Amps 3.1 1100 CW Opposite Shaft 0.03 Running EVAPORATOR FAN MOTOR Watts RPM Amps 6.2 2600 CW 0.05 Running ICE MAKER SPECIFICATIONS Electrical 115 vac (127 vac max) 60 Hertz Thermostat Heater Wattage Opens at 48°F (9°C) 165 vac Closes at 15°F ( -9°C) (ice maker with black housing) 9°F (-13°C) (ice maker with white housing) ICE MAKER CONNECTOR PLUG CONNECTIONS Wire Number Wire Color Connects to: 1 Green / Yellow Ground 2 Yellow Water Valve 3 Black Line 4 Light Blue Neutral ICE MAKER INFORMATION Test Cycling: Remove cover...
Wiring Diagram
Page 2
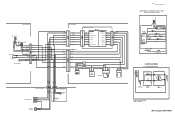
...) GRN/YEL COMPRESSOR RED LT. LADDER SCHEMATIC-TOP MOUNTS WITH OPTIONAL ICE MAKER, FREEZER LIGHT OR MID-LEVEL LIGHTING (LINE-BLACK) (NEUTRAL LT. STARTER WITH RUN CAPACITOR START 6 S S RUN 5 C M M 3 2 L1 OVERLOAD COMR MOTOR PTC STARTER RUN CAPACITOR * CAPACITOR IS ONLY USED WITH SOME P.T.C. Wire Diagram A01475501 BLUE DEFROST BI-METAL COIL HEATER DEFROST THERMISTOR BLACK YELLOW GRN/YEL GRN/YEL RED/WHITE LT. MODELS. FREEZER COMPARTMENT EVAPORATOR FAN COIL COVER ICE MAKER RED/WHITE GRN...
...) GRN/YEL COMPRESSOR RED LT. LADDER SCHEMATIC-TOP MOUNTS WITH OPTIONAL ICE MAKER, FREEZER LIGHT OR MID-LEVEL LIGHTING (LINE-BLACK) (NEUTRAL LT. STARTER WITH RUN CAPACITOR START 6 S S RUN 5 C M M 3 2 L1 OVERLOAD COMR MOTOR PTC STARTER RUN CAPACITOR * CAPACITOR IS ONLY USED WITH SOME P.T.C. Wire Diagram A01475501 BLUE DEFROST BI-METAL COIL HEATER DEFROST THERMISTOR BLACK YELLOW GRN/YEL GRN/YEL RED/WHITE LT. MODELS. FREEZER COMPARTMENT EVAPORATOR FAN COIL COVER ICE MAKER RED/WHITE GRN...
Product Specifications Sheet
Page 1
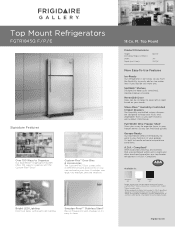
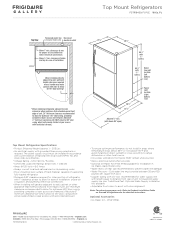
... needs. Ft. Full-Width Wire Freezer Shelf Gives you a way to organize with the Custom-Flex™ Door.1 Custom-Flex™ Door Bins & Accessories The Custom-Flex™ Door comes with bright LED lighting. frigidaire.com Compliant. A.D.A. - Standards for Accessible Design. Top Mount Product Dimensions Height (Including Hinges & Rollers) Width Depth (Incl. It's built to clean. 18 Cu. Door) 66-1/8" 30" 29-7/8" More Easy-To-Use Features Ice-Ready Our refrigerator...
... needs. Ft. Full-Width Wire Freezer Shelf Gives you a way to organize with the Custom-Flex™ Door.1 Custom-Flex™ Door Bins & Accessories The Custom-Flex™ Door comes with bright LED lighting. frigidaire.com Compliant. A.D.A. - Standards for Accessible Design. Top Mount Product Dimensions Height (Including Hinges & Rollers) Width Depth (Incl. It's built to clean. 18 Cu. Door) 66-1/8" 30" 29-7/8" More Easy-To-Use Features Ice-Ready Our refrigerator...
Product Specifications Sheet
Page 2
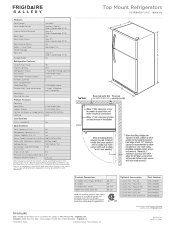
... & Rollers) B - Refer to change. Small, 2 - Product Dimensions A - Door) Depth with a separate ground wire. Always consult local and national electric and plumbing codes. Features Door Design Door Handle Design Cabinet Finish (Textured) Door Stops Door Hinge Covers Door Reverse Option Rollers - Ft.) 14.1 Freezer Capacity (Cu. Accessibility Guidelines and the Department of Justice's 2010 A.D.A. Ft.) 18.1 Refrigerator Capacity (Cu. Large Bin Freezer Features Door Bins Door Racks Freezer Shelves Factory Ice Maker w/ Large Ice Bin Lighting 2 Full-Width Clear 1 Full...
... & Rollers) B - Refer to change. Small, 2 - Product Dimensions A - Door) Depth with a separate ground wire. Always consult local and national electric and plumbing codes. Features Door Design Door Handle Design Cabinet Finish (Textured) Door Stops Door Hinge Covers Door Reverse Option Rollers - Ft.) 14.1 Freezer Capacity (Cu. Accessibility Guidelines and the Department of Justice's 2010 A.D.A. Ft.) 18.1 Refrigerator Capacity (Cu. Large Bin Freezer Features Door Bins Door Racks Freezer Shelves Factory Ice Maker w/ Large Ice Bin Lighting 2 Full-Width Clear 1 Full...
Product Specifications Sheet
Page 3
... instructions. Optional Water Supply Installation Kits available. • Adjustable front rollers to change. Refer to Product Installation Guide on rear wall recommended to household water supply line plus 7 additional feet. recommended for water supply line with length equal to allow for optimum 140° door swing, providing complete crisper access and removal. (Absolute 3" minimum clearance will ONLY allow for proper air circulation and water / electrical connections Allow 3/8" min. Optional Accessories • Ice Maker Kit - (PN # IM116). Specifications...
... instructions. Optional Water Supply Installation Kits available. • Adjustable front rollers to change. Refer to Product Installation Guide on rear wall recommended to household water supply line plus 7 additional feet. recommended for water supply line with length equal to allow for optimum 140° door swing, providing complete crisper access and removal. (Absolute 3" minimum clearance will ONLY allow for proper air circulation and water / electrical connections Allow 3/8" min. Optional Accessories • Ice Maker Kit - (PN # IM116). Specifications...


