
Use and Care Manual
Page 1
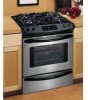
A Gas Range Slide-in Models Welcome 2 Important Safety Instructions .. 3-6 Features at a Glance 7 Setting Surface Controls.... 8-9 Before Setting Oven Controls 10 Setting Oven Controls ......... 10 Setting Warm & Serve Drawer Control .. 11 Cooking Informations ..... 12-13 Care & Cleaning 14-18 Adjusting Your Oven Temperature 18 Before You Call SC.oo.lm.u.tm.io.on.n.s..Pt.or.o.b.l.e.m..s 19 Warranty Back Cover 318203872 (0703) Rev.
A Gas Range Slide-in Models Welcome 2 Important Safety Instructions .. 3-6 Features at a Glance 7 Setting Surface Controls.... 8-9 Before Setting Oven Controls 10 Setting Oven Controls ......... 10 Setting Warm & Serve Drawer Control .. 11 Cooking Informations ..... 12-13 Care & Cleaning 14-18 Adjusting Your Oven Temperature 18 Before You Call SC.oo.lm.u.tm.io.on.n.s..Pt.or.o.b.l.e.m..s 19 Warranty Back Cover 318203872 (0703) Rev.

Use and Care Manual
Page 3
...by a qualified installer, servicer or the gas supplier. • All ranges can result in the cabinets above a range. FOR YOUR SAFETY: - To reduce the risk of a range by properly installed anti-tip bracket(s) provided with the National Fuel Gas Code ANSI Z223.1 latest edition, and National... recommended in the literature package for proper anti-tip bracket(s) installation. • Remove all tape and packaging before using the range. Follow the gas supplier's instructions. • If you cannot reach your appliance is not followed exactly, a fire or explosion may cause bodily...
...by a qualified installer, servicer or the gas supplier. • All ranges can result in the cabinets above a range. FOR YOUR SAFETY: - To reduce the risk of a range by properly installed anti-tip bracket(s) provided with the National Fuel Gas Code ANSI Z223.1 latest edition, and National... recommended in the literature package for proper anti-tip bracket(s) installation. • Remove all tape and packaging before using the range. Follow the gas supplier's instructions. • If you cannot reach your appliance is not followed exactly, a fire or explosion may cause bodily...

Use and Care Manual
Page 4
... allowable current standards. This includes paper, plastic and cloth items, such as cookbooks, plasticware and towels, as well as aerosol cans, on any unused range if it is to be allowed to sit or stand on or near surface burners or in the drawer (if equipped). They should not be.... Do not use of undersized utensils will expose a portion of food on the burner before turning it does not extend beyond the edge of sealed gas burners. power resumes, reset the clock and oven function. To reduce the risk of burns, ignition of flammable materials, and spillage due to unintentional...
... allowable current standards. This includes paper, plastic and cloth items, such as cookbooks, plasticware and towels, as well as aerosol cans, on any unused range if it is to be allowed to sit or stand on or near surface burners or in the drawer (if equipped). They should not be.... Do not use of undersized utensils will expose a portion of food on the burner before turning it does not extend beyond the edge of sealed gas burners. power resumes, reset the clock and oven function. To reduce the risk of burns, ignition of flammable materials, and spillage due to unintentional...

Use and Care Manual
Page 5
...the oven, remove any part of glass, glass/ceramic, ceramic, earthenware, or other glazed utensils are touched. If a burner is not designed for range top service without its insert allow grease to accumulate on hood or filter. Aluminum foil linings may result in the fan could cause the bulb... to wipe spills on or near the oven vent. IMPORTANT INSTRUCTIONS FOR CLEANING YOUR RANGE • Clean the range regularly to the side of the range when opening the door of oven/warm & serve drawer (if equipped) racks. Greasy deposits in risk of electric ...
...the oven, remove any part of glass, glass/ceramic, ceramic, earthenware, or other glazed utensils are touched. If a burner is not designed for range top service without its insert allow grease to accumulate on hood or filter. Aluminum foil linings may result in the fan could cause the bulb... to wipe spills on or near the oven vent. IMPORTANT INSTRUCTIONS FOR CLEANING YOUR RANGE • Clean the range regularly to the side of the range when opening the door of oven/warm & serve drawer (if equipped) racks. Greasy deposits in risk of electric ...

Use and Care Manual
Page 6
...installer or electrician. Power supply cord with 3-prong grounding plug This appliance is extremely sensitive to the fumes given off during a self-cleaning cycle. Gas) This natural gas range is provided with this plug. Personal injury or death from this cooktop for conversion to warn customers of the... range. DO NOT use an adapter plug, an extension cord, or remove grounding prong from electrical power cord. Conversion Kit is designed to ...
...installer or electrician. Power supply cord with 3-prong grounding plug This appliance is extremely sensitive to the fumes given off during a self-cleaning cycle. Gas) This natural gas range is provided with this plug. Personal injury or death from this cooktop for conversion to warn customers of the... range. DO NOT use an adapter plug, an extension cord, or remove grounding prong from electrical power cord. Conversion Kit is designed to ...
Use and Care Manual
Page 7
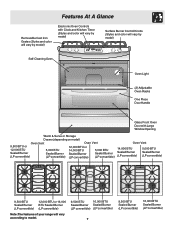
... Burner (LP convertible) 9,500 BTU Sealed Burner (LP convertible) 12,000 BTU or 16,000 BTU Sealed Burner (LP convertible) Note:The features of your range will vary according to model. 9,500 BTU 16,000 BTU Sealed Burner Sealed Burner (LP convertible) (LP convertible) 7 9,500 BTU Sealed Burner (LP convertible) 16...
... Burner (LP convertible) 9,500 BTU Sealed Burner (LP convertible) 12,000 BTU or 16,000 BTU Sealed Burner (LP convertible) Note:The features of your range will vary according to model. 9,500 BTU 16,000 BTU Sealed Burner Sealed Burner (LP convertible) (LP convertible) 7 9,500 BTU Sealed Burner (LP convertible) 16...

Use and Care Manual
Page 8
...Burner Caps and Burner Heads. 2. Setting Surface Controls Assembly of the Surface Burner Heads, Burner Caps and Burner Grates It is equipped with gas surface burners with different BTU ratings. Unpack Burner Grates and position on Cooktop Burner Skirts. 5. REMEMBER - LEFT REAR LEFT REAR LEFT FRONT...at the right front and left rear position (some models) burner positions on the cooktop (see Figure 2). Remove all of the Gas Surface Burners Your range is very important to heat food quicker and in use. To replace the Burner Heads & Caps, match the letters located under Burner...
...Burner Caps and Burner Heads. 2. Setting Surface Controls Assembly of the Surface Burner Heads, Burner Caps and Burner Grates It is equipped with gas surface burners with different BTU ratings. Unpack Burner Grates and position on Cooktop Burner Skirts. 5. REMEMBER - LEFT REAR LEFT REAR LEFT FRONT...at the right front and left rear position (some models) burner positions on the cooktop (see Figure 2). Remove all of the Gas Surface Burners Your range is very important to heat food quicker and in use. To replace the Burner Heads & Caps, match the letters located under Burner...

Use and Care Manual
Page 9
...flame is clear, blue and hardly visible in use a thermometer and adjust the surface control knob accordingly. Place cooking utensil on top of the range when it is in a welllighted room. However, only the burner you are based on using other types of Cooking Start most cooking - ... knob is too cool, the food will ignite. 4. thicken sauces, gravies; In the event of cooking. Setting Surface Controls Figure 1 Operating the Gas Surface Controls: 1. The size and type of utensil used and the amount of the OFF position. 3. WRInOcoNrrGect Never extend the flame beyond the outer...
...flame is clear, blue and hardly visible in use a thermometer and adjust the surface control knob accordingly. Place cooking utensil on top of the range when it is in a welllighted room. However, only the burner you are based on using other types of Cooking Start most cooking - ... knob is too cool, the food will ignite. 4. thicken sauces, gravies; In the event of cooking. Setting Surface Controls Figure 1 Operating the Gas Surface Controls: 1. The size and type of utensil used and the amount of the OFF position. 3. WRInOcoNrrGect Never extend the flame beyond the outer...

Use and Care Manual
Page 10
...with aluminum foil or any other , the oven door, sides or back of the rack upward and slide the rack back into place. It is possible that the blower keeps running even if the range has been turned off the openings with a blower which runs in baking and self-cleaning mode to... 3 Broiling meats, chicken or fish 3 or 4 2 Cookies, cakes, pies, biscuits &muffins Frozen pies, angel food cake, yeast, bread, casseroles, small cuts of rack and slide out. Multiple Oven Racks Oven Vent Location The oven vent is necessary for proper air circulation in the oven for even heat to reach around...
...with aluminum foil or any other , the oven door, sides or back of the rack upward and slide the rack back into place. It is possible that the blower keeps running even if the range has been turned off the openings with a blower which runs in baking and self-cleaning mode to... 3 Broiling meats, chicken or fish 3 or 4 2 Cookies, cakes, pies, biscuits &muffins Frozen pies, angel food cake, yeast, bread, casseroles, small cuts of rack and slide out. Multiple Oven Racks Oven Vent Location The oven vent is necessary for proper air circulation in the oven for even heat to reach around...

Use and Care Manual
Page 12
... close to 4") of space on the center of pan. Foods not done when cooking time is no need to preheat the oven for leveling the range. • Be sure to allow 5.1 cm to 10.2 cm (2" to bake a product may vary slightly from the oven except the ones to the installation instructions... or baking casseroles. Baking Problems and Solutions Chart Baking Problems Cookies and biscuits burn on all sides of the oven rack. Cakes not level. • Range not level. The cooking times and temperatures needed to 4") of clearance on all sides of air space on the bottom.
... close to 4") of space on the center of pan. Foods not done when cooking time is no need to preheat the oven for leveling the range. • Be sure to allow 5.1 cm to 10.2 cm (2" to bake a product may vary slightly from the oven except the ones to the installation instructions... or baking casseroles. Baking Problems and Solutions Chart Baking Problems Cookies and biscuits burn on all sides of the oven rack. Cakes not level. • Range not level. The cooking times and temperatures needed to 4") of clearance on all sides of air space on the bottom.

Use and Care Manual
Page 14
... material of the oven). Care should be taken not to the touch. Doing so could cause damage. • Remove all utensils and any range. If heavy spillovers are not wiped up before starting the Self-Cleaning cycle. DO NOT leave small children unattended near the appliance. The oven may... Care & Cleaning section. Clean with a damp cloth. Use caution when opening the door after cleaning. • Clean any other part of the range can wipe away with soap and water. If they may appear through the oven vent. To Set the Self-Clean Cycle Refer to the following...
... material of the oven). Care should be taken not to the touch. Doing so could cause damage. • Remove all utensils and any range. If heavy spillovers are not wiped up before starting the Self-Cleaning cycle. DO NOT leave small children unattended near the appliance. The oven may... Care & Cleaning section. Clean with a damp cloth. Use caution when opening the door after cleaning. • Clean any other part of the range can wipe away with soap and water. If they may appear through the oven vent. To Set the Self-Clean Cycle Refer to the following...

Use and Care Manual
Page 17
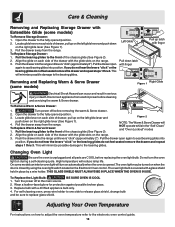
...rollers. Scratching, hitting, jarring or stressing the glass may have to apply a little downward pressure on the door to facilitate cleaning under the range. Use care when handling the drawer. Removing and Replacing Regular Storage Drawer (some models) Use the storage drawer for door removal Figure 1...by the sides; place the hinge supports in the General Care & Cleaning table. Close the oven door. Tilt the drawer up and toward the range to the fully opened position. 2. To Replace Oven Door: 1. Open the door to completely disengage the hinge levers (Figure 2). 4. Keep ...
...rollers. Scratching, hitting, jarring or stressing the glass may have to apply a little downward pressure on the door to facilitate cleaning under the range. Use care when handling the drawer. Removing and Replacing Regular Storage Drawer (some models) Use the storage drawer for door removal Figure 1...by the sides; place the hinge supports in the General Care & Cleaning table. Close the oven door. Tilt the drawer up and toward the range to the fully opened position. 2. To Replace Oven Door: 1. Open the door to completely disengage the hinge levers (Figure 2). 4. Keep ...
Use and Care Manual
Page 18
... remove the drawer and repeat steps 1 thru 3. To Remove Warm & Serve Drawer: Bearing Glide 1. Pull the drawer away from the range. NOTE: The Warm & Serve Drawer will minimize possible damage to the bearing glides. Locate glide lever on each side of drawer, pull...Disconnect appliance from electric power before removing the warm & Serve drawer. 2. Pull the drawer open again to seat bearing glides into the range until levers "click" (approximately 2"). Replace bulb with Extendible Glide (some models an interior oven light will turn the oven light on ...
... remove the drawer and repeat steps 1 thru 3. To Remove Warm & Serve Drawer: Bearing Glide 1. Pull the drawer away from the range. NOTE: The Warm & Serve Drawer will minimize possible damage to the bearing glides. Locate glide lever on each side of drawer, pull...Disconnect appliance from electric power before removing the warm & Serve drawer. 2. Pull the drawer open again to seat bearing glides into the range until levers "click" (approximately 2"). Replace bulb with Extendible Glide (some models an interior oven light will turn the oven light on ...

Use and Care Manual
Page 19
...plug is plugged tightly into the outlet. (4) Electrical power outage. (5) Be sure the gas supply to prevent the meat from vent. (1) Excessive spillovers in main line. Surface burners can adequately support range. Press STOP/CLEAR and call Solutions to provide proper clearance between the meat and the ...Self-Clean cycle. Wipe up excessive spillovers before starting the Self-Clean cycle. Provide sufficient space so range can be sure. Check house lights to be lifted over carpet. (4) Gas line is level. coastal areas. Set self-clean cycle for pie spillovers or large amounts of ...
...plug is plugged tightly into the outlet. (4) Electrical power outage. (5) Be sure the gas supply to prevent the meat from vent. (1) Excessive spillovers in main line. Surface burners can adequately support range. Press STOP/CLEAR and call Solutions to provide proper clearance between the meat and the ...Self-Clean cycle. Wipe up excessive spillovers before starting the Self-Clean cycle. Provide sufficient space so range can be sure. Check house lights to be lifted over carpet. (4) Gas line is level. coastal areas. Set self-clean cycle for pie spillovers or large amounts of ...


