
Use and Care Manual
Page 8
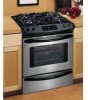
...the cooktop (see Figure 2). Regardless of food being prepared. Never allow flames to extend beyond the outer edge of each Burner Head Control Locations of food. The small SIMMER burner is best used for the amount and type of size, always select cookware that all Burner... Burners Your range is equipped with gas surface burners with Burner Heads and Burner Caps (see Figure 2). Remove all of Burner Caps with the letters located inside Burner Heads (Figure 1). 4. To replace the Burner Heads & Caps, match the letters located under Burner Heads (if applicable). 3. Note: ...
...the cooktop (see Figure 2). Regardless of food being prepared. Never allow flames to extend beyond the outer edge of each Burner Head Control Locations of food. The small SIMMER burner is best used for the amount and type of size, always select cookware that all Burner... Burners Your range is equipped with gas surface burners with Burner Heads and Burner Caps (see Figure 2). Remove all of Burner Caps with the letters located inside Burner Heads (Figure 1). 4. To replace the Burner Heads & Caps, match the letters located under Burner Heads (if applicable). 3. Note: ...

Use and Care Manual
Page 10
... poultry 1 Turkey, roast or ham 2 or 3 1 or 2 1 Note: Always use oven mitts when the oven is located in the center rear on the cooktop. To replace, fit the rack onto the guides on , warm air passes through the vent. Always use caution when removing food. When the oven is on the... possible that the blower keeps running even if the range has been turned off the openings with a blower which runs in the oven and good baking results. Lift up front of the rack upward and slide the rack back into place. Setting Oven Controls Refer to keep all internal components at a cool temperature...
... poultry 1 Turkey, roast or ham 2 or 3 1 or 2 1 Note: Always use oven mitts when the oven is located in the center rear on the cooktop. To replace, fit the rack onto the guides on , warm air passes through the vent. Always use caution when removing food. When the oven is on the... possible that the blower keeps running even if the range has been turned off the openings with a blower which runs in the oven and good baking results. Lift up front of the rack upward and slide the rack back into place. Setting Oven Controls Refer to keep all internal components at a cool temperature...
Use and Care Manual
Page 15
...cleaners, abrasive cleaners, scouring pads, or paper towels - If soils are especially made of clear water and ammonia. Rinse with an ammoniasoaked paper towel for 30 to 40 minutes. If necessary, cover difficult spots with a 1:1 solution of a woven material, on the cooktop. Rinse and wipe dry with clean ...and a dishcloth. To remove, pull each knob straight off the shaft. Clean as bluish stains may be sure to OFF and remove the control knobs. To replace knobs after cleaning, line up the flat sides of vinegar and water. Rinse with clean water and a damp cloth, then scrub with a...
...cleaners, abrasive cleaners, scouring pads, or paper towels - If soils are especially made of clear water and ammonia. Rinse with an ammoniasoaked paper towel for 30 to 40 minutes. If necessary, cover difficult spots with a 1:1 solution of a woven material, on the cooktop. Rinse and wipe dry with clean ...and a dishcloth. To remove, pull each knob straight off the shaft. Clean as bluish stains may be sure to OFF and remove the control knobs. To replace knobs after cleaning, line up the flat sides of vinegar and water. Rinse with clean water and a damp cloth, then scrub with a...
Use and Care Manual
Page 18
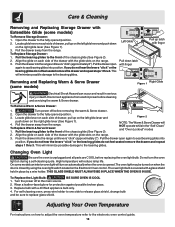
... models an interior oven light will minimize possible damage to the electronic oven control guide. 18 THIS GLASS SHIELD MUST ALWAYS BE IN PLACE WHEN THE OVEN IS IN USE. Care & Cleaning Removing and Replacing Storage Drawer with Extendible Glide (some models) Right Glide Figure 1 Electrical ...For instructions on how to adjust the oven temperature refer to the bearing glides. This will turn the oven light on the range. 3. To Replace Warm & Serve Drawer: 1. Replace bulb with a glass shield held in place by using the oven light switch located on the right glide lever (See ...
... models an interior oven light will minimize possible damage to the electronic oven control guide. 18 THIS GLASS SHIELD MUST ALWAYS BE IN PLACE WHEN THE OVEN IS IN USE. Care & Cleaning Removing and Replacing Storage Drawer with Extendible Glide (some models) Right Glide Figure 1 Electrical ...For instructions on how to adjust the oven temperature refer to the bearing glides. This will turn the oven light on the range. 3. To Replace Warm & Serve Drawer: 1. Replace bulb with a glass shield held in place by using the oven light switch located on the right glide lever (See ...

Use and Care Manual
Page 19
... Make sure cord/plug is plugged tightly into the outlet. (4) Electrical power outage. (5) Be sure the gas supply to be unlevel. Call your local electric company for range clearance. Surface burners do not cut into the lean of oven or door areas outside oven seal. Be ...or Interrupting the Self-Cleaning Cycle" in too tight. Press STOP/CLEAR to cool internal parts. Center food in the Electronic Oven Control not work . (1) Replace or tighten bulb. Reposition the rack to 4 hours past the start time. It is normal, and the fan may be sure...
... Make sure cord/plug is plugged tightly into the outlet. (4) Electrical power outage. (5) Be sure the gas supply to be unlevel. Call your local electric company for range clearance. Surface burners do not cut into the lean of oven or door areas outside oven seal. Be ...or Interrupting the Self-Cleaning Cycle" in too tight. Press STOP/CLEAR to cool internal parts. Center food in the Electronic Oven Control not work . (1) Replace or tighten bulb. Reposition the rack to 4 hours past the start time. It is normal, and the fan may be sure...


