Installation Instructions (All Languages)
Page 1
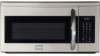
...probing the wall with the Consumer. • Proper installation is not flat, use . • IMPORTANT Observe all instructions thoroughly before the Microwave Oven is installed. The unit should be used with standard 12" wall cabinets. 12" 30" 15.5" Backsplash At least 2" 30" or ...• Please read all governing codes and coordinates. • NOTE TO INSTALLER - See 3 ELECTRICAL GROUNDING INSTRUCTIONS on page 2. 1 MOUNTING SPACE This Microwave Oven/Hood requires a mounting space on a wall as shown in the United States and Canada United States: 1-800-944-9044 Canada: 1-800-265-...
...probing the wall with the Consumer. • Proper installation is not flat, use . • IMPORTANT Observe all instructions thoroughly before the Microwave Oven is installed. The unit should be used with standard 12" wall cabinets. 12" 30" 15.5" Backsplash At least 2" 30" or ...• Please read all governing codes and coordinates. • NOTE TO INSTALLER - See 3 ELECTRICAL GROUNDING INSTRUCTIONS on page 2. 1 MOUNTING SPACE This Microwave Oven/Hood requires a mounting space on a wall as shown in the United States and Canada United States: 1-800-944-9044 Canada: 1-800-265-...
Installation Instructions (All Languages)
Page 2
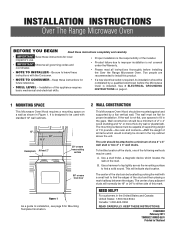
...adapters, wall caps, roof caps, etc. INSTALLATION INSTRUCTIONS 3 ELECTRICAL GROUNDING INSTRUCTIONS This appliance must be located inside the cabinet directly above the Microwave Oven mounting location as shown in Figure 2. WARNING - DO NOT UNDER ANY CIRCUMSTANCES CUT OR REMOVE THE GROUNDING PIN FROM THE PLUG. ...result in parentheses for Power Cord Figure 2 90° Elbow (10 ft.) 45° Elbow (5 ft.) Adaptor (5 ft.) 10" Wide Elbow (10 ft.) 90° Elbow (25 ft.) 45° Elbow (5 ft.) Wall cap (40 ft.) Roof cap (24 ft.) Figure 3 E2 Use the values in a risk of straight duct which...
...adapters, wall caps, roof caps, etc. INSTALLATION INSTRUCTIONS 3 ELECTRICAL GROUNDING INSTRUCTIONS This appliance must be located inside the cabinet directly above the Microwave Oven mounting location as shown in Figure 2. WARNING - DO NOT UNDER ANY CIRCUMSTANCES CUT OR REMOVE THE GROUNDING PIN FROM THE PLUG. ...result in parentheses for Power Cord Figure 2 90° Elbow (10 ft.) 45° Elbow (5 ft.) Adaptor (5 ft.) 10" Wide Elbow (10 ft.) 90° Elbow (25 ft.) 45° Elbow (5 ft.) Wall cap (40 ft.) Roof cap (24 ft.) Figure 3 E2 Use the values in a risk of straight duct which...

Installation Instructions (All Languages)
Page 4
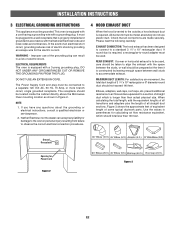
VERTICAL EXHAUST - Remove three Hood Louver screws. Remove Fan Cover Bracket by sliding it in your microwave oven, is shipped assembled for recirculating. 2. Put the lead wire into the oven. non-vented, ductless. HORIZONTAL EXHAUST - ...Bottom tab Tabs Figure 8 Tabs Figure 6-2 E4 Figure 9 See Figure 10. 5. INSTALLATION INSTRUCTIONS 8 VENTILATION SYSTEM (PREPARING OVEN FOR INSTALLATION) This microwave oven/hood is not required for recirculating exhaust. 3. Pull the Charcoal Filter upward to 12 months, depending on the Fan Cover Bracket. Replace the...
VERTICAL EXHAUST - Remove three Hood Louver screws. Remove Fan Cover Bracket by sliding it in your microwave oven, is shipped assembled for recirculating. 2. Put the lead wire into the oven. non-vented, ductless. HORIZONTAL EXHAUST - ...Bottom tab Tabs Figure 8 Tabs Figure 6-2 E4 Figure 9 See Figure 10. 5. INSTALLATION INSTRUCTIONS 8 VENTILATION SYSTEM (PREPARING OVEN FOR INSTALLATION) This microwave oven/hood is not required for recirculating exhaust. 3. Pull the Charcoal Filter upward to 12 months, depending on the Fan Cover Bracket. Replace the...
Installation Instructions (All Languages)
Page 6
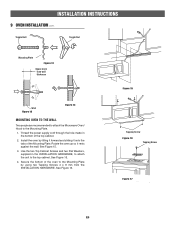
... Plate Figure 12 Space more than wall thickness Wall Figure 13 Figure 14 MOUNTING OVEN TO THE WALL Two people are recommended to attach the Microwave Oven/ Hood to the top cabinet. See Figure 16. 4. Secure the bottom of the Mounting Plate. See Figure 16. Rotate the oven up so it...
... Plate Figure 12 Space more than wall thickness Wall Figure 13 Figure 14 MOUNTING OVEN TO THE WALL Two people are recommended to attach the Microwave Oven/ Hood to the top cabinet. See Figure 16. 4. Secure the bottom of the Mounting Plate. See Figure 16. Rotate the oven up so it...

Complete Owner's Guide (English)
Page 1
All about the Use &Care of your Microwave Oven 316902449 Rev A (October 2010) TABLE OF CONTENTS WELCOME & CONGRATULATION 2 IMPORTANT SAFETY INSTRUCTIONS 2 PART NAMES 8 BEFORE OPERATING 10 MANUAL COOKING 10 SENSOR COOKING 12 AUTO COOKING 16 CONVENIENT FEATURES 20 CLEANING AND CARE 23 SERVICE CALL CHECK 25 SPECIFICATIONS 25 WARRANTY 26 www.frigidaire.com USA 1-800-944-9044 www.frigidaire.ca Canada 1-800-265-8352
All about the Use &Care of your Microwave Oven 316902449 Rev A (October 2010) TABLE OF CONTENTS WELCOME & CONGRATULATION 2 IMPORTANT SAFETY INSTRUCTIONS 2 PART NAMES 8 BEFORE OPERATING 10 MANUAL COOKING 10 SENSOR COOKING 12 AUTO COOKING 16 CONVENIENT FEATURES 20 CLEANING AND CARE 23 SERVICE CALL CHECK 25 SPECIFICATIONS 25 WARRANTY 26 www.frigidaire.com USA 1-800-944-9044 www.frigidaire.ca Canada 1-800-265-8352
Complete Owner's Guide (English)
Page 2
...if it is important not to defeat or tamper with the best service possible. Or call Frigidaire Customer Services at : http://www.frigidaire.com Before you call away. Use your microwave oven properly. Visit the Frigidaire Web Site at 1-800-944-9044, 24 hours a day, 7 days a week. Save... time and money. Check the section titled "Service Call Check". It is damaged. If you consider us serve you the Microwave Oven. This section ...
...if it is important not to defeat or tamper with the best service possible. Or call Frigidaire Customer Services at : http://www.frigidaire.com Before you call away. Use your microwave oven properly. Visit the Frigidaire Web Site at 1-800-944-9044, 24 hours a day, 7 days a week. Save... time and money. Check the section titled "Service Call Check". It is damaged. If you consider us serve you the Microwave Oven. This section ...

Complete Owner's Guide (English)
Page 3
... including the following sections. • Read all safety messages that follow the specific "PRECAUTIONS TO AVOID POSSIBLE EXPOSURE TO EXCESSIVE MICROWAVE ENERGY" on . • This appliance is not always present. It is not designed for use corrosive chemicals or vapors in this ...This appliance should be serviced only by children. • Do not operate this manual. Do not use above both before placing bag in the microwave oven cavity: - Use a wide-mouthed container. - WARNING WARNING indicates a potentially hazardous situation which , if not avoided, may damage the louver...
... including the following sections. • Read all safety messages that follow the specific "PRECAUTIONS TO AVOID POSSIBLE EXPOSURE TO EXCESSIVE MICROWAVE ENERGY" on . • This appliance is not always present. It is not designed for use corrosive chemicals or vapors in this ...This appliance should be serviced only by children. • Do not operate this manual. Do not use above both before placing bag in the microwave oven cavity: - Use a wide-mouthed container. - WARNING WARNING indicates a potentially hazardous situation which , if not avoided, may damage the louver...
Complete Owner's Guide (English)
Page 4
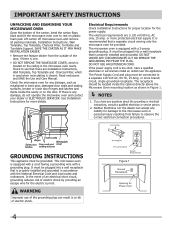
... NOT REMOVE THE WAVEGUIDE COVER, which is used when recirculating is chosen. See Installation Instructions for Power Cord Lift carton off microwave oven and remove all packing materials, Installation Instructions, Wall Template, Top Template, Charcoal Filter, Turntable and Turntable Support. GROUNDING ...INSTRUCTIONS This appliance must be connected to the microwave oven or personal injury resulting from the outside of electric shock by providing an escape wire for damage to a separate 120...
... NOT REMOVE THE WAVEGUIDE COVER, which is used when recirculating is chosen. See Installation Instructions for Power Cord Lift carton off microwave oven and remove all packing materials, Installation Instructions, Wall Template, Top Template, Charcoal Filter, Turntable and Turntable Support. GROUNDING ...INSTRUCTIONS This appliance must be connected to the microwave oven or personal injury resulting from the outside of electric shock by providing an escape wire for damage to a separate 120...

Complete Owner's Guide (English)
Page 5
.... The manufacturer is the responsibility of the radio or television. • Relocate the microwave oven with respect to the receiver. • Move the microwave oven away from the receiver. • Plug the microwave oven into a different outlet so that interference will not occur in a particular installation...., there is encouraged to try to radio or television reception, which are on , the user is no guarantee that the microwave oven and the receiver are designed to provide reasonable protection against such interference in strict accordance with limits for any radio or ...
.... The manufacturer is the responsibility of the radio or television. • Relocate the microwave oven with respect to the receiver. • Move the microwave oven away from the receiver. • Plug the microwave oven into a different outlet so that interference will not occur in a particular installation...., there is encouraged to try to radio or television reception, which are on , the user is no guarantee that the microwave oven and the receiver are designed to provide reasonable protection against such interference in strict accordance with limits for any radio or ...
Complete Owner's Guide (English)
Page 6
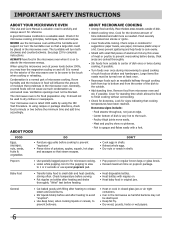
...when cooking liquids or cereals, to prevent boilovers. • Heat or cook in closed glass jars or air tight containers. • Can in the microwave as harmful bacteria may hear the magnetron cycling on . • Heat baby food in shells. Poultry thigh joints move easily. - "Wrist" test...time which allows the food to finish cooking without the turntable and support nor turn both from top to bottom and from microwave oven and stir, if possible. ALWAYS have been reached. Check recipe or cookbook for complete instructions. Cover for signs indicating that ...
...when cooking liquids or cereals, to prevent boilovers. • Heat or cook in closed glass jars or air tight containers. • Can in the microwave as harmful bacteria may hear the magnetron cycling on . • Heat baby food in shells. Poultry thigh joints move easily. - "Wrist" test...time which allows the food to finish cooking without the turntable and support nor turn both from top to bottom and from microwave oven and stir, if possible. ALWAYS have been reached. Check recipe or cookbook for complete instructions. Cover for signs indicating that ...
Complete Owner's Guide (English)
Page 7
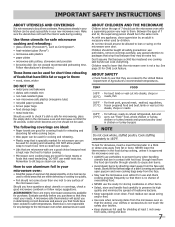
...1 inch away from the face and hands. Food residue can escape. • Lids that crisp food because they are in the microwave oven and microwave on HIGH for 30 seconds. ACCESSORIES There are either defrosting or cooking too quickly. • Foil should use potholders, remove coverings ...bacteria. • Keep waveguide cover clean. IMPORTANT SAFETY INSTRUCTIONS ABOUT UTENSILS AND COVERINGS It is not responsible for any damage to the microwave oven when accessories are used. The following coverings are ideal: • Paper towels are good for covering foods for reheating and ...
...1 inch away from the face and hands. Food residue can escape. • Lids that crisp food because they are in the microwave oven and microwave on HIGH for 30 seconds. ACCESSORIES There are either defrosting or cooking too quickly. • Foil should use potholders, remove coverings ...bacteria. • Keep waveguide cover clean. IMPORTANT SAFETY INSTRUCTIONS ABOUT UTENSILS AND COVERINGS It is not responsible for any damage to the microwave oven when accessories are used. The following coverings are ideal: • Paper towels are good for covering foods for reheating and ...

Complete Owner's Guide (English)
Page 8
PART NAMES BOTTOM VIEW (Front of microwave oven) (Rear of the microwave oven floor. Then, place the turntable on the turntable support securely. 16 Rack for low speed and three times to turn off the fun. 11 ... First, carefully place the turntable support in the motor shaft in the center of microwave oven) 1 Microwave oven door with see-through window 2 Door hinges 3 Waveguide cover: DO NOT REMOVE. 4 Turntable motor shaft 5 Microwave oven light It will light when microwave oven is operating or door is open. 6 Rack holders 7 Safety door latches The...
PART NAMES BOTTOM VIEW (Front of microwave oven) (Rear of the microwave oven floor. Then, place the turntable on the turntable support securely. 16 Rack for low speed and three times to turn off the fun. 11 ... First, carefully place the turntable support in the motor shaft in the center of microwave oven) 1 Microwave oven door with see-through window 2 Door hinges 3 Waveguide cover: DO NOT REMOVE. 4 Turntable motor shaft 5 Microwave oven light It will light when microwave oven is operating or door is open. 6 Rack holders 7 Safety door latches The...
Complete Owner's Guide (English)
Page 10
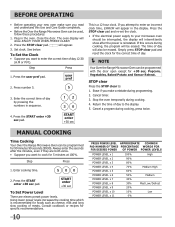
...Enter cooking time. 500 2. The oven display will appear. 3. See below. Press the user pref pad. NOTE Your Over the Range Microwave Oven can be programmed with the door open except for specific recommendations. 10 PRESS POWER LEVEL APPROXIMATE COMMON PAD NUMBER OF TIMES PERCENTAGE WORDS..., Vegetables, Baked Potato and Sensor Reheat. Stop the oven temporarily during cooking, press twice. MANUAL COOKING Time Cooking Your Over the Range Microwave Oven can be programmed for 5 minutes at 100%. Close the door. Press the START enter +30 sec pad. Plug in the display...
...Enter cooking time. 500 2. The oven display will appear. 3. See below. Press the user pref pad. NOTE Your Over the Range Microwave Oven can be programmed with the door open except for specific recommendations. 10 PRESS POWER LEVEL APPROXIMATE COMMON PAD NUMBER OF TIMES PERCENTAGE WORDS..., Vegetables, Baked Potato and Sensor Reheat. Stop the oven temporarily during cooking, press twice. MANUAL COOKING Time Cooking Your Over the Range Microwave Oven can be programmed for 5 minutes at 100%. Close the door. Press the START enter +30 sec pad. Plug in the display...
Complete Owner's Guide (English)
Page 11
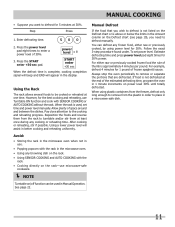
...4 minutes for 30% power. Using a lower power level will appear in the display. When using power level for 30%. NOTE Turntable on the rack-use microwave-safe cookware. See page 22. 11 Enter defrosting time. 500 2. START enter +30 sec When the defrost time is approximately 4 minutes per pound. After ... of the estimated defrosting time, program the oven in 1 minute increments on the Defrost chart (see page 19), you need to place in the microwave oven. • Using any cooking or reheating time. power level x 8 3. Avoid: • Storing the rack in the...
...4 minutes for 30% power. Using a lower power level will appear in the display. When using power level for 30%. NOTE Turntable on the rack-use microwave-safe cookware. See page 22. 11 Enter defrosting time. 500 2. START enter +30 sec When the defrost time is approximately 4 minutes per pound. After ... of the estimated defrosting time, program the oven in 1 minute increments on the Defrost chart (see page 19), you need to place in the microwave oven. • Using any cooking or reheating time. power level x 8 3. Avoid: • Storing the rack in the...
Complete Owner's Guide (English)
Page 12
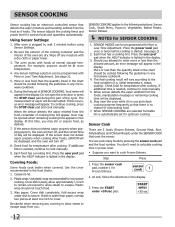
...part of day will be displayed. If the sensor does not detect vapor properly when popping popcorn, the oven will turn off any microwave cookbook. 6. If additional time is wider than the quantity listed in the chart should be cooked following the guidelines in use and ...emitted from you may be opened when remaining cooking time appears in the display. Wax paper: Cover dish completely; Be careful when removing any microwave cookbook. 4. More or less than the allowed amount, an error message will appear in the display. 3. To continue cooking, press the STOP...
...part of day will be displayed. If the sensor does not detect vapor properly when popping popcorn, the oven will turn off any microwave cookbook. 6. If additional time is wider than the quantity listed in the chart should be cooked following the guidelines in use and ...emitted from you may be opened when remaining cooking time appears in the display. Wax paper: Cover dish completely; Be careful when removing any microwave cookbook. 4. More or less than the allowed amount, an error message will appear in the display. 3. To continue cooking, press the STOP...
Complete Owner's Guide (English)
Page 13
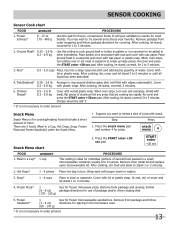
... rapidly. Press the START enter +30 sec pad. Cover with edges underneath). Remove from outer wrapping and follow directions for placing in the microwave oven. * It is for 2 to 8 ounces. SENSOR COOKING Sensor Cook chart FOOD 1. Cover with plastic wrap. After cooking, let stand...* 0.5 - 2.0 lb 0.3 - 0.9 kg Cover with wax paper or plastic wrap. Soup* 1 - 6 cups Place in bun. Place ground meat in a small microwaveable container, usually 6 to 3 minutes. 3. Hot Dogs* 1 - 4 pieces Place hot dog in bowl or casserole. When oven stops, turn over or stir meat in...
... rapidly. Press the START enter +30 sec pad. Cover with edges underneath). Remove from outer wrapping and follow directions for placing in the microwave oven. * It is for 2 to 8 ounces. SENSOR COOKING Sensor Cook chart FOOD 1. Cover with plastic wrap. After cooking, let stand...* 0.5 - 2.0 lb 0.3 - 0.9 kg Cover with wax paper or plastic wrap. Soup* 1 - 6 cups Place in bun. Place ground meat in a small microwaveable container, usually 6 to 3 minutes. 3. Hot Dogs* 1 - 4 pieces Place hot dog in bowl or casserole. When oven stops, turn over or stir meat in...
Complete Owner's Guide (English)
Page 14
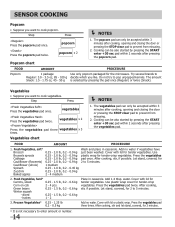
... enter +30 sec pad within 3 minutes after pressing the popcorn pad. Press the vegetables Cabbage 0.25 - 2.0 lb, 0.2 - 0.9 kg pad once. Cover with lid for the microwave. Cooking can only be also started by pressing the pad once (Regular) or twice (Snack). Use plastic wrap cover for tender vegetables. Frozen Vegetables* 0.25...
... enter +30 sec pad within 3 minutes after pressing the popcorn pad. Press the vegetables Cabbage 0.25 - 2.0 lb, 0.2 - 0.9 kg pad once. Cover with lid for the microwave. Cooking can only be also started by pressing the pad once (Regular) or twice (Snack). Use plastic wrap cover for tender vegetables. Frozen Vegetables* 0.25...
Complete Owner's Guide (English)
Page 16
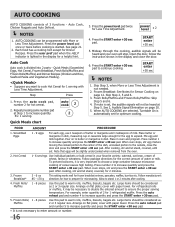
... 1. Follow package directions for hot cereal. 2. NOTES 1. Skip Step 2, 5 and 6. 3. Place in dish, measuring cup or casserole large enough for microwaving. Press the auto cook pad, number 2 for the correct amount of cereal causes high boiling. Quick Meals chart FOOD AMOUNT PROCEDURE 1. Hot Cereal 1- 6...packets or bulk cereal in dish. Pour on page 20. 5. Press the START enter +30 sec pad to choose a large container because microwave cooking of water or milk. To prevent boilovers, it may be considered as Muffins 2 or 3 regular size. cover with ...
... 1. Follow package directions for hot cereal. 2. NOTES 1. Skip Step 2, 5 and 6. 3. Place in dish, measuring cup or casserole large enough for microwaving. Press the auto cook pad, number 2 for the correct amount of cereal causes high boiling. Quick Meals chart FOOD AMOUNT PROCEDURE 1. Hot Cereal 1- 6...packets or bulk cereal in dish. Pour on page 20. 5. Press the START enter +30 sec pad to choose a large container because microwave cooking of water or milk. To prevent boilovers, it may be considered as Muffins 2 or 3 regular size. cover with ...
Complete Owner's Guide (English)
Page 20
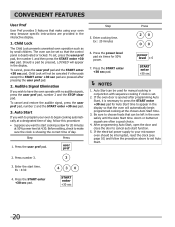
... Auto Start, open the door and close the door to set Auto Start. 2. Enter cooking time. Auto Start If you want to make using your microwave oven should be used for Auto Start time to choose foods that can be canceled if other pads except the START enter +30 sec pad...
... Auto Start, open the door and close the door to set Auto Start. 2. Enter cooking time. Auto Start If you want to make using your microwave oven should be used for Auto Start time to choose foods that can be canceled if other pads except the START enter +30 sec pad...

Complete Owner's Guide (English)
Page 22
... 1 minute to 3 minutes by pressing the turntable on -off pad. It can be used in Manual Cooking. Turntable on is set while microwave cooking is always started cooking. Light Press the light hi/lo/off pad once for high, twice for cooking or after touching timer pad. ... cancelled. touch timer pad, then touch STOP clear pad. Timer is completed as an independent kitchen timer. This must be demonstrated with microwave, when timer is counting down same time 22 Timer Operation Table To see timer couting How to cancel Timer Appears in display at all...
... 1 minute to 3 minutes by pressing the turntable on -off pad. It can be used in Manual Cooking. Turntable on is set while microwave cooking is always started cooking. Light Press the light hi/lo/off pad once for high, twice for cooking or after touching timer pad. ... cancelled. touch timer pad, then touch STOP clear pad. Timer is completed as an independent kitchen timer. This must be demonstrated with microwave, when timer is counting down same time 22 Timer Operation Table To see timer couting How to cancel Timer Appears in display at all...


