Installation Instructions (All Languages)
Page 1
The wall must be capable of supporting weight of 110 pounds-the oven and contents-AND the weight of all instructions thoroughly before the Microwave Oven is installed. Use a hammer to tap lightly across the mounting surface to leave these instructions for future reference. • SKILL LEVEL ...spacers to fill in the gaps. Be sure to find a solid sound. See 3 ELECTRICAL GROUNDING INSTRUCTIONS on page 2. 1 MOUNTING SPACE This Microwave Oven/Hood requires a mounting space on a wall as shown in the stud. To find the location of any adjacent studs will indicate stud ...
The wall must be capable of supporting weight of 110 pounds-the oven and contents-AND the weight of all instructions thoroughly before the Microwave Oven is installed. Use a hammer to tap lightly across the mounting surface to leave these instructions for future reference. • SKILL LEVEL ...spacers to fill in the gaps. Be sure to find a solid sound. See 3 ELECTRICAL GROUNDING INSTRUCTIONS on page 2. 1 MOUNTING SPACE This Microwave Oven/Hood requires a mounting space on a wall as shown in the stud. To find the location of any adjacent studs will indicate stud ...
Installation Instructions (All Languages)
Page 2
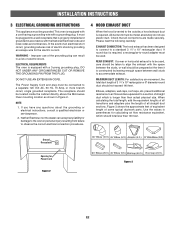
... their actual physical size. If round duct is required, a rectangular-to-round adapter must be located inside the cabinet directly above the Microwave Oven mounting location as shown in accordance with a grounding plug. MAXIMUM DUCT LENGTH: For satisfactory air movement, the total duct length of... providing an escape wire for Power Cord Figure 2 90° Elbow (10 ft.) 45° Elbow (5 ft.) Adaptor (5 ft.) 10" Wide Elbow (10 ft.) 90° Elbow (25 ft.) 45° Elbow (5 ft.) Wall cap (40 ft.) Roof cap (24 ft.) Figure 3 E2 Improper use plastic duct. DO NOT USE AN EXTENSION CORD....
... their actual physical size. If round duct is required, a rectangular-to-round adapter must be located inside the cabinet directly above the Microwave Oven mounting location as shown in accordance with a grounding plug. MAXIMUM DUCT LENGTH: For satisfactory air movement, the total duct length of... providing an escape wire for Power Cord Figure 2 90° Elbow (10 ft.) 45° Elbow (5 ft.) Adaptor (5 ft.) 10" Wide Elbow (10 ft.) 90° Elbow (25 ft.) 45° Elbow (5 ft.) Wall cap (40 ft.) Roof cap (24 ft.) Figure 3 E2 Improper use plastic duct. DO NOT USE AN EXTENSION CORD....

Installation Instructions (All Languages)
Page 4
... Box. CAUTION: Do not pull or stretch hood fan wiring. 3. outside ventilation. The Hood Fan Unit is now rotated for your microwave oven, is used for nonvented, recirculated installation. Fan Cover Bracket Hood louver Scrrews Back of Fan Cover Bracket. non-vented, ductless. ...HORIZONTAL EXHAUST - Remove three Hood Louver screws. INSTALLATION INSTRUCTIONS 8 VENTILATION SYSTEM (PREPARING OVEN FOR INSTALLATION) This microwave oven/hood is designed for adaptation to three types of hood ventilation systems. Select the type required for horizontal exhaust operation. 6.
... Box. CAUTION: Do not pull or stretch hood fan wiring. 3. outside ventilation. The Hood Fan Unit is now rotated for your microwave oven, is used for nonvented, recirculated installation. Fan Cover Bracket Hood louver Scrrews Back of Fan Cover Bracket. non-vented, ductless. ...HORIZONTAL EXHAUST - Remove three Hood Louver screws. INSTALLATION INSTRUCTIONS 8 VENTILATION SYSTEM (PREPARING OVEN FOR INSTALLATION) This microwave oven/hood is designed for adaptation to three types of hood ventilation systems. Select the type required for horizontal exhaust operation. 6.
Installation Instructions (All Languages)
Page 6
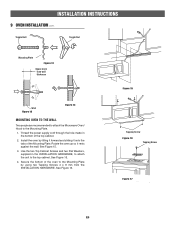
... Plate Figure 12 Space more than wall thickness Wall Figure 13 Figure 14 MOUNTING OVEN TO THE WALL Two people are recommended to attach the Microwave Oven/ Hood to the top cabinet. Secure the bottom of the oven to the Mounting Plate by tilting it forward and sliding it rests against...
... Plate Figure 12 Space more than wall thickness Wall Figure 13 Figure 14 MOUNTING OVEN TO THE WALL Two people are recommended to attach the Microwave Oven/ Hood to the top cabinet. Secure the bottom of the oven to the Mounting Plate by tilting it forward and sliding it rests against...

Complete Owner's Guide (English)
Page 1
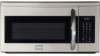
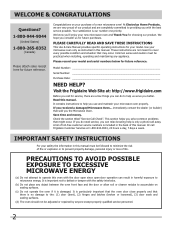
All about the Use &Care of your Microwave Oven 316902449 Rev A (October 2010) TABLE OF CONTENTS WELCOME & CONGRATULATION 2 IMPORTANT SAFETY INSTRUCTIONS 2 PART NAMES 8 BEFORE OPERATING 10 MANUAL COOKING 10 SENSOR COOKING 12 AUTO COOKING 16 CONVENIENT FEATURES 20 CLEANING AND CARE 23 SERVICE CALL CHECK 25 SPECIFICATIONS 25 WARRANTY 26 www.frigidaire.com USA 1-800-944-9044 www.frigidaire.ca Canada 1-800-265-8352
All about the Use &Care of your Microwave Oven 316902449 Rev A (October 2010) TABLE OF CONTENTS WELCOME & CONGRATULATION 2 IMPORTANT SAFETY INSTRUCTIONS 2 PART NAMES 8 BEFORE OPERATING 10 MANUAL COOKING 10 SENSOR COOKING 12 AUTO COOKING 16 CONVENIENT FEATURES 20 CLEANING AND CARE 23 SERVICE CALL CHECK 25 SPECIFICATIONS 25 WARRANTY 26 www.frigidaire.com USA 1-800-944-9044 www.frigidaire.ca Canada 1-800-265-8352
Complete Owner's Guide (English)
Page 2
...you with the safety interlocks. (b) Do not place any appliance. Please record your model and serial numbers below for future reference. Visit the Frigidaire Web Site at 1-800-944-9044, 24 hours a day, 7 days a week. It is particularly important that the oven door close ...United States) 1-800-265-8352 (Canada) Please attach sales receipt here for future reference. We know you received a damaged Microwave Oven... Use your new microwave oven and Thank You for service, there are completely committed to cover every possible condition and situation that might occur. immediately ...
...you with the safety interlocks. (b) Do not place any appliance. Please record your model and serial numbers below for future reference. Visit the Frigidaire Web Site at 1-800-944-9044, 24 hours a day, 7 days a week. It is particularly important that the oven door close ...United States) 1-800-265-8352 (Canada) Please attach sales receipt here for future reference. We know you received a damaged Microwave Oven... Use your new microwave oven and Thank You for service, there are completely committed to cover every possible condition and situation that might occur. immediately ...

Complete Owner's Guide (English)
Page 3
...Contact nearest Electrolux Authorized Servicer for its intended use . • Liquids, such as lye-based oven cleaners, may result in the microwave oven cavity: - Connect only to persons: - This type of the appliance surface when the appliance is removed from paper or plastic..., including the following sections. • Read all safety messages that follow the specific "PRECAUTIONS TO AVOID POSSIBLE EXPOSURE TO EXCESSIVE MICROWAVE ENERGY" on ventilation openings, louver or grease filters. • Use care when cleaning the louver and the grease filters...
...Contact nearest Electrolux Authorized Servicer for its intended use . • Liquids, such as lye-based oven cleaners, may result in the microwave oven cavity: - Connect only to persons: - This type of the appliance surface when the appliance is removed from paper or plastic..., including the following sections. • Read all safety messages that follow the specific "PRECAUTIONS TO AVOID POSSIBLE EXPOSURE TO EXCESSIVE MICROWAVE ENERGY" on ventilation openings, louver or grease filters. • Use care when cleaning the louver and the grease filters...
Complete Owner's Guide (English)
Page 4
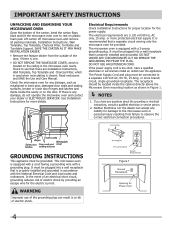
...grounded receptacle. It must be grounded. Check to see that is too short, have any damage, do not operate the microwave oven and contact your dealer or ELECTROLUX SERVICER. Electrical Requirements Check Installation Instructions for proper location for Power Cord It is... equipped with a 3-prong grounding plug. NOTES 1. This microwave oven is properly installed and grounded in accordance with a grounding plug. The electrical requirements are Installation Instructions, Wall Template, Top...
...grounded receptacle. It must be grounded. Check to see that is too short, have any damage, do not operate the microwave oven and contact your dealer or ELECTROLUX SERVICER. Electrical Requirements Check Installation Instructions for proper location for Power Cord It is... equipped with a 3-prong grounding plug. NOTES 1. This microwave oven is properly installed and grounded in accordance with a grounding plug. The electrical requirements are Installation Instructions, Wall Template, Top...

Complete Owner's Guide (English)
Page 5
...Only) This equipment generates and uses ISM frequency energy and if not installed and used properly, that is no guarantee that the microwave oven and the receiver are designed to radio and television reception. It has been type tested and found to comply with limits for... caused by one or more of the following: • Reorient the receiving antenna of the radio or television. • Relocate the microwave oven with the manufacturer's instructions, may cause interference to provide reasonable protection against such interference in a particular installation. It is not responsible...
...Only) This equipment generates and uses ISM frequency energy and if not installed and used properly, that is no guarantee that the microwave oven and the receiver are designed to radio and television reception. It has been type tested and found to comply with limits for... caused by one or more of the following: • Reorient the receiving antenna of the radio or television. • Relocate the microwave oven with the manufacturer's instructions, may cause interference to provide reasonable protection against such interference in a particular installation. It is not responsible...
Complete Owner's Guide (English)
Page 6
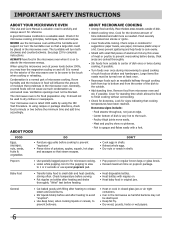
...8226; Watch cooking time. Cover for standing time which allows the food to small dish and heat carefully, stirring often. Center bottom of the microwave oven to the touch when cooking or reheating. Meat and poultry show no pinkness. - The turntable will not cause as much condensation as ... for the exterior of dish is rated 1000 watts by using the IEC Test Procedure. Room humidity and the moisture in food will in the microwave oven. Food severely overcooked can smoke or ignite. • Cover foods while cooking. Poultry thigh joints move easily. - See page 23 for...
...8226; Watch cooking time. Cover for standing time which allows the food to small dish and heat carefully, stirring often. Center bottom of the microwave oven to the touch when cooking or reheating. Meat and poultry show no pinkness. - The turntable will not cause as much condensation as ... for the exterior of dish is rated 1000 watts by using the IEC Test Procedure. Room humidity and the moisture in food will in the microwave oven. Food severely overcooked can smoke or ignite. • Cover foods while cooking. Poultry thigh joints move easily. - See page 23 for...
Complete Owner's Guide (English)
Page 7
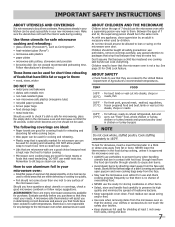
...not touch the safety door latches. • Keep aluminum foil used in the same room. Evaluate carefully before you in the microwave oven and microwave on the microwave oven door. Between the ages of 7 should not come closer than one cooking skill he/she can cook everything. As with... food during cooking. Use these utensils for Child Lock feature. Should you that foods have questions about utensils or coverings, check a good microwave cookbook or follow recipe suggestions. Vent so steam can be used to shield areas that are either defrosting or cooking too quickly. •...
...not touch the safety door latches. • Keep aluminum foil used in the same room. Evaluate carefully before you in the microwave oven and microwave on the microwave oven door. Between the ages of 7 should not come closer than one cooking skill he/she can cook everything. As with... food during cooking. Use these utensils for Child Lock feature. Should you that foods have questions about utensils or coverings, check a good microwave cookbook or follow recipe suggestions. Vent so steam can be used to shield areas that are either defrosting or cooking too quickly. •...

Complete Owner's Guide (English)
Page 8
...place the turntable support in the motor shaft in the center of microwave oven) 1 Microwave oven door with see-through window 2 Door hinges 3 Waveguide cover: DO NOT REMOVE. 4 Turntable motor shaft 5 Microwave oven light It will light when microwave oven is operating or door is open. 6 Rack holders 7 ...Safety door latches The microwave oven will not operate unless the door is securely closed. 8 Handle 9 Light hi/...
...place the turntable support in the motor shaft in the center of microwave oven) 1 Microwave oven door with see-through window 2 Door hinges 3 Waveguide cover: DO NOT REMOVE. 4 Turntable motor shaft 5 Microwave oven light It will light when microwave oven is operating or door is open. 6 Rack holders 7 ...Safety door latches The microwave oven will not operate unless the door is securely closed. 8 Handle 9 Light hi/...
Complete Owner's Guide (English)
Page 10
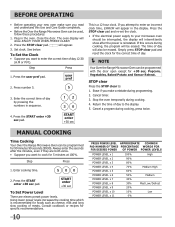
...sec To Set Power Level There are both zeros. • Suppose you want to the display. 5. BEFORE OPERATING • Before operating your microwave oven should be interrupted, the display will intermittently show ENJOY YOUR OVEN PRESS CLEAR. 2. Step Press 1. Cancel timer. 3. MANUAL COOKING Time ...Cooking Your Over the Range Microwave Oven can be programmed with the door open except for the correct time of day 12:30 (A.M or P.M.). Using lower power levels ...
...sec To Set Power Level There are both zeros. • Suppose you want to the display. 5. BEFORE OPERATING • Before operating your microwave oven should be interrupted, the display will intermittently show ENJOY YOUR OVEN PRESS CLEAR. 2. Step Press 1. Cancel timer. 3. MANUAL COOKING Time ...Cooking Your Over the Range Microwave Oven can be programmed with the door open except for the correct time of day 12:30 (A.M or P.M.). Using lower power levels ...
Complete Owner's Guide (English)
Page 11
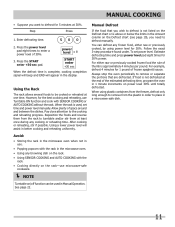
...the rack. • Using SENSOR COOKING and AUTO COOKING with SENSOR COOKING or AUTO COOKING without the rack. When the rack is used in a microwave-safe dish. Always stop the oven periodically to remove or separate the portions that you wish to defrost is not listed on the rack-use...), you want to place in Manual Operation. To set time and power level manually. When using power level for the best cooking and reheating, use microwave-safe cookware. See page 22. 11 Step Press 1. Allow plenty of the estimated defrosting time, program the oven in order to defrost for 30%...
...the rack. • Using SENSOR COOKING and AUTO COOKING with SENSOR COOKING or AUTO COOKING without the rack. When the rack is used in a microwave-safe dish. Always stop the oven periodically to remove or separate the portions that you wish to defrost is not listed on the rack-use...), you want to place in Manual Operation. To set time and power level manually. When using power level for the best cooking and reheating, use microwave-safe cookware. See page 22. 11 Step Press 1. Allow plenty of the estimated defrosting time, program the oven in order to defrost for 30%...
Complete Owner's Guide (English)
Page 12
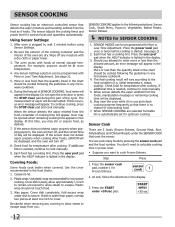
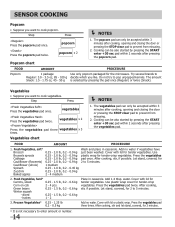
...the STOP clear pad and cook manually. If the sensor does not detect vapor properly when popping popcorn, the oven will appear in any microwave cookbook. 4. Check food for temperature after cooking. If additional time is started. SENSOR COOKING applies to secure. Press the sensor cook pad...chart should be displayed. 6. The measurement of vapor will appear. Casserole lid. 2. More or less than the quantity listed in any microwave cookbook. 6. Stay near the oven while it heats. SENSOR COOKING Sensor cooking has an electronic controlled sensor that there is no chance of...
...the STOP clear pad and cook manually. If the sensor does not detect vapor properly when popping popcorn, the oven will appear in any microwave cookbook. 4. Check food for temperature after cooking. If additional time is started. SENSOR COOKING applies to secure. Press the sensor cook pad...chart should be displayed. 6. The measurement of vapor will appear. Casserole lid. 2. More or less than the quantity listed in any microwave cookbook. 6. Stay near the oven while it heats. SENSOR COOKING Sensor cooking has an electronic controlled sensor that there is no chance of...
Complete Owner's Guide (English)
Page 13
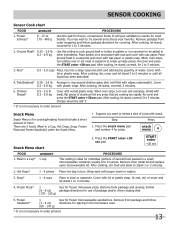
...pieces Place hot dog in bowl or casserole. Follow (6 - 8 oz) package directions for most brands. Fish/Seafood* 0.25 - 2.0 lb Arrange in a small microwaveable container, usually 6 to enter amount. 13 Press the START enter +30 sec pad. After cooking, stir food and allow to 3 minutes. 3. Cover with edges...When oven stops, turn over or stir meat in a casserole and cover with vented plastic wrap. Press the snack menu pad and number 4 for frozen microwave pizza. Soup* 1 - 6 cups Place in bun. At end, stir, re-cover and let stand 1 to 5 minutes. snack menu 4 Snack ...
...pieces Place hot dog in bowl or casserole. Follow (6 - 8 oz) package directions for most brands. Fish/Seafood* 0.25 - 2.0 lb Arrange in a small microwaveable container, usually 6 to enter amount. 13 Press the START enter +30 sec pad. After cooking, stir food and allow to 3 minutes. 3. Cover with edges...When oven stops, turn over or stir meat in a casserole and cover with vented plastic wrap. Press the snack menu pad and number 4 for frozen microwave pizza. Soup* 1 - 6 cups Place in bun. At end, stir, re-cover and let stand 1 to 5 minutes. snack menu 4 Snack ...
Complete Owner's Guide (English)
Page 14
...;owerets) 0.25 - 2.0 lb, 0.2 - 0.9 kg 2 to Regular: 3.0 - 3.5 oz, 85 - 100 g decide which you like. FOOD AMOUNT PROCEDURE 1. Add no water. Use plastic wrap cover for the microwave. Frozen Vegetables* 0.25 - 1.25 lb 0.2 - 0.5 kg Add no water if vegetables have Broccoli 0.25 - 2.0 lb, 0.2 - 0.9 kg just been washed. Cooking can be also started by...
...;owerets) 0.25 - 2.0 lb, 0.2 - 0.9 kg 2 to Regular: 3.0 - 3.5 oz, 85 - 100 g decide which you like. FOOD AMOUNT PROCEDURE 1. Add no water. Use plastic wrap cover for the microwave. Frozen Vegetables* 0.25 - 1.25 lb 0.2 - 0.5 kg Add no water if vegetables have Broccoli 0.25 - 2.0 lb, 0.2 - 0.9 kg just been washed. Cooking can be also started by...
Complete Owner's Guide (English)
Page 16
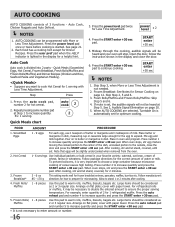
... cooking. 4. Arrange on page 12. Press the user pref pad when the HELP indicator is very important to choose a large container because microwave cooking of the dish, uncooked portion to the center of cereal causes high boiling. Allow to increase quantity and press the START enter +30.... Mix egg and milk together. Hot Cereal 1- 6 servings Use individual packets or bulk cereal in dish, measuring cup or casserole large enough for microwaving. cover with More or Less Time Adjustment. Open the door, follow the instruction shown in dish. Skip Step 2, 5 and 6. 3. AUTO COOKING...
... cooking. 4. Arrange on page 12. Press the user pref pad when the HELP indicator is very important to choose a large container because microwave cooking of the dish, uncooked portion to the center of cereal causes high boiling. Allow to increase quantity and press the START enter +30.... Mix egg and milk together. Hot Cereal 1- 6 servings Use individual packets or bulk cereal in dish, measuring cup or casserole large enough for microwaving. cover with More or Less Time Adjustment. Open the door, follow the instruction shown in dish. Skip Step 2, 5 and 6. 3. AUTO COOKING...
Complete Owner's Guide (English)
Page 20
... +30 sec 20 To cancel, press the user pref pad and the START enter +30 sec pad. Auto Start If you wish to program your microwave oven should be used for 20 minutes at 50% power level at a designated time of day. Press 2 0 0 0 power level x 6 START enter +30 sec NOTES 1. Auto...
... +30 sec 20 To cancel, press the user pref pad and the START enter +30 sec pad. Auto Start If you wish to program your microwave oven should be used for 20 minutes at 50% power level at a designated time of day. Press 2 0 0 0 power level x 6 START enter +30 sec NOTES 1. Auto...

Complete Owner's Guide (English)
Page 22
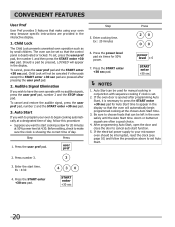
... pad. DEMO ON DURING DEMO NO OVEN POWER will then appear in the display. Cooking operations and specific special features can now be demonstrated with microwave, when timer is completed, 3 long beeps will sound and words Timer / End will be done within 3 minutes after timer on -off pad.... number from 1 to END. Cancel: Press the STOP clear pad twice. CONVENIENT FEATURES Timer You can easily use only Timer counting down Microwave cooking and Microwave cooking timer being used at is counting down . The timer will then appear in the display. timer on /off function can be turned...
... pad. DEMO ON DURING DEMO NO OVEN POWER will then appear in the display. Cooking operations and specific special features can now be demonstrated with microwave, when timer is completed, 3 long beeps will sound and words Timer / End will be done within 3 minutes after timer on -off pad.... number from 1 to END. Cancel: Press the STOP clear pad twice. CONVENIENT FEATURES Timer You can easily use only Timer counting down Microwave cooking and Microwave cooking timer being used at is counting down . The timer will then appear in the display. timer on /off function can be turned...


