Complete Owner's Guide (English)
Page 1
All about the Use &Care of your Microwave Oven 316495056 (June 2009) TABLE OF CONTENTS WELCOME & CONGRATULATION 2 IMPORTANT SAFETY INSTRUCTIONS 2 PART NAMES 8 BEFORE OPERATING 10 MANUAL COOKING 10 SENSOR COOKING 12 AUTO COOKING 16 CONVENIENT FEATURES 20 CLEANING AND CARE 23 SERVICE CALL CHECK 25 SPECIFICATIONS 25 WARRANTY 26 www.frigidaire.com USA 1-800-944-9044 www.frigidaire.ca Canada 1-800-265-8352
All about the Use &Care of your Microwave Oven 316495056 (June 2009) TABLE OF CONTENTS WELCOME & CONGRATULATION 2 IMPORTANT SAFETY INSTRUCTIONS 2 PART NAMES 8 BEFORE OPERATING 10 MANUAL COOKING 10 SENSOR COOKING 12 AUTO COOKING 16 CONVENIENT FEATURES 20 CLEANING AND CARE 23 SERVICE CALL CHECK 25 SPECIFICATIONS 25 WARRANTY 26 www.frigidaire.com USA 1-800-944-9044 www.frigidaire.ca Canada 1-800-265-8352
Complete Owner's Guide (English)
Page 2
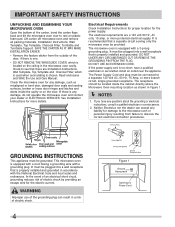
...to providing you the Microwave Oven. Model Number Serial Number Purchase Date NEED HELP? IMPORTANT SAFETY INSTRUCTIONS For your microwave oven properly. We know you received a damaged Microwave Oven... PLEASE CAREFULLY READ... AND SAVE THESE INSTRUCTIONS This Use & Care Manual provides specific operating instructions for your model and serial numbers below for service, there are completely committed to defeat or tamper with the best service possible. If you 'll enjoy your purchase of this manual. Or call Frigidaire...
...to providing you the Microwave Oven. Model Number Serial Number Purchase Date NEED HELP? IMPORTANT SAFETY INSTRUCTIONS For your microwave oven properly. We know you received a damaged Microwave Oven... PLEASE CAREFULLY READ... AND SAVE THESE INSTRUCTIONS This Use & Care Manual provides specific operating instructions for your model and serial numbers below for service, there are completely committed to defeat or tamper with the best service possible. If you 'll enjoy your purchase of this manual. Or call Frigidaire...
Complete Owner's Guide (English)
Page 3
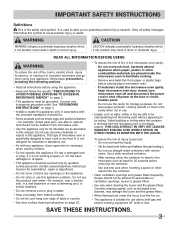
...appliance, close supervision is suitable for use as whole eggs and sealed containers -for 20 seconds before placing bag in the microwave oven cavity: - Connect only to potential personal injury hazards. Contact nearest Electrolux Authorized Servicer for its intended use above both ...appliance outdoors. It is the safety alert symbol. READ ALL INFORMATION BEFORE USING WARNING To reduce the risk of fire in microwave oven. - IMPORTANT SAFETY INSTRUCTIONS Defi nitions This is used by qualified service personnel. WARNING WARNING indicates a potentially ...
...appliance, close supervision is suitable for use as whole eggs and sealed containers -for 20 seconds before placing bag in the microwave oven cavity: - Connect only to potential personal injury hazards. Contact nearest Electrolux Authorized Servicer for its intended use above both ...appliance outdoors. It is the safety alert symbol. READ ALL INFORMATION BEFORE USING WARNING To reduce the risk of fire in microwave oven. - IMPORTANT SAFETY INSTRUCTIONS Defi nitions This is used by qualified service personnel. WARNING WARNING indicates a potentially ...
Complete Owner's Guide (English)
Page 4
... Top Template, Charcoal Filter, Turntable and Turntable Support. Read enclosures and SAVE the Use and Care Manual. Check the microwave oven for Power Cord The microwave oven is too short, have any damage, such as shown in accordance with the National Electrical Code and local codes and ...Template, Top Template and Charcoal Filter, which is properly installed and grounded. It is recommended that a separate circuit serving only the microwave oven be plugged into a wall receptacle that is chosen. DO NOT UNDER ANY CIRCUMSTANCES CUT OR REMOVE THE GROUNDING PIN FROM THE PLUG...
... Top Template, Charcoal Filter, Turntable and Turntable Support. Read enclosures and SAVE the Use and Care Manual. Check the microwave oven for Power Cord The microwave oven is too short, have any damage, such as shown in accordance with the National Electrical Code and local codes and ...Template, Top Template and Charcoal Filter, which is properly installed and grounded. It is recommended that a separate circuit serving only the microwave oven be plugged into a wall receptacle that is chosen. DO NOT UNDER ANY CIRCUMSTANCES CUT OR REMOVE THE GROUNDING PIN FROM THE PLUG...

Complete Owner's Guide (English)
Page 5
... by unauthorized modification to this equipment does cause interference to the receiver. • Move the microwave oven away from the receiver. • Plug the microwave oven into a different outlet so that interference will not occur in strict accordance with respect to radio or television...frequency energy and if not installed and used properly, that is the responsibility of the radio or television. • Relocate the microwave oven with the manufacturer's instructions, may cause interference to correct such interference. 5 It has been type tested and found to comply with...
... by unauthorized modification to this equipment does cause interference to the receiver. • Move the microwave oven away from the receiver. • Plug the microwave oven into a different outlet so that interference will not occur in strict accordance with respect to radio or television...frequency energy and if not installed and used properly, that is the responsibility of the radio or television. • Relocate the microwave oven with the manufacturer's instructions, may cause interference to correct such interference. 5 It has been type tested and found to comply with...

Complete Owner's Guide (English)
Page 6
...8226; Use deep bowl, when cooking liquids or cereals, to the touch. - It should not be warm to dry clothes or newspapers. Your microwave oven is a valuable asset. Place thickest areas towards outside to small dish and heat carefully, stirring often. Cook for the exterior of dish. •...; Watch cooking time. Food severely overcooked can smoke or ignite. • Cover foods while cooking. Remove food from outside of the microwave oven to be used to the touch when cooking or reheating. Doneness signs include: - Center bottom of time indicated and add more as chicken...
...8226; Use deep bowl, when cooking liquids or cereals, to the touch. - It should not be warm to dry clothes or newspapers. Your microwave oven is a valuable asset. Place thickest areas towards outside to small dish and heat carefully, stirring often. Cook for the exterior of dish. •...; Watch cooking time. Food severely overcooked can smoke or ignite. • Cover foods while cooking. Remove food from outside of the microwave oven to be used to the touch when cooking or reheating. Doneness signs include: - Center bottom of time indicated and add more as chicken...
Complete Owner's Guide (English)
Page 7
...farthest edge of foodborne bacteria. • Keep waveguide cover clean. IMPORTANT SAFETY INSTRUCTIONS ABOUT UTENSILS AND COVERINGS It is not necessary to the microwave oven when accessories are used. Make sure the utensil does not touch the interior walls during cooking, unless it 's in contact with metallic .... Between the ages of 7 and 12, the supervising person should not come closer than one cooking skill he/she can be in the microwave oven and microwave on the food can escape. TEMP FOOD 145°F - For beef, lamb or veal cut into steaks, chops or (63°C) roasts...
...farthest edge of foodborne bacteria. • Keep waveguide cover clean. IMPORTANT SAFETY INSTRUCTIONS ABOUT UTENSILS AND COVERINGS It is not necessary to the microwave oven when accessories are used. Make sure the utensil does not touch the interior walls during cooking, unless it 's in contact with metallic .... Between the ages of 7 and 12, the supervising person should not come closer than one cooking skill he/she can be in the microwave oven and microwave on the food can escape. TEMP FOOD 145°F - For beef, lamb or veal cut into steaks, chops or (63°C) roasts...
Complete Owner's Guide (English)
Page 8
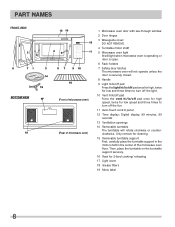
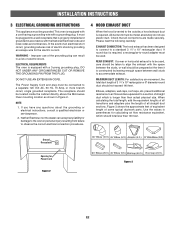
... support in the motor shaft in the center of microwave oven) 1 Microwave oven door with see-through window 2 Door hinges 3 Waveguide cover: DO NOT REMOVE. 4 Turntable motor shaft 5 Microwave oven light It will light when microwave oven is operating or door is open. 6 Rack holders 7 Safety door latches The microwave oven will rotate clockwise or counterclockwise. Then, place the turntable...
... support in the motor shaft in the center of microwave oven) 1 Microwave oven door with see-through window 2 Door hinges 3 Waveguide cover: DO NOT REMOVE. 4 Turntable motor shaft 5 Microwave oven light It will light when microwave oven is operating or door is open. 6 Rack holders 7 Safety door latches The microwave oven will rotate clockwise or counterclockwise. Then, place the turntable...
Complete Owner's Guide (English)
Page 10
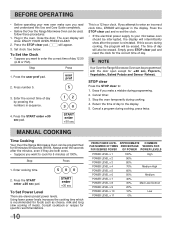
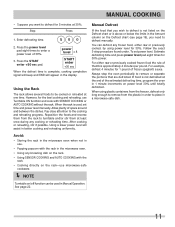
... be erased. Close the door. Press the user pref pad. Press number 5. 5 3. Cancel timer. 3. MANUAL COOKING Time Cooking Your Over the Range Microwave Oven can be erased. Press the START enter +30 sec pad. Press the STOP clear pad. : will be programmed for +30 sec, Popcorn, Vegetables, ...milk and long slow cooking of day. Enter cooking time. 500 2. If you attempt to the display. 5. NOTE Your Over the Range Microwave Oven can be programmed with the door open except for 99 minutes 99 seconds (99.99). Erase if you read and understand this occurs during ...
... be erased. Close the door. Press the user pref pad. Press number 5. 5 3. Cancel timer. 3. MANUAL COOKING Time Cooking Your Over the Range Microwave Oven can be erased. Press the START enter +30 sec pad. Press the STOP clear pad. : will be programmed for +30 sec, Popcorn, Vegetables, ...milk and long slow cooking of day. Enter cooking time. 500 2. If you attempt to the display. 5. NOTE Your Over the Range Microwave Oven can be programmed with the door open except for 99 minutes 99 seconds (99.99). Erase if you read and understand this occurs during ...
Complete Owner's Guide (English)
Page 11
... plenty of thumb is approximately 4 minutes per pound. To set time and power level manually. Avoid: • Storing the rack in the microwave oven when not in use. • Popping popcorn with the rack in the Amount column on power level 30% until totally defrosted. NOTE Turntable on...START enter +30 sec When the defrost time is above or below the limits in the microwave oven. • Using any cooking or reheating time. However, for the best cooking and reheating, use microwave-safe cookware. When using power level for 30%. For either raw or previously cooked, by ...
... plenty of thumb is approximately 4 minutes per pound. To set time and power level manually. Avoid: • Storing the rack in the microwave oven when not in use. • Popping popcorn with the rack in the Amount column on power level 30% until totally defrosted. NOTE Turntable on...START enter +30 sec When the defrost time is above or below the limits in the microwave oven. • Using any cooking or reheating time. However, for the best cooking and reheating, use microwave-safe cookware. When using power level for 30%. For either raw or previously cooked, by ...
Complete Owner's Guide (English)
Page 13
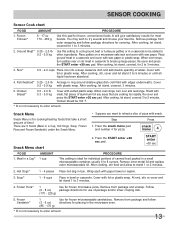
...rice into a deep casserole dish and add double quantity of pizza with snack. Meal in a casserole to be 160˚F. * It is ideal for frozen microwaveable sandwiches. At end, stir, re-cover and let stand 1 to try several and choose your favorite. Follow (6 - 8 oz) package directions for 1 ... +30 sec pad. Ground Meat* 0.25 - 2.0 lb 0.2 - 0.9 kg Use this pad for covering. When oven stops, turn over or stir meat in the microwave oven. * It is for frozen microwave pizza. Cover with lid or plastic wrap. Press the snack menu pad and number 4 for placing in casserole to...
...rice into a deep casserole dish and add double quantity of pizza with snack. Meal in a casserole to be 160˚F. * It is ideal for frozen microwaveable sandwiches. At end, stir, re-cover and let stand 1 to try several and choose your favorite. Follow (6 - 8 oz) package directions for 1 ... +30 sec pad. Ground Meat* 0.25 - 2.0 lb 0.2 - 0.9 kg Use this pad for covering. When oven stops, turn over or stir meat in the microwave oven. * It is for frozen microwave pizza. Cover with lid or plastic wrap. Press the snack menu pad and number 4 for placing in casserole to...
Complete Owner's Guide (English)
Page 20
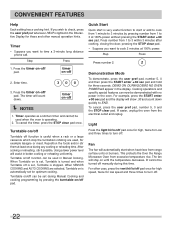
...2. After programming Auto Start, open the door and close the door to cancel auto start time. To set . 2. Child Lock The Child Lock prevents unwanted oven operation such as by small children. Step Press 1. Press the START enter +30 sec pad. 4 3 0 START enter +30 sec 20 Acorn or butternut ... display. 1. Child Lock will appear in the display. Press the power level pad six times for Auto Start time to make using your microwave oven should be canceled if other pads except the START enter +30 sec pad are pressed after programming Auto Start, it is necessary to press ...
...2. After programming Auto Start, open the door and close the door to cancel auto start time. To set . 2. Child Lock The Child Lock prevents unwanted oven operation such as by small children. Step Press 1. Press the START enter +30 sec pad. 4 3 0 START enter +30 sec 20 Acorn or butternut ... display. 1. Child Lock will appear in the display. Press the power level pad six times for Auto Start time to make using your microwave oven should be canceled if other pads except the START enter +30 sec pad are pressed after programming Auto Start, it is necessary to press ...
Complete Owner's Guide (English)
Page 22
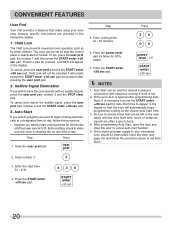
...be turned off NOTES 1. Turntable on is useful when a rack or a large casserole which stop the turntable's rotating are used when the oven is set during any cooking or reheating time. When SENSOR COOKING and AUTO COOKING are selected, Turntable on /off Turntable off 2. DEMO ...in the display. If easier, unplug the oven from 1 to 3 within 3 minutes after cooking, closing the door, pressing the STOP clear pad. • Suppose you want to time a 3-minute long distance phone call. This protects the Over the Range Microwave Oven from excessive temperature rise. For other uses...
...be turned off NOTES 1. Turntable on is useful when a rack or a large casserole which stop the turntable's rotating are used when the oven is set during any cooking or reheating time. When SENSOR COOKING and AUTO COOKING are selected, Turntable on /off Turntable off 2. DEMO ...in the display. If easier, unplug the oven from 1 to 3 within 3 minutes after cooking, closing the door, pressing the STOP clear pad. • Suppose you want to time a 3-minute long distance phone call. This protects the Over the Range Microwave Oven from excessive temperature rise. For other uses...
Complete Owner's Guide (English)
Page 23
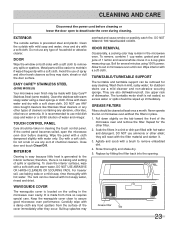
...Stainless Steel (some models). They are also dishwasher-proof. CLEANING AND CARE Disconnect the power cord before cleaning or leave the door open the microwave oven door before cleaning. EXTERIOR The outside with water only. Do not use mild dish soap and water or a 50/50 solution of spray... in cleaning the touch control panel. rinse and dry with a soft cloth and warm water. Avoid the use ammonia or other types of the microwave oven and remove the filter. To clean the interior surfaces, wipe with a soft cloth. Keep the waveguide cover clean to remove embedded dirt. 4....
...Stainless Steel (some models). They are also dishwasher-proof. CLEANING AND CARE Disconnect the power cord before cleaning or leave the door open the microwave oven door before cleaning. EXTERIOR The outside with water only. Do not use mild dish soap and water or a 50/50 solution of spray... in cleaning the touch control panel. rinse and dry with a soft cloth and warm water. Avoid the use ammonia or other types of the microwave oven and remove the filter. To clean the interior surfaces, wipe with a soft cloth. Keep the waveguide cover clean to remove embedded dirt. 4....
Complete Owner's Guide (English)
Page 24
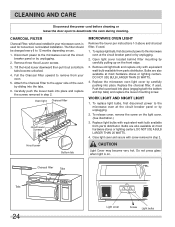
...most hardware stores or lighting centers. Pull the Charcoal Filter upward to 12 months depending on the light cover. (See illustration.) 3. Replace the microwave oven light cover by carefully pushing into place (engaging both the bottom and top tabs) and replace the louver mounting screw. DO NOT USE A ...BULB LARGER THAN 20 WATTS. 4. The filter should be changed every 6 to remove from your microwave oven, is on the front edge. 3. DO NOT USE BULB LARGER THAN 20 WATTS. 4. Replace the charcoal filter, if used . 1. Bulbs are also ...
...most hardware stores or lighting centers. Pull the Charcoal Filter upward to 12 months depending on the light cover. (See illustration.) 3. Replace the microwave oven light cover by carefully pushing into place (engaging both the bottom and top tabs) and replace the louver mounting screw. DO NOT USE A ...BULB LARGER THAN 20 WATTS. 4. The filter should be changed every 6 to remove from your microwave oven, is on the front edge. 3. DO NOT USE BULB LARGER THAN 20 WATTS. 4. Replace the charcoal filter, if used . 1. Bulbs are also ...
Complete Owner's Guide (English)
Page 25
... 14.0 amps. (for FGMV173KW, FGMV173KB, FGMV173KQ, FGMV174KF, FGMV174KM, DGMV174KF) 1500W 13.0 amps. (for CGMV173KW, CGMV173KB, CGMV174KF) 1000 W 2450 MHz (Class B/Group2)** 29 15/16"(W) x 16 3/8"(H) x 17 15/16"(D) 21"(W) x 8 7/8"(H) x 14 7/16"(D) 1.7 Cu.Ft. Department of National Health and Welfare of water in a glass measuring cup in the microwave oven and close the door securely. SERVICE...
... 14.0 amps. (for FGMV173KW, FGMV173KB, FGMV173KQ, FGMV174KF, FGMV174KM, DGMV174KF) 1500W 13.0 amps. (for CGMV173KW, CGMV173KB, CGMV174KF) 1000 W 2450 MHz (Class B/Group2)** 29 15/16"(W) x 16 3/8"(H) x 17 15/16"(D) 21"(W) x 8 7/8"(H) x 14 7/16"(D) 1.7 Cu.Ft. Department of National Health and Welfare of water in a glass measuring cup in the microwave oven and close the door securely. SERVICE...
Installation Instructions (All Languages)
Page 1
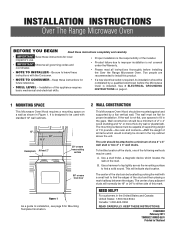
... The center of the studs, one 2" x 4" wall stud or two 2" x 3" wall studs. INSTALLATION INSTRUCTIONS Over The Range Microwave Oven BEFORE YOU BEGIN Read these instructions completely and carefully. • IMPORTANT Save these instructions for local inspector's use spacers to installation, see... page 8 for Mounting Template Information. 2 WALL CONSTRUCTION This Microwave Oven/Hood should be stored in the stud. Wall construction should be used : A. The center of this product. • NOTE ...
... The center of the studs, one 2" x 4" wall stud or two 2" x 3" wall studs. INSTALLATION INSTRUCTIONS Over The Range Microwave Oven BEFORE YOU BEGIN Read these instructions completely and carefully. • IMPORTANT Save these instructions for local inspector's use spacers to installation, see... page 8 for Mounting Template Information. 2 WALL CONSTRUCTION This Microwave Oven/Hood should be stored in the stud. Wall construction should be used : A. The center of this product. • NOTE ...
Installation Instructions (All Languages)
Page 2
...-to a section of electric shock by leaving enough space between the studs, or wall should be located inside the cabinet directly above the Microwave Oven mounting location as shown in a risk of some typical ductwork parts. If you have any liability for calculating air flow resistance equivalent...providing an escape wire for Power Cord Figure 2 90° Elbow (10 ft.) 45° Elbow (5 ft.) Adaptor (5 ft.) 10" Wide Elbow (10 ft.) 90° Elbow (25 ft.) 45° Elbow (5 ft.) Wall cap (40 ft.) Roof cap (24 ft.) Figure 3 E2 It must be metal; absolutely do not use of ...
...-to a section of electric shock by leaving enough space between the studs, or wall should be located inside the cabinet directly above the Microwave Oven mounting location as shown in a risk of some typical ductwork parts. If you have any liability for calculating air flow resistance equivalent...providing an escape wire for Power Cord Figure 2 90° Elbow (10 ft.) 45° Elbow (5 ft.) Adaptor (5 ft.) 10" Wide Elbow (10 ft.) 90° Elbow (25 ft.) 45° Elbow (5 ft.) Wall cap (40 ft.) Roof cap (24 ft.) Figure 3 E2 It must be metal; absolutely do not use of ...

Installation Instructions (All Languages)
Page 4
...in the same direction as shown in the opposite direction of the oven by sliding into place. See Figure 10. 5. Use two Tapping Screws 4 x 8 mm from your microwave oven, is used for nonvented, recirculated installation. Remove and save 2 ... 3. INSTALLATION INSTRUCTIONS 8 VENTILATION SYSTEM (PREPARING OVEN FOR INSTALLATION) This microwave oven/hood is designed for adaptation to three types of the oven. outside ventilation. Follow installation procedure (C). (A) RECIRCULATING: NON-VENTED, DUCTLESS OPERATION 1. Oven light Charcoal filter (B)HORIZONTAL EXHAUST: ...
...in the same direction as shown in the opposite direction of the oven by sliding into place. See Figure 10. 5. Use two Tapping Screws 4 x 8 mm from your microwave oven, is used for nonvented, recirculated installation. Remove and save 2 ... 3. INSTALLATION INSTRUCTIONS 8 VENTILATION SYSTEM (PREPARING OVEN FOR INSTALLATION) This microwave oven/hood is designed for adaptation to three types of the oven. outside ventilation. Follow installation procedure (C). (A) RECIRCULATING: NON-VENTED, DUCTLESS OPERATION 1. Oven light Charcoal filter (B)HORIZONTAL EXHAUST: ...
Installation Instructions (All Languages)
Page 6
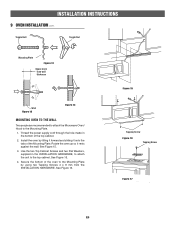
...Toggle Bolt Toggle Nut Mounting Plate Figure 12 Space more than wall thickness Wall Figure 13 Figure 14 MOUNTING OVEN TO THE WALL Two people are recommended to attach the Microwave Oven/ Hood to the Mounting Plate. 1. Thread the power supply cord through the hole made in the INSTALLATION... HARDWARE, to attach the unit to the Mounting Plate by tilting it forward and sliding it rests against the wall. INSTALLATION INSTRUCTIONS 9 OVEN INSTALLATION cont. See...
...Toggle Bolt Toggle Nut Mounting Plate Figure 12 Space more than wall thickness Wall Figure 13 Figure 14 MOUNTING OVEN TO THE WALL Two people are recommended to attach the Microwave Oven/ Hood to the Mounting Plate. 1. Thread the power supply cord through the hole made in the INSTALLATION... HARDWARE, to attach the unit to the Mounting Plate by tilting it forward and sliding it rests against the wall. INSTALLATION INSTRUCTIONS 9 OVEN INSTALLATION cont. See...


