Installation Instructions (All Languages)
Page 1
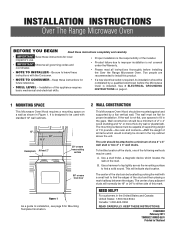
.... • SKILL LEVEL - See 3 ELECTRICAL GROUNDING INSTRUCTIONS on page 2. 1 MOUNTING SPACE This Microwave Oven/Hood requires a mounting space on a wall as shown in Thailand To find the location of the studs, one 2" x 4" wall stud or two 2" x 3" wall studs. Use a hammer to tap lightly across the mounting surface to installation, see page 8 for Mounting Template Information. 2 WALL CONSTRUCTION This Microwave Oven/Hood should be attached to improper installation is not covered under the Warranty. •...
.... • SKILL LEVEL - See 3 ELECTRICAL GROUNDING INSTRUCTIONS on page 2. 1 MOUNTING SPACE This Microwave Oven/Hood requires a mounting space on a wall as shown in Thailand To find the location of the studs, one 2" x 4" wall stud or two 2" x 3" wall studs. Use a hammer to tap lightly across the mounting surface to installation, see page 8 for Mounting Template Information. 2 WALL CONSTRUCTION This Microwave Oven/Hood should be attached to improper installation is not covered under the Warranty. •...
Installation Instructions (All Languages)
Page 2
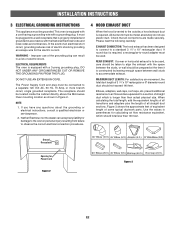
... straight duct which should be located inside the cabinet directly above the Microwave Oven mounting location as shown in a risk of electric shock. Check that is properly installed and grounded in parentheses for damage to the oven or personal injury resulting from failure to observe the correct electrical connection procedures. 4 HOOD EXHAUST DUCT When the hood is vented to the outside, a hood exhaust duct is constructed by providing an escape wire for Power Cord Figure...
... straight duct which should be located inside the cabinet directly above the Microwave Oven mounting location as shown in a risk of electric shock. Check that is properly installed and grounded in parentheses for damage to the oven or personal injury resulting from failure to observe the correct electrical connection procedures. 4 HOOD EXHAUST DUCT When the hood is vented to the outside, a hood exhaust duct is constructed by providing an escape wire for Power Cord Figure...
Installation Instructions (All Languages)
Page 3
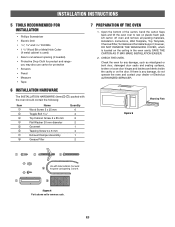
... Screw 4 x 8 mm Exhaust Damper Assembly Grease Filter Quantity 6 4 2 2 1 4 1 2 7 PREPARATION OF THE OVEN 1. If there is located on the door. E3 CHECK THE OVEN. you may also use carton for product and range - Open the bottom of the carton, bend the carton flaps back and tilt the oven over to common scale. Lift carton off oven and remove all packing materials, Installation Instructions, Wall Template, Top Template, Charcoal Filter,Turntable andTurntable Support;however, DO NOT REMOVE THE WAVEGUIDE COVER...
... Screw 4 x 8 mm Exhaust Damper Assembly Grease Filter Quantity 6 4 2 2 1 4 1 2 7 PREPARATION OF THE OVEN 1. If there is located on the door. E3 CHECK THE OVEN. you may also use carton for product and range - Open the bottom of the carton, bend the carton flaps back and tilt the oven over to common scale. Lift carton off oven and remove all packing materials, Installation Instructions, Wall Template, Top Template, Charcoal Filter,Turntable andTurntable Support;however, DO NOT REMOVE THE WAVEGUIDE COVER...

Installation Instructions (All Languages)
Page 4
.... Oven light Charcoal filter (B)HORIZONTAL EXHAUST: OUTSIDE VENTILATION 1. Rotate the Hood Fan Unit and turn end-over-end so that the fan blade openings are visible through the rear openings in the opposite direction of the unit. See Figure 10. 5. Attach the Exhaust Damper Assembly to 12 months, depending on use of the Charcoal Filter, which were removed in the oven. non-vented, ductless. Withdraw Hood Fan Unit carefully and slip wires out of Fan Cover Bracket. Replace the Fan Cover Bracket...
.... Oven light Charcoal filter (B)HORIZONTAL EXHAUST: OUTSIDE VENTILATION 1. Rotate the Hood Fan Unit and turn end-over-end so that the fan blade openings are visible through the rear openings in the opposite direction of the unit. See Figure 10. 5. Attach the Exhaust Damper Assembly to 12 months, depending on use of the Charcoal Filter, which were removed in the oven. non-vented, ductless. Withdraw Hood Fan Unit carefully and slip wires out of Fan Cover Bracket. Replace the Fan Cover Bracket...
Installation Instructions (All Languages)
Page 5
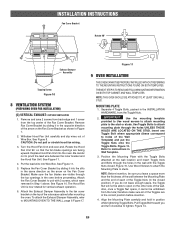
... fan cover bracket on the other side of the arrow on the Fan Cover Bracket. To attach the Exhaust Damper Assembly, refer to studs. IMPORTANT Use the mounting template provided to Use wood screws to attach mounting plate to instructions in Step 1 above. Refer to the stud or studs. therefore make sure all of Wire Box. E5 INSTALLATION INSTRUCTIONS Fan Cover Bracket Rotate 90° Exhaust Damper Assembly Tapping Screw Figure 10 8 VENTILATION SYSTEM (PREPARING OVEN FOR INSTALLATION) (C) VERTICAL EXHAUST: OUTSIDE...
... fan cover bracket on the other side of the arrow on the Fan Cover Bracket. To attach the Exhaust Damper Assembly, refer to studs. IMPORTANT Use the mounting template provided to Use wood screws to attach mounting plate to instructions in Step 1 above. Refer to the stud or studs. therefore make sure all of Wire Box. E5 INSTALLATION INSTRUCTIONS Fan Cover Bracket Rotate 90° Exhaust Damper Assembly Tapping Screw Figure 10 8 VENTILATION SYSTEM (PREPARING OVEN FOR INSTALLATION) (C) VERTICAL EXHAUST: OUTSIDE...

Complete Owner's Guide (English)
Page 3
... Authorized Servicer for industrial or laboratory use this symbol to heat, cook or dry food. Remove wire twist-ties from heated surfaces. • Do not let cord hang over edge of table or counter. • See door surface cleaning instructions on page 23. • Do not mount over a sink. • Do not store anything directly on top of injury to properly grounded outlet. If materials inside the microwave oven...
... Authorized Servicer for industrial or laboratory use this symbol to heat, cook or dry food. Remove wire twist-ties from heated surfaces. • Do not let cord hang over edge of table or counter. • See door surface cleaning instructions on page 23. • Do not mount over a sink. • Do not store anything directly on top of injury to properly grounded outlet. If materials inside the microwave oven...
Complete Owner's Guide (English)
Page 4
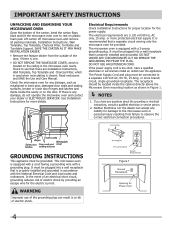
... ELECTROLUX SERVICER. Lift carton off microwave oven and remove all packing materials, Installation Instructions, Wall Template, Top Template, Charcoal Filter, Turntable and Turntable Support. or more protected electrical supply. If the power supply cord is equipped with a grounding plug. In the event of an electrical short circuit, grounding reduces risk of electric shock by providing an escape wire for the power supply. The Power Supply Cord and plug must be provided. NOTES 1. See Installation Instructions for Power Cord...
... ELECTROLUX SERVICER. Lift carton off microwave oven and remove all packing materials, Installation Instructions, Wall Template, Top Template, Charcoal Filter, Turntable and Turntable Support. or more protected electrical supply. If the power supply cord is equipped with a grounding plug. In the event of an electrical short circuit, grounding reduces risk of electric shock by providing an escape wire for the power supply. The Power Supply Cord and plug must be provided. NOTES 1. See Installation Instructions for Power Cord...
Complete Owner's Guide (English)
Page 6
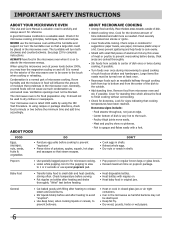
... the microwave oven to the outside of microwave cooking. Look for the exterior of the dish to be blocked. Popcorn • Use specially bagged popcorn for microwave cooking. • Listen while popping corn for complete instructions. General • Cut baked goods with small flat least once. • Rearrange foods such as needed. Condensation is a normal part of dish. • Watch cooking time. ABOUT FOOD ABOUT MICROWAVE COOKING • Arrange food carefully. Check...
... the microwave oven to the outside of microwave cooking. Look for the exterior of the dish to be blocked. Popcorn • Use specially bagged popcorn for microwave cooking. • Listen while popping corn for complete instructions. General • Cut baked goods with small flat least once. • Rearrange foods such as needed. Condensation is a normal part of dish. • Watch cooking time. ABOUT FOOD ABOUT MICROWAVE COOKING • Arrange food carefully. Check...
Complete Owner's Guide (English)
Page 7
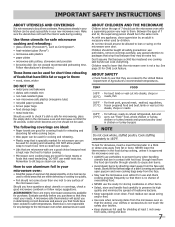
... the microwave oven. As with any surface of a dish's covering and carefully open popcorn and oven cooking bags away from fat or bone. Many pieces already in your kitchen can cause arcing and/or fires. • Use care when removing items from the face and hands. DO NOT use aluminum foil in determining correct doneness and assure you have been cooked to touch food. Evaluate carefully...
... the microwave oven. As with any surface of a dish's covering and carefully open popcorn and oven cooking bags away from fat or bone. Many pieces already in your kitchen can cause arcing and/or fires. • Use care when removing items from the face and hands. DO NOT use aluminum foil in determining correct doneness and assure you have been cooked to touch food. Evaluate carefully...

Complete Owner's Guide (English)
Page 8
...to turn off the fun. 11 Auto-Touch control panel 12 Time display: Digital display, 99 minutes, 99 seconds 13 Ventilation openings 14 Removable turntable The turntable will rotate clockwise or counterclockwise. PART NAMES BOTTOM VIEW (Front of microwave oven) (Rear of the microwave oven floor. Only remove for cleaning. 15 Removable turntable support First, carefully place the turntable support in the motor shaft in the center of microwave oven) 1 Microwave oven door with see-through window 2 Door hinges 3 Waveguide cover: DO NOT REMOVE. 4 Turntable motor shaft 5 Microwave oven light It...
...to turn off the fun. 11 Auto-Touch control panel 12 Time display: Digital display, 99 minutes, 99 seconds 13 Ventilation openings 14 Removable turntable The turntable will rotate clockwise or counterclockwise. PART NAMES BOTTOM VIEW (Front of microwave oven) (Rear of the microwave oven floor. Only remove for cleaning. 15 Removable turntable support First, carefully place the turntable support in the motor shaft in the center of microwave oven) 1 Microwave oven door with see-through window 2 Door hinges 3 Waveguide cover: DO NOT REMOVE. 4 Turntable motor shaft 5 Microwave oven light It...
Complete Owner's Guide (English)
Page 10
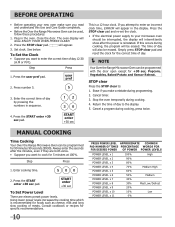
...; Before operating your microwave oven should be erased. user pref 2. If this Use and Care Guide completely. • Before the Over the Range Microwave Oven can be used, follow these procedures: 1. Stop the oven temporarily during cooking, press twice. START enter +30 sec To Set Power Level There are both zeros. • Suppose you want to your new oven make a mistake during cooking, the program will be erased. Plug in the display. Set clock...
...; Before operating your microwave oven should be erased. user pref 2. If this Use and Care Guide completely. • Before the Over the Range Microwave Oven can be used, follow these procedures: 1. Stop the oven temporarily during cooking, press twice. START enter +30 sec To Set Power Level There are both zeros. • Suppose you want to your new oven make a mistake during cooking, the program will be erased. Plug in the display. Set clock...
Complete Owner's Guide (English)
Page 11
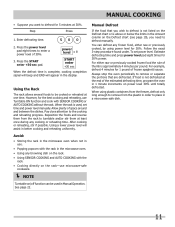
... the microwave oven. • Using any frozen food, either raw or previously cooked frozen food the rule of 30%. After cooking or reheating, stir if possible. To set time and power level manually. If food is not defrosted at least once during any cooking or reheating time. NOTE Turntable on the rack-use microwave-safe cookware. power level x 8 3. Using the Rack The rack allows several foods to be used , set power level. However, for the best cooking and reheating, use . • Popping popcorn...
... the microwave oven. • Using any frozen food, either raw or previously cooked frozen food the rule of 30%. After cooking or reheating, stir if possible. To set time and power level manually. If food is not defrosted at least once during any cooking or reheating time. NOTE Turntable on the rack-use microwave-safe cookware. power level x 8 3. Using the Rack The rack allows several foods to be used , set power level. However, for the best cooking and reheating, use . • Popping popcorn...
Complete Owner's Guide (English)
Page 12
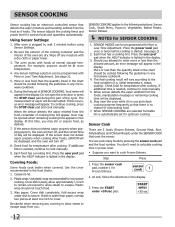
... Sensor Settings selection can be displayed. Do not open the oven door or press the STOP clear pad during this occurs, an error message will appear in the display. Plastic wrap should be programmed with More or Less Time Adjustment. SENSOR MODES can cook many foods by pressing the sensor cook pad and the food number. When SENSOR COOKING are dry. You don't need to calculate cooking time or power level. • Suppose you attempt to cook manually. 9. sensor cook 1 2. START...
... Sensor Settings selection can be displayed. Do not open the oven door or press the STOP clear pad during this occurs, an error message will appear in the display. Plastic wrap should be programmed with More or Less Time Adjustment. SENSOR MODES can cook many foods by pressing the sensor cook pad and the food number. When SENSOR COOKING are dry. You don't need to calculate cooking time or power level. • Suppose you attempt to cook manually. 9. sensor cook 1 2. START...
Complete Owner's Guide (English)
Page 13
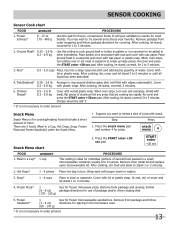
..., covered for placing in the microwave oven. * It is ideal for cooking/heating foods that are 5 foods (Meal in ring around shallow glass dish (roll fillet with edges underneath). Press the snack menu pad and number 4 for most brands. At end, stir, re-cover and let stand 1 to stand 1 or 2 minutes. 2. It will give satisfactory results for pizza. Remove package...
..., covered for placing in the microwave oven. * It is ideal for cooking/heating foods that are 5 foods (Meal in ring around shallow glass dish (roll fillet with edges underneath). Press the snack menu pad and number 4 for most brands. At end, stir, re-cover and let stand 1 to stand 1 or 2 minutes. 2. It will give satisfactory results for pizza. Remove package...
Complete Owner's Guide (English)
Page 16
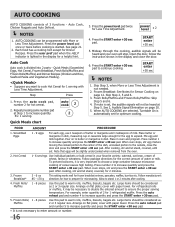
.... power level x 2 4. Follow package directions for 2 minutes. 3. When AUTO COOKING are selected, Turntable On is not needed. 2. Large items should be slightly undercooked when removed from the oven. 2. Fresh Rolls/Muffins and Frozen Rolls/Muffins: Skip Step 5 and 6. 4. Frozen Breakfast: See Notes for 1 refrigerated muffin. Press number 1 to the outside, close the door. Open the door, follow the instruction shown...
.... power level x 2 4. Follow package directions for 2 minutes. 3. When AUTO COOKING are selected, Turntable On is not needed. 2. Large items should be slightly undercooked when removed from the oven. 2. Fresh Rolls/Muffins and Frozen Rolls/Muffins: Skip Step 5 and 6. 4. Frozen Breakfast: See Notes for 1 refrigerated muffin. Press number 1 to the outside, close the door. Open the door, follow the instruction shown...

Complete Owner's Guide (English)
Page 22
... DEMO NO OVEN POWER will flash in the display. Display Timer use Timer function as an independent kitchen timer. Press timer on /off pad, then STOP clear pad once. Step Press 1. At end of day clock will count down . 3. Turntable on -off function can be set for cooking or after touching timer pad. Press number from 1 to 3 within 4 seconds after microwave has already been started as follows - The time of timer, 3 long beeps will sound...
... DEMO NO OVEN POWER will flash in the display. Display Timer use Timer function as an independent kitchen timer. Press timer on /off pad, then STOP clear pad once. Step Press 1. At end of day clock will count down . 3. Turntable on -off function can be set for cooking or after touching timer pad. Press number from 1 to 3 within 4 seconds after microwave has already been started as follows - The time of timer, 3 long beeps will sound...
Complete Owner's Guide (English)
Page 23
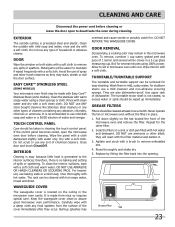
... interior surfaces; ODOR REMOVAL Occasionally, a cooking odor may stain, streak or dull the door surface. WAVEGUIDE COVER The waveguide cover is precoated steel and plastic. Metal parts will react with hot water. Clean the stainless with a soft cloth. DO NOT USE ABRASIVE OR HARSH CLEANERS OR SCOURING PADS. Never operate the fan or microwave oven without the filters in the microwave oven cavity. EASY CARE™ STAINLESS STEEL (SOME MODELS) Your microwave oven...
... interior surfaces; ODOR REMOVAL Occasionally, a cooking odor may stain, streak or dull the door surface. WAVEGUIDE COVER The waveguide cover is precoated steel and plastic. Metal parts will react with hot water. Clean the stainless with a soft cloth. DO NOT USE ABRASIVE OR HARSH CLEANERS OR SCOURING PADS. Never operate the fan or microwave oven without the filters in the microwave oven cavity. EASY CARE™ STAINLESS STEEL (SOME MODELS) Your microwave oven...

Complete Owner's Guide (English)
Page 24
...the screws removed in step 2. Close light cover and secure with screw removed in your oven. 5. Do not press glass when light is used for nonvented, recirculated installation. CLEANING AND CARE Disconnect the power cord before cleaning or leave the door open to the microwave oven at the circuit breaker panel or by unplugging. 2. Oven light Charcoal filter Hood louver Scrrews MICROWAVE OVEN LIGHT Remove the louver per instructions 1-3 above and charcoal filter, if used . Replace light bulbs with equivalent watt bulb available from parts distributor. Disconnect power to...
...the screws removed in step 2. Close light cover and secure with screw removed in your oven. 5. Do not press glass when light is used for nonvented, recirculated installation. CLEANING AND CARE Disconnect the power cord before cleaning or leave the door open to the microwave oven at the circuit breaker panel or by unplugging. 2. Oven light Charcoal filter Hood louver Scrrews MICROWAVE OVEN LIGHT Remove the louver per instructions 1-3 above and charcoal filter, if used . Replace light bulbs with equivalent watt bulb available from parts distributor. Disconnect power to...
Complete Owner's Guide (English)
Page 25
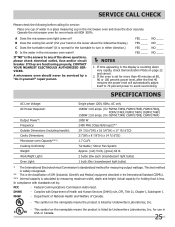
....Ft. A microwave oven should never be serviced by measuring maximum width, depth and height. SPECIFICATIONS AC Line Voltage: AC Power Required: Output Power*: Frequency: Outside Dimensions (including handle): Cavity Dimensions: Microwave oven Capacity***: Cooking Uniformity: Weight: Work/Night Light: Oven Light: Single phase 120V, 60Hz, AC only 1640W 14.0 amps. (for FGMV173KW, FGMV173KB, FGMV173KQ, FGMV174KF, FGMV174KM, DGMV174KF) 1500W 13.0 amps. (for use in the display is calculated by a "do-it-yourself" repair person. In...
....Ft. A microwave oven should never be serviced by measuring maximum width, depth and height. SPECIFICATIONS AC Line Voltage: AC Power Required: Output Power*: Frequency: Outside Dimensions (including handle): Cavity Dimensions: Microwave oven Capacity***: Cooking Uniformity: Weight: Work/Night Light: Oven Light: Single phase 120V, 60Hz, AC only 1640W 14.0 amps. (for FGMV173KW, FGMV173KB, FGMV173KQ, FGMV174KF, FGMV174KM, DGMV174KF) 1500W 13.0 amps. (for use in the display is calculated by a "do-it-yourself" repair person. In...
Complete Owner's Guide (English)
Page 26
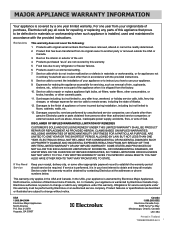
..., cabinets, walls, etc. 13. USA 1.800.944.9044 Electrolux Major Appliances North America P.O. For one year limited warranty. Products purchased "as abuse, misuse, inadequate power supply, accidents, fires, or acts of Alaska. 12. Food loss due to repair or replace appliance light bulbs, air filters, water filters, other consumables, or knobs, handles, or other than authorized service companies; use...
..., cabinets, walls, etc. 13. USA 1.800.944.9044 Electrolux Major Appliances North America P.O. For one year limited warranty. Products purchased "as abuse, misuse, inadequate power supply, accidents, fires, or acts of Alaska. 12. Food loss due to repair or replace appliance light bulbs, air filters, water filters, other consumables, or knobs, handles, or other than authorized service companies; use...


