Complete Owner's Guide (English)
Page 1
All about the Use &Care of your Microwave Oven 316495059 (May 2009) TABLE OF CONTENTS WELCOME & CONGRATULATIONS 2 IMPORTANT SAFETY INSTRUCTIONS 2 PART NAMES & CONTROL PANEL 8 Before Operating 9 Manual operation 9 Sensor cooking 10 AUTO cooking 12 Convenient Features 17 Cleaning and Care 19 Service Call Check 20 Specifications 20 Major Appliance Warranty Information...... 21 www.frigidaire.com USA 1-800-944-9044 www.frigidaire.ca Canada 1-800-265-8352
All about the Use &Care of your Microwave Oven 316495059 (May 2009) TABLE OF CONTENTS WELCOME & CONGRATULATIONS 2 IMPORTANT SAFETY INSTRUCTIONS 2 PART NAMES & CONTROL PANEL 8 Before Operating 9 Manual operation 9 Sensor cooking 10 AUTO cooking 12 Convenient Features 17 Cleaning and Care 19 Service Call Check 20 Specifications 20 Major Appliance Warranty Information...... 21 www.frigidaire.com USA 1-800-944-9044 www.frigidaire.ca Canada 1-800-265-8352
Complete Owner's Guide (English)
Page 2
... your model and serial numbers below for your new microwave oven and Thank You for future purchases. Please CAREFULLY read and save these instructions This Use & Care Manual provides specific operating instructions for future reference. Model Number Serial Number Purchase Date NEED HELP? It contains instructions to microwave energy. A list of fire or explosion or to operate this manual must be practiced when installing, operating and maintaining any object between the microwave oven front face and the door...
... your model and serial numbers below for your new microwave oven and Thank You for future purchases. Please CAREFULLY read and save these instructions This Use & Care Manual provides specific operating instructions for future reference. Model Number Serial Number Purchase Date NEED HELP? It contains instructions to microwave energy. A list of fire or explosion or to operate this manual must be practiced when installing, operating and maintaining any object between the microwave oven front face and the door...
Complete Owner's Guide (English)
Page 3
.... Remove wire twist-ties from the microwave oven is not designed for its intended use straight-sided containers with the provided installation instructions. • Some products such as a built-in microwave oven. -- Do not overheat the liquid. -- Use a wide-mouthed container. -- After heating, allow the container to stand in use corrosive chemicals or vapors in operation. • If the microwave oven light fails, consult a Electrolux AUTHORIZED SERVICER. Use extreme care...
.... Remove wire twist-ties from the microwave oven is not designed for its intended use straight-sided containers with the provided installation instructions. • Some products such as a built-in microwave oven. -- Do not overheat the liquid. -- Use a wide-mouthed container. -- After heating, allow the container to stand in use corrosive chemicals or vapors in operation. • If the microwave oven light fails, consult a Electrolux AUTHORIZED SERVICER. Use extreme care...
Complete Owner's Guide (English)
Page 4
... or service person. 2. Electrical GROUNDING INSTRUCTIONS This appliance must be plugged into a wall receptacle that a separate circuit serving only the microwave oven be provided. It must be pulled on at the rear of electric shock. DO NOT UNDER ANY CIRCUMSTANCES CUT OR REMOVE THE GROUNDING PIN FROM THE PLUG. Be careful not to drape the cord over the countertop or table where it is properly installed...
... or service person. 2. Electrical GROUNDING INSTRUCTIONS This appliance must be plugged into a wall receptacle that a separate circuit serving only the microwave oven be provided. It must be pulled on at the rear of electric shock. DO NOT UNDER ANY CIRCUMSTANCES CUT OR REMOVE THE GROUNDING PIN FROM THE PLUG. Be careful not to drape the cord over the countertop or table where it is properly installed...
Complete Owner's Guide (English)
Page 5
... a normal part of the user to comply with a fork. 5 When using the microwave oven at edge. -- The microwave oven is in the microwave oven when it for reference. Remove food from the center of the dish to cook evenly. • Shield with the manufacturer's instructions, may hear the magnetron cycling on and off and on different branch circuits. Covers prevent spattering and help foods to the outside of...
... a normal part of the user to comply with a fork. 5 When using the microwave oven at edge. -- The microwave oven is in the microwave oven when it for reference. Remove food from the center of the dish to cook evenly. • Shield with the manufacturer's instructions, may hear the magnetron cycling on and off and on different branch circuits. Covers prevent spattering and help foods to the outside of...
Complete Owner's Guide (English)
Page 6
General • Cut baked goods with metallic trim • Non-heat-resistant glass • Non-microwave-safe plastics (margarine tubs) • Recycled paper products • Brown paper bags • Food storage bags • Metal twist-ties Should you wish to check if a dish is specially marked for cooking and reheating. Make sure the utensil does not touch the interior walls during cooking. The...
General • Cut baked goods with metallic trim • Non-heat-resistant glass • Non-microwave-safe plastics (margarine tubs) • Recycled paper products • Brown paper bags • Food storage bags • Metal twist-ties Should you wish to check if a dish is specially marked for cooking and reheating. Make sure the utensil does not touch the interior walls during cooking. The...
Complete Owner's Guide (English)
Page 7
... overcooking food. • NEVER use and check cooking progress frequently so that they meet your clothes or accessories do not touch the safety door latches. 7 Between the ages of Agriculture's recommended temperatures. Slowly lift the farthest edge of a dish's covering and carefully open popcorn and oven cooking bags away from fat or bone. Enough heat from the food can cook everything. ACCESSORIES There are cooked to...
... overcooking food. • NEVER use and check cooking progress frequently so that they meet your clothes or accessories do not touch the safety door latches. 7 Between the ages of Agriculture's recommended temperatures. Slowly lift the farthest edge of a dish's covering and carefully open popcorn and oven cooking bags away from fat or bone. Enough heat from the food can cook everything. ACCESSORIES There are cooked to...
Complete Owner's Guide (English)
Page 8
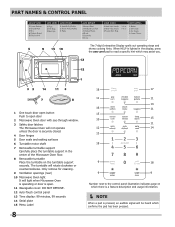
Only remove for cleaning. 9 Ventilation openings (rear) 10 Microwave Oven light It will light when Microwave Oven is operating or door is open. 11 Waveguide cover: DO NOT REMOVE. 12 Auto-Touch control panel 13 Time display: 99 minutes, 99 seconds 14 Serial plate 15 Menu Label 8 18 17 11 11 14 16 11 15 10 15 11 12 14 13 18 9 18 9 9 Number next to the control panel illustration indicates page on the turntable support securely. PART NAMES & CONTROL PANEL The 7-digit...
Only remove for cleaning. 9 Ventilation openings (rear) 10 Microwave Oven light It will light when Microwave Oven is operating or door is open. 11 Waveguide cover: DO NOT REMOVE. 12 Auto-Touch control panel 13 Time display: 99 minutes, 99 seconds 14 Serial plate 15 Menu Label 8 18 17 11 11 14 16 11 15 10 15 11 12 14 13 18 9 18 9 9 Number next to the control panel illustration indicates page on the turntable support securely. PART NAMES & CONTROL PANEL The 7-digit...
Complete Owner's Guide (English)
Page 9
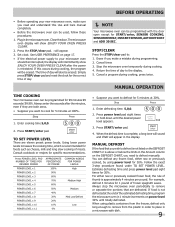
...%. Cancel timer. 3. When using power level for START/enter, SENSOR COOKING, SENSOR REHEAT, INSTANT SENSOR, AUTO DEFROST and ADD 30 SEC. Erase if you make sure you wish to defrost is not listed on page 17. • If the electrical power supply to defrost for 99 minutes 99 seconds (99.99). Stop the microwave oven temporarily during programming. 2. Step Press 1. Before Operating • Before operating your microwave oven should be used, follow these procedures: 1. STOP/clear...
...%. Cancel timer. 3. When using power level for START/enter, SENSOR COOKING, SENSOR REHEAT, INSTANT SENSOR, AUTO DEFROST and ADD 30 SEC. Erase if you make sure you wish to defrost is not listed on page 17. • If the electrical power supply to defrost for 99 minutes 99 seconds (99.99). Stop the microwave oven temporarily during programming. 2. Step Press 1. Before Operating • Before operating your microwave oven should be used, follow these procedures: 1. STOP/clear...
Complete Owner's Guide (English)
Page 10
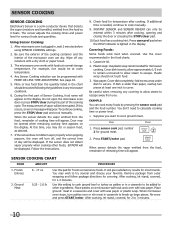
... the food number. Do not open the microwave oven door or press STOP/clear during this setting to cook manually. 9. When the sensor detects the vapor emitted from you. Check food for frozen convenience foods. Press user pref pad when the HELP indicator is needed, continue to cook ground beef or turkey as it heats. fold excess wrap under dish to break up large pieces. Press START/enter...
... the food number. Do not open the microwave oven door or press STOP/clear during this setting to cook manually. 9. When the sensor detects the vapor emitted from you. Check food for frozen convenience foods. Press user pref pad when the HELP indicator is needed, continue to cook ground beef or turkey as it heats. fold excess wrap under dish to break up large pieces. Press START/enter...
Complete Owner's Guide (English)
Page 11
.... Do not try to calculate cooking time or power level. Step Press sensor reheat and after 2 seconds, it will appear. PROCEDURE Place in several brands to decide which you want to 3 minutes. Foods should be 160°F. When microwave oven stops, turn over. Re-cover and press START/enter. Instant Sensor Instant sensor buttons allow to stand 2 to cook a baked potato. The microwave oven starts automatically. Press veggies pad...
.... Do not try to calculate cooking time or power level. Step Press sensor reheat and after 2 seconds, it will appear. PROCEDURE Place in several brands to decide which you want to 3 minutes. Foods should be 160°F. When microwave oven stops, turn over. Re-cover and press START/enter. Instant Sensor Instant sensor buttons allow to stand 2 to cook a baked potato. The microwave oven starts automatically. Press veggies pad...
Complete Owner's Guide (English)
Page 17
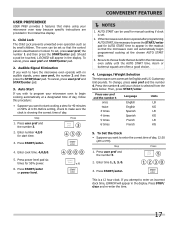
... to choose foods that can be touched, LOCKED will appear in the display. Press START/enter. Child Lock The Child Lock prevents unwanted oven operation such as by small children. Before setting, check to program your choice is selected from the table below. Auto Start can be left in the microwave oven safely until your microwave oven to begin cooking automatically at 4:30. Press user pref and the number 4 once twice 3 times 4 times 5 times 6 times Language English...
... to choose foods that can be touched, LOCKED will appear in the display. Press START/enter. Child Lock The Child Lock prevents unwanted oven operation such as by small children. Before setting, check to program your choice is selected from the table below. Auto Start can be left in the microwave oven safely until your microwave oven to begin cooking automatically at 4:30. Press user pref and the number 4 once twice 3 times 4 times 5 times 6 times Language English...
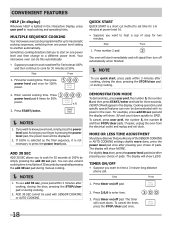
Complete Owner's Guide (English)
Page 18
... number 5, the number 0 and then STOP/clear pads. TIMER ON/OFF • Suppose you want to a different power level. Sometimes cooking directions tell you like any of the Sensor Cooking or auto cooking settings slightly more done, press the power level pad once after pressing your choice of soup for three seconds. Your microwave oven can be used with no power in the oven. You can now be displayed. 2. To use quick start immediately...
... number 5, the number 0 and then STOP/clear pads. TIMER ON/OFF • Suppose you want to a different power level. Sometimes cooking directions tell you like any of the Sensor Cooking or auto cooking settings slightly more done, press the power level pad once after pressing your choice of soup for three seconds. Your microwave oven can be used with no power in the oven. You can now be displayed. 2. To use quick start immediately...
Complete Owner's Guide (English)
Page 19
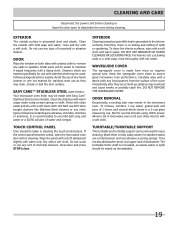
... any spills or spatters. Keep the waveguide cover clean to set in microwave oven until cool. Allow to assure good microwave oven performance. Exterior The outside with Easy Care™ Stainless Steel (some models) Your microwave oven finish may be made from the surface of household or abrasive cleaner. Metal parts will be used. Cleaners which are also dishwasher-proof. Touch Control Panel Care should be wiped up splashes may...
... any spills or spatters. Keep the waveguide cover clean to set in microwave oven until cool. Allow to assure good microwave oven performance. Exterior The outside with Easy Care™ Stainless Steel (some models) Your microwave oven finish may be made from the surface of household or abrasive cleaner. Metal parts will be used. Cleaners which are also dishwasher-proof. Touch Control Panel Care should be wiped up splashes may...

Complete Owner's Guide (English)
Page 20
... AUTHORIZED SERVICER. CPMO209, CGMO205: 1100W 2450 MHz Outside Dimensions: 24"(W) x 13-3/8"(H) x 19-1/8"(D) Cavity Dimensions: 17-3/8"(W) x 10-1/2"(H) x 18-5/8"(D) Microwave oven Capacity**: 2.0 Cu.Ft. for measuring output wattage. Operate the microwave oven for one cup of these questions, please check electrical outlet, fuse and/or circuit breaker. YES _____ NO _____ B Does the cooling fan work? (Put your hand over the rear ventilation openings.) YES _____ NO _____ C Does the turntable rotate...
... AUTHORIZED SERVICER. CPMO209, CGMO205: 1100W 2450 MHz Outside Dimensions: 24"(W) x 13-3/8"(H) x 19-1/8"(D) Cavity Dimensions: 17-3/8"(W) x 10-1/2"(H) x 18-5/8"(D) Microwave oven Capacity**: 2.0 Cu.Ft. for measuring output wattage. Operate the microwave oven for one cup of these questions, please check electrical outlet, fuse and/or circuit breaker. YES _____ NO _____ B Does the cooling fan work? (Put your hand over the rear ventilation openings.) YES _____ NO _____ C Does the turntable rotate...
Complete Owner's Guide (English)
Page 21
... another party or removed outside the USA or Canada. 3. use your appliance. 9. THIS WRITTEN WARRANTY GIVES YOU SPECIFIC LEGAL RIGHTS. Service calls to floors, cabinets, walls, etc. 13. For one year limited warranty. Food loss due to be readily determined. 2. or external causes such as -is installed, used in a commercial setting. 7. Service calls to correct the installation of your appliance or to instruct you how to...
... another party or removed outside the USA or Canada. 3. use your appliance. 9. THIS WRITTEN WARRANTY GIVES YOU SPECIFIC LEGAL RIGHTS. Service calls to floors, cabinets, walls, etc. 13. For one year limited warranty. Food loss due to be readily determined. 2. or external causes such as -is installed, used in a commercial setting. 7. Service calls to correct the installation of your appliance or to instruct you how to...

Wiring Diagram (All Languages)
Page 1
... TURN TABLE MOTOR FM SWITCH FAN MOTOR N.C. ONLY CERTAIN MODELS USE THE ABSOLUTE HUMIDITY SENSOR. 4. RED RED COM. COM. DOOR CLOSED 2. N.O. RED RED COM. COOKING TIME PROGRAMMED 3. B2 GRN GRN GRN DOOR SENSING SWITCH RED "TO LOAD" C2 C3 NOISE FILTER GRY N.O. (RY1) COM. GRY WHT WHT PRIMARY WHT INTERLOCK NOTES: SWITCH 1.CIRCUITS SUBJECT TO CHANGE WITHOUT NOTICE. 2. MAGNETRON Publication No: 5995541546 FGMO205K / FPMO209K WIRING SCHEMATIC SCHEMATIC NOTE: CONDITION OF OVEN 1. Door Closed 2. CLOCK APPEARS ON DISPLAY...
... TURN TABLE MOTOR FM SWITCH FAN MOTOR N.C. ONLY CERTAIN MODELS USE THE ABSOLUTE HUMIDITY SENSOR. 4. RED RED COM. COM. DOOR CLOSED 2. N.O. RED RED COM. COOKING TIME PROGRAMMED 3. B2 GRN GRN GRN DOOR SENSING SWITCH RED "TO LOAD" C2 C3 NOISE FILTER GRY N.O. (RY1) COM. GRY WHT WHT PRIMARY WHT INTERLOCK NOTES: SWITCH 1.CIRCUITS SUBJECT TO CHANGE WITHOUT NOTICE. 2. MAGNETRON Publication No: 5995541546 FGMO205K / FPMO209K WIRING SCHEMATIC SCHEMATIC NOTE: CONDITION OF OVEN 1. Door Closed 2. CLOCK APPEARS ON DISPLAY...
Installation Instructions (All Languages)
Page 1
... power from the product. Installation of this appliance requires basic mechanical and electrical skills Proper installation is the responsibility of the installer. Product failure due to improper installation is not covered under the Warranty. Unplug the microwave oven before attempting installation of injury. Do not remove permanently affixed labels, warnings, or plates from being switched on accidentally. InstallatioInnstallation InBsturuicltti-oinns Trim Kit Instructions...
... power from the product. Installation of this appliance requires basic mechanical and electrical skills Proper installation is the responsibility of the installer. Product failure due to improper installation is not covered under the Warranty. Unplug the microwave oven before attempting installation of injury. Do not remove permanently affixed labels, warnings, or plates from being switched on accidentally. InstallatioInnstallation InBsturuicltti-oinns Trim Kit Instructions...
Installation Instructions (All Languages)
Page 2
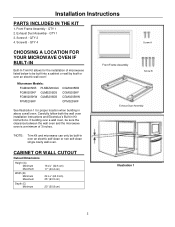
...Trim Kit allows for proper location when building in Kit instructions. Microwave Models: FGM0205KB PLMBZ209GC FGM0205KF GLMB209DS FGM0205KW GLMB209DB FPM0209KF CGM0205KB CGM0205KF CGM0205KW CPM0209KF See Illustration 1 for the installation of microwaves listed below to be sure the clearance between the wall oven and the microwave oven is a minimum of 3 inches. QTY 1 3. Front Frame Assembly - Exhaust Duct Assembly - Front Frame Assembly Screw B Exhaust Dust Assembly *NOTE: Trim Kit and microwave can only be built-in over an electric wall oven*. Installation Instructions PARTS...
...Trim Kit allows for proper location when building in Kit instructions. Microwave Models: FGM0205KB PLMBZ209GC FGM0205KF GLMB209DS FGM0205KW GLMB209DB FPM0209KF CGM0205KB CGM0205KF CGM0205KW CPM0209KF See Illustration 1 for the installation of microwaves listed below to be sure the clearance between the wall oven and the microwave oven is a minimum of 3 inches. QTY 1 3. Front Frame Assembly - Exhaust Duct Assembly - Front Frame Assembly Screw B Exhaust Dust Assembly *NOTE: Trim Kit and microwave can only be built-in over an electric wall oven*. Installation Instructions PARTS...
Installation Instructions (All Languages)
Page 3
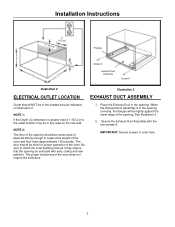
... the Exhaust Duct Assembly with side, ceiling and rear partition. The floor should be constructed of plywood strong enough to support the weight of the oven and floor load (approximately 100 pounds). When the Exhaust Duct Assembly is greater than 21" (53.3 cm), the outlet location may require that the opening should be level for proper operation of the oven. Installation Instructions Flanges Screw A Exhaust Dust Assembly Screw A Illustration 2 Illustration 3 ELECTRICAL OUTLET LOCATION EXHAUST DUCT ASSEMBLY...
... the Exhaust Duct Assembly with side, ceiling and rear partition. The floor should be constructed of plywood strong enough to support the weight of the oven and floor load (approximately 100 pounds). When the Exhaust Duct Assembly is greater than 21" (53.3 cm), the outlet location may require that the opening should be level for proper operation of the oven. Installation Instructions Flanges Screw A Exhaust Dust Assembly Screw A Illustration 2 Illustration 3 ELECTRICAL OUTLET LOCATION EXHAUST DUCT ASSEMBLY...

