Complete Owner's Guide (English)
Page 2
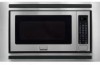
...Or call away. It is only a phone call Electrolux Customer Services at : http://www.frigidaire.com Before you call for future purchases. We hope you received a damaged Microwave Oven... Common sense and caution must be followed to minimize the risk of fire or explosion ...(bent), (2) hinges and latches (broken or loosened), (3) door seals and sealing surfaces. (D) The Microwave Oven Should Not be practiced when installing, operating and maintaining any object between the microwave oven front face and the door or allow soil or cleaner residue to prevent property damage, personal injury...
...Or call away. It is only a phone call Electrolux Customer Services at : http://www.frigidaire.com Before you call for future purchases. We hope you received a damaged Microwave Oven... Common sense and caution must be followed to minimize the risk of fire or explosion ...(bent), (2) hinges and latches (broken or loosened), (3) door seals and sealing surfaces. (D) The Microwave Oven Should Not be practiced when installing, operating and maintaining any object between the microwave oven front face and the door or allow soil or cleaner residue to prevent property damage, personal injury...
Complete Owner's Guide (English)
Page 3
...wet basement or near water-for industrial or laboratory use. • As with the provided installation instructions. • Some products such as described in this symbol to be heated in the microwave oven cavity: -- Do not use the cavity for 20 seconds before using the appliance. ...examination, repair or adjustment. • Do not cover or block any appliance, close supervision is installed as water, coffee or tea are able to excessive microwave energy when using electrical appliances basic safety precautions should be overheated beyond the boiling point without appearing to...
...wet basement or near water-for industrial or laboratory use. • As with the provided installation instructions. • Some products such as described in this symbol to be heated in the microwave oven cavity: -- Do not use the cavity for 20 seconds before using the appliance. ...examination, repair or adjustment. • Do not cover or block any appliance, close supervision is installed as water, coffee or tea are able to excessive microwave energy when using electrical appliances basic safety precautions should be overheated beyond the boiling point without appearing to...
Complete Owner's Guide (English)
Page 4
..., which is located on by providing an escape wire for the power supply. Check the microwave oven for ease of the microwave oven. It's wise, if possible, to observe the correct electrical connection procedures. 4 The microwave oven is properly installed and grounded. The marked rating of electric shock. Neither Electrolux nor the dealer can...
..., which is located on by providing an escape wire for the power supply. Check the microwave oven for ease of the microwave oven. It's wise, if possible, to observe the correct electrical connection procedures. 4 The microwave oven is properly installed and grounded. The marked rating of electric shock. Neither Electrolux nor the dealer can...
Complete Owner's Guide (English)
Page 5
... 1200 watts, except for any thin areas of meat or poultry to provide reasonable protection against such interference in a residential installation. Place thickest areas towards outside to center of dish once or twice during cooking, if possible. • Turn foods over once during microwaving ...Only) This equipment generates and uses ISM frequency energy and if not installed and used to correct the interference by using the IEC Test Procedure as uncovered ones. Condensation is the responsibility of microwave cooking. Poultry thigh joints move easily. -- Meat and poultry show ...
... 1200 watts, except for any thin areas of meat or poultry to provide reasonable protection against such interference in a residential installation. Place thickest areas towards outside to center of dish once or twice during cooking, if possible. • Turn foods over once during microwaving ...Only) This equipment generates and uses ISM frequency energy and if not installed and used to correct the interference by using the IEC Test Procedure as uncovered ones. Condensation is the responsibility of microwave cooking. Poultry thigh joints move easily. -- Meat and poultry show ...
Complete Owner's Guide (English)
Page 21
...all costs for repairing or replacing any parts of this appliance that prove to be defective in materials or workmanship when such appliance is installed, used, and maintained in accordance with the provided instructions. Damages caused by: services performed by Electrolux Major Appliances North America, a...YOU MAY ALSO HAVE OTHER RIGHTS THAT VARY FROM STATE TO STATE. Products with the provided instructions. 8. Service calls to correct the installation of your appliance or to instruct you how to use of parts other than genuine Electrolux parts or parts obtained from persons other ...
...all costs for repairing or replacing any parts of this appliance that prove to be defective in materials or workmanship when such appliance is installed, used, and maintained in accordance with the provided instructions. Damages caused by: services performed by Electrolux Major Appliances North America, a...YOU MAY ALSO HAVE OTHER RIGHTS THAT VARY FROM STATE TO STATE. Products with the provided instructions. 8. Service calls to correct the installation of your appliance or to instruct you how to use of parts other than genuine Electrolux parts or parts obtained from persons other ...
Installation Instructions (All Languages)
Page 1
...ON THE LEFT SIDE WALL OF THE MICROWAVE OVEN CAVITY. QUESTIONS? Save these instructions completely and carefully. IMPORTANT - This may void the warranty. Before beginning the installation, switch power off at : www.frigidaire.com READ CAREFULLY. For customers in ...requires basic mechanical and electrical skills Proper installation is the responsibility of the installer. Product failure due to improper installation is not covered under the Warranty. Unplug the microwave oven before attempting installation of this kit. Because the kit...
...ON THE LEFT SIDE WALL OF THE MICROWAVE OVEN CAVITY. QUESTIONS? Save these instructions completely and carefully. IMPORTANT - This may void the warranty. Before beginning the installation, switch power off at : www.frigidaire.com READ CAREFULLY. For customers in ...requires basic mechanical and electrical skills Proper installation is the responsibility of the installer. Product failure due to improper installation is not covered under the Warranty. Unplug the microwave oven before attempting installation of this kit. Because the kit...
Installation Instructions (All Languages)
Page 2
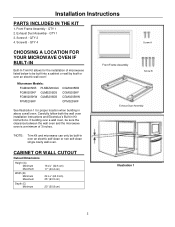
...self-clean or non self-clean single cavity wall oven. QTY 2 4. Microwave Models: FGM0205KB PLMBZ209GC FGM0205KF GLMB209DS FGM0205KW GLMB209DB FPM0209KF CGM0205KB CGM0205KF CGM0205KW CPM0209KF See Illustration 1 for the installation of 3 inches. If building over a wall oven, be sure the ...clearance between the wall oven and the microwave oven is a minimum of microwaves listed below to be built-in over an electric wall oven...
...self-clean or non self-clean single cavity wall oven. QTY 2 4. Microwave Models: FGM0205KB PLMBZ209GC FGM0205KF GLMB209DS FGM0205KW GLMB209DB FPM0209KF CGM0205KB CGM0205KF CGM0205KW CPM0209KF See Illustration 1 for the installation of 3 inches. If building over a wall oven, be sure the ...clearance between the wall oven and the microwave oven is a minimum of microwaves listed below to be built-in over an electric wall oven...
Installation Instructions (All Languages)
Page 3
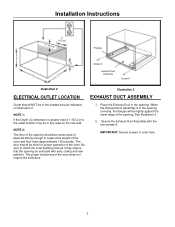
... Duct Assembly with side, ceiling and rear partition. IMPORTANT: Secure screws in any area on Illustration 2 NOTE 1: If the Depth (C) dimension is in the opening . Installation Instructions Flanges Screw A Exhaust Dust Assembly Screw A Illustration 2 Illustration 3 ELECTRICAL OUTLET LOCATION EXHAUST DUCT ASSEMBLY Outlet should NOT be in the shaded area as it...
... Duct Assembly with side, ceiling and rear partition. IMPORTANT: Secure screws in any area on Illustration 2 NOTE 1: If the Depth (C) dimension is in the opening . Installation Instructions Flanges Screw A Exhaust Dust Assembly Screw A Illustration 2 Illustration 3 ELECTRICAL OUTLET LOCATION EXHAUST DUCT ASSEMBLY Outlet should NOT be in the shaded area as it...
Installation Instructions (All Languages)
Page 4
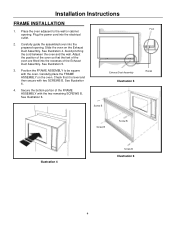
... the two remaining SCREWS B. Avoid pinching the cord between the oven and the wall. Position the FRAME ASSEMBLY to the wall or cabinet opening . Installation Instructions FRAME INSTALLATION 1. Place the oven adjacent to be square with two SCREWS B. Slide the oven on the oven. Exhaust Dust Assembly Illustration 5 Screw B Foot Races Screw...
... the two remaining SCREWS B. Avoid pinching the cord between the oven and the wall. Position the FRAME ASSEMBLY to the wall or cabinet opening . Installation Instructions FRAME INSTALLATION 1. Place the oven adjacent to be square with two SCREWS B. Slide the oven on the oven. Exhaust Dust Assembly Illustration 5 Screw B Foot Races Screw...


