Complete Owner's Guide (English)
Page 1
All about the Use &Care of your Microwave Oven 316495059 (May 2009) TABLE OF CONTENTS WELCOME & CONGRATULATIONS 2 IMPORTANT SAFETY INSTRUCTIONS 2 PART NAMES & CONTROL PANEL 8 Before Operating 9 Manual operation 9 Sensor cooking 10 AUTO cooking 12 Convenient Features 17 Cleaning and Care 19 Service Call Check 20 Specifications 20 Major Appliance Warranty Information...... 21 www.frigidaire.com USA 1-800-944-9044 www.frigidaire.ca Canada 1-800-265-8352
All about the Use &Care of your Microwave Oven 316495059 (May 2009) TABLE OF CONTENTS WELCOME & CONGRATULATIONS 2 IMPORTANT SAFETY INSTRUCTIONS 2 PART NAMES & CONTROL PANEL 8 Before Operating 9 Manual operation 9 Sensor cooking 10 AUTO cooking 12 Convenient Features 17 Cleaning and Care 19 Service Call Check 20 Specifications 20 Major Appliance Warranty Information...... 21 www.frigidaire.com USA 1-800-944-9044 www.frigidaire.ca Canada 1-800-265-8352
Complete Owner's Guide (English)
Page 2
... cover every possible condition and situation that might occur. Your satisfaction is damaged. Please CAREFULLY read and save these instructions This Use & Care Manual provides specific operating instructions for future reference. Model Number Serial Number Purchase Date NEED HELP? If you consider us serve you the Microwave Oven. Check the section titled "Service Call Check". Please record your purchase of life. Read this manual must be practiced when installing, operating...
... cover every possible condition and situation that might occur. Your satisfaction is damaged. Please CAREFULLY read and save these instructions This Use & Care Manual provides specific operating instructions for future reference. Model Number Serial Number Purchase Date NEED HELP? If you consider us serve you the Microwave Oven. Check the section titled "Service Call Check". Please record your purchase of life. Read this manual must be practiced when installing, operating...
Complete Owner's Guide (English)
Page 3
... and sealed containers -for example, closed , turn microwave oven off and disconnect the power cord or shut off power at least for its intended use this symbol to heat, cook or dry food. Do not mount over edge of table or counter. • See door surface cleaning instructions on page 4. • Install or locate this appliance only in accordance with the provided installation instructions. • Some products such as water...
... and sealed containers -for example, closed , turn microwave oven off and disconnect the power cord or shut off power at least for its intended use this symbol to heat, cook or dry food. Do not mount over edge of table or counter. • See door surface cleaning instructions on page 4. • Install or locate this appliance only in accordance with the provided installation instructions. • Some products such as water...
Complete Owner's Guide (English)
Page 4
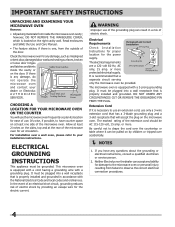
... have counter space on at the rear of the grounding plug can be grounded. IMPORTANT SAFETY INSTRUCTIONS Unpacking and Examining Your Microwave oven Remove: • All packing materials from inside the cavity or on the door. It must be pulled on by providing an escape wire for ease of electric shock. Door Seals and Hinges Sealing Surfaces Waveguide Cover Choosing a Location for the power supply...
... have counter space on at the rear of the grounding plug can be grounded. IMPORTANT SAFETY INSTRUCTIONS Unpacking and Examining Your Microwave oven Remove: • All packing materials from inside the cavity or on the door. It must be pulled on by providing an escape wire for ease of electric shock. Door Seals and Hinges Sealing Surfaces Waveguide Cover Choosing a Location for the power supply...
Complete Owner's Guide (English)
Page 5
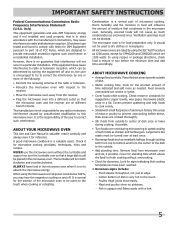
... installation. Ventilation openings must be used properly, that condenses in strict accordance with the manufacturer's instructions, may hear the magnetron cycling on , the user is valuable: read it carefully and always save it is no pinkness. -- Remove food from the center of FCC Rules, which are designed to part 18 of the dish to finish cooking without the turntable and support nor turn both...
... installation. Ventilation openings must be used properly, that condenses in strict accordance with the manufacturer's instructions, may hear the magnetron cycling on , the user is valuable: read it carefully and always save it is no pinkness. -- Remove food from the center of FCC Rules, which are designed to part 18 of the dish to finish cooking without the turntable and support nor turn both...
Complete Owner's Guide (English)
Page 6
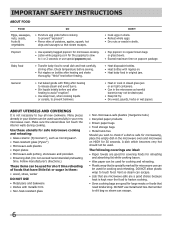
... dish and heat carefully, stirring often. General • Cut baked goods with metallic trim • Non-heat-resistant glass • Non-microwave-safe plastics (margarine tubs) • Recycled paper products • Brown paper bags • Food storage bags • Metal twist-ties Should you wish to buy all new cookware. Make sure the utensil does not touch the interior walls during cooking. DO NOT...
... dish and heat carefully, stirring often. General • Cut baked goods with metallic trim • Non-heat-resistant glass • Non-microwave-safe plastics (margarine tubs) • Recycled paper products • Brown paper bags • Food storage bags • Metal twist-ties Should you wish to buy all new cookware. Make sure the utensil does not touch the interior walls during cooking. DO NOT...
Complete Owner's Guide (English)
Page 7
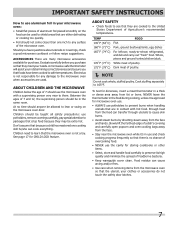
... food because they are many microwave accessories available for storing cookbooks or other items. • Select, store and handle food carefully to preserve its high quality and minimize the spread of 7 and 12, the supervising person should use potholders, remove coverings carefully, pay special attention to lean or swing on the food can be used . To test for Child Lock feature. Food residue can cook...
... food because they are many microwave accessories available for storing cookbooks or other items. • Select, store and handle food carefully to preserve its high quality and minimize the spread of 7 and 12, the supervising person should use potholders, remove coverings carefully, pay special attention to lean or swing on the food can be used . To test for Child Lock feature. Food residue can cook...
Complete Owner's Guide (English)
Page 8
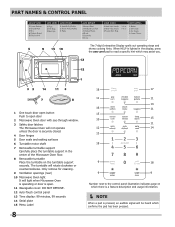
... Interactive Display spells out operating steps and shows cooking hints. The turntable will not operate unless the door is securely closed. 4 Door hinges 5 Door seals and sealing surfaces 6 Turntable motor shaft 7 Removable turntable support Carefully place the turntable support in the display, press the user pref pad to read a specific hint which may assist you. 1 One touch door open button Push to open . 11 Waveguide cover: DO NOT REMOVE. 12 Auto-Touch control panel 13 Time display: 99 minutes, 99 seconds 14 Serial plate 15...
... Interactive Display spells out operating steps and shows cooking hints. The turntable will not operate unless the door is securely closed. 4 Door hinges 5 Door seals and sealing surfaces 6 Turntable motor shaft 7 Removable turntable support Carefully place the turntable support in the display, press the user pref pad to read a specific hint which may assist you. 1 One touch door open button Push to open . 11 Waveguide cover: DO NOT REMOVE. 12 Auto-Touch control panel 13 Time display: 99 minutes, 99 seconds 14 Serial plate 15...
Complete Owner's Guide (English)
Page 9
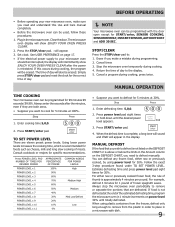
... you read and understand this occurs during programming. 2. If this Use and Care manual completely. • Before the microwave oven can be programmed for specific recommendations. Cancel timer. 3. Close the door. Step Press 1. Cancel a program during cooking. 4. Step Press 1. Enter defrosting time. 5,0,0. 2. x 8 3. Follow the exact 3-step procedure found under TO SET POWER LEVEL. Always stop the microwave oven periodically to place in the microwave oven. Consult cookbook or recipes for 99 minutes...
... you read and understand this occurs during programming. 2. If this Use and Care manual completely. • Before the microwave oven can be programmed for specific recommendations. Cancel timer. 3. Close the door. Step Press 1. Cancel a program during cooking. 4. Step Press 1. Enter defrosting time. 5,0,0. 2. x 8 3. Follow the exact 3-step procedure found under TO SET POWER LEVEL. Always stop the microwave oven periodically to place in the microwave oven. Consult cookbook or recipes for 99 minutes...
Complete Owner's Guide (English)
Page 10
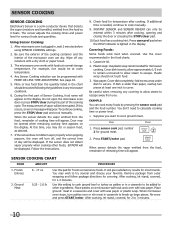
... the food number. Covering Foods: Some foods work best when covered. You may stir or season food, as desired. 7. Remove package from outer wrapping and follow package directions for 1-3 minutes. After cooking, let stand, covered, for temperature after cooking, opening and closing the door or pressing the STOP/clear pad. 10.Each food has a cooking hint. After microwave oven is needed, continue to cook manually. 9. The measurement of the cooking cycle. If this part of...
... the food number. Covering Foods: Some foods work best when covered. You may stir or season food, as desired. 7. Remove package from outer wrapping and follow package directions for 1-3 minutes. After cooking, let stand, covered, for temperature after cooking, opening and closing the door or pressing the STOP/clear pad. 10.Each food has a cooking hint. After microwave oven is needed, continue to cook manually. 9. The measurement of the cooking cycle. If this part of...
Complete Owner's Guide (English)
Page 11
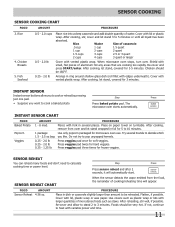
... that are cooking too rapidly. Rice Water Size of more dense foods such as stews. Re-cover and press START/enter. Press Instant Sensor Chart FOOD Baked Potato Popcorn Veggies AMOUNT 1 - 8 med. 1 package 1.5 - 3.5 oz bag 0.25 - 2.0 lb 0.25 - 2.0 lb 0.25 - 1.25 lb PROCEDURE Pierce with vented plastic wrap. Use covers such as plastic wrap or lids with variable power and time. 11 If...
... that are cooking too rapidly. Rice Water Size of more dense foods such as stews. Re-cover and press START/enter. Press Instant Sensor Chart FOOD Baked Potato Popcorn Veggies AMOUNT 1 - 8 med. 1 package 1.5 - 3.5 oz bag 0.25 - 2.0 lb 0.25 - 2.0 lb 0.25 - 1.25 lb PROCEDURE Pierce with vented plastic wrap. Use covers such as plastic wrap or lids with variable power and time. 11 If...
Complete Owner's Guide (English)
Page 17
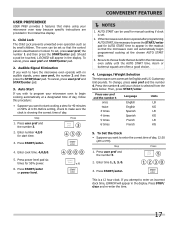
... STOP/clear pad. Step Press 1. The oven can be used for 50% power. Press user pref and the number 3. 2. Be sure to program your choice is a 12 hour clock. Auto Start If you wish to choose foods that can be touched, LOCKED will automatically begin cooking automatically at the chosen Auto Start time. 3. Child Lock The Child Lock prevents unwanted oven operation such as by small children. Should a pad be set , press user pref, the number...
... STOP/clear pad. Step Press 1. The oven can be used for 50% power. Press user pref and the number 3. 2. Be sure to program your choice is a 12 hour clock. Auto Start If you wish to choose foods that can be touched, LOCKED will automatically begin cooking automatically at the chosen Auto Start time. 3. Child Lock The Child Lock prevents unwanted oven operation such as by small children. Should a pad be set , press user pref, the number...
Complete Owner's Guide (English)
Page 18
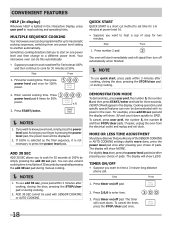
... Features HELP (In display) Whenever HELP is a short-cut method to set clock. For slightly less done, press the power level pad twice after cooking, closing the door, pressing the STOP/clear pad or during cooking. 2. Press power level pad 6 times for 100% power. 2. To use quick start on /off pad. Step Press 1. DEMONSTRATION MODE To demonstrate, press user pref, the number 5, the number 0 and then press START/enter and hold for...
... Features HELP (In display) Whenever HELP is a short-cut method to set clock. For slightly less done, press the power level pad twice after cooking, closing the door, pressing the STOP/clear pad or during cooking. 2. Press power level pad 6 times for 100% power. 2. To use quick start on /off pad. Step Press 1. DEMONSTRATION MODE To demonstrate, press user pref, the number 5, the number 0 and then press START/enter and hold for...
Complete Owner's Guide (English)
Page 19
... The outside with a damp cloth to use baking soda or a mild soap; Dry with Easy Care™ Stainless Steel (some models) Your microwave oven finish may remain in mild, sudsy water; Close door and press STOP/clear. DO NOT USE ABRASIVE OR HARSH CLEANERS OR SCOURING PADS. Keep the waveguide cover clean to the interior surfaces; Do not remove the waveguide cover. Allow to set in cleaning the touch control panel...
... The outside with a damp cloth to use baking soda or a mild soap; Dry with Easy Care™ Stainless Steel (some models) Your microwave oven finish may remain in mild, sudsy water; Close door and press STOP/clear. DO NOT USE ABRASIVE OR HARSH CLEANERS OR SCOURING PADS. Keep the waveguide cover clean to the interior surfaces; Do not remove the waveguide cover. Allow to set in cleaning the touch control panel...

Complete Owner's Guide (English)
Page 20
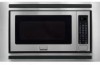
... YOUR NEAREST Electrolux AUTHORIZED SERVICER. Specifications FPMO209KF, CPMO209KF, FGMO205KF, CGMO205KF, FGMO205KB, FGMO205KW AC Line Voltage: UL Rating - CPMO209, CGMO205: 1100W 2450 MHz Outside Dimensions: 24"(W) x 13-3/8"(H) x 19-1/8"(D) Cavity Dimensions: 17-3/8"(W) x 10-1/2"(H) x 18-5/8"(D) Microwave oven Capacity**: 2.0 Cu.Ft. Complies with standards set by a "do-ityourself" repair person. NOTE If time appearing in the display is the answer to turn in either direction.) YES _____ NO _____...
... YOUR NEAREST Electrolux AUTHORIZED SERVICER. Specifications FPMO209KF, CPMO209KF, FGMO205KF, CGMO205KF, FGMO205KB, FGMO205KW AC Line Voltage: UL Rating - CPMO209, CGMO205: 1100W 2450 MHz Outside Dimensions: 24"(W) x 13-3/8"(H) x 19-1/8"(D) Cavity Dimensions: 17-3/8"(W) x 10-1/2"(H) x 18-5/8"(D) Microwave oven Capacity**: 2.0 Cu.Ft. Complies with standards set by a "do-ityourself" repair person. NOTE If time appearing in the display is the answer to turn in either direction.) YES _____ NO _____...
Complete Owner's Guide (English)
Page 21
Exclusions This warranty does not cover the following: 1. Rust on the interior or exterior of parts other than genuine Electrolux parts or parts obtained from the factory. 10. Products purchased "as described or illustrated are subject to use your appliance or to instruct you how to change or add to repair or replace appliance light bulbs, air filters, water filters, other consumables, or knobs, handles, or other...
Exclusions This warranty does not cover the following: 1. Rust on the interior or exterior of parts other than genuine Electrolux parts or parts obtained from the factory. 10. Products purchased "as described or illustrated are subject to use your appliance or to instruct you how to change or add to repair or replace appliance light bulbs, air filters, water filters, other consumables, or knobs, handles, or other...

Wiring Diagram (All Languages)
Page 1
... MODELS USE THE ABSOLUTE HUMIDITY SENSOR. 4. BRN ORG GRN RED RED WHT WHT WHT WHT POWER TRANSFORMER HIGH VOLTAGE CAPACITOR xx µF HIGH VOLTAGE RECTIFIER Figure O-1 Oven Schematic - Off Condition SCHEMATIC NOTE: CONDITION OF OVEN 1. DOOR CLOSED 2. "START" PAD TOUCHED BLK H GRN 120VAC GND 60Hz N R2 C1 MONITOR FUSE (20A) "TO SOURCE" CAVITY MAGNETRON TEMPERATURE TEMPERATURE FUSE RED FUSE ORG ORG N.O. COM. Cooking Condition MAGNETRON 06/09 6 Door...
... MODELS USE THE ABSOLUTE HUMIDITY SENSOR. 4. BRN ORG GRN RED RED WHT WHT WHT WHT POWER TRANSFORMER HIGH VOLTAGE CAPACITOR xx µF HIGH VOLTAGE RECTIFIER Figure O-1 Oven Schematic - Off Condition SCHEMATIC NOTE: CONDITION OF OVEN 1. DOOR CLOSED 2. "START" PAD TOUCHED BLK H GRN 120VAC GND 60Hz N R2 C1 MONITOR FUSE (20A) "TO SOURCE" CAVITY MAGNETRON TEMPERATURE TEMPERATURE FUSE RED FUSE ORG ORG N.O. COM. Cooking Condition MAGNETRON 06/09 6 Door...
Installation Instructions (All Languages)
Page 1
... THIS BUILT-IN KIT IS DESIGNED FOR USE ONLY WITH ELECTROLUX MICROWAVE OVENS SPECIFYING BUILT-IN KIT MWTK(P)27K OR MWTK(P)30K ON THE RATING LABEL ON THE LEFT SIDE WALL OF THE MICROWAVE OVEN CAVITY. Before beginning the installation, switch power off at : www.frigidaire.com READ CAREFULLY. Observe all governing codes and coordinates. Note to the service panel. Installation of this appliance requires basic mechanical and electrical...
... THIS BUILT-IN KIT IS DESIGNED FOR USE ONLY WITH ELECTROLUX MICROWAVE OVENS SPECIFYING BUILT-IN KIT MWTK(P)27K OR MWTK(P)30K ON THE RATING LABEL ON THE LEFT SIDE WALL OF THE MICROWAVE OVEN CAVITY. Before beginning the installation, switch power off at : www.frigidaire.com READ CAREFULLY. Observe all governing codes and coordinates. Note to the service panel. Installation of this appliance requires basic mechanical and electrical...
Installation Instructions (All Languages)
Page 2
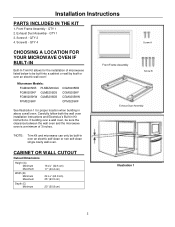
Screw A - Carefully follow both the wall oven installation instructions and Electrolux's Built-in over a wall oven, be sure the clearance between the wall oven and the microwave oven is a minimum of 3 inches. Front Frame Assembly Screw B Exhaust Dust Assembly *NOTE: Trim Kit and microwave can only be built into a cabinet or wall by itself or over an electric wall oven*. QTY 4 Screw A CHOOSING A LOCATION FOR YOUR MICROWAVE OVEN IF BUILT-IN Built-In Trim Kit allows for proper location when building in above a wall oven. CABINET OR WALL CUTOUT Cutout Dimensions Height (A) ...
Screw A - Carefully follow both the wall oven installation instructions and Electrolux's Built-in over a wall oven, be sure the clearance between the wall oven and the microwave oven is a minimum of 3 inches. Front Frame Assembly Screw B Exhaust Dust Assembly *NOTE: Trim Kit and microwave can only be built into a cabinet or wall by itself or over an electric wall oven*. QTY 4 Screw A CHOOSING A LOCATION FOR YOUR MICROWAVE OVEN IF BUILT-IN Built-In Trim Kit allows for proper location when building in above a wall oven. CABINET OR WALL CUTOUT Cutout Dimensions Height (A) ...
Installation Instructions (All Languages)
Page 3
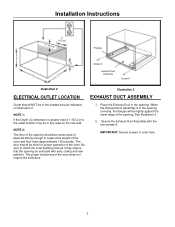
Installation Instructions Flanges Screw A Exhaust Dust Assembly Screw A Illustration 2 Illustration 3 ELECTRICAL OUTLET LOCATION EXHAUST DUCT ASSEMBLY Outlet should be constructed of plywood strong enough to check the local building code as indicated on the rear wall. See Illustration 3. 2. IMPORTANT: Secure screws in any area on Illustration 2 NOTE 1: If the Depth (C) dimension is in the opening correctly, the flanges will be tightly against the lower edge of the oven. The...
Installation Instructions Flanges Screw A Exhaust Dust Assembly Screw A Illustration 2 Illustration 3 ELECTRICAL OUTLET LOCATION EXHAUST DUCT ASSEMBLY Outlet should be constructed of plywood strong enough to check the local building code as indicated on the rear wall. See Illustration 3. 2. IMPORTANT: Secure screws in any area on Illustration 2 NOTE 1: If the Depth (C) dimension is in the opening correctly, the flanges will be tightly against the lower edge of the oven. The...


