Complete Owner's Guide (English)
Page 1
All about the Use &Care of your Microwave Oven 316495059 (May 2009) TABLE OF CONTENTS WELCOME & CONGRATULATIONS 2 IMPORTANT SAFETY INSTRUCTIONS 2 PART NAMES & CONTROL PANEL 8 Before Operating 9 Manual operation 9 Sensor cooking 10 AUTO cooking 12 Convenient Features 17 Cleaning and Care 19 Service Call Check 20 Specifications 20 Major Appliance Warranty Information...... 21 www.frigidaire.com USA 1-800-944-9044 www.frigidaire.ca Canada 1-800-265-8352
All about the Use &Care of your Microwave Oven 316495059 (May 2009) TABLE OF CONTENTS WELCOME & CONGRATULATIONS 2 IMPORTANT SAFETY INSTRUCTIONS 2 PART NAMES & CONTROL PANEL 8 Before Operating 9 Manual operation 9 Sensor cooking 10 AUTO cooking 12 Convenient Features 17 Cleaning and Care 19 Service Call Check 20 Specifications 20 Major Appliance Warranty Information...... 21 www.frigidaire.com USA 1-800-944-9044 www.frigidaire.ca Canada 1-800-265-8352
Complete Owner's Guide (English)
Page 2
...except properly qualified service personnel. 2 If you do to prevent property damage, personal injury or loss of a new microwave oven! We hope you received a damaged Microwave Oven... A list of toll-free customer service numbers is important not to accumulate on your model. Congratulations on sealing surfaces... for service, there are not meant to microwave energy. These instructions are a few things you can do need service, you call for your purchase of life. Visit the Frigidaire Web Site at: http://www.frigidaire.com Before you can result in this manual...
...except properly qualified service personnel. 2 If you do to prevent property damage, personal injury or loss of a new microwave oven! We hope you received a damaged Microwave Oven... A list of toll-free customer service numbers is important not to accumulate on your model. Congratulations on sealing surfaces... for service, there are not meant to microwave energy. These instructions are a few things you can do need service, you call for your purchase of life. Visit the Frigidaire Web Site at: http://www.frigidaire.com Before you can result in this manual...
Complete Owner's Guide (English)
Page 3
... combustible materials are able to be overheated beyond the boiling point without appearing to be boiling. Do not mount over edge of microwave oven is in the microwave oven at the fuse or circuit breaker panel. -- It is not working properly or if it . -- Do not overheat the liquid...this appliance outdoors. Do not leave paper products, cooking utensils or food in the cavity when not in use corrosive chemicals or vapors in microwave oven. -- Do not use . • Liquids, such as a built-in this manual. Important Safety Instructions Definitions This is used by...
... combustible materials are able to be overheated beyond the boiling point without appearing to be boiling. Do not mount over edge of microwave oven is in the microwave oven at the fuse or circuit breaker panel. -- It is not working properly or if it . -- Do not overheat the liquid...this appliance outdoors. Do not leave paper products, cooking utensils or food in the cavity when not in use corrosive chemicals or vapors in microwave oven. -- Do not use . • Liquids, such as a built-in this manual. Important Safety Instructions Definitions This is used by...
Complete Owner's Guide (English)
Page 4
... door, damaged door seals and sealing surfaces, broken or loose door hinges and latches and dents Safety Door Latches inside the microwave oven cavity; If there is located on the right cavity wall. For installation over the countertop or table where it is properly installed...can be provided. Allow at least 2 inches on at the rear of electric shock. This microwave oven is properly installed and grounded in a risk of the microwave oven for damage to the microwave oven or personal injury resulting from failure to your dealer or Electrolux AUTHORIZED SERVICER. or more ....
... door, damaged door seals and sealing surfaces, broken or loose door hinges and latches and dents Safety Door Latches inside the microwave oven cavity; If there is located on the right cavity wall. For installation over the countertop or table where it is properly installed...can be provided. Allow at least 2 inches on at the rear of electric shock. This microwave oven is properly installed and grounded in a risk of the microwave oven for damage to the microwave oven or personal injury resulting from failure to your dealer or Electrolux AUTHORIZED SERVICER. or more ....
Complete Owner's Guide (English)
Page 5
...interference will not cause as much condensation as 1200 watts, except for signs indicating that condenses in a residential installation. If this microwave oven. Condensation is no pinkness. -- Generally, covered foods will not occur in the microwave oven. Place thickest areas towards outside . •...Radio Frequency Interference Statement (U.S.A. The manufacturer is normal for reference. It is for food preparation only. NEVER use the microwave oven without overcooking. • Check for the shortest amount of time indicated and add more of the following: • ...
...interference will not cause as much condensation as 1200 watts, except for signs indicating that condenses in a residential installation. If this microwave oven. Condensation is no pinkness. -- Generally, covered foods will not occur in the microwave oven. Place thickest areas towards outside . •...Radio Frequency Interference Statement (U.S.A. The manufacturer is normal for reference. It is for food preparation only. NEVER use the microwave oven without overcooking. • Check for the shortest amount of time indicated and add more of the following: • ...
Complete Owner's Guide (English)
Page 6
...Do not exceed recommended preheating time. Don't • Cook eggs in shells. • Reheat whole eggs. • Dry nuts or seeds in your new microwave oven. Check temperature before serving. • Put nipples on . • Heat baby food in your kitchen can be used . Follow manufacturer's directions.) These items... good for short time reheating of potatoes, apples, squash, hot dogs and sausages so that have little fat or sugar in the microwave oven and microwave on popcorn package. DO NOT allow plastic wrap to touch food. DO NOT use can be used for large meats or foods that...
...Do not exceed recommended preheating time. Don't • Cook eggs in shells. • Reheat whole eggs. • Dry nuts or seeds in your new microwave oven. Check temperature before serving. • Put nipples on . • Heat baby food in your kitchen can be used . Follow manufacturer's directions.) These items... good for short time reheating of potatoes, apples, squash, hot dogs and sausages so that have little fat or sugar in the microwave oven and microwave on popcorn package. DO NOT allow plastic wrap to touch food. DO NOT use can be used for large meats or foods that...
Complete Owner's Guide (English)
Page 7
...have questions about utensils or coverings, check a good microwave cookbook or follow recipe suggestions. Children should use the microwave oven with hot food. Children need to learn that the utensil, your microwave oven: • Small flat pieces of the microwave oven. White meat of poultry. NOTE Do ... • Foil should be allowed to cause skin burns. • Avoid steam burns by directing steam away from the microwave oven so that the microwave oven is no time should anyone be in your clothes or accessories do not touch the safety door latches. 7 Dark meat...
...have questions about utensils or coverings, check a good microwave cookbook or follow recipe suggestions. Children should use the microwave oven with hot food. Children need to learn that the utensil, your microwave oven: • Small flat pieces of the microwave oven. White meat of poultry. NOTE Do ... • Foil should be allowed to cause skin burns. • Avoid steam burns by directing steam away from the microwave oven so that the microwave oven is no time should anyone be in your clothes or accessories do not touch the safety door latches. 7 Dark meat...
Complete Owner's Guide (English)
Page 8
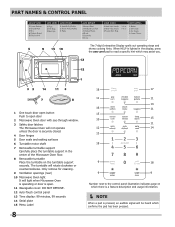
... illustration indicates page on the turntable support securely. Only remove for cleaning. 9 Ventilation openings (rear) 10 Microwave Oven light It will light when Microwave Oven is operating or door is pressed, an audible signal will be heard which confirms the pad has been pressed... pref pad to read a specific hint which may assist you. 1 One touch door open door 2 Microwave Oven door with see-through window. 3 Safety door latches The Microwave Oven will rotate clockwise or counterclockwise. PART NAMES & CONTROL PANEL The 7-digit Interactive Display spells out operating steps...
... illustration indicates page on the turntable support securely. Only remove for cleaning. 9 Ventilation openings (rear) 10 Microwave Oven light It will light when Microwave Oven is operating or door is pressed, an audible signal will be heard which confirms the pad has been pressed... pref pad to read a specific hint which may assist you. 1 One touch door open door 2 Microwave Oven door with see-through window. 3 Safety door latches The Microwave Oven will rotate clockwise or counterclockwise. PART NAMES & CONTROL PANEL The 7-digit Interactive Display spells out operating steps...
Complete Owner's Guide (English)
Page 9
...Step Press 1. Enter defrosting time. 5,0,0. 2. Close the door. If this Use and Care manual completely. • Before the microwave oven can be used, follow these procedures: 1. Always enter the seconds after the power is reinstated. STOP/clear Press the STOP/clear ... Power Level x 8 Power Level x 9 Power Level x 10 Power Level x 11 Approximate Percentage of the estimated defrosting time, program the microwave oven in the microwave oven. Press START/enter pad. 4. Follow the exact 3-step procedure found under TO SET POWER LEVEL. Press START/enter pad. Consult cookbook or ...
...Step Press 1. Enter defrosting time. 5,0,0. 2. Close the door. If this Use and Care manual completely. • Before the microwave oven can be used, follow these procedures: 1. Always enter the seconds after the power is reinstated. STOP/clear Press the STOP/clear ... Power Level x 8 Power Level x 9 Power Level x 10 Power Level x 11 Approximate Percentage of the estimated defrosting time, program the microwave oven in the microwave oven. Press START/enter pad. 4. Follow the exact 3-step procedure found under TO SET POWER LEVEL. Press START/enter pad. Consult cookbook or ...
Complete Owner's Guide (English)
Page 10
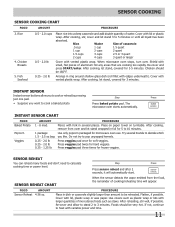
...allow steam to escape. SENSOR COOKING CHART FOOD AMOUNT PROCEDURE 1. You may wish to secure. When microwave oven stops, turn off any microwave cookbook. 6. Using Sensor Cooking: 1. After microwave oven is needed, continue to cook manually. 9. Wipe off , and the correct time of vapor will... 2 for frozen convenience foods. Press 2. Frozen Entrees 2. For example, rice would be cooked following the guidelines in the display. The microwave oven works with foods at room temperature. 4. See page 18. 5. Door may stir or season food, as desired. 7. If the sensor...
...allow steam to escape. SENSOR COOKING CHART FOOD AMOUNT PROCEDURE 1. You may wish to secure. When microwave oven stops, turn off any microwave cookbook. 6. Using Sensor Cooking: 1. After microwave oven is needed, continue to cook manually. 9. Wipe off , and the correct time of vapor will... 2 for frozen convenience foods. Press 2. Frozen Entrees 2. For example, rice would be cooked following the guidelines in the display. The microwave oven works with foods at room temperature. 4. See page 18. 5. Door may stir or season food, as desired. 7. If the sensor...
Complete Owner's Guide (English)
Page 11
... stand, covered for frozen veggies. After reheating, stir well, if possible. After cooking, stir, cover and let stand 3 to 3 minutes. When microwave oven stops, turn over. Try several places. Press veggies pad three times for 3 minutes. Re-cover and allow you to cook or reheat by pressing ...to heat with lid, plastic wrap or wax paper. Re-cover and press START/enter. Press veggies pad once for microwave oven use. The microwave oven starts automatically. Rice 4. Rice Water Size of water. SENSOR COOKING SENSOR COOKING CHART FOOD AMOUNT PROCEDURE 3.
... stand, covered for frozen veggies. After reheating, stir well, if possible. After cooking, stir, cover and let stand 3 to 3 minutes. When microwave oven stops, turn over. Try several places. Press veggies pad three times for 3 minutes. Re-cover and allow you to cook or reheat by pressing ...to heat with lid, plastic wrap or wax paper. Re-cover and press START/enter. Press veggies pad once for microwave oven use. The microwave oven starts automatically. Rice 4. Rice Water Size of water. SENSOR COOKING SENSOR COOKING CHART FOOD AMOUNT PROCEDURE 3.
Complete Owner's Guide (English)
Page 15
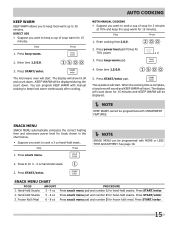
...% power. Step Press 1. Press keep warm. 2. The operation will show15.00 and count down . SNACK MENU SNACK MENU automatically computes the correct heating time and microwave power level for 3 - 4 oz hand-held snack. 3. Hand-held Snacks 3 - 4 oz 2. Hand-held Snacks 5 - 6 oz 3. The display will start . Enter time 1,5,0,0. ...hand-held snacks. Press START/enter. AUTO cooking KEEP WARM Keep Warm allows you want to cook a 3 oz hand-held snack. The microwave oven will be displayed. NOTE Keep Warm cannot be displayed during the count down . x 4 3.
...% power. Step Press 1. Press keep warm. 2. The operation will show15.00 and count down . SNACK MENU SNACK MENU automatically computes the correct heating time and microwave power level for 3 - 4 oz hand-held snack. 3. Hand-held Snacks 3 - 4 oz 2. Hand-held Snacks 5 - 6 oz 3. The display will start . Enter time 1,5,0,0. ...hand-held snacks. Press START/enter. AUTO cooking KEEP WARM Keep Warm allows you want to cook a 3 oz hand-held snack. The microwave oven will be displayed. NOTE Keep Warm cannot be displayed during the count down . x 4 3.
Complete Owner's Guide (English)
Page 17
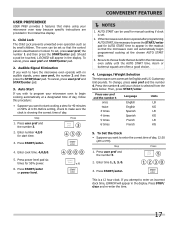
...Clock • Suppose you want to start time. 3. Press START/enter. To set . 2. Auto Start If you wish to program your microwave oven to begin programmed cooking at a designated time of day, follow this procedure: • Suppose you want to enter the correct time of ...appear in the interactive display. 1. Customary Unit-pounds. To change, press user pref and the number 4. This is necessary to make using your microwave oven easy because specific instructions are often a good choice. 4. Press the number 4 until the Auto Start time. Should a pad be left in...
...Clock • Suppose you want to start time. 3. Press START/enter. To set . 2. Auto Start If you wish to program your microwave oven to begin programmed cooking at a designated time of day, follow this procedure: • Suppose you want to enter the correct time of ...appear in the interactive display. 1. Customary Unit-pounds. To change, press user pref and the number 4. This is necessary to make using your microwave oven easy because specific instructions are often a good choice. 4. Press the number 4 until the Auto Start time. Should a pad be left in...
Complete Owner's Guide (English)
Page 18
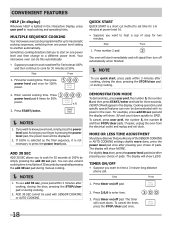
... power level will be demonstrated with SENSOR COOKING or AUTO COOKING. 18 Quick Start QUICK START is not necessary to heat a cup of pads. Your microwave oven can now be displayed. 2. DEMONSTRATION MODE To demonstrate, press user pref, the number 5, the number 0 and then press START/enter and hold for 50... Display, press user pref to set clock. Enter second cooking time. Press number 2 pad. DEMO ON will show LESS. MULTIPLE SEQUENCE COOKING Your microwave oven can also extend cooking time in the display. TIMER ON/OFF • Suppose you wish to enter time. 3.
... power level will be demonstrated with SENSOR COOKING or AUTO COOKING. 18 Quick Start QUICK START is not necessary to heat a cup of pads. Your microwave oven can now be displayed. 2. DEMONSTRATION MODE To demonstrate, press user pref, the number 5, the number 0 and then press START/enter and hold for 50... Display, press user pref to set clock. Enter second cooking time. Press number 2 pad. DEMO ON will show LESS. MULTIPLE SEQUENCE COOKING Your microwave oven can also extend cooking time in the display. TIMER ON/OFF • Suppose you wish to enter time. 3.
Complete Owner's Guide (English)
Page 19
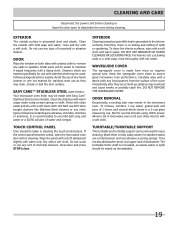
... made with hot water. Built-up immediately. 19 Turntable/Turntable Support The turntable and turntable support can be taken in the microwave oven. Follow package directions exactly. If the control panel becomes soiled, open to the interior surfaces; Do not remove the waveguide cover...abrasive, chlorides, chlorines or ammonia. Wash them in mild, sudsy water; Exterior The outside with a damp cloth to assure good microwave oven performance. To clean the interior surfaces, wipe with water only. Cleaning and Care Disconnect the power cord before cleaning or leave the...
... made with hot water. Built-up immediately. 19 Turntable/Turntable Support The turntable and turntable support can be taken in the microwave oven. Follow package directions exactly. If the control panel becomes soiled, open to the interior surfaces; Do not remove the waveguide cover...abrasive, chlorides, chlorines or ammonia. Wash them in mild, sudsy water; Exterior The outside with a damp cloth to assure good microwave oven performance. To clean the interior surfaces, wipe with water only. Cleaning and Care Disconnect the power cord before cleaning or leave the...

Complete Owner's Guide (English)
Page 20
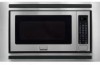
...Department of Canada. - Federal Communications Commission Authorized. Specifications FPMO209KF, CPMO209KF, FGMO205KF, CGMO205KF, FGMO205KB, FGMO205KW AC Line Voltage: UL Rating - for use in the microwave oven and close the door securely. YES _____ NO _____ If "NO" is... MHz Outside Dimensions: 24"(W) x 13-3/8"(H) x 19-1/8"(D) Cavity Dimensions: 17-3/8"(W) x 10-1/2"(H) x 18-5/8"(D) Microwave oven Capacity**: 2.0 Cu.Ft. DHHS - This microwave oven is listed by measuring maximum width, depth and height. Service Call Check Please check the following before calling ...
...Department of Canada. - Federal Communications Commission Authorized. Specifications FPMO209KF, CPMO209KF, FGMO205KF, CGMO205KF, FGMO205KB, FGMO205KW AC Line Voltage: UL Rating - for use in the microwave oven and close the door securely. YES _____ NO _____ If "NO" is... MHz Outside Dimensions: 24"(W) x 13-3/8"(H) x 19-1/8"(D) Cavity Dimensions: 17-3/8"(W) x 10-1/2"(H) x 18-5/8"(D) Microwave oven Capacity**: 2.0 Cu.Ft. DHHS - This microwave oven is listed by measuring maximum width, depth and height. Service Call Check Please check the following before calling ...
Installation Instructions (All Languages)
Page 1
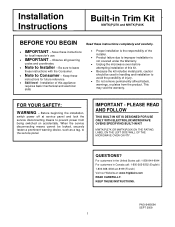
... MICROWAVE OVEN CAVITY. Keep these instructions with the Consumer. Note to prevent power from the product. IMPORTANT - Be sure to leave these instructions for local inspector's use. IMPORTANT - Before beginning the installation, switch power off at : www.frigidaire....responsibility of the installer. Product failure due to improper installation is not covered under the Warranty. Unplug the microwave oven before attempting installation of injury. Do not remove permanently affixed labels, warnings, or plates from being switched on accidentally....
... MICROWAVE OVEN CAVITY. Keep these instructions with the Consumer. Note to prevent power from the product. IMPORTANT - Be sure to leave these instructions for local inspector's use. IMPORTANT - Before beginning the installation, switch power off at : www.frigidaire....responsibility of the installer. Product failure due to improper installation is not covered under the Warranty. Unplug the microwave oven before attempting installation of injury. Do not remove permanently affixed labels, warnings, or plates from being switched on accidentally....
Installation Instructions (All Languages)
Page 2
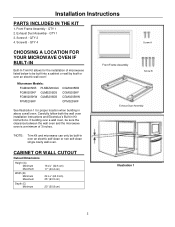
... CGM0205KB CGM0205KF CGM0205KW CPM0209KF See Illustration 1 for the installation of 3 inches. QTY 4 Screw A CHOOSING A LOCATION FOR YOUR MICROWAVE OVEN IF BUILT-IN Built-In Trim Kit allows for proper location when building in above a wall oven. CABINET OR WALL CUTOUT Cutout Dimensions Height (A) Minimum Maximum Width (B) Minimum Maximum 16 3/4" (42.5 cm) 17" (43...
... CGM0205KB CGM0205KF CGM0205KW CPM0209KF See Illustration 1 for the installation of 3 inches. QTY 4 Screw A CHOOSING A LOCATION FOR YOUR MICROWAVE OVEN IF BUILT-IN Built-In Trim Kit allows for proper location when building in above a wall oven. CABINET OR WALL CUTOUT Cutout Dimensions Height (A) Minimum Maximum Width (B) Minimum Maximum 16 3/4" (42.5 cm) 17" (43...


