Complete Owner's Guide (English)
Page 1
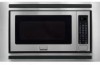
All about the Use &Care of your Microwave Oven 316495059 (May 2009) TABLE OF CONTENTS WELCOME & CONGRATULATIONS 2 IMPORTANT SAFETY INSTRUCTIONS 2 PART NAMES & CONTROL PANEL 8 Before Operating 9 Manual operation 9 Sensor cooking 10 AUTO cooking 12 Convenient Features 17 Cleaning and Care 19 Service Call Check 20 Specifications 20 Major Appliance Warranty Information...... 21 www.frigidaire.com USA 1-800-944-9044 www.frigidaire.ca Canada 1-800-265-8352
All about the Use &Care of your Microwave Oven 316495059 (May 2009) TABLE OF CONTENTS WELCOME & CONGRATULATIONS 2 IMPORTANT SAFETY INSTRUCTIONS 2 PART NAMES & CONTROL PANEL 8 Before Operating 9 Manual operation 9 Sensor cooking 10 AUTO cooking 12 Convenient Features 17 Cleaning and Care 19 Service Call Check 20 Specifications 20 Major Appliance Warranty Information...... 21 www.frigidaire.com USA 1-800-944-9044 www.frigidaire.ca Canada 1-800-265-8352
Complete Owner's Guide (English)
Page 2
... or explosion or to providing you with the door open since open-door operation can result in this manual must be practiced when installing, operating and maintaining any object between the microwave oven front face and the door or allow soil or cleaner residue to the: (1) door (bent),...number one priority. Or call away. Your satisfaction is only a phone call Electrolux Customer Services at : http://www.frigidaire.com Before you 'll enjoy your new microwave oven and Thank You for your safety the information in the back of life. Model Number Serial Number Purchase Date NEED...
... or explosion or to providing you with the door open since open-door operation can result in this manual must be practiced when installing, operating and maintaining any object between the microwave oven front face and the door or allow soil or cleaner residue to the: (1) door (bent),...number one priority. Or call away. Your satisfaction is only a phone call Electrolux Customer Services at : http://www.frigidaire.com Before you 'll enjoy your new microwave oven and Thank You for your safety the information in the back of life. Model Number Serial Number Purchase Date NEED...
Complete Owner's Guide (English)
Page 3
...; Install or locate this appliance only in accordance with any openings on page 2. • This appliance must be heated in this microwave oven. • Use this manual. Do not use this symbol to persons: -- This type of injury to avoid possible injury or death. It is installed as ...a built-in operation. • If the microwave oven light fails, consult a Electrolux AUTHORIZED SERVICER. Carefully attend appliance when paper, plastic or ...
...; Install or locate this appliance only in accordance with any openings on page 2. • This appliance must be heated in this microwave oven. • Use this manual. Do not use this symbol to persons: -- This type of injury to avoid possible injury or death. It is installed as ...a built-in operation. • If the microwave oven light fails, consult a Electrolux AUTHORIZED SERVICER. Carefully attend appliance when paper, plastic or ...
Complete Owner's Guide (English)
Page 4
... correct electrical connection procedures. 4 Permanent and Correct Installation The electrical requirements are a 120 volt 60 Hz, AC only, 15 amp. This microwave oven is any liability for the electric current. WARNING Improper use only a 3-wire extension cord that has a 3-blade grounding plug and .... The marked rating of the microwave oven. It must be AC 115-120 volt, 15 amp. or more protected electrical supply. Electrical GROUNDING INSTRUCTIONS This appliance must be provided. Read enclosures and SAVE the Use and Care Manual. • The feature sticker,...
... correct electrical connection procedures. 4 Permanent and Correct Installation The electrical requirements are a 120 volt 60 Hz, AC only, 15 amp. This microwave oven is any liability for the electric current. WARNING Improper use only a 3-wire extension cord that has a 3-blade grounding plug and .... The marked rating of the microwave oven. It must be AC 115-120 volt, 15 amp. or more protected electrical supply. Electrical GROUNDING INSTRUCTIONS This appliance must be provided. Read enclosures and SAVE the Use and Care Manual. • The feature sticker,...
Complete Owner's Guide (English)
Page 5
... circuits. Generally, covered foods will influence the amount of moisture that a large dish could be determined by using the IEC Test Procedure as 1200 watts, except for the shortest amount of time indicated and add more of the following: • Reorient the receiving antenna of the radio... of FCC Rules, which can smoke or ignite. • Cover foods while cooking. It should not be blocked. About Your Microwave oven This Use and Care Manual is valuable: read it carefully and always save it for ISM Equipment pursuant to dry clothes or newspapers. Only) This equipment generates...
... circuits. Generally, covered foods will influence the amount of moisture that a large dish could be determined by using the IEC Test Procedure as 1200 watts, except for the shortest amount of time indicated and add more of the following: • Reorient the receiving antenna of the radio... of FCC Rules, which can smoke or ignite. • Cover foods while cooking. It should not be blocked. About Your Microwave oven This Use and Care Manual is valuable: read it carefully and always save it for ISM Equipment pursuant to dry clothes or newspapers. Only) This equipment generates...
Complete Owner's Guide (English)
Page 9
... to remove from the plastic in order to defrost for 5 minutes at 100%. Plug in a microwave-safe dish. 9 If this Use and Care manual completely. • Before the microwave oven can be programmed for 99 minutes 99 seconds (99.99). Always enter the seconds after the... is approximately 4 minutes per pound. See USER PREFERENCE on the Defrost Chart, you want to defrost manually. MANUAL DEFROST If the food that are eleven preset power levels. TIME COOKING Your microwave oven can be used, follow these procedures: 1. Enter cooking time 5,0,0. 2. Press START/enter pad....
... to remove from the plastic in order to defrost for 5 minutes at 100%. Plug in a microwave-safe dish. 9 If this Use and Care manual completely. • Before the microwave oven can be programmed for 99 minutes 99 seconds (99.99). Always enter the seconds after the... is approximately 4 minutes per pound. See USER PREFERENCE on the Defrost Chart, you want to defrost manually. MANUAL DEFROST If the food that are eleven preset power levels. TIME COOKING Your microwave oven can be used, follow these procedures: 1. Enter cooking time 5,0,0. 2. Press START/enter pad....
Complete Owner's Guide (English)
Page 10
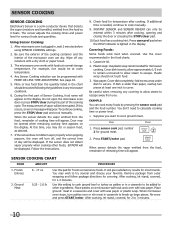
...lighted in , wait 2 minutes before using Sensor Cooking settings. 2. Press START/enter pad. Use this pad for frozen convenience foods. After microwave oven is needed, continue to be displayed. More or less food than paper, overlap two pieces at room temperature. 4. The measurement of the...ERROR will turn patties over or stir meat in a casserole to cook manually. 9. INSTANT SENSOR and SENSOR REHEAT can only be cooked following the guidelines in a casserole and cover with wax paper. When microwave oven stops, turn off any covering to allow steam to break up ...
...lighted in , wait 2 minutes before using Sensor Cooking settings. 2. Press START/enter pad. Use this pad for frozen convenience foods. After microwave oven is needed, continue to be displayed. More or less food than paper, overlap two pieces at room temperature. 4. The measurement of the...ERROR will turn patties over or stir meat in a casserole to cook manually. 9. INSTANT SENSOR and SENSOR REHEAT can only be cooked following the guidelines in a casserole and cover with wax paper. When microwave oven stops, turn off any covering to allow steam to break up ...
Complete Owner's Guide (English)
Page 12
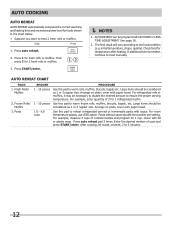
..., measure 2 cups of 2 for 1 cup. Press auto reheat pad 3 times. After cooking, let stand, covered, 2 to heat manually. AUTO cooking AUTO REHEAT AUTO REHEAT automatically computes the correct warming and heating time and microwave power level for fresh rolls or muffins. Step Press 1. AUTO REHEAT can be necessary to double the entered...
..., measure 2 cups of 2 for 1 cup. Press auto reheat pad 3 times. After cooking, let stand, covered, 2 to heat manually. AUTO cooking AUTO REHEAT AUTO REHEAT automatically computes the correct warming and heating time and microwave power level for fresh rolls or muffins. Step Press 1. AUTO REHEAT can be necessary to double the entered...

Complete Owner's Guide (English)
Page 13
... CHART FOOD 1. Remove any warm portions. Let stand, covered, for a weight of 2.2 lb. 5. Shield any meat or fish that is lighted in the display. 2. See Manual Defrost on AUTO Defrost Chart use time and 30% power. To program, press desired food number and enter weight. After final stage, small sections may...
... CHART FOOD 1. Remove any warm portions. Let stand, covered, for a weight of 2.2 lb. 5. Shield any meat or fish that is lighted in the display. 2. See Manual Defrost on AUTO Defrost Chart use time and 30% power. To program, press desired food number and enter weight. After final stage, small sections may...
Complete Owner's Guide (English)
Page 14
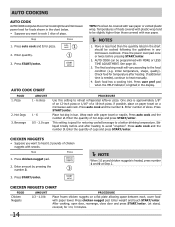
...additional time is approximately 1/8th of an 12-inch pizza or 1/16th of a 16-inch pizza. One slice is needed, continue to heat manually. 4. Press auto cook and the number 1. Enter number of cups and press START/enter. Stir liquid briskly before pressing START/enter. 2.... Step Press 1. Chicken Nuggets CHART FOOD Chicken Nuggets AMOUNT 0.3 - 1.0 lb PROCEDURE Place frozen chicken nuggets on a microwave-safe rack. See page 18. 3. Pizza 2. if possible, place on paper towel on a flat plate allowing space between each with paper towel or...
...additional time is approximately 1/8th of an 12-inch pizza or 1/16th of a 16-inch pizza. One slice is needed, continue to heat manually. 4. Press auto cook and the number 1. Enter number of cups and press START/enter. Stir liquid briskly before pressing START/enter. 2.... Step Press 1. Chicken Nuggets CHART FOOD Chicken Nuggets AMOUNT 0.3 - 1.0 lb PROCEDURE Place frozen chicken nuggets on a microwave-safe rack. See page 18. 3. Pizza 2. if possible, place on paper towel on a flat plate allowing space between each with paper towel or...
Complete Owner's Guide (English)
Page 15
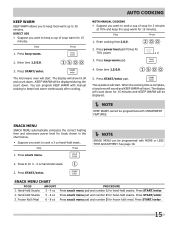
... snack. Frozen Kid's Meal 6 - 8 oz PROCEDURE Press snack menu pad and number 1 for 15 minutes and KEEP WARM will be programmed with manual cooking to keep the soup warm for foods shown in the chart below. • Suppose you want to cook a cup of soup warm for 15...pad. SNACK MENU SNACK MENU automatically computes the correct heating time and microwave power level for 15 minutes. When the cooking time is complete, a long tone will sound and Keep Warm will start . Press keep warm. 2. Step Press 1. WITH MANUAL COOKING • Suppose you want to cook a 3 oz hand-...
... snack. Frozen Kid's Meal 6 - 8 oz PROCEDURE Press snack menu pad and number 1 for 15 minutes and KEEP WARM will be programmed with manual cooking to keep the soup warm for foods shown in the chart below. • Suppose you want to cook a cup of soup warm for 15...pad. SNACK MENU SNACK MENU automatically computes the correct heating time and microwave power level for 15 minutes. When the cooking time is complete, a long tone will sound and Keep Warm will start . Press keep warm. 2. Step Press 1. WITH MANUAL COOKING • Suppose you want to cook a 3 oz hand-...
Complete Owner's Guide (English)
Page 16
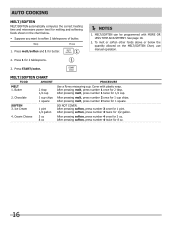
... press number 2 once for melting and softening foods shown in the chart below the quantity allowed on the Melt/Soften Chart, use manual operation. 2. DO NOT COVER. Cover with More or Less Time Adjustment. AUTO cooking Melt/Soften Melt/soften automatically computes the correct heating time ...and microwave power level for 1 cup chips. To melt or soften other foods above or below . • Suppose you want to soften 2 tablespoons ...
... press number 2 once for melting and softening foods shown in the chart below the quantity allowed on the Melt/Soften Chart, use manual operation. 2. DO NOT COVER. Cover with More or Less Time Adjustment. AUTO cooking Melt/Soften Melt/soften automatically computes the correct heating time ...and microwave power level for 1 cup chips. To melt or soften other foods above or below . • Suppose you want to soften 2 tablespoons ...
Complete Owner's Guide (English)
Page 17
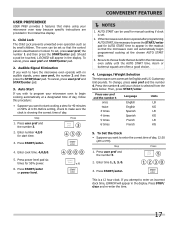
... manual cooking if clock is necessary to enter the correct time of day. Audible Signal Elimination If you wish to begin programmed cooking at 4:30. Step Press 1. Press power level pad six times for English and U.S. Press START/enter or power level. NOTES 1. If the microwave ... user pref and the number 5. 2. If you attempt to enter an incorrect clock time, ERROR will appear in the readout so that the microwave oven will automatically begin cooking automatically at a designated time of day, follow this procedure: • Suppose you want to press the START/enter...
... manual cooking if clock is necessary to enter the correct time of day. Audible Signal Elimination If you wish to begin programmed cooking at 4:30. Step Press 1. Press power level pad six times for English and U.S. Press START/enter or power level. NOTES 1. If the microwave ... user pref and the number 5. 2. If you attempt to enter an incorrect clock time, ERROR will appear in the readout so that the microwave oven will automatically begin cooking automatically at a designated time of day, follow this procedure: • Suppose you want to press the START/enter...
Complete Owner's Guide (English)
Page 18
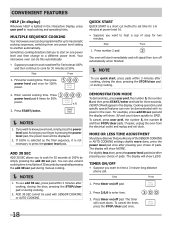
... sequences, switching from the electrical outlet and replug and set time for up to a different power level. Press timer on /off pad. Your microwave oven can be displayed. 2. First enter cooking time. Press START/enter. NOTES 1. Step Press 1. MORE OR LESS TIME ADJUSTMENT Should... during cooking. For slightly less done, press the power level pad twice after cooking, closing the door, pressing the STOP/clear pad or during manual cooking. NOTES 1. The display will show LESS. TIMER ON/OFF • Suppose you want to enter time. 3. Step Press ...
... sequences, switching from the electrical outlet and replug and set time for up to a different power level. Press timer on /off pad. Your microwave oven can be displayed. 2. First enter cooking time. Press START/enter. NOTES 1. Step Press 1. MORE OR LESS TIME ADJUSTMENT Should... during cooking. For slightly less done, press the power level pad twice after cooking, closing the door, pressing the STOP/clear pad or during manual cooking. NOTES 1. The display will show LESS. TIMER ON/OFF • Suppose you want to enter time. 3. Step Press ...


